Batching Resources in MSBuild – Part 1
Sometime after Visual Studio 2010 shipped, we received reports about an issue where when targeting .NET 3.5, customers were receiving a build error stating that the RESGEN command line was too long. The errors/warnings would look as follows:
Error:
The specified task executable "ResGen.exe" could not be run. The filename or extension is too long
Warning:
The command-line for the "ResGen" task is too long. Command-lines longer than 32000 characters are likely to fail. Try reducing the length of the command-line by breaking down the call to "ResGen" into multiple calls with fewer parameters per call.
As a result, my team responded with an article to help customers work around the issue:
This article provides several different approaches for fixing the issue. One of these involves changing your targets file to override the GenerateResource target.
Approaches to fixing issues for shipped targets
The article above suggests that you can update your Microsoft installed "Common" targets file ("%WinDir%\Microsoft.net\Framework\v4.0.30128\Microsoft.Common.targets") with an updated one. (And notes you should backup prior to doing so.) But, maybe you don't want to change the Microsoft installed file. There are a couple of other options.
In MSBuild, the last target of a given name found in the project file wins. That is, we only keep that last one defined, and the rest are thrown out. So, to override this target, all you have to do is place an import (Imports are processed like C++ #include's) at the bottom of your project file so that is last thing in the file, and then override the functionality in the existing GenerateResource target with your own.
This option is the simplest. But, it only affects the one project that you add the import. You also start to run into problems quickly if you want to locate a target. You can define your own property
You can use the new functionality in MSBuild to carefully place a new target file you write into a location known to MSBuild, and we will auto-magically pick it up and add it as an import when we load any project file.
This option requires the same targets changes, but you have to place the target in the "special" location. Additionally, debugging will be harder. But, once in place, it fixes the problem for all project files in one fell swoop. To deploy this across a group, and build server, you will have to install these targets on each machine individually.
How does option #2 work?
In the Microsoft.Common.targets file, at the very bottom, you will see something that looks like this:
   <Import Project="$(MSBuildExtensionsPath)\$(MSBuildToolsVersion)\$(MSBuildThisFile)\ImportAfter\*"
          Condition="'$(ImportByWildcardAfterMicrosoftCommonTargets)' == 'true'
          and Exists('$(MSBuildExtensionsPath)\$(MSBuildToolsVersion)\$(MSBuildThisFile)\ImportAfter')" />
This import basically says, if I find a file in the MSBuild folder in a special location (see below), then I will load it after this file. The special location is defined by the MSBuild properties as follows: (the values are from my box, and could vary on the installation)
| $(MSBuildExtensionsPath) | The MSBuild folder in "Program Files" (or "Program Files (x86)" on a 64-bit box). For example: "C:\Program Files (x86)\MSBuild" |
| $(MSBuildToolsVersion) | The version of the MSBuild tools to use when building the project. For example "3.5" or "4.0" |
| $(MSBuildThisFile) | The name of the current file. For the above example, "Microsoft.Common.targets" |
So, the final path would be: "C:\Program Files (x86)\MSBuild\4.0\Microsoft.Common.targets\ImportAfter" for this scenario.
Note on paths:
MSBuild uses all environment variables (which are allowed to be XML node names) as properties inside MSBuild. There are some very nice shortcuts that allow you to get to things you might commonly need. An example I used above was the Windows directory, which was the start of the path to the "Microsoft.Common.targets" file. The environment variable is "%WinDir%", and is not case sensitive. There are a few nice features this environment variable provides:
- It supplies the path to the Windows folder, which may be on another drive. It is prefixed with the appropriate drive letter as needed. On my machine it is "C:\Windows".
- I can use the environment variable in explorer to quickly get to a known location. So, if you click in the location text box in an explorer windows, and type "%WinDir%" (without the quotes) and press enter, you will be taken to your Windows folder.
- Since it's an environment variable, it becomes a property in MSBuild, so in MSBuild I can reference this path as $(WinDir).
Some of the other ones I use a lot:
Environment |
MSBuild |
Description |
%AppData% |
$(AppData) |
Location of the users roaming profile |
%DevEnvDir% |
$(DevEnvDir) |
Location of Visual Studio main folder |
%FrameworkDir% |
$(FrameworkDir) |
Location of .NET Framework root folder |
%HomePath% |
$(HomePath) |
Location of the users root folder |
%LocalAppData% |
$(LocalAppData) |
Location of the users local profile |
%ProgramFiles% |
$(ProgramFiles) |
Location of the 32-bit "Program Files" folder |
%ProgramW6432% |
$(ProgramW6432) |
Location of the 64-bit "Program Files" folder (only on 64-bit box) |
%TEMP% |
$(TEMP) |
Location of the users temp folder |
%WindowsSdkDir% |
$(WindowsSdkDir) |
Location of the currently selected Windows SDK |
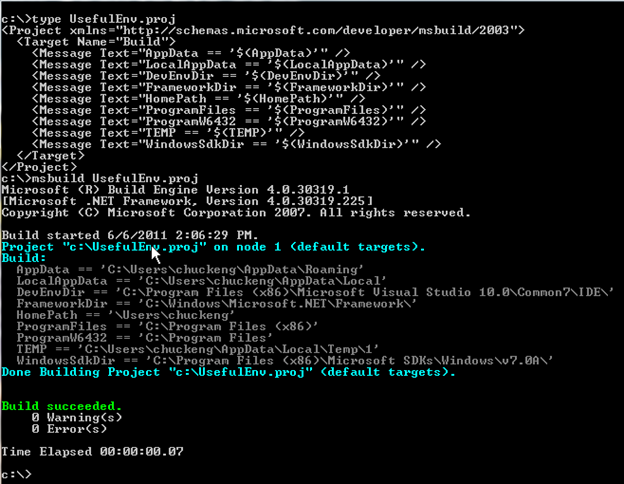
Here is a sample MSBuild file I wrote that uses them:
<Project xmlns="https://schemas.microsoft.com/developer/msbuild/2003">
<Target Name="Build">
<Message Text="AppData == '$(AppData)'" />
<Message Text="LocalAppData == '$(LocalAppData)'" />
<Message Text="DevEnvDir == '$(DevEnvDir)'" />
<Message Text="FrameworkDir == '$(FrameworkDir)'" />
<Message Text="HomePath == '$(HomePath)'" />
<Message Text="ProgramFiles == '$(ProgramFiles)'" />
<Message Text="ProgramW6432 == '$(ProgramW6432)'" />
<Message Text="TEMP == '$(TEMP)'" />
<Message Text="WindowsSdkDir == '$(WindowsSdkDir)'" />
</Target>
</Project>
And here is the output I generated…
Next up…
In the next article, I will show you how I came up with the Batching Solution for RESGEN. Note that the article shown above on the Visual Studio blog has the batching solution in it. The purpose of my article will be to show you how you could have effectively figured this out yourself.