Email Phishing Protection Guide - Part 4: Deploy Windows Hello
The Email Phishing Protection Guide is a multi-part blog series written to walk you through the setup of many security focused features you may already own in Microsoft Windows, Microsoft Office 365, and Microsoft Azure. By implementing some or all of these items, an organization will increase their security posture against phishing email attacks designed to steal user identities. This guide is written for system administrators with skills ranging from beginner to expert.
Email Phishing Protection Guide Index: Introduction: Email Phishing Protection Guide - Enhancing Your Organization's Security Posture Part 1: Customize the Office 365 Logon Portal Part 2: Training Users with the Office 365 Attack Simulator Part 3: Deploy Multi Factor Authentication (MFA) Part 4: Deploy Windows Hello Part 5: Define Country and Region Logon Restrictions for Office 365 and Azure Services Part 6: Deploy Outlook Plug-in to Report Suspicious Emails Part 7: Deploy ATP Anti-Phishing Policies Part 8: Deploy ATP Safe Link Policies Part 9: Deploy ATP Safe Attachment Policies Part 10: Deploy and Enforce Smart Screen for Microsoft Edge, Microsoft Internet Explorer and Google Chrome Part 11: Monitor Phishing and SPAM Attacks in Office 365 Part 12: Discover Who is Attacking Your Office 365 User Identities Part 13: Update Your User Identity Password Strategy Part 14: Prevent Brute Force and Spray Attacks in Office 365 Part 15: Implement the Microsoft Azure AD Password Protection Service (for On-Premises too!) Part 16: Disable Office 365 Legacy Email Authentication Protocols Part 17: Control Application Consent Registrations in Microsoft Office 365 and Microsoft Azure Part 18: Increase Security with Microsoft Secure Score Part 19: Email Phishing Protection Security Checklist Part 20: Recommended Security and Anti-Phishing Training from Microsoft Ignite 2018
Part 4: Deploy Windows Hello
This blog series highlights and explains how to setup the many features in Microsoft Office 365 to protect your users and environment from the constant onslaught of identity email phishing attacks. This is part four of the blog series where I move away from the Human Firewall and more into the technology that should be configured to provide additional protection for your organization. Windows Hello is a feature included in Windows 8, 8.1, and 10 that is another lock to implement in you organization to keep the attackers out.
As discussed in earlier blogs in this series, phishing attacks are designed to steal a username and password - the identity of users. The attacker can then use these credentials to gain access to organizational data and launch additional attacks from. But, what if we removed the username and password from a user and provided another, more secure method to logon? Instead of a username and password, what about a quicker method the user would prefer to logon with each day? Without entering a username and password to steal, an email phishing attack is useless. Using Windows Hello, this is possible by enabling a long using a PIN, fingerprint, or facial recognition. At this point you may be wondering how a PIN used with Windows Hello is any better than a password because both could be stolen and used. With Windows Hello, the PIN is tied to only the specific device it was setup on. So if a Windows Hello PIN was stolen it is of no use to an attacker as it can't be used from another system to logon with. For more information, be sure to review this link: Why a PIN is Better Than a Password.
I recommend you review the information about Windows Hello in this site for deeper technical information on this great feature - my intent in this blog is not to re-iterate the information already available in the provided link. Rather, the intent of this blog to create awareness in its capabilities to help thwart identity theft from phishing emails. Keep in mind that Windows Hello is based on strong two-factor authentication on PCs and mobile devices. As outlined in this document about Windows Hello, "Authentication is the two-factor authentication with the combination of a key or certificate tied to a device and something that the person knows (a PIN) or something that the person is (Windows Hello)." For user devices where a username and password is still being used, a periodic password change will not impact this process (reference).
When talking with customers about this great way to provide a quick and secure authentication method for their environment, I sometimes hear concern regarding where a person's facial imprint or fingerprint is stored. This is a common and great question that I am happy to answer. As stated here, the gesture used in Windows Hello (fingerprint or facial imprint) is only stored on the device and is never shared with an external server or cloud system. As part of a communication plan when enabling this feature in your organization, be sure to include information about this topic. Encourage your users to embrace this technology for faster and more convenient logons, as well as a way to further help secure the environment. Address the privacy concerns to make them feel secure and comfortable using it.
There is no shortage of devices available on the market that support Windows Hello. This could be a laptop with an integrated fingerprint reader or a webcam designed for Windows Hello. A list of integrated devices that support Windows Hello is available here. For devices that do not have a biometric device included, the PIN option is available as well as external USB connected fingerprint readers and external Windows Hello compatible cameras. Coming soon (limited private preview April 2018), FIDO2 Security keys will enable users to carry their credential with them to safely authenticate to Azure AD joined Windows 10 pcs (video). Imagine the convenience and security this new key will provide to a hospital where pcs are shared by doctors, nurses, and other personnel each day. Also announced in July 2018 is the capability to use Windows Hello in Microsoft Edge, providing a more secure and password-less web browsing experience.
Fast, Easy, and a Secure Sign on - each and every day. This is how I logon each day, without a username and password and I love it. To understand more about how Microsoft is enabling users like myself to leave usernames and passwords in the past, see the blog post with embedded videos called Building a World Without Passwords. As part of a plan to help increase the security posture of your organization and limit the threats of email phishing, consider enabling Windows Hello as another security lock.
Configuration Options for Windows Hello:
Windows Hello may be applied using a Group policy setting, using a Mobile Device Management (MDM) policy in Microsoft InTune as well as Configuration Manager. The Windows Hello for Business Deployment Guide available here provides detailed configuration steps, so I am not going to rehash them here. Also included in the guide are the prerequisites for the configuration to work correctly.
In addition to the deployment guide link above, I have provided high level information below for accessing and configuring each option.
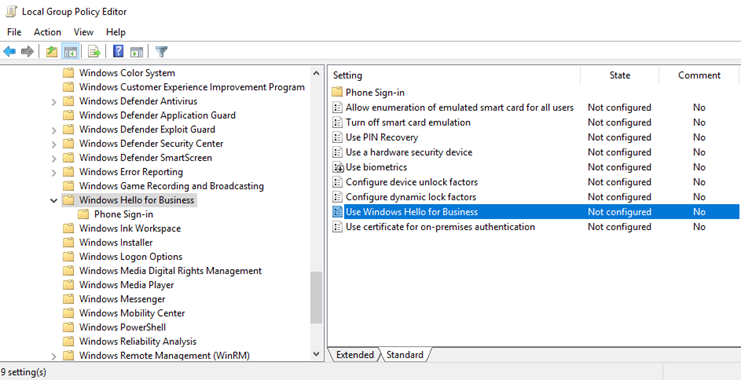
Group Policy Settings:
- Each of the Group Policy settings available for configuration is available in this article.
- Settings are configured by opening the Group Policy Editor and expanding either the User or Computer Configuration -> Policies -> Administrative Templates -> Windows Components -> Windows Hello for Business
- Once the policy is setup, apply it to your target group
- I recommend setting this up in a test lab first so you can test your settings and become comfortable with the behavior. If needed, setup a 30 day Microsoft Intune free trial at this site.
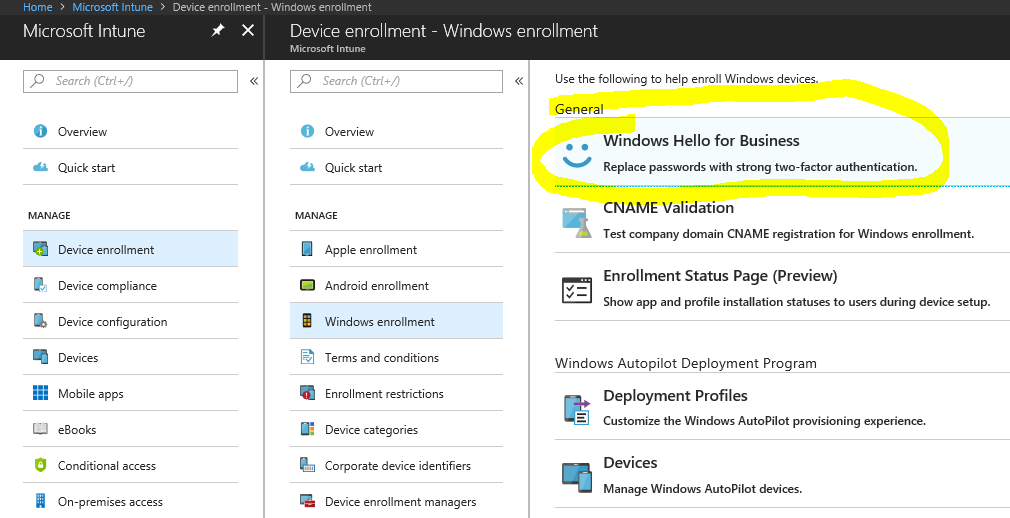
Microsoft Intune Setup and Settings:
Microsoft Intune may be used to enforce Windows Hello for Business.
- The configuration options are accessed below by signing in with a global admin account to https://portal.azure.com. From there, search for Microsoft Intune. From within Microsoft Intune, select Device enrollment, Windows Enrollment, and then Windows Hello for Business.
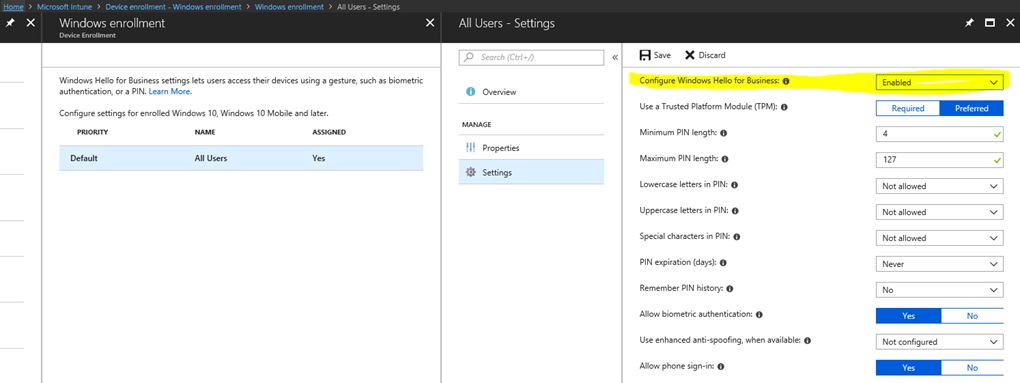
 .
. - With Windows Hello for Business selected, highlight the Default policy below. Then select Settings. To view the configuration options below, change the top option Configure Windows Hello for Business to Enabled.
User Experience When Setting up Windows Hello:
To learn more about the user experience to setup Windows Hello, see this blog. This post will allow users to see if their device works with Windows Hello and how to set up facial recognition, fingerprints, and a PIN.
Conclusion:
Part 4 of this blog series highlights the security benefits of using Windows Hello. By removing the need for usernames and passwords and instead using Windows Hello, an email phishing attack designed to steal identities is rendered useless. This is a feature that, when enabled, users will want to use each day to logon, if anything out of convenience over the standard username and password method.