System Center 2012, or Microsoft Deployment Toolkit for OS Deployment, Part 3, by Dujon Walsham
If you've been following my series of blog posts, you know I've been walking through alternative ways to deploy an OS. (If you haven't been following my series, here are links to the first two posts: https://blogs.msdn.com/b/customer_reviews_of_stb_products/archive/2013/03/11/os-deployment-system-center-configuration-manager-2012-or-microsoft-deployment-toolkit-or-both-by-dujon-walsham.aspx and https://blogs.msdn.com/b/customer_reviews_of_stb_products/archive/2013/04/07/system-center-2012-or-microsoft-deployment-toolkit-for-os-deployment-part-2-by-dujon-walsham.aspx.) This third part will now focus on showing the theoretical design. I'll now put in place everything I explained in the previous parts, and explain each step and how it contributes to the design of the true zero-touch interface (ZTI).
Each section below will look at the mechanism changes , starting off with the current state mechanism in the light-touch mode.
Mechanism So Far (Default)
So far we've been looking at the default setup of trying to build a standard machine without any additional setup whatsoever. This means that this is currently in a light-touch state, rather than a zero-touch state--that is, it will require some light participation from either you to perform the build. So if we go ahead and try to build a machine with these settings so far, here is what we get:
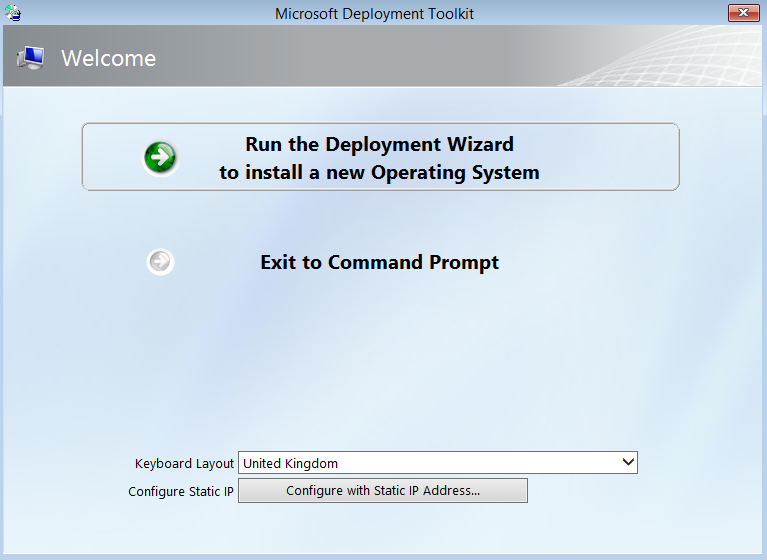
Figure
1.1 – MDT Wizard Welcome Screen
- Requires Keyboard Layout drop-down selection
- Manual network configuration if accessing from a different subnet
- Manual acceptance to start the Deployment Wizard
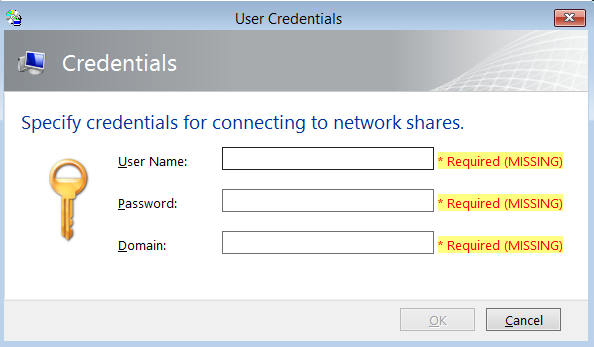
Figure 1.2 – User Credentials
- Enter Username, password and the domain that the user credentials belong to
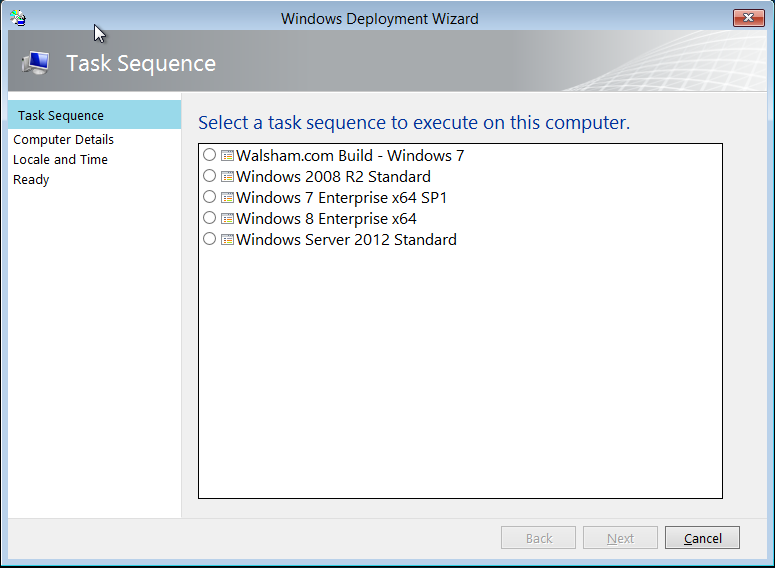
Figure 1.3 – Task Sequence
- Choose the Task Sequence that you will use to build your machine
These are some of the windows you would see when building a machine, as well as a few others that are related
- Computer Details
- Move Data and Settings
- User Data (Restore)
- Locale and Time
- Applications
The reason for displaying this is to show the amount of effort involved in a light-touch scenario, which is perfectly acceptable if you're just building a few machines. But for a mass deployment, this can be a lot of work..
Let's now elaborate on all the functions we will use to display how we will use a true ZTI.
How to Achieve the Real ZTI Experience (Practical)
Custom.INI Settings
Let’s dive into the rules and Bootstrap.ini of our MDT environment:
- In the MDT Console, right click where it says “MDT Deployment Share,” and select Properties
- Select the rules tab
Now we can see the default settings:
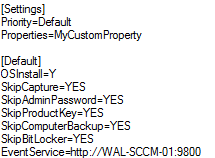
Figure 2.1 – MDT Rules
This is pretty standard. So if we analyse under the [Default], we can see a list which outlines the Wizard screens which you do not see as they have “Skip” as a prefix and yes as the answer to skip them.
One of the big drivers in ZTI is to eliminate the need to go through the wizard screens above and have them already pre-configured. This way users or staff do not have to be present during the deployment--at least when the deployment is going successfully, anyway.
So the next step here would be to enter the other steps to skip the screens above.
Then you will see the MDT Rules look like this:
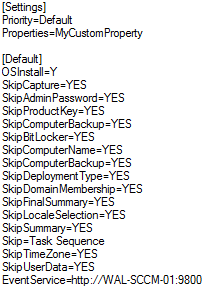
Figure 2.2 – Newly added MDT Rules
And next step is the Bootstrap.ini, which will be used to pre-configure domain membership credentials so that this is also automated. This will eliminate the need for the steps in Figure 1.2
And we will add the following:
- UserDomain – The Doman which the account used to authenticate
belongs to - UserID – The username of the account which has permissions to
authenticate - UserPassword – Password of the account
So it should now look like this:
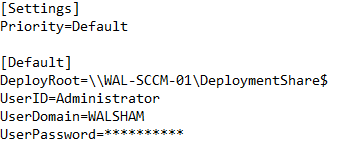
Figure 2.3 – Bootstrap.ini. Admin password blanked out for security reasons
Mechanism So Far (After Custom.ini settings applied)
After completing this, we now have silenced all of the windows in the Deployment wizard from the light-touch experience. This was first step. Of course if you tried to build a machine in this current state, it would just reboot as all the windows have nothing selected. So stripping the MDT rules shown earlier would bring this back to life if needed .That ability can be very handy for troubleshooting purposes. So we have now avoided the MDT wizard screens explained earlier.
Task Sequences
The screenshot below shows the Task Sequences. These are standard Task Sequences that contain vanilla OSs, with no applications.
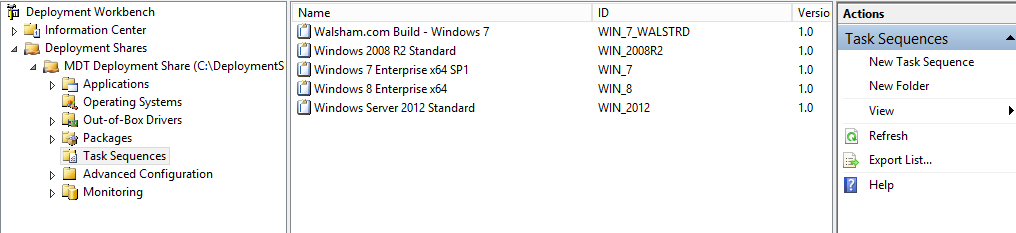
Figure 3.1 – Task Sequences layout
So this includes everything from
- Windows 7
- Windows 8
- Windows Server 2008 R2 (one with Server Role setups, and one without)
- Windows Server 2012 (One with Server Role Setup,s and one without)
- Company Standard Build
Now we dive into each task sequence: Desktop OS (Windows 7/8) and a Server OS (Windows Server 2008/2012)
One reasons for this is to plant some seeds that will allow us to control the customization of the deployments from a Web Frontend interface. For example, a feature we would love to control on demand is the addition of applications.
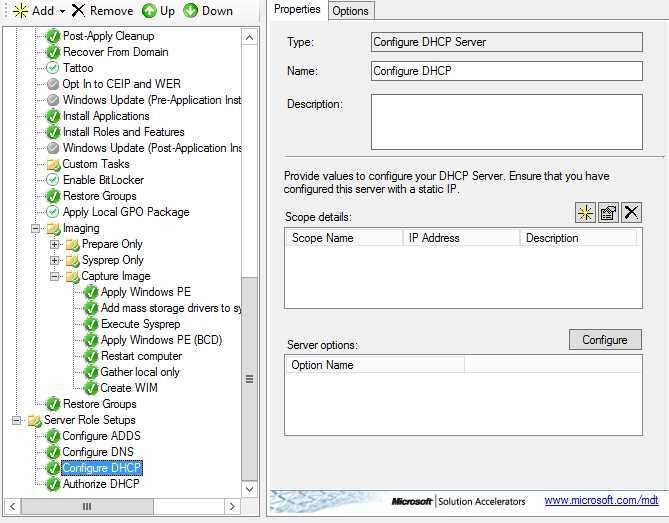
Figure 3.1a – Server OS Task Sequence steps (With Server Role Setups). Pre-Staged actions for ADDS, DHCP, & DNS as well as the “Install Application” and “Install Roles and Features
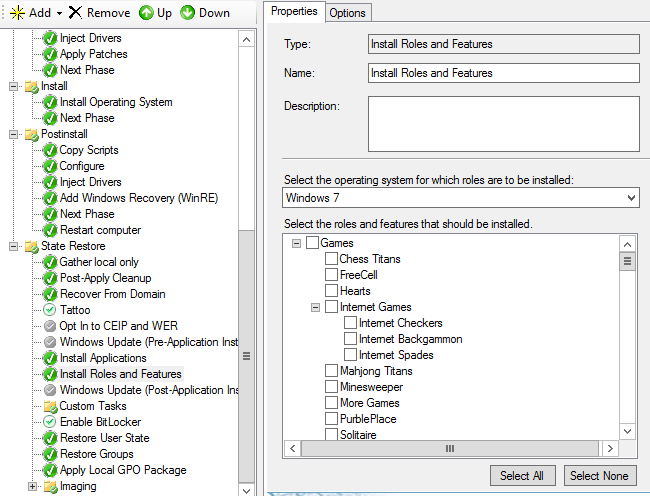
Figure 3.2 – Desktop OS Task Sequence which has “Install Roles and Features” and “Install Applications” steps pre-staged
Applications
Here we have the list of applications that are added into the MDT console. These will also play a vital role in the customization and flexibility of options for deployment. Figure 3.3 shows some applications that have been gathered, and you will see these again later.
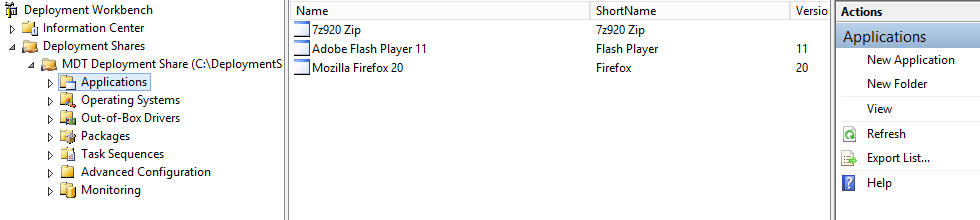
Figure 3.3 – Applications Layout
Mechanism so Far (After Configuring Task Sequences)
The whole idea and reasoning for creating them this way is to achieve flexibility of deployment options, so we can deploy from vanilla, to hybrid and customized builds with-on demand options to customize them. Your company-standard Task Sequence will contain customized actions that would be used for any base image and, requirements for the desktop environment.
Database Setup
This is an integral step, in every sense. Here is where we establish a connection to the database server to create its own database that we will use to store the clients' details, These will be referenced when it comes to the Task Sequences being deployed to the clients.
- In the MDT Deployment console, click the arrow next to the Advanced Configuration
- Right click the Database folder and choose
- Enter the details for your SQL Server from Server name. Instance and port number are optional but are helpful if your server does not adhere to default configuration. Network library should use TCP/IP Sockets
- Create a database by providing a name. In this case I have simply named this as MDT
- Enter a name for your SQL Server Share. In my case I have used DeploymentShare$
- Finish the wizard
Now we should see some details for our database connection below, as well as some more options for us to play with:
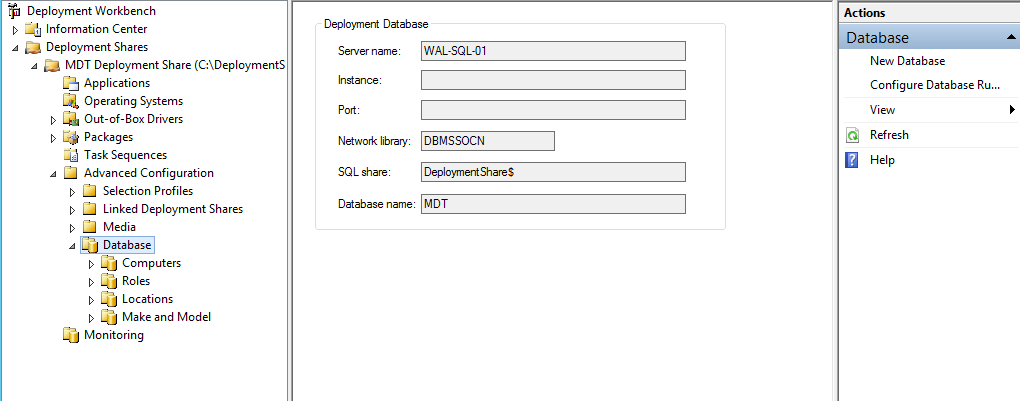
Figure 4.1 – Database configuration with additional folders listed below
Now we have further options available to us called Database Rules. We currently have an additional four folders:
- Computers
- Roles
- Locations
- Make and Model
These contain a series of rules that are processed in priority order.
In the MDT Console right click the Database and click Configure database rules.
Computer Rules
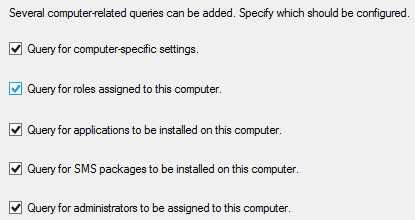
Figure 4.2
Location Rules
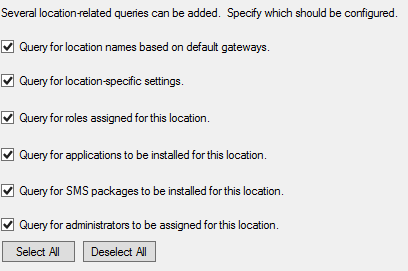
Figure 4.3
Make/Model Rules
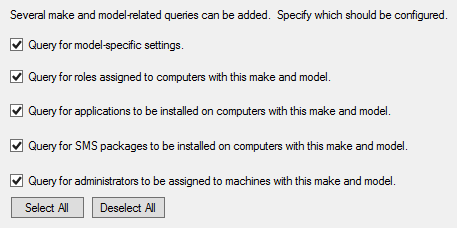
Figure 4.4
Role Options
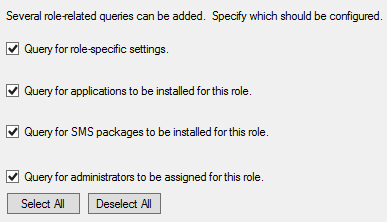
Figure 4.5
You can tick and untick where appropriate. In this case I’m more concerned with the Computer rules. These rules are normally processed one-by-one with the first one, of course, being the main priority. In this case we need to change this order so it can reflect how we want our customizations processed. So currently, this how the rules are laid out in the bootstrap.ini:

Figure 4.6 – Bootstrap Settings after Database rules have been configured
If you're adding any other rules, then make sure that these stay ahead. One little hurdle is, of course, the authentication between the SQL Server database and the MDT server. This would prompt us to create a SQL Server login that will authenticate with the database.
1. Log on to your SQL Server
2. Open a connection to your SQL Server with the SQL management studio
3. Go to Security – Logins. Then right click and choose New Login
4. Provide a name and password and check the SQL Server Authentication box. Untick password expiration (you’ll thank me later) and select the database default to the MDT database
5. Click the Server roles tab and choose sysadmin role and click OK to finish
6. Right click your SQL server name in the SQL Management Studio console and choose properties. And go to the security tab and ensure that it has SQL Server and Windows Authentication checked
Now when we return back to the bootstrap.ini further down, we can see additional entries regarding the Computer rules.
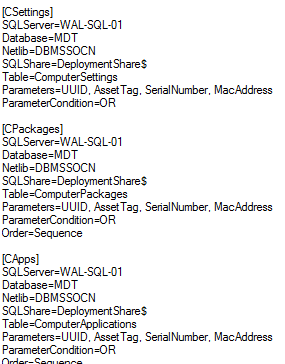
Figure 4.7 – Bootstrap.ini settings with database rules configuration
So what we need to do now is add the SQL Server login and password like we created earlier so that it looks like Figure 4.8. This has to be done on each part.
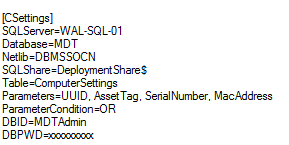
Figure 4.8 – Bootstrap.ini with Database rules, which require the SQL Server login credentials
The DBID and DPWD values must be placed below each Database rule shown in the bootstrap.ini. Then update deployment share to generate boot images that reflect this:Right click the Deployment share, and choose Update Deployment share. This will generate the boot images with the new configurations, and these can be added
into the WDS Server again.
To do this, open your WDS console and perform the following
- Go to the boot images folder and highlight your boot image and choose the “Replace Image” option
- Browse to the location of your deployment share, which would be C:\DeploymentShare\Boot\, and choose the x86 or x64 version
- Complete the wizard
Database Form
Once we click to add a new record, we see for options that will allow the machine to be picked up by the SQL Server database:
- Asset Tag
- UUID
- Serial Number
- MAC Address
The form contains all the raw values that make up all the settings, either compulsory or optional, that reflect how a machine will be built by either the task sequence or the options you choose with the MDT Deployment wizard.
So values we would most probably need would include:
- Task Sequence ID
- ComputerName
- JoinDomain
- DomainAdminName
- DomadinAdminDomain
- DomainAdminPassword
- Admin Password
- Applications
You can get away with pre-configuring the values for these variables within the form to build your machine fully automated.

Figure 4.9 – MDT 2012 Database form
Downside: Although it is very useful, you may find it's very non-user friendly due to the raw material of variable names, as well as the fact that you need specific values that refer directly to the variables listed. And this is where the good stuff comes in.
Mechanism so Far (After Database Configuration)
We now have the foundation ability to build machines using ZTI. We can have machines detected on the network by variable methods within the SQL Server database. Of course, I would like to address the main downside that will be the icing on the cake for this solution.
MDT Web Frontend Setup
First, let me start by saying this magnificent tool was created by Maik Koster. The installation guide can be found here: https://mdtwebfrontend.codeplex.com/wikipage?title=Installation%20Guide&referringTitle=Documentation. This tool really adds to the overall design and feel for this.First off once we bring up the first screen, we need to enter the details of our SQL Server Database server name and Database. Then we need to tick both boxes and click to Upgrade Database . Settings will automatically be saved.
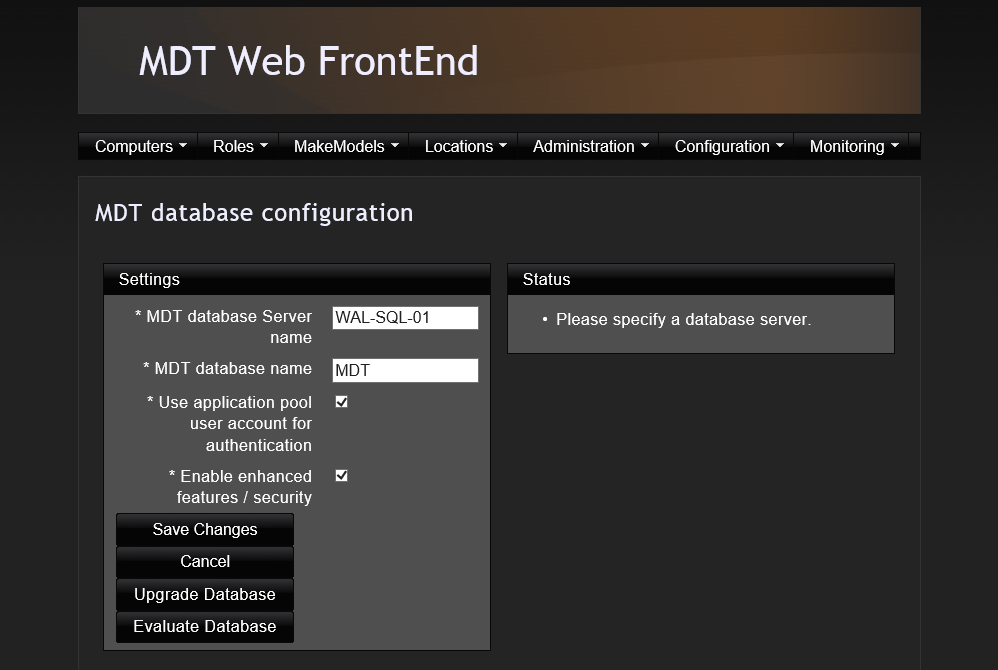
Figure 5.1 – Opening page to set up your Database connection
Once this has been set up, we can now begin the building blocks to form the UI for true ZTI design.
Administration List
Task Sequences: You will now see how we develop the whole user friendly interface. Starting from here is where we create a list of entries that will contain the variables needed to refer to the database form shown earlier. So when we create a list here, we then use the two fields as follows:
Name – Name of the Operating System (any name you wish)
Value – Task Sequence ID in the MDT console
So if we refer back to the MDT Console where we have our task sequences created, we see that they all contain a Task Sequence ID, which is their variable. And if we look at the database form above, we can see where it has “TaskSequenceID” listed. So once we make entries within our list, we can make the variables into simpler choices by providing them with a friendly name for the Task Sequence IDs to be similar to the friendly names of the Task Sequences within the MDT Console.
Languages – Now here is an interesting one. Sometimes you may experience issues with trying to select the default languages when building machines. Most are US English by default but have sometimes caused complications when I was setting this inside the answer file “unattend.xml.” So I have created a list that focuses on the languages we are most likely to flip through, which would be U.K English or U.S. English.
Name – Name of Language
Value – Value Locale ID. These can be obtained from here https://msdn.microsoft.com/en-gb/goglobal/bb895996.aspx
OS Roles/OS Role Services/OS Features – Another little addition we can choose is the ability to add OS Roles/Features on demand. Of course little drawbacks include things like the fact that you cannot refer to multiple roles or features in the same values without using “,” between them. So if you want to use this method, you can either use one value or string up multiple to make one value.
Name – Name of OS Role
Value – Role Name in PowerShell context. Can be found using this https://technet.microsoft.com/en-us/library/cc732757.aspx#BKMK_wps or using a PowerShell command Get-WindowsFeature (Note: if using Windows Server 2008, then run Import-Module ServerManager first)Name – Name of OS Feature
Value – OS Feature Name in PowerShell context. Can be found using this https://technet.microsoft.com/en-us/library/cc732757.aspx#BKMK_wps or using a PowerShell command Get-WindowsFeature (Note: if using Windows Server 2008 then run Import-Module ServerManager first)Name – Name of OS Role Services
Value - OS Role Service Name in PowerShell context. Can be found using this https://technet.microsoft.com/en-us/library/cc732757.aspx#BKMK_wps or using a PowerShell command Get-WindowsFeature (Note: if using Windows Server 2008 then run Import-Module ServerManager first)
Categories: Here we will construct the user friendly form used to build machines. The first one, we will label as Machine Details, which will have the values below:
Computer Name – Computer Name
- Operating System – Task Sequence ID
- Local Administrator
Password – AdminPassword - MAC Address – OSDAdapter0MacAddress
- IP Address – OSDAdapter0IPAddressList
- Subnet Mask – OSDAdapter0SubnetMask
- Default Gateway – OSDAdapter0Gateways
- Keyboard Language – InputLocale
- System Locale – SystemLocale
- TimeZone – TimeZoneName
The next form will be the Network Details, which provides fields used to join the domain:
- Join Domain Name – JoinDomain
- Domain Admin Name – DomainAdmin
- Domain Admin Password – DomainAdminPassword
- Domain Admin Domain – DomainAdminDomain
The next form will be Additional Roles, where you will choose your Roles/Role Services and OS Features if required:
- OS Roles
- OS Role Services
- OS Features
Then the final one is Additional Roles continued, which is optional as this will contain options to build Primary server role functions such as Domain Controllers, DHCP servers and DNS Servers.
Administration – Groups
In this tab, we will now group together all the sections to create one big form which will contain the following:
- Machine Details
- Network Details
- Additional Roles
Let’s take an opportunity to create another group with similar categories but this time we’ll add a few more. This will tie in more with the Task Sequences that have the Server Role Setup groups so that we can configure additional server roles such as the Domain Controller, DHCP, and DNS Servers:
- Machine Details
- Network Details
- Additional Roles
- ADDS Settings
- DHCP Settings
- DNS Settings
Administration – Users
Add users here from your domain to control access to the MDT Web Front end.
Administration – Access RolesHere is where we can set our newly constructed form to be in use by default, which we can do by clicking the Edit button and choosing our Group as the GroupID. Click save (Note: We can create different forms and assign them to different users, but that will be described later in the final part of this series of articles.)
Administration – Applications
Here we can upload all of our applications that are in the MDT console and load them into the MDT Web Front End for easy selection. In this section, click the Upload applications.xml and select it by going to Deployment Share\Control\Applications.xml, and choose Upload.
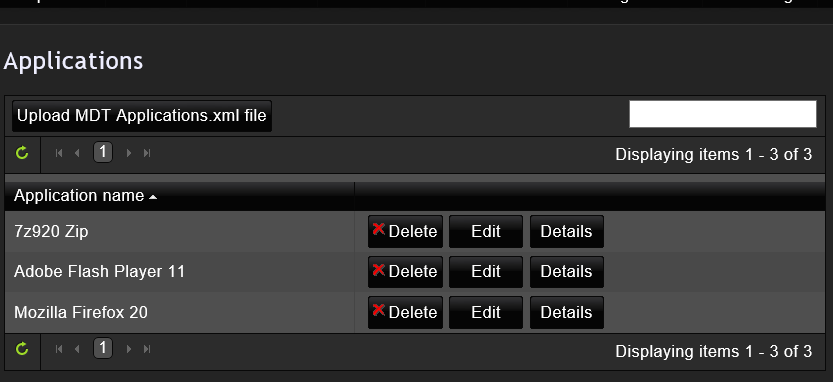
Figure 5.2 – Application list uploaded
Now you can see all the applications we have within the console
Computers – Add New Record
Once we click to add a new record, we are presented with four options that will allow the machine to be picked up by the SQL Server database:
- Asset Tag
- UUID
- Serial Number
- MAC Address
You may find MAC address easier for virtual machines and find serial numbers easily for physical machines. But make sure you verify the serial number in the physical machine BIOS also, as they might not always match, and any serial number within the BIOS will always be correct.
And now below is our newly constructed form. Now once we edit, we can now populate the entire form and build our machine in a preconfigured friendly manner.
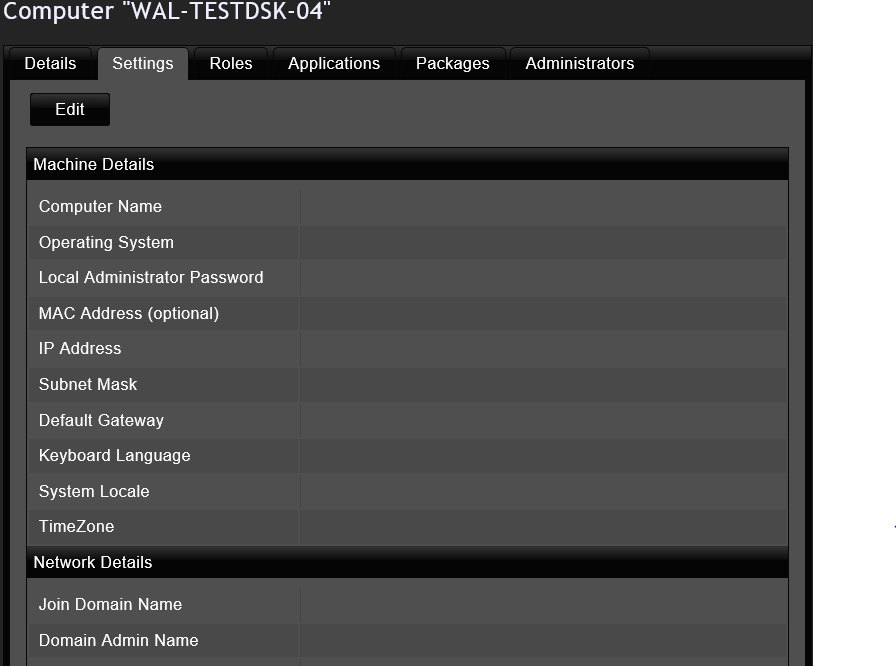
Figure 5.4 – Our new form for building machines
Now, in the other form, we can see we have additional configurations:
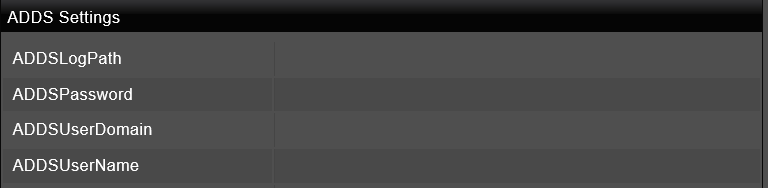
Figure 5.5 – Doman Controller Settings
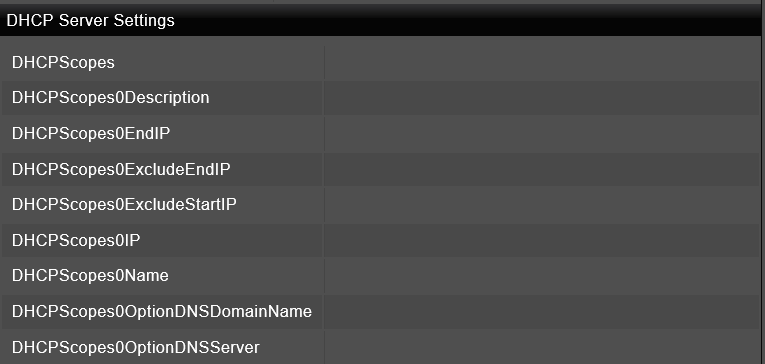
Figure 5.6 – DHCP Server Settings
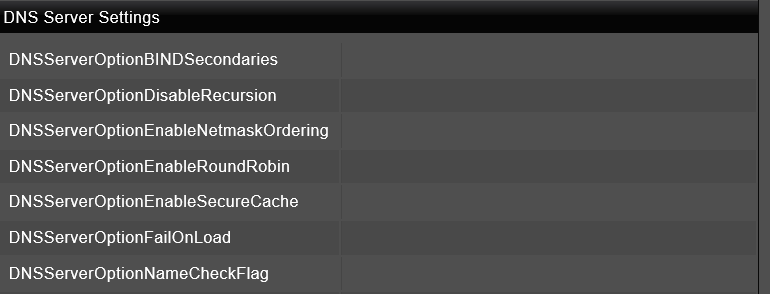
Figure 5.7 – DNS Server Settings
So with these additional settings we can build Domain Controllers, DHCP Servers, and DNS servers--just from this form alone.
(Note: you must install the server roles first. You can choose to do this on demand in the Web Front End or just configure it inside the base task sequence for a Server OS that has the Server Role Setups group inside)
Applications
With the pre-configured “Install Applications” step in the Task Sequence we did earlier, we can now choose applications within this tab to add on demand.
Mechanism Now (after MDT Web Front End)
With the whole UI constructed in a web portal, we have now made customization of the build process and on-demand features in such a user friendly way as to eliminates a lot of the administrative effort needed that could result in multiple task sequences and various steps.
Mechanism All Together
We now have True ZTI in full effect now, with foundation Task Sequences with steps that allow us to control on demand. We have customized features that are fully automated without user interaction. And all machine builds are referenced through the SQL Server database and stored in the SQL Server database.
So now give this a try by building a machine, and it should just flow through without any issues at all--hopefully. But the end result should be a painless and easy machine build through a web form.
Administrative Drawback
One drawback which you may experience is once a machine is built its record stays intact in the web front end, as well as its preferred method to detect it on the network. This means that if a machine were to accidently PXE boot into the MDT server, it could rebuild over the whole machine. Well I’m sure nobody wants to do this so
there are two options:
Workaround 1
You can take the time to either delete the records with the Computers tab in the MDT web front end or simply remove either its MAC Address, UUID, Serial Number, or asset tag and just type the word “Blank” to prevent this.
Workaround 2
In the WDS Server we can enable pre-staging clients similar to the System Center Configuration Manager console by configuring Windows Deployment Services (WDS) to allow only known clients as shown below:
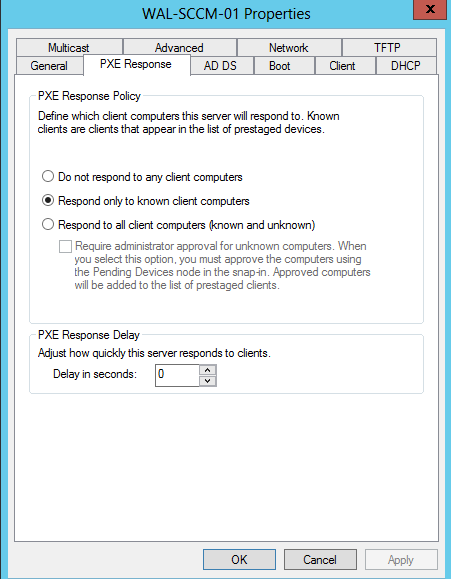
Figure 5.8 – WDS Tab for PXE Response
Then go to the Active Directory PreStage Devices and right click and choose Add Device
- Enter the name for your machine, and Device ID will be the MAC Address. (Note: MAC Address 8 bit characters should be separated with “-“ and not “:”)
- Click next if you are happy with defaults if the WDS and boot image is set as defaults. If not, please specify them in this step and click next
- Skip the next window
- Click to finish unless you wish to specify a user for your pre-staged machine
Conclusion
This has been a long article, but I hope it provides a lot of valuable information and step-by-step instructions. The last part of this series will be short and will just run through the other stuff you can do with the MDT Web Front End in this scenario. I'll analyse more of the Role Options, Locations, Make and Model.