Setting up a custom build environment in Visual Studio to build all your 32 bit and 64 bit vc++ projects .
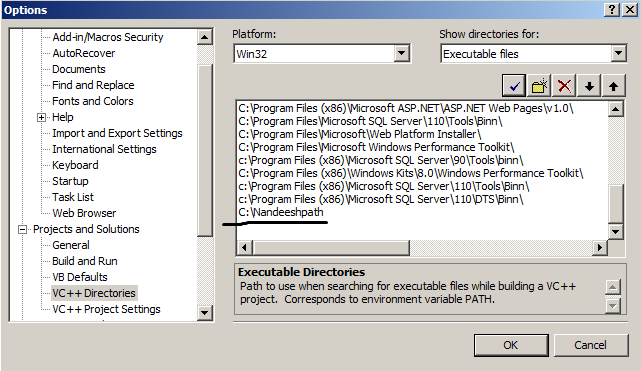
Recently we were approached by one of our clients regarding a build environment to build both their 32 bit and 64 bit projects . While the requirement sounds usual , the idea is not to add any project dependencies like paths for lib files,include files at the project level, and have custom output paths for 32 bit build and 64 bit build in the same project through command line etc . We can easily achieve one of the above task in Visual Studio editions previous to Visual Studio 2010 by adding all the include files,lib files ,etc at Tools->Options->Projects & Solutions->VC++ Directories. Although the above is a part of solution but it is actually a chunk of custom environment I am about to discuss. There are some alternatives and roadblocks along the way .
Initially the environment was already set up to build 32 bit projects through command line. How ever when we tried to build a brand new project targeting x64 we were getting linker errors like " machine type 'X86' conflicts with target machine type 'x64' ." One of the most common reasons for such an error is paths are changed or their order is altered at Tools > Options from the main menu, select Projects and Solutions > VC++ Directories . The next logical thing is to reset the settings of IDE using devenv /resetsettings. This did resolve our issue . But after couple of hours the user reported back the same issue when building a project targeting x64. We saw that settings were again corrupted i.e vc++ directories were again altered and hence we were erring. On inspection we observed that shortcut tab of devenv had a parameter /useenv . This would launch Visual Studio and load environmental variables into the VC++ Directories dialog box. Since the environment variables were set up to build 32 bit projects , this was coming in our way of building 64 bit projects. We had to come up with a strategy to update the directories so that we are able to build the projects targeting both the platforms and also output the binaries(x86 and x64) into separate directories. Below are 2 ways to do the same.
1. Using batch files to set up the environment.
We will have to create separate batch files for targeting 32 bit or 64 bit and launch the bat files from cmd. There are environment variables like LIB,INCLUDE,PATH,LIBPATH . Our idea is to run some batch file from command prompt and then launch Visual studio from the same command prompt with /devenv switch.
First open a command prompt under administrator.
Now run a batch file with the below steps to set up 64 bit command prompt .
Note: When we follow the below steps only 64 bit environment( vcvarsx86_amd64.bat) is setup and you cannot build 32 bit applications as you will receive error. Once you close this instance of Visual Studio launched under below steps everything will be normal , as you are opening devenv from a command prompt. Run the below batch file. The below example uses Visual Studio 2010 .
set INCLUDE=%INCLUDE%;c:\nandeesh64;
set LIB=%LIB%;C:\Nandeeshlib;
set Path=%path%;C:\Nandeeshpath;
set LIBPATH=%LIBPATH%;C:\Nandeeshlibpath;
call "C:\Program Files (x86)\Microsoft Visual Studio 8\VC\bin\x86_amd64\vcvarsx86_amd64.bat"
devenv /useenv
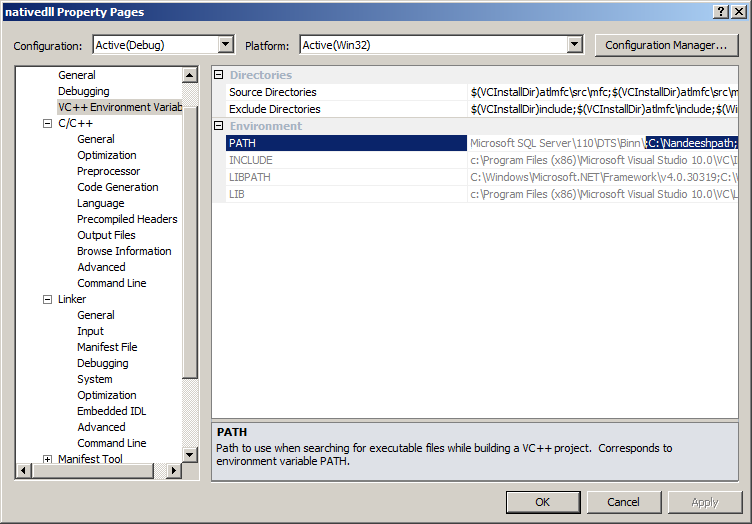
Now Visual studio will have new settings , like below. Observe the path got appended. At C:\Nandeeshpath you can go on appending the additional paths with semicolons.
The batch file pretty much first adds our custom paths at the start and and then calls vcvarsx86_amd64.bat , this batch file pretty much sets up the environment for using Visual Studio x64 tools.
The above example uses Visual Studio 2005 . When we run the same batch file to use Visual Studio 2010 or above , the only difference would be that your custom directories would be under Project Properties->Configuration Properties->VC++ Environment Variables.
To setup your 32 bit environment ,
You will have to run the below batch only under command prompt not outside of cmd .
Note: When we follow the below steps only 32 bit environment(vcvars32.bat) is setup and you cannot build 64 bit applications as you will receive error. Once you close this instance of Visual Studio launched under below steps everything will be normal , as you are opening devenv from a command prompt. Run the below batch file.
set INCLUDE=%INCLUDE%;c:\nandeesh32;
set LIB=%LIB%;C:\Nandeeshlib32;
set Path=%path%;C:\Nandeeshpath32;
set LIBPATH=%LIBPATH%;C:\Nandeeshlibpath32;
call "C:\Program Files (x86)\Microsoft Visual Studio 8\VC\bin\vcvars32.bat"
devenv /useenv
2. Editing paths in Visual Studio/ vccomponents.dat
In the course of debugging Visual Studio Settings corruption I found out that Visual Studio picks up the VC++ directories from VCComponents.dat . This file is at C:\Users\User Name\AppData\Local\Microsoft\VisualStudio\8.0 or C:\Users\User Name\ AppData\Local\Microsoft\VisualStudio\9.0 . This would depend on the version of Visual Studio we are using. When we see the contents of the file , Below are the vc++ directories (x86) that get loaded when you open Visual Studio 2005 , can you spot the customization? Our idea is to append our custom directories after the default ones .
 [VC\VC_OBJECTS_PLATFORM_INFO\Win32\Directories]
Path Dirs=$(VCInstallDir)bin;$(VCInstallDir)PlatformSDK\bin;$(VCInstallDir)PlatformSDK\common\bin;$(VSInstallDir)Common7\Tools\bin;$(VSInstallDir)Common7\tools;$(VSInstallDir)Common7\ide;$(ProgramFiles)\HTML Help Workshop;$(FrameworkSDKDir)bin;$(FrameworkDir)$(FrameworkVersion);$(VSInstallDir);$(SystemRoot)\SysWow64;$(FxCopDir);$(PATH); $(Path_Custom)
Include Dirs=$(VCInstallDir)include;$(VCInstallDir)atlmfc\include;$(VCInstallDir)PlatformSDK\include;$(VCInstallDir)PlatformSDK\common\include;$(FrameworkSDKDir)include; $(INCLUDE_Custom)
Reference Dirs=$(FrameworkDir)$(FrameworkVersion);$(VCInstallDir)atlmfc\lib
Library Dirs=$(VCInstallDir)lib;$(VCInstallDir)atlmfc\lib;$(VCInstallDir)atlmfc\lib\i386;$(VCInstallDir)PlatformSDK\lib;$(VCInstallDir)PlatformSDK\common\lib;$(FrameworkSDKDir)lib;$(VSInstallDir);$(VSInstallDir)lib; $(LIB_Custom)
Source Dirs=$(VCInstallDir)atlmfc\src\mfc;$(VCInstallDir)atlmfc\src\atl;$(VCInstallDir)crt\src
Exclude Dirs=$(VCInstallDir)include;$(VCInstallDir)atlmfc\include;$(VCInstallDir)PlatformSDK\include;$(VCInstallDir)PlatformSDK\common\include;$(FrameworkSDKDir)include;$(FrameworkDir)$(FrameworkVersion);$(VCInstallDir)atlmfc\lib
The path in bold are our custom directories , they look like macros but they are environment Variables. Our client added the custom environment variables into the file and we were able to build the projects wth out any error . While we can directly just add the path into the Vccomponents.dat instead of creating the environment variable , it can be handy when we are adding too many custom paths.
The above can also be accomplished directly from Visual Studio , Just go to Visual Studio Tools->Options->Projects & Solutions->VC++ Directories and directly add your paths . I would definitely recommend to add it to via Visual Studio rather than directly editing vccomponents.dat.
If there are other developers who desire the settings you can directly pass the vccomponents.dat file , the recommended way would be to add it via Visual
There have been changes wrt VC+++ directories from Visual Studio 2010 as we do not have these any more at the IDE level , these are now at project level. Please check the blog for more answers.
One of the the above methods will help us set up the custom environments to build our 64 bit and 32 bit projects. Since our client was having custom out put paths for binaries , we wanted to get the dlls and exes into separate directories for each configuration, like in case of
x86->C:/Temp1/win32 and x64->C:\Temp1\x64 . For this, all we have to do is add a macro $(PlatformName) for the output directory . Please note that you will have to change it for each configurations separately, Go to Project Properties->General->Output Directory-> Now browse to the folder where you want the binaries and add the macro like C:\Temp1\$(PlatformName). This will make sure to build all your files into win32 folder for x86 and x64 folder for x64.
Targeting x86 or x64 when building with devenv via command line
Finally our client was using devenv to build the projects , they wanted to build to pass the configuration like x86 or x64 through the devenv command line . While this can be achieved pretty easily using msbuild , we can also do this via devenv For example if you are building Test.vcproj . Below would be the command line for Release configuration ,Platform:x64.
devenv.exe myproject.sln /Build "Release|x64"
Here are some of the msdn articles and blogs which speak about vccomponents.dat, VC++ directories .
blogs.msdn.com/b/vsproject/archive/2009/07/07/vc-directories.aspx
blogs.msdn.com/b/pusu/archive/2008/05/16/visual-studio-ide-vs-command-prompt.aspx
msdn.microsoft.com/en-us/library/t9az1d21(v=vs.90).aspx
Keep Coding!
Nandeesh Swami