Introduction to Web Development; Building an ASP.NET/SQL Web Application
In the third of a series of five articles exploring Microsoft Web technologies I'll walk you through building a simple Web application which retrieves and stores data in a SQL database.
Getting Started
First off you need to set up your development environment, to find out how see my previous article.
I'm going to show you how to build a simple address book application which will allow you to search for a contact by name and add new contacts. The data will be stored in a SQL database and the frontend will be built using ASP.NET.
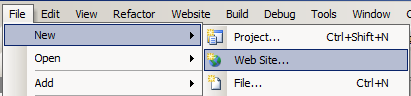
To kick off you need to open Visual Studio and create a new Web Site:
- Click the File menu > New > Web Site...
- In the resulting dialogue box select 'ASP.NET Web Site' and give your project a name in the Location dialogue.
- A new Web Site project will then be shown in Visual Studio. Locate the Solution Explorer:
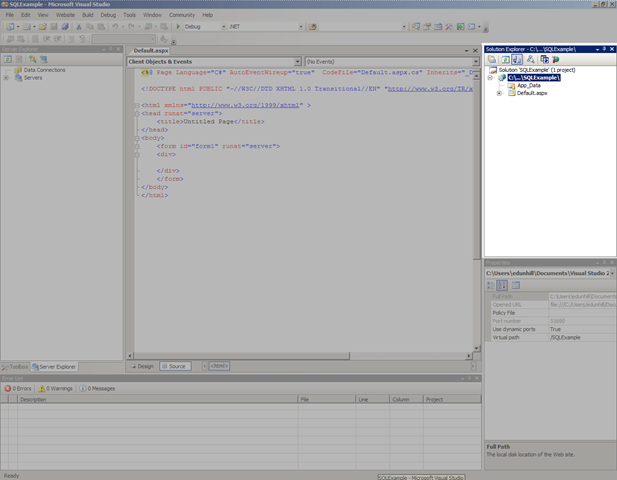
(If the Solution Explorer is not displayed press Ctrl + S + W)
The Database...
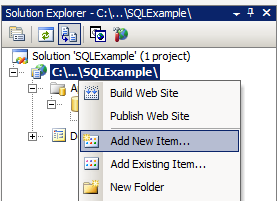
- Now we will create a new SQL database to store out data. Right click the App_Data folder (
 ) folder and select 'Add New Item...'
 - Select 'SQL Database' and give your database a name.
- Locate the 'Server Explorer' pane, select your database and right click Tables and select 'Add New Table'

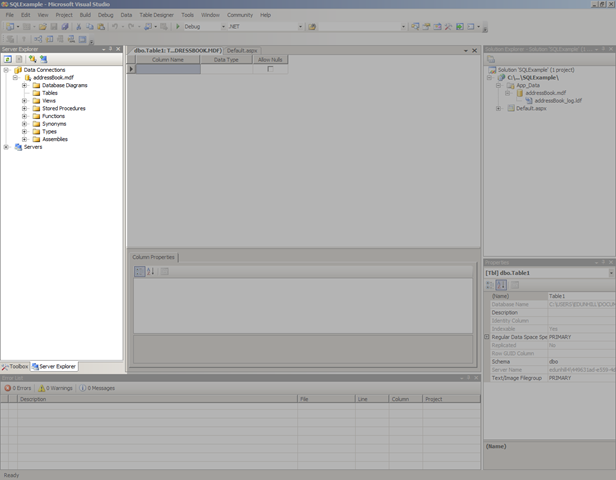
(If the Server Explorer is not displayed press Ctrl + S + L)
- In the centre pane create two columns called Name and Phone, set their Data Types to 'varchar(50)' and uncheck the 'Allow Nulls' box in the Name column.
- Hit Ctrl + S and give the table a name.
We now have our database ready to use so its time to link it to our web app and build a simple frontend.
- Go back to the Solution Explorer and right click your project and select 'Add New Item...'
- Now select Dataset and give it a name. (If you get a warning simply click OK and the appropriate folder structure will be created)
You will now get a wizard pop up which will walk you through the creation of your Dataset.
- In the first window select your database and click next, give the 'Connection String' a name and select Use SQL statements
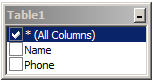
- At the next step select the 'Query Builder...' button, select your table and click close.
- Click *(All Columns) and OK.
- In the wizard click Finish
- Click on the query section and click Add > Query...
- In the wizard select Use SQL statements, Next, Insert, Finish.
The frontend...
- In the Solution Explorer double click Default.aspx and when it loads click on the 'Design' tab

- At the bottom of the Server Explorer click 'Toolbox and then drag and drop three textboxes and two buttons onto the page:

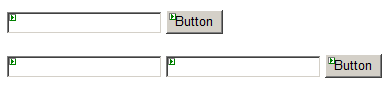
- Change the name of each control in the Properties pane.
- Now double click the top button to create the click event and access the code.
- Copy and paste the below code into your click even for the search button (please note this code may need tweaking depending on the naming conventions you've used)
1: DataSet1TableAdapters.addressBookTableAdapter addressAdapter = new DataSet1TableAdapters.addressBookTableAdapter();
2: DataSet1.addressBookDataTable addresses = addressAdapter.GetData();
3:
4: foreach (DataSet1.addressBookRow addressRow in addresses)
5: {
6: Response.Write(addressRow.Name + "/" + addressRow.Phone);
7: }
Once you've got your code working and everything compiles we have a way to retrieve all the data from the database and display it. The code can be modified slightly to display only results matching what was entered in the search box with the addition of an if statement:
1: DataSet1TableAdapters.addressBookTableAdapter addressAdapter = new DataSet1TableAdapters.addressBookTableAdapter();
2: DataSet1.addressBookDataTable addresses = addressAdapter.GetData();
3:
4: foreach (DataSet1.addressBookRow addressRow in addresses)
5: {
6: if (searchBox.Text == addressRow.Name)
7: Response.Write(addressRow.Name + "/" + addressRow.Phone);
8: }
This is the quickest way to implement search functionality for this example but it would be much more elegant to construct a SQL query based on the search term to avoid iterating over all data in the table.
Now we have our database and means of getting data out implemented it just leaves the small task of implementing the ability to put some data in!
- First go back to the Solution Explorer and open the Dataset then right click the Table Adapter and select Add > Query...
- Select 'Use SQL statements' > Next > Insert > Next> Finish
- Go back to Default.aspx and double click the second button.
- Copy in the below code - again it may need tweaking.
1: DataSet1TableAdapters.addressBookTableAdapter addressAdapter = new DataSet1TableAdapters.addressBookTableAdapter();
2: addressAdapter.InsertQuery(nameBox.Text,phoneBox.Text);
3: Response.Write(nameBox.Text + " and " + phoneBox.Text + " written to database!");
If you hit F5 it will compile and run and you should be able insert data and then search it.
If you get stuck check out the below video of me building the application from start to finish.
Next Month...
We will be looking at building a Silverlight front end for our address book database.
Technorati Tags: ASP.NET,SQL,Visual Studio,Studentzine