WebMatrix - Creating a Custom Silverlight Helper
This post provides details and code about creating a custom helper for WebMatrix (Beta).
The idea behind helpers in WebMatrix is to be able to add functionality very easily to your Web page. You will see that adding (or calling) the helper using markup in your Web page is fairly simple. The complex part that we're doing here is creating the custom Silverlight helper class that contains the functionality. Note that many helpers are already built in to WebMatrix (see my previous posts WebMatrix Helpers and WebMatrix Helpers (Part 2).
To create a custom Silverlight helper in WebMatrix:
Create a new Web site in WebMatrix.
Add an App_Code folder to the root of your new Web site.
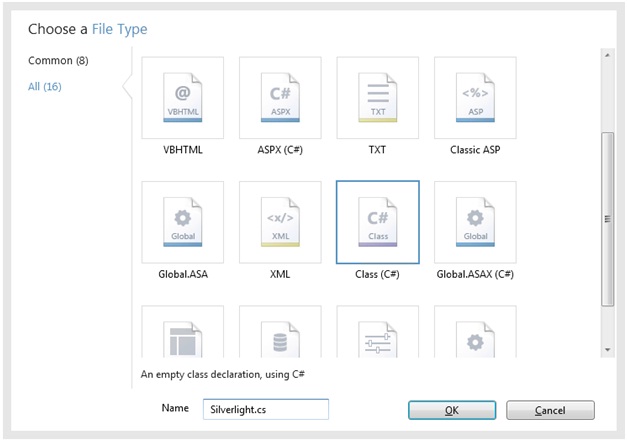
Add a new Silverlight.cs class file to the App_Code folder.
Replace the default code in the class file with the following code:
using System;
using System.Collections.Generic;
using System.Text;
using System.Web;
/// <summary>WebMatrix Silverlight Helper</summary>
/// <param name="path" type="string">The path to a Silverlight .xap file.</param>
/// <param name="width" type="string">(Optional) The width of the Silverlight player. Default = 720.</param>
/// <param name="height" type="string">(Optional) The height of the Silverlight player. Default = 480.</param>
///
public static class MySilverlight
{
public static IHtmlString Silverlight(
string path,
string width = "720",
string height = "480"
)
{
// Generate the HTML
string html = GeneratedCode(path, width, height);
return new HtmlString(html);
}
private static string GeneratedCode(
string path,
string width,
string height)
{
if (string.IsNullOrEmpty(path))
throw new ArgumentException("The path parameter cannot be null or empty.", "path");
StringBuilder builder = new StringBuilder();
builder.AppendLine("<object ");
builder.Append(string.Format("width = '{0}'", width));
builder.Append(string.Format("height = '{0}'", height));
builder.Append("type='application/x-silverlight-2' data='data:application/x-silverlight-2,' >");
builder.AppendLine(" <param name='source'");
builder.Append(string.Format("value = '{0}' />", path));
builder.AppendLine("</object>");
return builder.ToString();
}
}Create a new page at the root of the Web site named Default.cshtml.
Replace the default markup in the page with the following markup:
<!DOCTYPE html>
<html>
<head>
<title>WebMatrix Silverlight Helper</title>
</head>
<body>
@MySilverlight.Silverlight(
path: "https://samples.msdn.microsoft.com/silverlight/samplebrowser/ClientBin/RichNotepadSnippets.xap",
width: "100%",
height: "600"
)
</body>
</html>
Now, run the Default.cshtml page.

Note that the helper is named MySilverlight. It has a method named Silverlight with three parameters. The path parameter points to a Silverlight .xap file. The .xap file can be local in your Web site or on the Web. The second parameter is an optional width value. And, the third parameter is an optional height value.
Are you wondering where the .xap file came from? It is available as part of the Silverlight SDK Sample Browser. These samples are a very cool way to learn about Silverlight. Try them out in WebMatrix by setting the path parameter of your new Silverlight helper to one of the following:
- https://samples.msdn.microsoft.com/silverlight/samplebrowser/ClientBin/DeepZoomFullSample.xap
- https://samples.msdn.microsoft.com/silverlight/samplebrowser/ClientBin/media\_ovw\_controlling\_media.xap
- https://samples.msdn.microsoft.com/silverlight/samplebrowser/ClientBin/DataServicesQuickStart.xap
For more information about creating WebMatrix helpers, see Guy Burstein's Blog post - How to create a CSHTML and WebMatrix TweetMeme Helper.
-- Erik Reitan
ASP.NET User Education
This posting is provided "AS IS" with no warranties, and confers no rights.