Office 365 API Walkthrough for Windows Store App
With Office 365 API Tools, you can integrate Office 365 services - including Mail, Calendar, Contacts, Files and other services - with your applications. Office 365 API Tools take care of registering your application to consume Office 365 APIs and adding necessary NuGet libraries to your project. Before you get started, you will need an Office 365 Developer Tenant. If you don’t have an Office 365 Developer tenant yet, but are interested in the Office 365 APIs, the API Sandbox offers you a quick in-browser C#/JavaScript code editing experience to try the APIs with no sign-up needed.
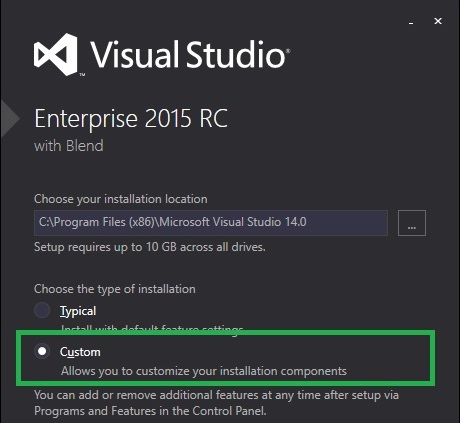
Note: To use Office 365 API Tools with Visual Studio 2015 RC, you will need Microsoft Visual Studio Enterprise 2015 RC with Microsoft Office Developer Tools. Choose the Custom option when running the Visual Studio installer and check the option to install Microsoft Office Development Tools.

If you are using Visual Studio 2013, then you will need the latest version of Microsoft Office Developer Tools for Visual Studio 2013.
In the following walkthrough, we will build a simple Windows Store app and integrate Office 365 APIs to let users sign in, view files stored on their OneDrive accounts and their contacts. Let’s start by creating a new Windows 8 store app. For this demo, I named my app O365SampleApp.
1. Configure Office 365 API
We will use Office 365 API Tools to configure the app to use Office 365 APIs. To do so, right-click on the project node in the solution explorer and select Add -> Connected Service… Select Office 365 APIs from the list of providers and click Configure.
Click on the Register your app link and enter the credentials for your Office 365 Developer tenant account. Note: This step registers your app on Azure Active Directory associated with your Office 365 tenant.
Now you will be presented with the page to set permissions for various Office 365 services. Set the following permissions and click the Add button once all the permissions are set:
- For the Contacts service, set the Read your contacts permission.
- For the My Files service, set the Read your files permission.
The above steps will add some NuGet libraries, and also enable Read your contacts and Read your files permissions for the app that was registered on Azure Active Directory. A complete list of libraries that were added can be seen in the Visual Studio output window.
2. Access Office 365 API by using .NET Client Library
To access Office 365 APIs using the .NET client library, first acquire an access token. Then get the Outlook Services client for fetching Contacts and SharePoint Client for fetching MyFiles. We can then send asynchronous queries to interact with contacts/files data.
2.1 Get Access Token
In this walkthrough, we will use Azure Active Directory Authentication Libraries (ADAL) to authenticate users and obtain an access token for securing API calls.
Add Microsoft.IdentityModel.Clients.ActiveDirectory to your project through the NuGet Package Manager.
Next, add a new class to the solution; let’s call it AuthenticationHelper.cs and replace the content of this file with:
 using Microsoft.IdentityModel.Clients.ActiveDirectory;
using System;
using System.Threading.Tasks;
using Windows.Security.Authentication.Web;
using Windows.Storage;
using Windows.UI.Popups;

namespace O365SampleApp
{
    class AuthenticationHelper
    {
        public static readonly string DiscoveryServiceResourceId = "https://api.office.com/discovery/";
        const string AuthorityFormat = "https://login.microsoftonline.com/{0}/";
        static readonly Uri DiscoveryServiceEndpointUri = new Uri("https://api.office.com/discovery/v1.0/me/");
        static readonly string ClientId = App.Current.Resources["ida:ClientID"].ToString();
        static ApplicationDataContainer AppSettings = ApplicationData.Current.LocalSettings;
        static string _authority = String.Empty;
        static string _lastTenantId = "common";
        const string _lastTenantIdKey = "LastAuthority";
        static AuthenticationContext authContext = null;

        public static Uri AppRedirectURI
        {
            get
            {
                return WebAuthenticationBroker.GetCurrentApplicationCallbackUri();
            }
        }

        public static string LastTenantId
        {
            get
            {
                if (AppSettings.Values.ContainsKey(_lastTenantIdKey) && AppSettings.Values[_lastTenantIdKey] != null)
                {
                    return AppSettings.Values[_lastTenantIdKey].ToString();
                }
                else
                {
                    return _lastTenantId;
                }
            }
            set
            {
                _lastTenantId = value;
                AppSettings.Values[_lastTenantIdKey] = _lastTenantId;
            }
        }

        public static string Authority
        {
            get
            {
                _authority = String.Format(AuthorityFormat, LastTenantId);
                return _authority;
            }
        }

        public static async Task<AuthenticationResult> GetAccessToken(string serviceResourceId)
        {
            AuthenticationResult authResult = null;
            if (authContext == null)
            {
                authContext = new AuthenticationContext(Authority);

                #region To enable Windows Integrated Authentication (if you deploying your app in a corporate network)
                //// To enable Windows Integrated Authentication, in Package.appxmanifest, in the Capabilities tab, enable:
                //// * Enterprise Authentication
                //// * Private Networks (Client & Server)
                //// * Shared User Certificates
                //// Plus add (uncomment) the following line of code:
                //authContext.UseCorporateNetwork = true;
                #endregion

                authResult = await authContext.AcquireTokenAsync(serviceResourceId, ClientId, AppRedirectURI);
            }
            else
            {
                authResult = await authContext.AcquireTokenSilentAsync(serviceResourceId, ClientId);
            }
            LastTenantId = authResult.TenantId;
            if (authResult.Status != AuthenticationStatus.Success)
            {
                LastTenantId = authResult.TenantId;
                if (authResult.Error == "authentication_canceled")
                {
                    // The user cancelled the sign-in, no need to display a message.
                }
                else
                {
                    MessageDialog dialog = new MessageDialog(string.Format("If the error continues, please contact your administrator.\n\nError: {0}\n\n Error Description:\n\n{1}", authResult.Error, authResult.ErrorDescription), "Sorry, an error occurred while signing you in.");
                    await dialog.ShowAsync();
                }
            }
            return authResult;
        }

        public static void SignOut()
        {
            authContext = new AuthenticationContext(Authority);
            authContext.TokenCache.Clear();
            authContext = null;
            ApplicationData.Current.LocalSettings.Values["TenantId"] = null;
            ApplicationData.Current.LocalSettings.Values["LastAuthority"] = null;
        }
    }
}
2.2 Get Outlook Services Client and SharePoint Client
An OutlookServiceClient is required to access Calendar, Contacts and Mail APIs. While, a SharePointClient is required to access Files APIs.
Add a new class to the solution; let’s call it Office365Helper.cs and replace the content of this file with:
 using Microsoft.Office365.Discovery;
using Microsoft.Office365.OutlookServices;
using Microsoft.Office365.SharePoint.CoreServices;
using System.Collections.Generic;
using System.Linq;
using System.Threading.Tasks;

namespace O365SampleApp
{
    class Office365Helper
    {
        private static IDictionary<string, CapabilityDiscoveryResult> AppCapabilities = null;

        private static async Task getAppCapabilities()
        {
            DiscoveryClient discoveryClient = new DiscoveryClient(
                    async () =>
                    {
                        var authResult = await AuthenticationHelper.GetAccessToken(AuthenticationHelper.DiscoveryServiceResourceId);
                        return authResult.AccessToken;
                    }
                );
            AppCapabilities = await discoveryClient.DiscoverCapabilitiesAsync();
        }

        public async static Task<OutlookServicesClient> CreateOutlookClientAsync(string capability)
        {
            if (AppCapabilities == null)
            {
                await getAppCapabilities();
            }
            var myCapability = AppCapabilities
                                        .Where(s => s.Key == capability)
                                        .Select(p => new { Key = p.Key, ServiceResourceId = p.Value.ServiceResourceId, ServiceEndPointUri = p.Value.ServiceEndpointUri })
                                        .FirstOrDefault();
            OutlookServicesClient outlookClient = new OutlookServicesClient(myCapability.ServiceEndPointUri,
                     async () =>
                     {
                         var authResult = await AuthenticationHelper.GetAccessToken(myCapability.ServiceResourceId);
                         return authResult.AccessToken;
                     });
            return outlookClient;
        }

        public async static Task<SharePointClient> CreateSharePointClientAsync(string capability)
        {
            if (AppCapabilities == null)
            {
                await getAppCapabilities();
            }
            var myCapability = AppCapabilities
                                        .Where(s => s.Key == capability)
                                        .Select(p => new { Key = p.Key, ServiceResourceId = p.Value.ServiceResourceId, ServiceEndPointUri = p.Value.ServiceEndpointUri })
                                        .FirstOrDefault();
            SharePointClient spClient = new SharePointClient(myCapability.ServiceEndPointUri,
                     async () =>
                     {
                         var authResult = await AuthenticationHelper.GetAccessToken(myCapability.ServiceResourceId);
                         return authResult.AccessToken;
                     });
            return spClient;
        }
    }
}
2.3 Interact with Contact and Files Data
By sending async queries to OutlookServiceClient and SharePointClient, we can interact with Contact and Files data respectively.
Add the following getContacts() and getMyFiles() methods to Office365Helper class in Office365Helper.cs file.
 public static async Task<List<IContact>> getContacts(OutlookServicesClient contactsClient)
        {
            List<IContact> myContacts = new List<IContact>();
            var contactsResult = await contactsClient.Me.Contacts.OrderBy(c => c.DisplayName).ExecuteAsync();
            do
            {
                var contacts = contactsResult.CurrentPage;
                foreach (var contact in contacts)
                {
                    myContacts.Add(contact);
                }
                contactsResult = await contactsResult.GetNextPageAsync();
            } while (contactsResult != null);
            return myContacts;
        }

        public static async Task<List<Microsoft.Office365.SharePoint.FileServices.IItem>> getMyFiles(SharePointClient spClient)
        {
            List<Microsoft.Office365.SharePoint.FileServices.IItem> myFiles = new List<Microsoft.Office365.SharePoint.FileServices.IItem>();
            var myFileResult = await spClient.Files.ExecuteAsync();
            do
            {
                var files = myFileResult.CurrentPage;
                foreach (var file in files)
                {
                    myFiles.Add(file);
                }
                myFileResult = await myFileResult.GetNextPageAsync();
            } while (myFileResult != null);
            return myFiles;
        }
3. Update MainPage.xaml to Include GetContacts and GetMyFiles Buttons
Now we will add 3 buttons to our MainPage to trigger the getContacts, getMyFiles and SignOut calls. To do so, open MainPage.xaml from solution explorer and add the following 3 buttons:
 <Grid Background="{ThemeResource ApplicationPageBackgroundThemeBrush}">
 <Button x:Name="BtnGetContacts" Content="Get Contacts" HorizontalAlignment="Left" Margin="58,110,0,0" VerticalAlignment="Top" RenderTransformOrigin="-1.737,-2.446" Click="BtnGetContacts_Click"/>
 <Button x:Name="BtnGetMyFiles" Content="Get My Files" HorizontalAlignment="Left" Margin="58,167,0,0" VerticalAlignment="Top" RenderTransformOrigin="-1.737,-2.446" Click="BtnGetMyFiles_Click"/>
 <Button x:Name="BtnSignOut" Content="Sign Out" HorizontalAlignment="Left" Margin="58,225,0,0" VerticalAlignment="Top" RenderTransformOrigin="-1.737,-2.446" Click="BtnSignOut_Click"/>
 </Grid>
Let’s now create button click event handlers. Open MainPage.xaml.cs file and add these methods within the MainPage class.
 private async void BtnGetContacts_Click(object sender, RoutedEventArgs e)
{
    var contactsClient = await Office365Helper.CreateOutlookClientAsync("Contacts");
    var contacts = await Office365Helper.getContacts(contactsClient);

    string contactsString = "";
    foreach (var contact in contacts)
    {
        contactsString += contact.DisplayName + Environment.NewLine;
    }
    MessageDialog mg = new MessageDialog(contactsString, "Contacts");
    await mg.ShowAsync();
}

private async void BtnGetMyFiles_Click(object sender, RoutedEventArgs e)
{
    var spClient = await Office365Helper.CreateSharePointClientAsync("MyFiles");
    var myFiles = await Office365Helper.getMyFiles(spClient);

    string myFilesString = "";
    foreach (var myFile in myFiles)
    {
         myFilesString += myFile.Type + " - " + myFile.Name + Environment.NewLine;
    }
    MessageDialog mg = new MessageDialog(myFilesString, "My Files");
    await mg.ShowAsync();
}

private void BtnSignOut_Click(object sender, RoutedEventArgs e)
{
    AuthenticationHelper.SignOut();
}
Note: Add using Windows.UI.Popups; to MainPage.xaml.cs so that we can show Contacts and Files results on a MessageDialog.
Our app is now ready to fetch a list of Contacts and MyFiles. You can now press F5 and click on “Get Contacts” button to see a list of your contacts or “Get My Files” button to see the files stored on OneDrive.
Next Steps
Apart from just interacting with Contacts and Files APIs, you can also interact with Mail, Calendar and other services. A complete list can be found on Office 365 API reference. For any service that you want your app to interact with, remember to set the right permissions when using the Office 365 APIs connected service wizard to configure Office 365 APIs. You can also explore the Office 365 APIs using the API Sandbox. Various sample projects for almost every project type can be found on Office Developer GitHub.