AutomatedLab Introduction - Part 2
Summary
This blog article explains how to create a small lab environment using AutomatedLab. After going through this article, you will have AutomatedLab installed on you Hyper-V host and have a lab setup with two machines.
Installation
The installation of AutomatedLab itself, is very easy. You can download AutomatedLab from https://automatedlab.codeplex.com/. The download will consist of one MSI file.
After starting the installer (the MSI file), you get three options; Typical, Custom or Complete. If you have more than one logical disks (or even better, more than one physical disk), you can take advantage of this and choose Custom.
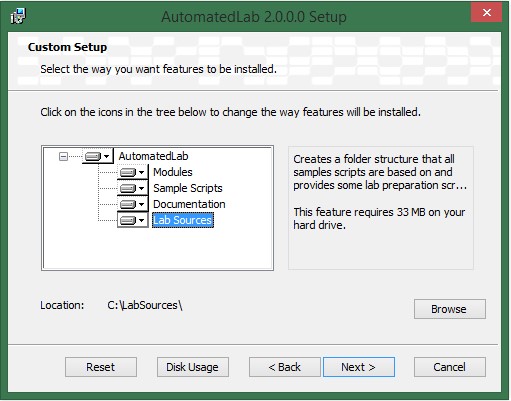
In time, the Lab Sources folder can grow quite large, so you might want to choose another drive than drive C.
Note:
Feel free to change installation folders as you wish. However, for the PowerShell modules coming with AutomatedLab to work (be imported) automatically, the Modules are required to be installed either in the user specific path of PowerShell modules (C:\Users\<user>\Documents\WindowsPowerShell\Modules) or the computer specific path of PowerShell modules (C:\Windows\System32\WindowsPowerShell\v1.0\Modules).
Assuming that you did not change the default directories you will, after performing the installation, have seven new PowerShell modules in the directory user specific path of PowerShell modules, C:\Users\<user>\Documents\WindowsPowerShell\Modules.
In your documents folder, you will find the sample scripts and the documentation (folder names: AutomatedLab Sample Scripts and AutomatedLab Documentation).
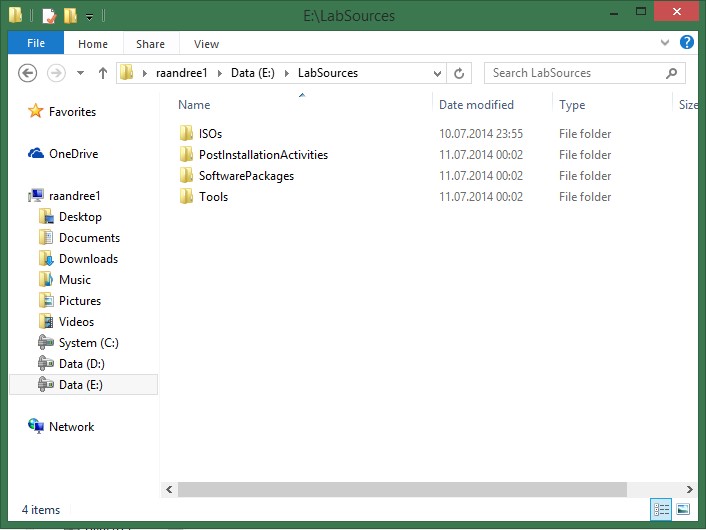
An important part is the folder hierarchy of Lab Sources. The purpose of this folder was explained in the last article of this series.
Installation done.
Prerequisites for installing the first lab
Three requirements need to be verified, before a lab can be created:
AutomatedLab required a Hyper-V on Windows Server 2012 R2 or Windows 8.1
The ISO files to be used during creation of the lab need to be present in \LabSources\ISOs
PowerShell remoting needs to be enabled on the host machine
First thing to do, is to acquire ISO files/images for Windows Server 2012 R2 and Windows 8.1. The ISO files/images must provide a standard or datacenter version of Windows Server 2012 R2 and a Windows 8.1 Pro or Enterprise version.
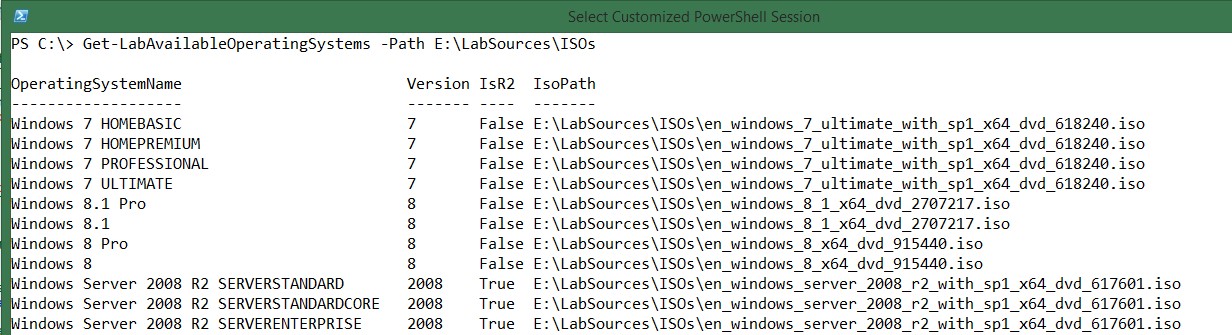
If you want to know which operating system versions your ISO files contains, use the command:
Get-LabAvailableOperatingSystems -Path <path>
Enable PowerShell Remoting on the host computer. This is required as described in the previous article. This has to be done just once.
Open an elevated PowerShell and type in the command Set-LabHostRemoting.
The output looks like this:
VERBOSE: starting log
VERBOSE: Set-LabHostRemoting Entering... )
VERBOSE: Remoting is enabled on the host machine
WARNING: TrustedHosts does not include '*'. Replacing the currernt value '' with '*'
VERBOSE: Local policy 'Computer Configuration -> Administrative Templates -> System -> Credentials Delegation -> Allow Delegating Fresh Credentials' configured correctly
VERBOSE: Local policy 'Computer Configuration -> Administrative Templates -> System -> Credentials Delegation -> Allow Delegating Fresh Credentials' configured correctly
VERBOSE: Set-LabHostRemoting...leaving.
Note:
Because running the command Set-LabHostRemoting sets TrustedHosts to ‘*’, your host computer will now allow (any) credentials to be sent from your host computer to any other computer. This is a security risk which you need to be aware of. If you will not allow this, you will need to modify this configuration manually after running the command Set-LabHostRemoting. You can modify trusted hosts by opening gpedit.msc, go to “Computer Configuration\Administrative Templates, System, Credentials Delegation” and modify policies “Allow delegating fresh credentials” and “Allow delegating fresh credentials with NTLM-only server authentication”. Change content to only allow credentials to be sent to the computers of your choice. For AutomatedLab to work, you will need to enter names for all virtual machines used/deployed using AutomatedLab.
Creating the first lab
Now when the prerequisites are fulfilled, a lab can be created. Creating a lab consists of different tasks which will be described in the following.
Basic metadata information
First, metadata information regarding where to look for data and where to store data, needs to be defined. The information (files) which needs to be read, are the files in the LabSources directory. The information which needs to written, is the information about the lab definition (to make is persist when exiting the PowerShell session and even restarting the host computer). Also, information about where to store the VMs is needed.
Note:
For performance reasons, it is a good idea to place the VMs on a separate (physical) drive from the operating system, and preferably this drive should be an SSD. AutomatedLab uses a parent disk for each operating system, and creates differentiating disks for each VM using the parent disks as base disks. By placing the ISO files/images on a separate drive from the VMs (where the reference disks are also stored), creating the reference disks will be faster (though this task only need to be executed once as the parent disks are never modified they are created).
Also, for performance reasons, it is highly recommended to exclude the folder of the ISO files/images and the folder for the VMs from being scanned by antivirus software (real time scanning).
In the following example, Lab Sources (containing the ISO files/images) is placed on drive E which is a mechanical drive. The VMs will be created on drive D which is an SSD.
$labSources = 'E:\LabSources' #here are the lab sources
$vmDrive = 'D:' #this is the drive where to create the VMs
$labName = 'FirstLab' #the name of the lab, VM folder and network Switch
#create the folder path for the lab using Join-Path
$labPath = Join-Path -Path $vmDrive -ChildPath $labName
#create the target directory if it does not exist
if (-not (Test-Path $labPath)) { New-Item $labPath -ItemType Directory | Out-Null }
Defining the lab
A lab definition is a set of data containing information about the lab environment like lab name, network adapter, the domains and the configuration of the machines (name, number of CPUs, amount of memory, machine roles etc). This definition is created by calling New-LabDefinition.
The following command will create a new lab definition:
New-LabDefinition -Path $labPath -VmPath $labPath -Name $labName -ReferenceDiskSizeInGB 60
Defining the network
All virtual machines in the lab, need to have a network adapter. This network adapter is connected to a Hyper-V virtual switch. Hence, this Hyper-V virtual switch need to be created for the lab. By default, this Hyper-V virtual switch will be created as an internal switch, providing the host computer network access to the virtual machines and vice versa. However, the virtual machines cannot connect to your physical network or vice versa. Here, for simplicity, the network name will be the same as the lab name.
Add-LabVirtualNetworkDefinition -Name $labName -IpAddress 192.168.81.1 -PrefixLength 24
In this scenario, the lab is going to use IP addresses in the subnet 192.168.81.x which has the subnet mask 255.255.255.0. Hence, possible IP addresses are 192.168.81.1-192.168.81.255
Note:
The IP address 192.168.81.1 will automatically be used as the IP address of the Hyper-V virtual switch seen from the host operating system. Hence, this IP address cannot be used for virtual machines in the lab.
Defining domains
If you want to only create standalone machines (machines in a workgroup), no domain is required. However, in this lab, there will be one domain with (of course) one domain controller and one member server. Hence, a domain needs to be defined for the lab. This domain definition will the domain name, the administrator, and the password of the administrator. This account is used for all domain related tasks like the domain controller promotion, setting the DSRM/DSREPAIR password and joining machines to the domain.
Add-LabDomainDefinition -Name test1.net -AdminUser administrator -AdminPassword Password1
Adding ISOs to the lab
All required ISO files/images for software (operating systems, server application and client applications) to be used in the lab, need to be defined, for AutomatedLab to find it. If you add an operating system ISO, you need to mark it with the IsOperatingSystem switch. The name parameter is only used to uniquely identify the ISO definition and are not used elsewhere. Name is free of choice (but has to be unique in the lab).
Add-LabIsoImageDefinition -Name Server2012R2 -Path $labSources\ISOs\en_windows_server_2012_r2_x64_dvd_2707946.iso –IsOperatingSystem
Credentials used to connect to the machines
For the initial machine setup of each virtual machine, a username and password is needed to define the username and password of the local administrator. This information is injected into a file named unattended.xml. This file is then injected into each virtual machine for performing the initial machine setup.
Note/disclaimer:
Creating a PSCredential object using a plain text password, is absolutely not best practice for any production environment. However, since this lab environment will not be a production environment, plain text password will be used.
$installationCredential = New-Object PSCredential('Administrator', ('Password1' | ConvertTo-SecureString -AsPlainText -Force))
Defining roles
Using roles, will be the easiest way in AutomatedLab to customize a machine and set it up as required. In version 2.1.0, AutomatedLab supports the following roles:
RootDC |
Root domain controller for a domain |
FirstChildDC |
First child domain controller for a domain |
DC |
Additional domain controller for a domain |
DHCP |
DHCP server role |
FileServer |
File server role |
WebServer |
Web server role (all web role services) |
SQLServer |
SQL server 2012 with default instance |
Exchange |
Exchange Server 2013 |
Orchestrator |
System Center Orchestrator 2012 |
CaRoot |
Certificate Authority (Windows 2012 or 2012R2) |
Office2013 |
Microsoft Office 2013 |
DevTools |
Visual Studio 2012/2013 |
In this lab, only a single role will be used, the RootDC role. As the lab will contain a domain, a new Active Directory forest is required, and this of course requires a root domain controller. A requirement for defining a root domain controller, is to provide the ForestFunctionalLevel and the DomainFunctionalLevel. This information is specified using a properties parameter which is a hash table. There is no documentation yet for this part, so this is a good opportunity to make mistakes. However, avoiding mistakes in regards to this parameter is not crucial as all the lab definitions will be validated by AutomatedLab before installation is actually started. The validation component makes sure that, in our case, the parameters ForestFunctionalLevel and the DomainFunctionalLevel is defined, and that they are not higher than the version of the operating system of the machine.
The cmdlet Get-LabMachineRoleDefinition has a role parameter and a properties parameter. While the properties parameter is not mandatory for some roles, it is mandatory for domain controllers. Calling Get-LabMachineRoleDefinition, returns a role object. This role object, is later used when defining a lab machine.
$role = Get-LabMachineRoleDefinition -Role RootDC -Properties @{ DomainFunctionalLevel = 'Win2012R2'; ForestFunctionalLevel = 'Win2012R2' }
Defining a lab machine
Now, the first lab machine is defined using the cmdlet Add-LabMachineDefinition. Here, the name of machine is provided as well as basic information like number of CPUs, memory and IP configuration.
Furthermore, it can be specified that the machine is to be domain joined, will be in the domain test1.net, and that the machine should have the root domain controller role (defined in the previous step). This effectively results in defining, that we want a root domain controller in the forest test1.net.
Next thing is to provide the installation credentials. These credentials will be required to connect to the machine later, for doing administrative tasks.
The ToolsPath parameter is optional, and points to a folder of your choice on the host. When using this parameter, AutomatedLab will be copy the content of this folder to all of the virtual machines in the lab, prior to starting these. This is an effective way of copying tools and utilities of your choice, to all of the virtual machines in the lab.
Finally, the operating system needs to be defined. This parameter is restricted to a number of supported operating systems. PowerShell IntelliSense helps you finding the desired value. Make sure to provide the value in quotes (after the IntelliSense), as the operating system names contain whitespaces.
Add-LabMachineDefinition -Name S1DC1 `
-MemoryInMb 512 `
-Network $labName `
-IpAddress 192.168.81.10 `
-DnsServer1 192.168.81.10 `
-DomainName test1.net `
-IsDomainJoined `
-Roles $role `
-InstallationUserCredential $installationCredential `
-ToolsPath $labSources\Tools `
-OperatingSystem 'Windows Server 2012 R2 SERVERDATACENTER'
First machine is now defined.
Adding a second machine to the lab, is merely a copy/paste of the previous cmdlet. Just the name and the IP address, are different as well as this virtual machine will not be associated with any role. If no role is defined, the virtual machine will be a plain member of the domain.
Add-LabMachineDefinition -Name S1Server1 `
-MemoryInMb 512 `
-Network $labName `
-IpAddress 192.168.81.20 `
-DnsServer1 192.168.81.10 `
-DomainName test1.net `
-IsDomainJoined `
-Roles $role `
-InstallationUserCredential $installationCredential `
-ToolsPath $labSources\Tools `
-OperatingSystem 'Windows Server 2012 R2 SERVERDATACENTER'
Exporting the lab
After configuring all lab definitions, you can export the lab configuration using the cmdlet Export-LabDefinition. This cmdlet creates two XML files in the directory ‘D:\FirstLab’. These files will contain the configuration of the lab, making them persistent.
Export-LabDefinition –Force -ExportDefaultUnattendedXml

The Force switch overwrites existing files without asking for permission.
Before the lab can be installed it has to be imported. By reading the XML files AutomatedLab validates a lot of things. It checks for duplicate IP addresses or computer names, makes sure that the roles have all the required information, verifies the paths and much more. If somehtihng is not OK you get an error or warning.
Import-Lab -Path (Get-LabDefinition).LabFilePath
Installing the first lab
After configuring all lab definitions and the configuration has been exported (saved to disk), the lab can be installed. This is done using just one cmdlet; Install-Lab. Using different switches, you can activate different tasks to be performed by Install-Lab;:
Switch |
Task |
NetworkSwitches |
Creates the virtual switch |
BaseImages |
Creates all parent disks |
VMs |
Creates and configures all the Hyper-V virtual machines |
Domains |
Starts installation of all domain controllers starting with root domain controllers, then child domain controller and additional domain controllers |
DHCP |
Installs DHCP role on machines where this role is specified |
PostInstallations |
Starts on post installation actions |
SQLServers |
Installs SQL server on machines where this role is specified |
Orchestrator |
Installs SC Orchestrator on machines where this role is specified |
WebServers |
Installs Web server role on machines where this role is specified |
Exchange |
Installs Exchange Server on machines where this role is specified |
DevTools |
Installs DevTools (Visual Studio) on machines where this role is specified |
Office2013 |
Installs Office 2013 where this role is specified |
StartRemainingMachines |
Starts all remaining machines (the machines which has not yet been started) |
Calling Install-Lab
As the current lab contains only a domain controller and a member machine, the following tasks (parameters for Install-Lab) are needed:
- NetworkSwitches: This created the virtual switch. By default, the virtual switch is an internal switch. Hence, the VMs cannot connect to any network resources outside of the lab (and the host).
- BaseImages: AutomatedLab will create one base image for every operating system as described in the preceding article. All VMs will use these disks as parent disks.
- VMs: This actually creates/configures each VMs using differencing disks.
- Domains: This installs all domain controllers. In one lab, it is possible to create multiple forests, multiple child domains or domain trees and use both RODCs and RWDCs. This tasks will install all domain controller specific roles.
- StartRemainingMachines: All machines defined in the lab which have not yet been started, will be started in this task. This tasks is important, as starting the machines triggers the unattended installation based in the XML files AutomatedLab created for you. This unattended.xml file contains configuration for each machine such as computer name, IP address, locale, domain and much more.
In this example, Install-Lab is called three times to separate the process. However you can start all tasks in a single call as well by using all required switch parameters.
Install-Lab -NetworkSwitches -BaseImages -VMs
#This sets up all domains / domain Controllers
Install-Lab -Domains
#Start all machines which have not yet been started
Install-Lab -StartRemainingMachines
The above tasks, will take a considerable amount of time, and will depend on the speed of you disk(s). When the above tasks are completed, the lab is ready to use. Congratulations!
Removing the lab
If in need of removing a lab, removing the small lab described in this article, is quite easy. However, if a lab of 10+ machines needs to be removed, the task becomes tedious. AutomatedLab also contains a cmdlet which can help cleanup all machines used in a lab. The cmdlet Remove-Lab first removes all the VMs used in a lab, then the disks and finally the network adapter. This way, if required, it is possible to install the lab, test what needs to be tested, and remove the lab again. This enables you to sequentially perform lab installations first, then perform tests in the lab, remove the lab, install a new lab, perform tests etc. Of course, checkpoints are also available enabling you to revert to these. One of the next articles will show how you can take advantage of this functionality.
What’s next?
The next article describes, as mentioned, how checkpoints work in AutomatedLab and how to define your own Post Installation Activities to help you customize your lab even further.
The full script
This is how the full script should look like after putting all the pieces together.
$labSources = 'E:\LabSources' #here are the lab sources
$vmDrive = 'D:' #this is the drive where to create the VMs
$labName = 'FirstLab' #the name of the lab, VM folder and network Switch
#create the folder path for the lab using Join-Path
$labPath = Join-Path -Path $vmDrive -ChildPath $labName
#create the target directory if it does not exist
if (-not (Test-Path $labPath)) { New-Item $labPath -ItemType Directory | Out-Null }
New-LabDefinition -Path $labPath -VmPath $labPath -Name $labName -ReferenceDiskSizeInGB 60
Add-LabVirtualNetworkDefinition -Name $labName -IpAddress 192.168.81.1 -PrefixLength 24
Add-LabDomainDefinition -Name test1.net -AdminUser administrator -AdminPassword Password1
Add-LabIsoImageDefinition -Name Server2012R2 -Path $labSources\ISOs\en_windows_server_2012_r2_x64_dvd_2707946.iso –IsOperatingSystem
$installationCredential = New-Object PSCredential('Administrator', ('Password1' | ConvertTo-SecureString -AsPlainText -Force))
$role = Get-LabMachineRoleDefinition -Role RootDC -Properties @{ DomainFunctionalLevel = 'Win2012R2'; ForestFunctionalLevel = 'Win2012R2' }
Add-LabMachineDefinition -Name S1DC1 `
-MemoryInMb 512 `
-Network $labName `
-IpAddress 192.168.81.10 `
-DnsServer1 192.168.81.10 `
-DomainName test1.net `
-IsDomainJoined `
-Roles $role `
-InstallationUserCredential $installationCredential `
-ToolsPath $labSources\Tools `
-OperatingSystem 'Windows Server 2012 R2 SERVERDATACENTER'
Add-LabMachineDefinition -Name S1Server1 `
-MemoryInMb 512 `
-Network $labName `
-IpAddress 192.168.81.20 `
-DnsServer1 192.168.81.10 `
-DomainName test1.net `
-IsDomainJoined `
-InstallationUserCredential $installationCredential `
-ToolsPath $labSources\Tools `
-OperatingSystem 'Windows Server 2012 R2 SERVERDATACENTER'
Export-LabDefinition –Force -ExportDefaultUnattendedXml
Import-Lab -Path (Get-LabDefinition).LabFilePath
Install-Lab -NetworkSwitches -BaseImages -VMs
#This sets up all domains / domain Controllers
Install-Lab -Domains
#Start all machines which have not yet been started
Install-Lab -StartRemainingMachines