HealthVault Library for Windows Store C#/XAML Sample
The HealthVault for Windows Store application is now among the most popular Windows Store applications. You can utilize the same underlying class library to develop your own HealthVault integrated Windows Store solutions. A recent blog post details availability and usage of the HealthVault Library for Windows 8. The library itself is available via Codeplex and includes library source files along with a WinJS (i.e. JavaScript) sample application. See Doris Chen’s recent article for a comprehensive list of Windows 8 developer resources. Herein, we’ll simply re-introduce the HealthVault Library for Windows 8 but with a focus upon development using C# and XAML instead of JavaScript. Download the source for this example here.
Download a PDF version of this article.
(Note: 5/26/2013 - I found a bug during testing and will refresh the code drop when the sample is further debugged. You may still use the sample, but don't ship-it! This bug is reproducible by pressing GetThings before pressing Connect. I don't first check that myApp.UserInfo.AuthorizedRecords[0] contains a valid authorized user record.)
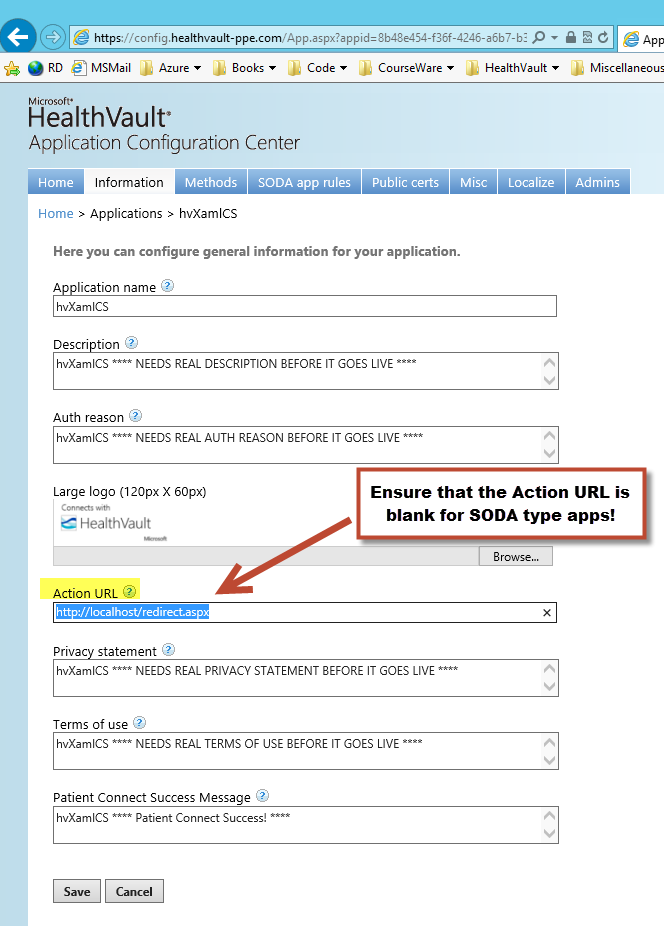
(Note: 6/20/2013 - I noticed that when my sample app starts and an initial user-authentication sequence occurs that the browser session ends with a redirection to localhost. This redirection is not useful with HealthVault SODA type applications. It's a configuration issue within the HealthVault Application Configuration Center for my sample application. The following illustration applies. If you see the issue too, just remove the redirect URL from your application configuration settings.)
A Quick Visual to Set Expectations
The following image is a screen-capture of the sample application as it opens from within the Visual Studio 2012 Windows Runtime simulator. Please ignore the fact that our sample isn’t likely to pass the Windows Store “look-and-feel” quality-bar. For now, we’re only interested in a simple UI experience that maps directly onto the primary HealthVault Library for Windows 8 API’s. Notice that you can create a fully functional HealthVault application using only six or seven library functions.

When a user presses the Connect button, the application initiates an interactive session with the HealthVault platform. If this is a first-time connection, a redirection to the HealthVault Shell with a logon experience occurs. Subsequent connections use cached credentials. Next, the user may press the QueryThings button. This action results in a HealthVault query for a number of data-elements within the user’s HealthVault record. Any items returned are display in a scrolling List View wherein the query results are serialized to XML strings and displayed as illustrated.

That’s it, nothing more than a simple demonstration of connecting-to, reading-from, and writing-to HealthVault platform services. But, hopefully, that’s a good place to start and without introducing any unnecessary complexity.
A Look at our Visual Studio Projects
The following image illustrates the contents of the Visual Studio 2012 Solution. Four projects are contained therein. The HealthVault.Foundation project builds into an assembly providing lower-level functionality for connecting-to, authenticating-with, and exchanging-data with the HealthVault platform service. The HealthVault.Runtime project builds into an assembly providing classes that encapsulate HealthVault data-types as well as classes that assist with storing HealthVault data within the Windows Runtime application cache facility. You must add these two assemblies as references within your Windows Store HealthVault projects. There is no need to use the published HealthVault .NET SDK as that SDK includes assemblies useful for Windows Desktop applications and not for Windows Runtime applications.

The hvJS project is the sample project provided previously demonstrating use of the aforementioned library but using HTML and JavaScript for the application user-interface. The hvXamlCS project is the subject of this blog. All of the code-snippets discussed herein are copied from either the MainPage.xaml file or the MainPage.xaml.cs file. No other files need be modified beyond these two as generated via the New Project + Windows Store + Blank App (XAML) Visual Studio template.
Constructing our Main Page
The following XAML listing is copied from our MainPage.xaml file. Refer to the application UI screen-shots above. The elements herein serve to implement each element of the UI. We’re using a parent Grid (line #1) defining three primary rows. Grid-Row 0, line #10, defines our application title-bar. Grid-Row 1, lines #13 thru #21, specify our user-action buttons. Grid-Row 2, lines #22 thru #48, specify the functionality of our scrolling ListView control (aka: our “ResultsGrid”).
Note the use of DataContext binding at line #3. Since we need to display a list of strings (i.e. a Collection of Strings), we’ll specify this in XAML as a CollectionViewSource element. Additional data-binding statement occur further down at line #29 wherein we name the “ResultsListView” and bind it to the previously named CollectionViewSource “CVS”. A final binding statement occurs at line #39 in which individual strings within our collection are bound as “Result” items.
1: <Grid Background="{StaticResource ApplicationPageBackgroundThemeBrush}">
2: <Grid.Resources>
3: <CollectionViewSource x:Name="CVS" IsSourceGrouped="False"/>
4: </Grid.Resources>
5: <Grid.RowDefinitions>
6: <RowDefinition Height="Auto"/>
7: <RowDefinition Height="Auto"/>
8: <RowDefinition Height="*"/>
9: </Grid.RowDefinitions>
10: <TextBlock Text="My HealthVault App"
11: Margin="12"
12: Style="{StaticResource HeaderTextStyle}"/>
13: <StackPanel Grid.Row="1" Margin="10" Orientation="Horizontal">
14: <Button Content="Connect" Click="OnConnect" />
15: <Button Content="RevokeConnections" Click="OnRevokeConnections" />
16: <Button Content="ReConnect" Click="OnReconnect" />
17: <Button Content="AuthorizeOthers" Click="OnAuthorizeOthers" />
18: <Button Content="GetThing" Click="OnGetThing" />
19: <Button Content="QueryThings" Click="OnQueryThings" />
20: <Button Content="PutThing" Click="OnPutThing" />
21: </StackPanel>
22: <Grid x:Name="ResultsGrid" Grid.Row="2" Margin="10" >
23: <Grid.Resources>
24: </Grid.Resources>
25: <Grid.RowDefinitions>
26: <RowDefinition />
27: <RowDefinition Height="10" />
28: </Grid.RowDefinitions>
29: <ListView x:Name="ResultsListView" ItemsSource="{Binding Source={StaticResource CVS}}"
30: Width="Auto" Margin="0,0,0,0" Height="Auto"
31: VerticalAlignment="Top" Background="DarkGray"
32: ScrollViewer.HorizontalScrollBarVisibility="Auto"
33: ScrollViewer.VerticalScrollBarVisibility="Auto"
34: ScrollViewer.VerticalScrollMode="Enabled"
35: ScrollViewer.HorizontalScrollMode="Enabled">
36: <ListView.ItemTemplate>
37: <DataTemplate>
38: <StackPanel Orientation="Horizontal">
39: <TextBlock x:Name="RowText" Text="{Binding Result, Mode=OneWay}"
40: Margin="0,0,0,0" Height="Auto" Width="Auto"
41: ScrollViewer.VerticalScrollMode="Auto"
42: ScrollViewer.HorizontalScrollMode="Auto"
43: ScrollViewer.BringIntoViewOnFocusChange="True" />
44: </StackPanel>
45: </DataTemplate>
46: </ListView.ItemTemplate>
47: </ListView>
48: </Grid>
49: </Grid>
Now, let’s consider how this XAML specification maps onto our collection of results-strings within the code-behind file, MainPage.xaml.cs. The class “ResultItem” is used to house a single string item. The class derives from Windows.UI.Xaml.Data.IValueConverter in order to reuse the base functionality of data-exchange between individual ResultItem instances and corresponding individual TextBlock elements within the XAML show above (line #39).
1: public class ResultItem : IValueConverter
2: {
3: public string Result { get; set; }
4:
5: public ResultItem()
6: {
7: }
8:
9: public ResultItem(string result)
10: {
11: Result = result;
12: }
13:
14: // Convert and ConvertBack derive from IValueConverter and provide data-exchange with UI elements.
15: public object Convert(object value, Type targetType, object parameter, string language)
16: {
17: var item = value as string;
18: object retVal = Result;
19: return retVal;
20: }
21:
22: public object ConvertBack(object value, Type targetType, object parameter, string language)
23: {
24: throw new NotImplementedException(); // we're only using it for one-way visual output.
25: }
26: }
We establish our ObservableCollection (i.e. list of ResultItems) further below within MainPage class as illustrated via the following code-snippet (line #8). The instructions at lines #15 and #16 programmatically bind the collection to our parent Grid as the CVS.Source.
1: public sealed partial class MainPage : Page
2: {
3: HealthVault.Foundation.HealthVaultAppSettings myAppSettings;
4: HealthVault.Foundation.HealthVaultApp myApp;
5:
6: // Use the ObservableCollection for DataContext Binding
7: private ResultItem resultItem;
8: public ObservableCollection<ResultItem> ResultItems { get; set; }
9:
10: public MainPage()
11: {
12: this.InitializeComponent();
13:
14: // Bind our results string collection to the ListView UI element.
15: this.ResultItems = new ObservableCollection<ResultItem>();
16: CVS.Source = this.ResultItems;
17:
18: // Create HealthVault Application Instance.
19: this.CreateHealthVaultApplication();
20: }
While here, notice the call to CreateHealthVaultApplication(…) at line #19. This method appears immediately below. This demonstrates how to associate your application with the HealthVault platform. The GUID listed within line #4 is the Application ID associated with this HealthVault application as registered using the HealthVault Application Configuration Center portal. Learn more about how to register and configure a HealthVault application here.
1: private void CreateHealthVaultApplication()
2: {
3: // **** My AppID from config.healthvault-ppe.com ****
4: myAppSettings = new HealthVault.Foundation.HealthVaultAppSettings("8b48e454-f36f-4246-a6b7-b365af4754c4");
5: myApp = new HealthVault.Foundation.HealthVaultApp(myAppSettings);
6: myApp.AppInfo.InstanceName = "hvXamlCS TestApp";
7: myApp.DebugMode = true;
8: }
What remains to be illustrated is how the ResultItems collection is filled with individual Result objects. Lines #14 and #15 from the TestGetThing method demonstrate this step. The call to ScrollToBottom at line #17 is not strictly needed, it simply auto-scrolls the ListView so that the last ResultItems entry is visible.
1: async private void TestGetThing()
2: {
3: // Get a simple Weight measurement
4:
5: ItemQuery query = HealthVault.ItemTypes.Weight.QueryFor();
6:
7: var record = myApp.UserInfo.AuthorizedRecords[0];
8:
9: ItemDataTypedList result = await record.GetAsync(query);
10:
11: foreach (var item in result)
12: {
13: Debug.WriteLine(item.Serialize());
14: this.resultItem = new ResultItem(item.Serialize()); // Update our collection
15: this.ResultItems.Add(this.resultItem);
16: }
17: ScrollToBottom();
18: }
The subsequent rendering of information is accomplished entirely via the automated DataContext binding of XAML and the Windows Runtime. Note that we’re only putting new information into the display and not setting any class member data in our code-behind classes so there’s no need for two-way data-exchange.
Getting Things from HealthVault
A basic “Get Things” example function was presented immediately above. The “TestGetThing” method is invoked when an application user presses the GetThing button. Note that this test function uses the HealthVault.ItemTypes.Weight.QueryFor(…) library function to obtain a list of Weight measurements from the currently selected HealthVault user record.
The Weight class, like other data-type classes within the HealthVault.ItemTypes namespace, implements an QueryFor method derived from the HealthVault.Types.ItemQuery base class. A simple and thankfully shallow class hierarchy exists in which individual HealthVault data-types, such as Weight, are defined. You may easily extend this pattern to define your own data-types. A key benefit of doing so enables participation not only in the QueryFor construct but also in IItemDataType derived serialization capability as illustrated in line #14 above.
Continuing with a more sophisticated query, the following source illustrates the use of an ItemFilter to specify a request for multiple ItemTypes (e.g. Weight, Condition, Medication) created after a specific date, and ordered by an effective date (lines #11 thru #19). As indicated, the asynchronous request operation may be invoked with either a GetAsync(query) or a GetAllItemsAsync(query) library method call. The later option returns when all pending HealthVault transactions occur.
1: async private void TestQuery()
2: {
3: // The following code queries for a maximum of 10 Weight, Condition,
4: // and Medication items that were created after November 1st 2010
5: // and returns the results ordered by the effective date of each item
6: // (HealthVault’s default sort order).
7:
8: ItemQuery query = new HealthVault.Types.ItemQuery();
9: query.Name = "GetThingsWithFilter";
10:
11: ItemFilter filter = new HealthVault.Types.ItemFilter();
12:
13: filter.TypeIDs.Add(HealthVault.ItemTypes.Weight.TypeID);
14: filter.TypeIDs.Add(HealthVault.ItemTypes.Condition.TypeID);
15: filter.TypeIDs.Add(HealthVault.ItemTypes.Medication.TypeID);
16: filter.CreatedDateMin = new HealthVault.Types.DateTime("11/1/2010");
17:
18: query.Filters.Add(filter);
19: query.MaxResults = new HealthVault.Types.NonNegativeInt(10);
20:
21: var record = myApp.UserInfo.AuthorizedRecords[0];
22:
23: // GetAsync is one approach...
24: //
25: // ItemDataTypedList result = await record.GetAsync(query);
26: // foreach (var item in result)
27: // {
28: // Debug.WriteLine(item.Serialize());
29: // }
30:
31: // GetAllItemsAsync returns only when all recordItems AND
32: // pending items have been retrieved from HealthVault
33: var result2 = await record.GetAllItemsAsync(query);
34:
35: foreach (RecordItem item in result2)
36: {
37: Debug.WriteLine(item.Serialize());
38: this.resultItem = new ResultItem(item.Serialize());
39: this.ResultItems.Add(this.resultItem);
40: }
41: ScrollToBottom();
42: }
Putting Things into HealthVault
Adding information to a HealthVault user record is also very intuitive as illustrated in the following code-snippet. Simply utilize the HealthVault.ItemTypes class library to set your chosen data-type properties. Then, invoke the PutAsync API on the selected HealthVault Record.
1: async private void TestPutThing()
2: {
3: // Store a Blood Pressure item in a HealthVault record.
4:
5: HealthVault.ItemTypes.BloodPressure bp = new HealthVault.ItemTypes.BloodPressure();
6:
7: bp.When = HealthVault.Types.StructuredDateTime.Now();
8: bp.SystolicValue = 120;
9: bp.DiastolicValue = 80;
10: bp.PulseValue = 58;
11: bp.IrregularHeartbeat = new HealthVault.Types.BooleanValue(false);
12:
13: var record = myApp.UserInfo.AuthorizedRecords[0];
14:
15: await record.PutAsync(bp);
16: }
Account and Connection Management
The following set of methods correspond to the Connect, RevokeConnections, ReConnect, and AuthorizeOthers buttons available via the application UI. The use of these should be self-explanatory. The primary objective is to add flexibility to your Windows Store application for the management of HealthVault account connectivity.
1: async private void ConnectWithHealthVault()
2: {
3: await myApp.StartAsync(); // Redirect to HealthVault for account access authorization.
4: }
5:
6: async private void ReconnectWithHealthVault()
7: {
8: await myApp.ResetAsync();
9: ConnectWithHealthVault();
10: }
11:
12: async private void RevokeConnectionsWithHealthVault()
13: {
14: foreach (var record in myApp.UserInfo.AuthorizedRecords)
15: {
16: await record.RemoveApplicationRecordAuthorizationAsync();
17: }
18: }
19:
20: async private void AuthorizeAdditionalRecords()
21: {
22: await myApp.AuthorizeAdditionalRecordsAsync();
23: }
24:
25: async private Task<bool> IsAuthorizedOnServer()
26: {
27: return await Task.Run(() => IsAuthorizedOnServerImpl());
28: }
29:
30: private bool IsAuthorizedOnServerImpl()
31: {
32: IAsyncOperation<bool> b = myApp.IsAuthorizedOnServerAsync();
33: return b.GetResults();
34: }
35:
36: private Record GetCurrentRecord()
37: {
38: return (myApp.UserInfo.AuthorizedRecords[0] as HealthVault.Foundation.Types.Record);
39: }
40:
41: LocalRecordStore GetCurrentRecordStore()
42: {
43: return myApp.LocalVault.RecordStores.GetStoreForRecord(GetCurrentRecord() as HealthVault.Foundation.IRecord);
44: }
Summary
The HealthVault Library for Windows 8 is a great new way to build Windows Runtime healthcare applications and take advantage of Windows Store marketing and distribution benefits. The library leverages the Software on Device Authentication (SODA) model for HealthVault connectivity. We’ve provided “getting-started” samples using both WinJS and XAML/C#. The library includes source files that are both instructive and extensible. Enjoy!