Using SignalR to power ASP.NET Dashboards
Edit: This is now part 1 of a series.
- This post covers SignalR and how it is used to provide real-time "health" updates to a web page.
- Part 2 covers how to use the .NET PerformanceCounter class to pull actual status information and forward it to the dashboard.
Lately, I have received a number of requests for help with simple dashboard applications. Most of the people making these requests have similar requirements. They would like an application that:
- Runs in a web page
- Acquires updated information without page refreshes or post-backs
- Is easy to code
- Receives data within seconds of that data being generated
Some people have additional requirements. Their application must also:
- Run on different browser brands and versions
- Obtain data from non-web sources, such as console or Windows applications
My demo addresses all of these points, and consists of two parts. The first is a web application that displays the health of a fictitious environment that contains six computers. Those computers are divided into three different environments; Development (DEV), User-Acceptance (UAT), and Production (PRD). Each computer name is derived, imaginatively enough, from its environment and ordinal position within that environment. We therefore have DEV1 and DEV2 in the development area, UAT1 and UAT2 in the user-acceptance area, and PRD1 and PRD2 in the production area.
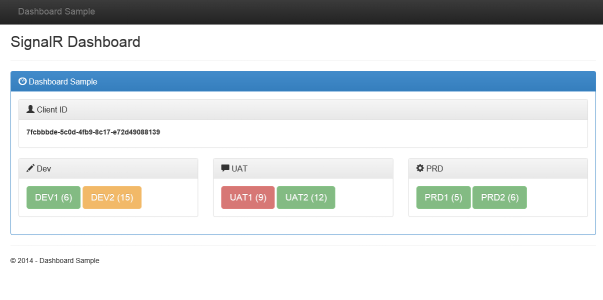
In this sample, you can quickly see that the computers in the production environment are just fine, but that we have a possible situation in development, and an outright problem in acceptance.
The second part of the solution is a Windows application that provides the status values for this fictitious environment.
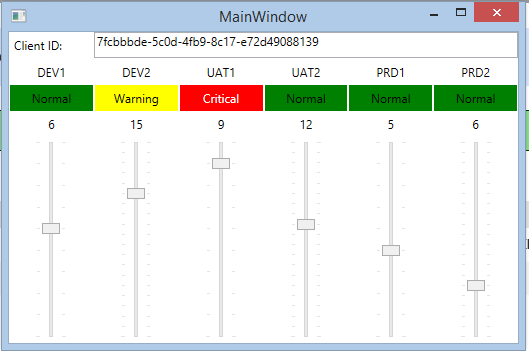
You can see that there is a slider for each machine, and that the data values here are reflected in the web page. The demo implements a one-way communications channel from the Windows application to the web page. Changes made in this Windows application are quickly transmitted to the web page.
By the way, in a real implementation, this Windows application would be a background task that constantly assesses the health of the environment. It could be any type of application; a console app, a Windows service, or even a PowerShell script. Anything that can communicate using HTTP protocols will work. Here, however, we are concerned about how the data is sent from the source to the web page and not on the data collection itself. Therefore, we have a simple set of sliders.
Try it out
I will describe the solution in some detail below. However, if you would like to try this for yourself first, then follow these steps:
- Navigate to the web page. The URL is https://signalrdashboard.azurewebsites.net/ .
- Run the Windows application. It is a ClickOnce-deployed application hosted at https://signalrdashboard.blob.core.windows.net/wpfclient/publish.htm . (You will probably need to add https://signalrdashboard.blob.core.windows.net to your trusted sites list in order to run the application. It was signed with an untrusted, temporary certificate.)
- Copy the "Client ID" value from the web page and paste it into the Windows application. (Because this demo is hosted in the cloud, many people may try to use it at the same time. To keep things simple, each instance of the Windows application will send data only to the client whose ID matches that entered into the application's "Client ID" textbox.)
- Fiddle with the sliders and watch the web page change. (Don't fiddle TOO fast. Again, I'm trying to keep things simple. The demo does not throttle slider-value changes, so it is possible to change the slider values faster than the web page can apply them. In a real application, messages will normally be throttled in an appropriate manner.)
Read the details
The demo uses a SignalR Hub to facilitate easy communications. The hub is defined in the web application code-behind, so it runs on the Web server. It is defined in a class called StatusHub:
namespace SignalRDashboard.Web
{
public class StatusHub: Hub
{
public void SendStatus(string connectionId,
string systemName,
string value,
string status)
{
Clients.Client(connectionId).ProcessStatusMessage(
systemName,
value,
status);
}
}
}
The hub class defines a method (SendStatus) that sends a message to a particular client. The command is broken down like this:
Clients ß returns an IHubCallerConnectionContext that
allows access to clients
Client(connectionId) ß returns a connection to the client with
the specified Id
ProcessStatusMessage(...); ß invokes the ProcessStatusMessage function
defined in the web page
The ProcessStatusMessage function is defined in the JavaScript in the web page itself:
 hub.client.processStatusMessage = function (systemName, value, status) {
    // get appropriate class from status
    var c = "btn btn-lg";

    if (status == "Critical") {
        c = "btn btn-lg btn-danger";
    }

    if (status == "Warning") {
        c = "btn btn-lg btn-warning";
    }

    if (status == "Normal") {
        c = "btn btn-lg btn-success";
    }

    // assign the class to the appropriate button
    $("#" + systemName).attr("class", c);

    // assign name based on value
    $("#" + systemName).text(systemName + " (" + value + ")")
}
The cool part is that SignalR wires up the communications between the function in the code-behind on the server (SendStatus) and the function in the JavaScript in the browser (ProcessStatusMessage). It does this based on the capabilities of the specific web server and browser being used. It implements various transport protocols and chooses the most –appropriate one for the situation. This eliminates a lot of tedious programming.
Now that we know that the hub can send data to the browser client, we need to know how to send data to the hub. In this demo, the data is generated in the Windows application, so that is where the communication happens as well. In the SignalRSupport class, there are two interesting sections of code.
First, in the constructor:
 private SignalRSupport()
{
    // create a connection to the hub
    // note that this is a disposable object, but I do not dispose of it here.
    // the connection will be used for the life of the application, so this is acceptable.
    var hubConnection = new HubConnection("https://signalrdashboard.azurewebsites.net/");

    // create a client proxy class to use to communicate with the hub.
    statusHubProxy = hubConnection.CreateHubProxy("StatusHub");

    // start the connection and wait for it to complete.
    // without .wait, the code would continue while the connection is made.
    hubConnection.Start().Wait();
}
The code creates a connection to the hub via its URL. (Hey! I KNOW that this shouldn't be hard-coded, but this is a demo. Do what I say, not what I do.) It next creates a Hub proxy that will be used to execute the SendStatus function mentioned above. Finally, it starts the connection. Note the "Wait" method call. The Start method is asynchronous. Without Wait, the code would continue executing even though the connection hasn't started. In many applications, this is fine. In this demo though, I didn't want to deal with people moving sliders around when the hub connection wasn't ready.
The second interesting section is the SendStatusUpdate method:
 public void SendStatusUpdate(string clientId, string systemName, string value, string status)
{
    // invoke the SendStatus method that is defined on the hub.
    statusHubProxy.Invoke("SendStatus", clientId, systemName, value, status);
}
This code uses the proxy that was create in the constructor to invoke the SendStatus method that is defined in the Hub. Once again, SignalR takes care of wiring up the communications between the Windows application and the Web server. (Remember when I said that the Hub class ran on the server?) It negotiates the best protocol and handles the connection automatically. More tedious code that I don't have to write.
Believe it or not, the SignalR part of the application is complete. The rest of the example is all XAML and data-binding, which is not the point of this post. However, it goes something like this:
The main window has 6 instances of the StatusControl usercontrol, which contains the slider that is used to control a single machine value. Each StatusControl binds to an instance of the StatusCounter class. The StatusCounter value property contains code that initiates the SignalR communications described above:
 public int Value
{
    get
    {
        return _value;
    }
    set
    {
        // has the value changed?
        if (_value != value)
        {
            // the value has changed, so apply it.
            _value = value;

            // raise propertychanged events so that databinding can work
            if (PropertyChanged != null)
            {
                PropertyChanged(this, new PropertyChangedEventArgs("Value"));
                PropertyChanged(this, new PropertyChangedEventArgs("Status"));

                SignalRSupport.Instance.SendStatusUpdate(this.ClientId, this.CounterName, this.Value.ToString(), this.Status.ToString());
            }
        }
    }
}
Therefore, when a slider value is changed, data-binding drives the sending of that value to the appropriate machine counter on the correct client. Gotta love data-binding!
Download the code
Read the references
Please leave a comment if you find this useful.