Fun with the Service Bus (Part 2)
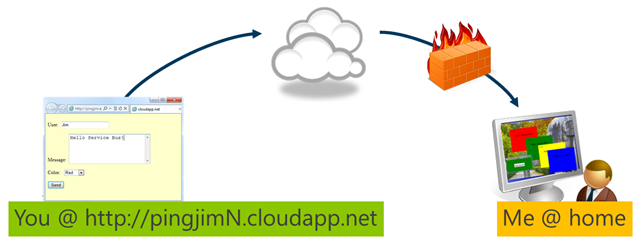
In Part 1, we looked at a scenario using the Service Bus as a WCF relay endpoint that allowed clients on the web to communicate with a WCF service hosted on my local machine. The workflow looks something like below, where a publically available endpoint (a simple ASP.NET application on Windows Azure) made calls to my service, self-hosted in a WPF application and running on my local machine, behind a firewall but attached to a relay endpoint in the Service Bus.
A Service Bus relay implementation is fairly straightforward, well for anyone that has done WCF programming, since the primary difference from the on-premises scenario is the use of a Service Bus namespace to host the endpoint and a set of relay bindings, most of which have analogs in the on-premises world (we used BasicHttpRelayBinding in the previous post).
All that works fine, but there is a significant drawback in the approach: both sides have to be “up” at the same time or the communication fails. Sure that happens on-premises too, and you can build retry logic in, but wouldn’t it be easier if all that were just done for you? That’s where Service Bus queues come in. A queue provides a place for the messages to sit in case there are no clients available to process them, perhaps because the client is down or too busy. As an direct result of this ‘temporal decoupling,’ it’s possible now for senders and receivers to operate at different rates; furthermore, multiple consumers that work off the same queue can process messages at their independent own rates. It’s the same type of “competing consumer” model as a queue in a bank where you’re waiting to be served by the next available teller.
As the focus of this post, I’ll take the existing sample I walked through in the previous blog post and modify it to work with Service Bus queues. As with that previous sample, you can download the full source code from GitHub, although you will need to modify the application settings (in App.config and web.config) to use the Service Bus identities and keys you set up for the previous sample.
Creating a Queue
The first step is to create a Service Bus queue. You can do that programmatically or via the Windows Azure Portal directly under the Service Bus namespace you created in part 1. Here I’ve created a queue named thequeue and left all of the properties at their default settings:

- Default message time to live (TTL) indicates how long the message will sit on the queue before it is deleted. That curious default number there is just over 29000 years, by the way! If you also check the Enable Dead Lettering on Message Expiration box, the message will be moved to a special dead letter queue with an endpoint in this case of
sb://heyjim.servicebus.windows.net/thequeue/$DeadLetterQueue - Queues also support duplicate message detection where a message’s uniqueness is defined by the MessageId property. To detect duplicates, you’d check the Requires Duplicate Detection checkbox and set the time window during which you want duplicates to be detected (Duplicate Detection History Time Window). The default is 10 minutes, which means that a second message with the same MessageId that arrives within 10 minutes of the first occurrence of that message will automatically be deleted.
- Lock Duration specifies the length of time (with a max of five minutes) that a message is hidden to other consumers when the queue is accessed in PeekLock mode (versus ReceiveAndDelete mode).
- The Maximum Queue Size can be specified in increments of 1GB up to a maximum of 5GB; each message can be up to 256KB in size.
- If Requires Session is checked, messages that must be processed together by the same consumer can be accommodated. A session is defined at message creation time using the SessionId property. Setting this property requires that clients use a SessionReceiver to consume messages from the queue.
All of these properties can be set when you programmatically create a queue as well (using the CreateQueue method via a Service Bus identity that has the Manage claim). In fact there are two additional (QueueDescription) properties that don’t seem settable via the portal:
- EnableBatchedOperations indicates that Send and Complete requests to the queue can be batched (only when using asynchronous methods of the .NET managed client), which can increase efficiency; by default batched operations are enabled.
- MaxDeliveryCount (default value: 10) indicates the maximum number of times a message can be read from the queue. This setting applies only when the MessageReceiver is in PeekLock mode, in which a message is locked for a period of time (LockDuration) during which it must be marked complete, or it will again be available for processing. MaxDeliveryCount then figures into strategies for poison message processing, since a doomed message would never be marked complete and would otherwise reappear on the queue ad infinitum.
Windows Azure Storage also includes queues, how do they differ? In general, Service Bus queues have more capabilities and features, but they can have higher latency and are capped at 5GB. Service Bus queues are a great option for hybrid applications and those requiring “at-most-once” or “first-in-first-out” delivery. Windows Azure Storage queues have a simpler programming model and are well suited for inter-role communication, like between a Web Role and Worker Role within a cloud service. That said there are a host of other distinctions that could push your decision one way or the other. Check out Windows Azure Queues and Windows Azure Service Bus Queues - Compared and Contrasted for a detailed analysis.
Coding the Consumer
In our example, the message queue consumer is the WPF client application. In the on-premises scenario covered by my previous post, the WPF application self-hosted a WCF service endpoint through the Service Bus using BasicHttpRelayBinding. With queues you can also use WCF semantics via a new binding, NetMessagingBinding, and Tom Hollander covers this approach in his blog. Alternatively, you can use the REST API from any HTTP client, or as I’ll cover here the .NET API.
The code for processing the messages is launched on a separate thread from the simple UI of the WPF window. The complete code appears below, with the more salient portions highlighted and explained below.
1: internal void ProcessMessages()
2: {
3: try
4: {
5: MessagingFactory factory = MessagingFactory.Create(
6: ServiceBusEnvironment.CreateServiceUri("sb",
7: Properties.Settings.Default.SBNamespace,
8: String.Empty),
9: TokenProvider.CreateSharedSecretTokenProvider("wpfsample",
10: Properties.Settings.Default.SBListenerCredentials));
11: MessageReceiver theQueue = factory.CreateMessageReceiver("thequeue");
12:
13: while (isProcessing)
14: {
15: BrokeredMessage message = theQueue.Receive(new TimeSpan(0, 0, 0, 5));
16: if (message != null)
17: {
18: Dispatcher.Invoke((System.Action)(()
19: =>
20:
21: {
22: NotificationWindow w;
23: try
24: {
25: w = new NotificationWindow(
26: message.Properties["Sender"].ToString(),
27: message.GetBody<String>(),
28: message.Properties["Color"].ToString());
29: }
30: catch (KeyNotFoundException)
31: {
32: w = new NotificationWindow(
33: "system",
   34:                              String.Format("Invalid message:\n{0}",
                                                     message.GetBody<String>()),
35: "Red"
36: );
37: }
38: WindowRegistry.Add(w);
39: w.Show();
40: message.Complete();
41: }));
42: }
43: }
44: }
45:
46: catch (Exception ex)
47: {
48: Dispatcher.Invoke((System.Action)(()
49: =>
50: {
51: btnServiceControl.Content = "Start Responding";
52: this.Background = new SolidColorBrush(Colors.Orange);
53: this.isProcessing = false;
54: }));
   55:          MessageBox.Show(ex.Message, "Processing halted",
                                 MessageBoxButton.OK, MessageBoxImage.Stop);
56: }
57: }
Lines 5-10 set up the MessagingFactory which establishes the Service Bus endpoint and the credentials for access (the wpfsample user is assumed to present the Send claim as set up in my prior blog post). In Line 11, a MessageReceiver is instantiated pointing to the queue that we explicitly created earlier via the Windows Azure portal.
The call to Receive in Line 15 yields the next message on the queue or times out after five seconds. If no message appears on the queue within that time period, the resulting message in Line 16 is null. The enclosing while loop will then iterate and continue to await the next message. (The isProcessing flag is a class level variable that enables the WPF application user to stop and start listening on the queue; it’s set via the command button on the user interface).
The message returned is of type BrokeredServiceMessage, through which you can access header information in a Properties bag and obtain the message payload itself via the GetBody method (Lines 25-28). If the message doesn’t contain the expected content, for instance the headers aren’t set, some action needs to be taken. Here the remediation (Lines 30ff) is to simply display a error message via the same method as for a legitimate notification, but we could have taken another approach and moved it to the dead letter queue, via the aptly named DeadLetter method, where some other process could inspect and forward messages for human intervention or diagnosis.
With the message processed, the last step is to mark it complete (Line 40). That should be a cue that I’m using the (default) PeekLock semantics on the queue. If I’d set theQueue.Mode = ReceiveMode.ReceiveAndDelete; the message would automatically be deleted; however, I would have run the risk of losing that message had there been a service outage or error between retrieving the message and completing the processing of the message.
Other possibilities for handling the message include:
abandoning it, in which case the peek lock on the message is immediately released and the message become visible again for another consumer,
moving it to the dead letter queue as mentioned earlier, or
deferring the message and moving on to the next one in the queue. Here you must retain the SequenceNumber and call the overloaded Receive method passing that number at the point when you do wish to process the message.
Coding the Producer
The message producer in this case is the ASP.NET web application. It could be hosted anywhere, like say Windows Azure, but if you’re just testing it out, you can run it from the Azure emulator on your local machine or even just via the development web server (Cassini) from within Visual Studio. The code follows:
1: protected void btnSend_Click(object sender, EventArgs e)
2: {
3: if (txtMessage.Text.Trim().Length == 0) return;
4: String userName = (txtUser.Text.Trim().Length == 0) ? "guest" : txtUser.Text;
5:
6: // create and format the message
7: BrokeredMessage message = new BrokeredMessage(txtMessage.Text);
8: message.Properties["Sender"] = txtUser.Text;
9: message.Properties["Color"] = ddlColors.SelectedItem.Text;
10:
11: // send the message
12: MessagingFactory factory = MessagingFactory.Create(
13: ServiceBusEnvironment.CreateServiceUri("sb",
14: ConfigurationManager.AppSettings["SBNamespace"],
15: String.Empty),
16: TokenProvider.CreateSharedSecretTokenProvider(
17: userName,
18: ConfigurationManager.AppSettings["SBGuestCredentials"]));
19: factory.CreateMessageSender("thequeue").Send(message);
20: }
In Lines 7-9, a new message is created from the text provided in the Web form, and two properties set, one corresponding to the name of the sender and the other corresponding to the selected color.
Then in Lines 12-18, a MessagingFactory is likewise instantiated; however, here the Service Bus identity (guest, by default) needs the Send versus the Listen claim.
In Line 19, the message is sent via a MessageSender instance. It’s done synchronously here, but asynchronous versions of Send and other operations on the complementary MessageReceiver class are also available (and preferred in most cases for scalability and user experience reasons).
Grab the Code!
 I’ve added the code for the brokered messaging sample to the relay sample code already on GitHub (MS-LPL license) so you can experiment on your own. Next time we’ll look at a more advanced publication/subscription scenario leveraging Service Bus topics and subscriptions.