Sample Walkthrough of the DR.DADA Approach to SharePoint
Update 2009-11-18
I discovered that using relative paths in the DDF file is not compatible with Team Foundation Build. Refer to the following post for the updated DDF file and corresponding modifications to the project file:
Building SharePoint WSPs with Team Foundation Build
In a previous post, I introduced the "DR.DADA" approach to SharePoint development. This post walks you through an actual implementation of a feature -- well, actually two features -- using DR.DADA (Deactivate, Retract, Delete, Add, Deploy, and Activate).
If you've worked with me in the past, you know that I am a huge fan of using scenario-based development. So for the purposes of this post, let's use a scenario to drive the development of our features:
Fabrikam Technologies [my favorite fictitious manufacturing company] has hired us to customize the look-and-feel of their corporate intranet site (https://fabweb), which is currently running on Microsoft Office SharePoint Server (MOSS) 2007. While Fabrikam has done some customization of the site using SharePoint Designer, they have found it to be very tedious to make the changes in their Development environment (DEV), subsequently copy the changes to their Test environment (TEST) for review and approval, and finally apply the changes to their Production environment (PROD) once the changes are approved. Instead, they want us to create a SharePoint "feature" that greatly simplifies the deployment of their site customizations.
If you've ever customized the look-and-feel of a SharePoint site, you probably already know about simple changes like selecting a different master page, changing the site logo, and perhaps applying a theme. However, sooner or later, the amount of customization leads to creating your own master page (and, more than likely, your own page layouts as well).
Note that creating your own master page is highly recommended over customizing one of the out-of-the-box master pages (e.g. default.master). You can certainly use one of the out-of-the-box master pages as a baseline to start from when creating your own master page, but it's just not a good idea to modify the out-of-the-box stuff when other alternatives are readily available.
For the purposes of this post -- er, I mean, for the Fabrikam intranet scenario -- I'll create a new SharePoint Web Solution Package (WSP) that contains a couple of features. The first feature contains the master page and associated resources (e.g. CSS files), while the second feature simply applies the custom master page to a site. [Note: Applying a custom master page is really easy using the Master page link under the Look and Feel section of Site Settings. However, for the purposes of showing how one WSP can (and often should) contain multiple features, I am going to apply the custom master page by activating a second feature.]
Thinking ahead a little in the Fabrikam scenario, rather than naming our solution (and corresponding features) something like Fabrikam.Demo.MasterPage, let's use a more generic moniker that conveys the intent that the solution/features may eventually contain other publishing resources (for example, page layouts). As such, let's call our solution Fabrikam.Demo.Publishing and our corresponding features Fabrikam.Demo.Publishing.Layouts and Fabrikam.Demo.Publishing.DefaultSiteConfiguration. [In the time it has taken me to come up with this sample scenario, I've decided to not only apply the custom master page via the second feature, but also to automatically set the site logo, instead of making an administrator update it manually via the Title, description, and icon link in Site Settings. Sure, one could argue this is "scope creep" since Fabrikam didn't explicitly ask for this in the scenario, but, hey, sometimes you really want to impress the customer, especially if it can be done with something that requires almost no effort ;-) ]
Creating the Visual Studio Solution
The first step is to create a Visual Studio solution. Again, rather than making a solution specifically for the Fabrikam.Demo.Publishing SharePoint solution, let's keep it more general in case other projects are added later on. Let's name our Visual Studio solution Fabrikam.Demo.sln. If you've seen my post on structuring Visual Studio solutions or my later post on shared assembly info in Visual Studio projects, then you know my first step is to build out a "shell" that looks like the following:
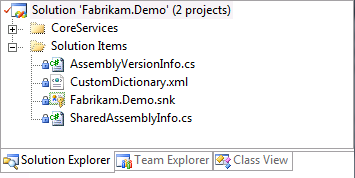
Figure 1: Visual Studio solution before adding SharePoint features
Next, I create a new Visual Studio solution folder called Publishing and then add a new Class Library project named Publishing.csproj (in C:\NotBackedUp\Fabrikam\Main\Source\Publishing). [Note that the Visual Studio solution folder simply helps "partition" the solution and makes it really easy in the future to load and unload multiple projects at once (for example, if we later need to add a Publishing.DeveloperTests project for unit tests corresponding to code in Publishing.csproj).]
Since I didn't create the project with the fully qualified name (in order to conserve precious space within the Visual Studio Solution Explorer window), I then update the project properties to change the assembly name and default namespace to Fabrikam.Demo.Publishing. I also delete the default Class1.cs file (which gets created with every Class Library project), add some linked files to the project, configure a strong name key file to sign the assembly, configure shared assembly information for the new project (as described in my previous posts), and add some assembly references (e.g. to the CoreServices project as well as to the System.Web and Microsoft.SharePoint assemblies).
To ensure the solution delivered to Fabrikam adheres to development best practices, I also update the project properties for both the Debug and Release configurations to:
- Enable code analysis
- Treat all warnings as errors
- Generate XML documentation files
- Set the base address for the assembly
Next, I create a couple of folders named Layouts and DefaultSiteConfiguration -- corresponding for each feature -- as well as a DeploymentFiles folder for files and scripts related to the deployment of our features (in other words, the files needed to create our WSP as well as some scripts that save us from having to type lengthy stsadm.exe commands whenever deploying our solution).
Within the Layouts folder, I then create some additional folders to contain the various files in the Fabrikam.Demo.Publishing.Layouts feature. Likewise, within the DefaultSiteConfiguration folder, I add some corresponding folders for the Fabrikam.Demo.Publishing.DefaultSiteConfiguration feature.
I then start adding feature.xml files, master pages, images, CSS files, etc. into the appropriate locations for each feature. Once I have these files in place, I then add the files used to build the WSP -- as well as the actual scripts to deploy the solution -- into the DeploymentFiles folder.
After that's all done, the Visual Studio solution looks like the following:
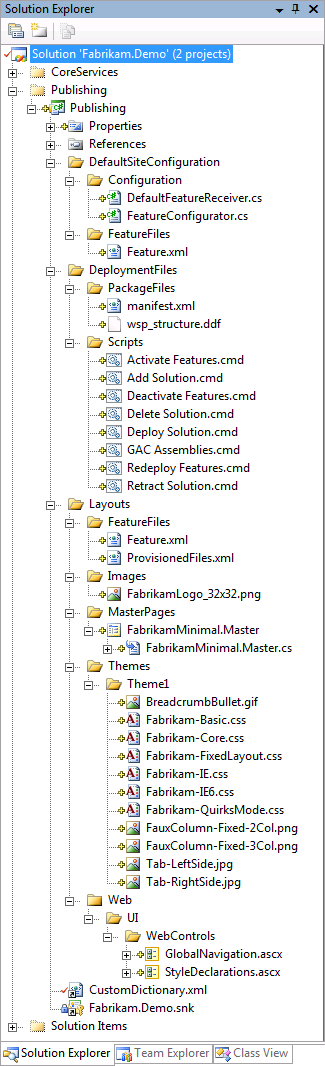
Figure 2: Visual Studio solution after adding SharePoint features and deployment files
Files for Creating SharePoint Web Solution Package (WSP)
Assuming you've developed custom SharePoint WSPs before, the contents of manifest.xml should be very familiar:
 <?xml version="1.0" encoding="utf-8" ?>
<Solution xmlns="https://schemas.microsoft.com/sharepoint/"
    SolutionId="5A186A38-5A93-45db-9321-CC8F21B3488A">
  <FeatureManifests>
    <FeatureManifest
      Location="Fabrikam.Demo.Publishing.DefaultSiteConfiguration\Feature.xml"/>
    <FeatureManifest
      Location="Fabrikam.Demo.Publishing.Layouts\Feature.xml"/>
  </FeatureManifests>
  <Assemblies>
    <Assembly
      DeploymentTarget="GlobalAssemblyCache"
      Location="Fabrikam.Demo.CoreServices.dll" />
    <Assembly
      DeploymentTarget="GlobalAssemblyCache"
      Location="Fabrikam.Demo.Publishing.dll">
      <SafeControls>
        <SafeControl
          Assembly="Fabrikam.Demo.Publishing, Version=1.0.0.0, Culture=neutral, PublicKeyToken=786f58ca4a6e3f60"
          Namespace="Fabrikam.Demo.Publishing.Layouts.Web.UI.WebControls"
          Safe="True"
          TypeName="*" />
        <SafeControl
          Assembly="Fabrikam.Demo.Publishing, Version=1.0.0.0, Culture=neutral, PublicKeyToken=786f58ca4a6e3f60"
          Namespace="Fabrikam.Demo.Publishing.Layouts.MasterPages"
          Safe="True"
          TypeName="*" />
        </SafeControls>
    </Assembly>
  </Assemblies>
  <TemplateFiles>
    <TemplateFile Location="ControlTemplates\Fabrikam\Demo\Publishing\Layouts\GlobalNavigation.ascx" />
    <TemplateFile Location="ControlTemplates\Fabrikam\Demo\Publishing\Layouts\StyleDeclarations.ascx" />
  </TemplateFiles>
</Solution>
The contents of the WSP (i.e. files and folder structure) are defined in wsp_structure.ddf:
 ;
; This ddf specifies the structure of the .wsp solution cab file.
;
; HACK: OPTION EXPLICIT cannot be used when specifying a variable with the /D option,
; otherwise MakeCAB aborts with an error similar to the following:
;
;       ERROR: Option Explicit and variable not defined: BUILD_CONFIGURATION
;
;.OPTION EXPLICIT   ; Generate errors for undefined variables

.Set CabinetNameTemplate=Fabrikam.Demo.Publishing.wsp

; The following variable must be set when calling MakeCAB (using the /D option)
;.Define BUILD_CONFIGURATION=

.Set DiskDirectoryTemplate=CDROM    ; All cabinets go in a single directory
.Set CompressionType=MSZIP          ; All files are compressed in cabinet files
.Set UniqueFiles=ON
.Set Cabinet=ON
.Set DiskDirectory1=Package

..\..\DeploymentFiles\PackageFiles\manifest.xml

Fabrikam.Demo.Publishing.dll

; Note: Referenced assemblies must be specified with a path corresponding to the
; build configuration. If the path is not specified to the referenced assembly,
; then the build works fine as long as the referenced assembly is not in the GAC.
;
; However, when the referenced assembly is in the GAC (i.e. after a deployment)
; then MakeCAB will not be able to find the referenced assembly (since it is no
; longer copied to the current project's bin\Debug or bin\Release folder).

..\..\..\CoreServices\bin\%BUILD_CONFIGURATION%\Fabrikam.Demo.CoreServices.dll

.Set DestinationDir=Fabrikam.Demo.Publishing.DefaultSiteConfiguration
..\..\DefaultSiteConfiguration\FeatureFiles\Feature.xml

.Set DestinationDir=Fabrikam.Demo.Publishing.Layouts
..\..\Layouts\FeatureFiles\Feature.xml
..\..\Layouts\FeatureFiles\ProvisionedFiles.xml

.Set DestinationDir=Fabrikam.Demo.Publishing.Layouts\MasterPages
..\..\Layouts\MasterPages\FabrikamMinimal.master

.Set DestinationDir=Fabrikam.Demo.Publishing.Layouts\Images
..\..\Layouts\Images\FabrikamLogo_32x32.png

.Set DestinationDir=Fabrikam.Demo.Publishing.Layouts\Themes\Theme1
..\..\Layouts\Themes\Theme1\BreadcrumbBullet.gif
..\..\Layouts\Themes\Theme1\FauxColumn-Fixed-2Col.png
..\..\Layouts\Themes\Theme1\FauxColumn-Fixed-3Col.png
..\..\Layouts\Themes\Theme1\Fabrikam-Basic.css
..\..\Layouts\Themes\Theme1\Fabrikam-Core.css
..\..\Layouts\Themes\Theme1\Fabrikam-FixedLayout.css
..\..\Layouts\Themes\Theme1\Fabrikam-IE.css
..\..\Layouts\Themes\Theme1\Fabrikam-IE6.css
..\..\Layouts\Themes\Theme1\Fabrikam-QuirksMode.css
..\..\Layouts\Themes\Theme1\Tab-LeftSide.jpg
..\..\Layouts\Themes\Theme1\Tab-RightSide.jpg

.Set DestinationDir=ControlTemplates\Fabrikam\Demo\Publishing\Layouts
..\..\Layouts\Web\UI\WebControls\GlobalNavigation.ascx
..\..\Layouts\Web\UI\WebControls\StyleDeclarations.ascx

.Set DestinationDir=Layouts\Fabrikam
..\..\Layouts\MasterPages\FabrikamMinimal.master
The most interesting aspect of this DDF is that we want to deploy the corresponding Debug or Release build of Fabrikam.Demo.CoreServices.dll as part of our WSP. The best way I found to do this is to specify the BUILD_CONFIGURATION variable when calling makecab.exe.
Next, I unload Publishing.csproj and edit the MSBuild file directly in order to create the SharePoint solution package (WSP). As noted in an earlier blog post, this is simply a matter of adding a custom build target that invokes makecab.exe and adding this new target as a dependency of the build:
<PropertyGroup>
<BuildDependsOn>
$(BuildDependsOn);
CreateSharePointSolutionPackage
</BuildDependsOn>
</PropertyGroup>
<Target
Name="CreateSharePointSolutionPackage"
Inputs="@(None);@(Content);$(OutDir)$(TargetFileName);"
Outputs="$(ProjectDir)$(OutDir)Package\Fabrikam.Demo.Publishing.wsp">
<Message Text="Creating SharePoint solution package..." />
<Exec
Command="makecab /D BUILD_CONFIGURATION=$(ConfigurationName) /F "$(ProjectDir)DeploymentFiles\PackageFiles\wsp_structure.ddf""
WorkingDirectory="$(OutDir)" />
</Target>
The next step is to build and deploy the solution. I start by pressing CTRL+SHIFT+B to compile the solution and create the corresponding WSP.
Installing the Solution and Activating the Features
Finally, it's time to run the "ADA" portion of "DR.DADA"...
Since I'm running Windows Server 2008, I first use the Run as administrator option on a Visual Studio 2008 Command Prompt. Then I set two environment variables: one that specifies the URL of the Fabrikam intranet site on my local development VM and the other that specifies to add the Debug build of my solution. (Normally I would set these once in the Environment Variables dialog box so that I never need to set them again on this development environment, but I set them explicitly here for the purposes of explaining the variables.) Next, I change to the Publishing\DeploymentFiles\Scripts folder and then Add Solution.cmd, followed by Deploy Solution.cmd, and then finally Activate Features.cmd.
 Setting environment for using Microsoft Visual Studio 2008 x86 tools.

C:\Windows\system32>set FABRIKAM_FABWEB_URL=https://fabweb-local

C:\Windows\system32>set FABRIKAM_BUILD_CONFIGURATION=Debug

C:\Windows\system32>cd \NotBackedUp\Fabrikam\Demo\Main\Source\Publishing\DeploymentFiles\Scripts

C:\NotBackedUp\Fabrikam\Demo\Main\Source\Publishing\DeploymentFiles\Scripts>"Add Solution.cmd"
Adding Fabrikam.Demo.Publishing (Debug)...

Operation completed successfully.

Done
C:\NotBackedUp\Fabrikam\Demo\Main\Source\Publishing\DeploymentFiles\Scripts>"Deploy Solution.cmd"
Deploying Fabrikam.Demo.Publishing on https://fabweb-local...

Operation completed successfully.

Done
C:\NotBackedUp\Fabrikam\Demo\Main\Source\Publishing\DeploymentFiles\Scripts>"Activate Features.cmd"
Activating Fabrikam.Demo.Publishing.Layouts on https://fabweb-local...

Operation completed successfully.

Activating Fabrikam.Demo.Publishing.DefaultSiteConfiguration on https://fabweb-local...

Operation completed successfully.

Done
Tip
For environment variables that you expect team members (e.g. Development, Test, and Release Management) to set in the Environment Variables dialog box, consider prefixing the variables with your company name to "group" them together and also avoid any potential naming conflicts.
Here are the contents of Add Solution.cmd:
 @echo off

setlocal

if ("%SPDIR%")==("") set SPDIR="%ProgramFiles%\Common Files\Microsoft Shared\Web Server Extensions\12"
if ("%FABRIKAM_BUILD_CONFIGURATION%")==("") set FABRIKAM_BUILD_CONFIGURATION=Release

set SOLUTION_NAME=Fabrikam.Demo.Publishing
echo Adding %SOLUTION_NAME% (%FABRIKAM_BUILD_CONFIGURATION%)...
%SPDIR%\bin\stsadm.exe -o addsolution -filename "..\..\bin\%FABRIKAM_BUILD_CONFIGURATION%\Package\%SOLUTION_NAME%.wsp"
if %ERRORLEVEL% neq 0 goto Errors

goto Quit

:: -----------------------------------------------
::
:Errors

echo Warning! One or more errors detected.

:: -----------------------------------------------
::
:Quit

echo Done

:: -----------------------------------------------
::
Note how I allow certain variables (i.e. SPDIR and FABRIKAM_BUILD_CONFIGURATION) to be defined outside of the script. This is useful, for example, to deploy either Debug or Release builds depending on the environment. For example, in the Production environment, we always want to deploy Release builds -- not Debug builds. Whereas in development environments, we always want to install the Debug Builds. (Whether we install Debug or Release builds to the Test environment depends on where we are at in the release cycle.)
Tip
Having your scripts default settings for the Production environment -- but allowing overrides for other environments -- minimizes the risk of "accidents" when deploying to PROD.
Also note that the error handling certainly isn't what I'd call "robust" but I've found no reason to change this after working with these scripts for several years now. It's definitely expected that somebody is watching the scripts while they run (or at least logging the output and subsequently checking the logs for any errors).
Here are the contents of Deploy Solution.cmd:
 @echo off

setlocal

if ("%SPDIR%")==("") set SPDIR="%ProgramFiles%\Common Files\Microsoft Shared\Web Server Extensions\12"
if ("%DEPLOY_METHOD%")==("") set DEPLOY_METHOD=-immediate

if ("%FABRIKAM_FABWEB_URL%")==("") set FABRIKAM_FABWEB_URL=https://fabweb

if ("%1") NEQ ("") set FABRIKAM_FABWEB_URL=%1

REM Sometimes it is necessary to force the deployment to circumvent errors
REM set FORCE_OPTION=-force

REM For LOCAL environments, use synchronous method (i.e. avoid scheduled timer job)
if ("%FABRIKAM_FABWEB_URL%")==("https://fabweb-local") set DEPLOY_METHOD=-local

set SOLUTION_NAME=Fabrikam.Demo.Publishing
echo Deploying %SOLUTION_NAME% on %FABRIKAM_FABWEB_URL%...
%SPDIR%\bin\stsadm.exe -o deploysolution -name "%SOLUTION_NAME%.wsp" -url %FABRIKAM_FABWEB_URL% %DEPLOY_METHOD% -allowGacDeployment %FORCE_OPTION%
if %ERRORLEVEL% neq 0 goto Errors

if ("%DEPLOY_METHOD%")==("-immediate") %SPDIR%\bin\stsadm.exe -o execadmsvcjobs
if %ERRORLEVEL% neq 0 goto Errors

goto Quit

:: -----------------------------------------------
::
:Errors

echo Warning! One or more errors detected.

:: -----------------------------------------------
::
:Quit

echo Done

:: -----------------------------------------------
::
The most interesting part about Deploy Solution.cmd is the fact that I try to avoid using a SharePoint Timer job to deploy the solution if at all possible. In other words, on my local development VM, there's no need to schedule the deployment through the SharePoint Timer infrastructure since it's just a single server environment. This is another great reason to follow a standard naming convention for your environments. Also note that the URL of the SharePoint site can be specified either through an environment variable or as a parameter to the script (which is occasionally useful for troubleshooting purposes -- for example, to quickly deploy to a "vanilla" SharePoint site).
Tip
If you do have to use a SharePoint timer job, use
stsadm.exe -o execadmsvcjobsto wait for the timer job to finish before continuing (as shown in the script above whenDEPLOY_METHODis-immediateinstead of-local).
Here are the contents of Activate Features.cmd:
 @echo off

setlocal

if ("%SPDIR%")==("") set SPDIR="%ProgramFiles%\Common Files\Microsoft Shared\Web Server Extensions\12"

if ("%FABRIKAM_FABWEB_URL%")==("") set FABRIKAM_FABWEB_URL=https://fabweb

if ("%1") NEQ ("") set FABRIKAM_FABWEB_URL=%1

set FEATURE_NAME=Fabrikam.Demo.Publishing.Layouts
echo Activating %FEATURE_NAME% on %FABRIKAM_FABWEB_URL%...
%SPDIR%\bin\stsadm.exe -o activatefeature -filename %FEATURE_NAME%\Feature.xml -url %FABRIKAM_FABWEB_URL%
if %ERRORLEVEL% neq 0 goto Errors

set FEATURE_NAME=Fabrikam.Demo.Publishing.DefaultSiteConfiguration
echo Activating %FEATURE_NAME% on %FABRIKAM_FABWEB_URL%...
%SPDIR%\bin\stsadm.exe -o activatefeature -filename %FEATURE_NAME%\Feature.xml -url %FABRIKAM_FABWEB_URL%
if %ERRORLEVEL% neq 0 goto Errors

goto Quit

:: -----------------------------------------------
::
:Errors

echo Warning! One or more errors detected.

:: -----------------------------------------------
::
:Quit

echo Done

:: -----------------------------------------------
::
Nothing all that interesting about this script, except of course that the order of activating features is important (in this particular case) and once again the URL of the SharePoint site can be specified either using an environment variable or as a parameter to the script.
Deactivating the Features and Removing the Solution
Removing the solution is simply a matter of calling Deactivate Features.cmd, followed by Retract Solution.cmd, and then finally Delete Solution.cmd.
Here are the contents of Deactivate Features.cmd:
 @echo off

setlocal

if ("%SPDIR%")==("") set SPDIR="%ProgramFiles%\Common Files\Microsoft Shared\Web Server Extensions\12"

REM Sometimes it is necessary to force the operation to circumvent errors
REM set FORCE_OPTION=-force

if ("%FABRIKAM_FABWEB_URL%")==("") set FABRIKAM_FABWEB_URL=https://fabweb

if ("%1") NEQ ("") set FABRIKAM_FABWEB_URL=%1

set FEATURE_NAME=Fabrikam.Demo.Publishing.DefaultSiteConfiguration
echo Deactivating %FEATURE_NAME% on %FABRIKAM_FABWEB_URL%...
%SPDIR%\bin\stsadm.exe -o deactivatefeature -filename %FEATURE_NAME%\Feature.xml -url %FABRIKAM_FABWEB_URL% %FORCE_OPTION%
if %ERRORLEVEL% neq 0 goto Errors

set FEATURE_NAME=Fabrikam.Demo.Publishing.Layouts
echo Deactivating %FEATURE_NAME% on %FABRIKAM_FABWEB_URL%...
%SPDIR%\bin\stsadm.exe -o deactivatefeature -filename %FEATURE_NAME%\Feature.xml -url %FABRIKAM_FABWEB_URL% %FORCE_OPTION%
if %ERRORLEVEL% neq 0 goto Errors

goto Quit

:: -----------------------------------------------
::
:Errors

echo Warning! One or more errors detected.

:: -----------------------------------------------
::
:Quit

echo Done

:: -----------------------------------------------
::
Here are the contents of Retract Solution.cmd:
 @echo off

setlocal

if ("%SPDIR%")==("") set SPDIR="%ProgramFiles%\Common Files\Microsoft Shared\Web Server Extensions\12"
if ("%RETRACT_METHOD%")==("") set RETRACT_METHOD=-immediate

if ("%FABRIKAM_FABWEB_URL%")==("") set FABRIKAM_FABWEB_URL=https://fabweb

if ("%1") NEQ ("") set FABRIKAM_FABWEB_URL=%1

REM For LOCAL environments, use synchronous method (i.e. avoid scheduled timer job)
if ("%FABRIKAM_FABWEB_URL%")==("https://fabweb-local") set RETRACT_METHOD=-local

set SOLUTION_NAME=Fabrikam.Demo.Publishing
echo Retracting %SOLUTION_NAME% from %FABRIKAM_FABWEB_URL%...
%SPDIR%\bin\stsadm.exe -o retractsolution -name "%SOLUTION_NAME%.wsp" -url %FABRIKAM_FABWEB_URL% %RETRACT_METHOD%
if %ERRORLEVEL% neq 0 goto Errors

if ("%RETRACT_METHOD%")==("-immediate") %SPDIR%\bin\stsadm.exe -o execadmsvcjobs
if %ERRORLEVEL% neq 0 goto Errors

goto Quit

:: -----------------------------------------------
::
:Errors

echo Warning! One or more errors detected.

:: -----------------------------------------------
::
:Quit

echo Done

:: -----------------------------------------------
::
Here are the contents of Delete Solution.cmd:
 @echo off

setlocal

if ("%SPDIR%")==("") set SPDIR="%ProgramFiles%\Common Files\Microsoft Shared\Web Server Extensions\12"

set SOLUTION_NAME=Fabrikam.Demo.Publishing
echo Deleting %SOLUTION_NAME%...
%SPDIR%\bin\stsadm.exe -o deletesolution -name "%SOLUTION_NAME%.wsp"
if %ERRORLEVEL% neq 0 goto Errors

goto Quit

:: -----------------------------------------------
::
:Errors

echo Warning! One or more errors detected.

:: -----------------------------------------------
::
:Quit

echo Done

:: -----------------------------------------------
::
Deploying an Updated Master Page
Suppose that after deploying the Fabrikam.Demo.Publishing solution, I need to make a change to the master page. All I need to do is make the update to FabrikamMinimal.master, rebuild the Visual Studio solution (which will create an updated WSP containing the changes to the master page), and then "DR.DADA" the features. Note that while I could certainly run each script individually, I find it much easier to utilize another script -- namely Redeploy Features.cmd -- which is simply a "wrapper" for the six scripts described previously.
 @echo off

setlocal

if /I ("%1") == ("-quick") set QUICK_DEPLOY=1

if ("%QUICK_DEPLOY%") == ("1") goto RetractSolution

:: ----------------------------------------------------------------------------
call :LogMessage "Deactivating Features..."
call "Deactivate Features.cmd"

:RetractSolution
:: ----------------------------------------------------------------------------
call :LogMessage "Retracting Solution..."
call "Retract Solution.cmd"

:: ----------------------------------------------------------------------------
call :LogMessage "Deleting Solution..."
call "Delete Solution.cmd"

:: ----------------------------------------------------------------------------
call :LogMessage "Adding Solution..."
call "Add Solution.cmd"

:: ----------------------------------------------------------------------------
call :LogMessage "Deploying Solution..."
call "Deploy Solution.cmd"

if ("%QUICK_DEPLOY%") == ("1") goto Quit

:: ----------------------------------------------------------------------------
call :LogMessage "Activating Features..."
call "Activate Features.cmd"

goto Quit

:: ----------------------------------------------------------------------------
::
:LogMessage

REM Strip leading and trailing quotes and then display message with timestamp
set MESSAGE=%1
set MESSAGE=%MESSAGE:~1,-1%

for /f "tokens=2-4 delims=/ " %%i in ('date /t') do set currentDate=%%k-%%i-%%j
for /f "tokens=1-2" %%i in ('time /t') do set currentTime=%%i %%j
echo %currentDate% %currentTime% - %MESSAGE%

goto :eof

:: ----------------------------------------------------------------------------
::
:Errors

echo Warning! One or more errors detected.

:: ----------------------------------------------------------------------------
::
:Quit

Call :LogMessage "Done"

:: ----------------------------------------------------------------------------
::
I also added a minimal logging "function" that allows me to quickly see the duration of each portion of the "DR.DADA" process.
Tip
If there is no need to deactivate/(re)activate your features when redeploying, use
Redeploy Solution.cmd -quickto streamline the process.
Deploying Updated Code
Now suppose that we have discovered a bug in the code-behind for our master page. In other words, we need to deploy updated code -- but not any changes to files deployed to the SPDIR folder (%ProgramFiles%\Common Files\Microsoft Shared\Web Server Extensions\12).
While we could certainly use Redeploy Features.cmd (or even Redeploy Solution.cmd -quick) it's definitely not the most efficient way to accomplish our goal. Enter GAC Assemblies.cmd:
 @echo off

setlocal

if ("%FABRIKAM_BUILD_CONFIGURATION%")==("") set FABRIKAM_BUILD_CONFIGURATION=Release

echo Installing assembly: Fabrikam.Demo.CoreServices.dll (%FABRIKAM_BUILD_CONFIGURATION%)
gacutil /nologo -i ..\..\..\CoreServices\bin\%FABRIKAM_BUILD_CONFIGURATION%\Fabrikam.Demo.CoreServices.dll
if %ERRORLEVEL% neq 0 goto Errors

echo Installing assembly: Fabrikam.Demo.Publishing.dll (%FABRIKAM_BUILD_CONFIGURATION%)
gacutil /nologo -i ..\..\bin\%FABRIKAM_BUILD_CONFIGURATION%\Fabrikam.Demo.Publishing.dll
if %ERRORLEVEL% neq 0 goto Errors

goto Quit

:: -----------------------------------------------
::
:Errors

echo Warning! One or more errors detected.

:: -----------------------------------------------
::
:Quit

echo Done

:: -----------------------------------------------
::
Note that GAC Assemblies.cmd updates all assemblies contained in the SharePoint WSP. This allows us, for example, to fix a bug in Fabrikam.Demo.CoreServices.dll and still use the GAC Assemblies.cmd script to quickly deploy the code change.
Also note that you need to recycle the application pool for your SharePoint site after updating the assemblies in the GAC:
 C:\NotBackedUp\Fabrikam\Demo\Main\Source\Publishing\DeploymentFiles\Scripts>"GAC Assemblies.cmd"
Installing assembly: Fabrikam.Demo.CoreServices.dll (Debug)
Assembly successfully added to the cache
Installing assembly: Fabrikam.Demo.Publishing.dll (Debug)
Assembly successfully added to the cache
Done
C:\NotBackedUp\Fabrikam\Demo\Main\Source\Publishing\DeploymentFiles\Scripts>C:\Windows\System32\inetsrv\appcmd.exe recycle apppool "SharePoint - foobar-local80"
"SharePoint - foobar-local80" successfully recycled

C:\NotBackedUp\Fabrikam\Demo\Main\Source\Publishing\DeploymentFiles\Scripts>
Wrapping It Up
At this point, we are ready to check-in all of the files, mark our scenario as Resolved in Team Foundation Server to indicate that it is ready for testing, and either kick-off a build or wait for the next daily build to compile our solution and copy it to the Release Server. The Test team can then copy the files from the Release Server and then use the "DR.DADA" scripts to install the new SharePoint features in the Fabrikam Test environment. Woohoo!
So there you have it..."DR.DADA" in all its detail. I've been meaning to blog the details of this for a few years now, and I'm glad to finally get it off my plate after all this time.
Note that if Fabrikam approached us with another scenario that we decided to implement in a different WSP, we could quickly copy the files from the Publishing project and only have to make minimal changes to get the new WSP built and deployed.
Before finishing off this post, I also want to ensure that you are aware of the "command history" feature in Microsoft Windows. To rerun a command, simply press F7 in a command window. A popup window shows the list of commands you've executed -- allowing you to quickly run a previous command without having to type it in again. You might already have been using the "up arrow" to essentially do the same thing, but I've found pressing F7 -- and then scrolling to the command I want -- to be a little more convenient. Unlike using the "up arrow" to repeat a command, selecting one after using F7 won't re-add it to the command history.
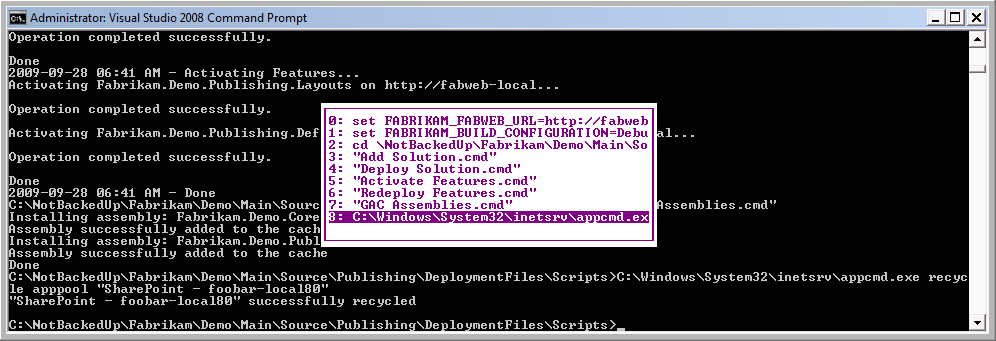
Figure 3: Command history