Implementing a New Authorization Provider
Membership Provider Setup
Tools Needed and other Assumptions
The following is assuming you have a working Central Administration Site and Website you wish to apply the custom membership provider to. You will also need access to the latest of the following files:
- Security.dll (Custom Membership and Role Provider)
In implementing the custom membership provider we are also assuming that you will have access to the custom provider database. Please note anything bold and red is configurable.
We also must note that these instructions apply to the changes that need to be made to the MOSS Server and will need to be done on each WFE that you wish to host the custom membership on.
Once you have completed the following directions to configure the custom provider for your site, the Sharepoint Designer application will not be able to connect to it. For this reason, I recommend you extend your web application to the "intranet" zone with AD credentials and let the designers know the URL to connect to for Sharepoint Designer.
Please keep in mind that without the SP1 of the .NET 2.0 Framework, the below will throw http Cookie exceptions in the Event viewer. If you cannot implement the Service Pack, please change CacheRolesInCookie to equal False.
GAC
The first thing we will do is GAC the following files:
- Security.dll
Machine.config
We are now going to modify the machine.config located at C:\WINDOWS\Microsoft.NET\Framework\v2.0.50727\CONFIG\machine.config. We will make the following entries:
<membership> <providers> <add name="sqlmembershipproviderName" type="Security.sqlmembershipproviderName, Security, Version=1.0.0.0, Culture=neutral, PublicKeyToken=d003b67fe3e7980d" /> <add name="AspNetSqlMembershipProvider" type="System.Web.Security.SqlMembershipProvider, System.Web, Version=2.0.0.0, Culture=neutral, PublicKeyToken=b03f5f7f11d50a3a" connectionStringName="LocalSqlServer" enablePasswordRetrieval="false" enablePasswordReset="true" requiresQuestionAndAnswer="true" applicationName="/" requiresUniqueEmail="false" passwordFormat="Hashed" maxInvalidPasswordAttempts="5" minRequiredPasswordLength="7" minRequiredNonalphanumericCharacters="1" passwordAttemptWindow="10" passwordStrengthRegularExpression="" /> </providers> </membership> <roleManager> <providers> <add name="sqlroleproviderName" type="Security.sqlroleproviderName, Security, Version=1.0.0.0, Culture=neutral, PublicKeyToken=d003b67fe3e7980d" connectionStringName="OdbcServices" applicationName="sqlmembershipproviderName" /> <add name="AspNetSqlRoleProvider" connectionStringName="LocalSqlServer" applicationName="/" type="System.Web.Security.SqlRoleProvider, System.Web, Version=2.0.0.0, Culture=neutral, PublicKeyToken=b03f5f7f11d50a3a" /> <add name="AspNetWindowsTokenRoleProvider" applicationName="/" type="System.Web.Security.WindowsTokenRoleProvider, System.Web, Version=2.0.0.0, Culture=neutral, PublicKeyToken=b03f5f7f11d50a3a" /> </providers> </roleManager> |
These entries will take the place of the existing <Membership>, <Profile>, and <Role Manager> tags. This only makes the providers available to the whole machine. If you want, you can go ahead and simply implement them in the central administration and web application you have.
Central Administration Web.config
Add the Membership and Role Providers directly under <System.Web>
<membership defaultProvider="sqlmembershipproviderName"> <providers> <remove name="sqlmembershipproviderName" /> <add connectionStringName="LocalSqlServer" passwordAttemptWindow="10" enablePasswordRetrieval="false" enablePasswordReset="true" requiresQuestionAndAnswer="true" applicationName="sqlmembershipproviderName" requiresUniqueEmail="false" passwordFormat="Hashed" description="Stores and retrieves membership data from the Microsoft SQL Server database" name="sqlmembershipproviderName" type="Security.sqlmembershipproviderName, Security, Version=1.0.0.0, Culture=neutral, PublicKeyToken=d003b67fe3e7980d" /> </providers> </membership> <roleManager defaultProvider="AspNetWindowsTokenRoleProvider" enabled="true" cacheRolesInCookie="true" cookieName=".ASPROLES" cookieTimeout="30" cookiePath="/" cookieRequireSSL="false" cookieSlidingExpiration="true" cookieProtection="All" > <providers> </providers> </roleManager> |
Replace the <PeoplePickerWildcards/> with the following keys
<PeoplePickerWildcards> <clear /> <add key="sqlmembershipproviderName" value="%" /> <add key="sqlroleproviderName" value="%" /> <add key="AspNetSqlMembershipProvider" value="%" /> </PeoplePickerWildcards> |
Add the following directly under </appsettings>
<connectionStrings> <add name="SQLDB" connectionString="Data Source=SQLServer;Initial Catalog=WSS_Membership;User ID=sa; Password=password" providerName="System.Data.SqlClient" /> </connectionStrings> |
Web Application Web.config
Add the Membership and Role Providers directly under <System.Web>
<membership defaultProvider="sqlmembershipproviderName"> <providers> <remove name="sqlmembershipproviderName" /> <add connectionStringName="LocalSqlServer" passwordAttemptWindow="10" enablePasswordRetrieval="false" enablePasswordReset="true" requiresQuestionAndAnswer="true" applicationName="sqlmembershipproviderName" requiresUniqueEmail="false" passwordFormat="Hashed" description="Stores and retrieves membership data from the Microsoft SQL Server database" name="sqlmembershipproviderName" type="Security.sqlmembershipproviderName, Security, Version=1.0.0.0, Culture=neutral, PublicKeyToken=d003b67fe3e7980d" /> </providers> </membership> <roleManager defaultProvider="sqlroleproviderName" enabled="true" cacheRolesInCookie="true" cookieName=".ASPROLES" cookieTimeout="30" cookiePath="/" cookieRequireSSL="false" cookieSlidingExpiration="true" cookieProtection="All"> <providers> </providers> </roleManager> |
Replace the <PeoplePickerWildcards/> with the following keys
<PeoplePickerWildcards> <clear /> <add key="sqlmembershipproviderName" value="%" /> <add key="sqlroleproviderName" value="%" /> <add key="AspNetSqlMembershipProvider" value="%" /> </PeoplePickerWildcards> |
Add the following directly under </appsettings>
<connectionStrings> <add name="SQLDB" connectionString="Data Source=SQLServer;Initial Catalog=WSS_Membership;User ID=sa; Password=password" providerName="System.Data.SqlClient" /> </connectionStrings> |
Set Authentication Provider for Web Application
Log in to your central administration site and go to Application Management à Authentication Providers. This can be accessed at https://ServerName/_admin/authenticationproviders.aspx.
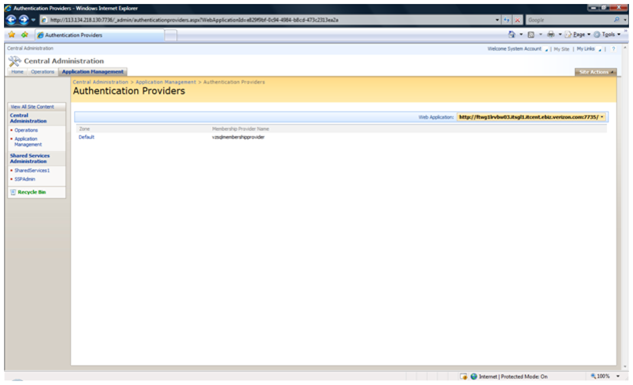
Make sure that you are in the right web application that you wish to implement the provider for.
Click on the default zone which should be the only one listed at this moment.
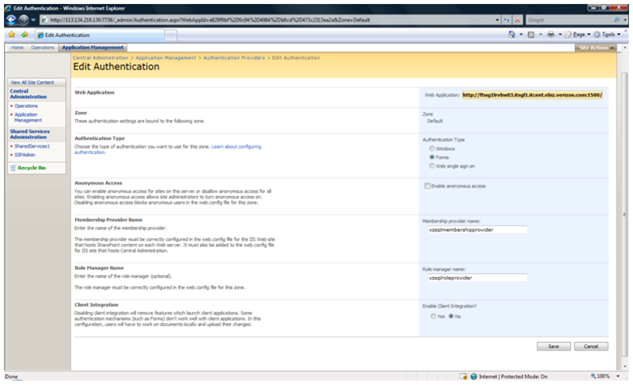
Choose forms authentication type and type in [membershipproviderName],[sqlroleproviderName] in the appropriate boxes. Choose Save.
Set Policy Administrator for your web application
Since you have now changed the authentication for your web application, no one can actually log in quite yet. What you want to do is set the administrator for the account. I do not recommend setting more than one or two at this level.
Log in to your central administration site and go to Application Management --> Policy for Web Application. This can be accessed at https://ServerName/_admin/policy.aspx.
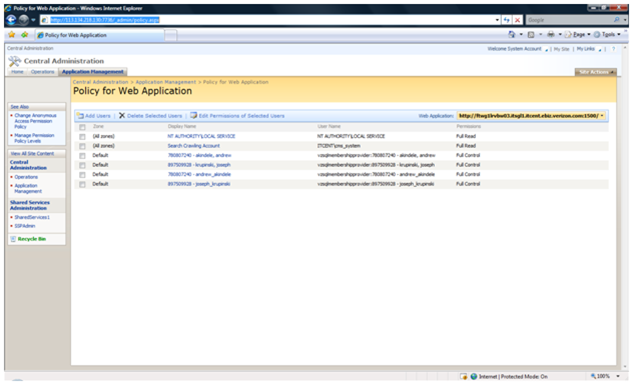
Click on "Add Users" and choose Default zone
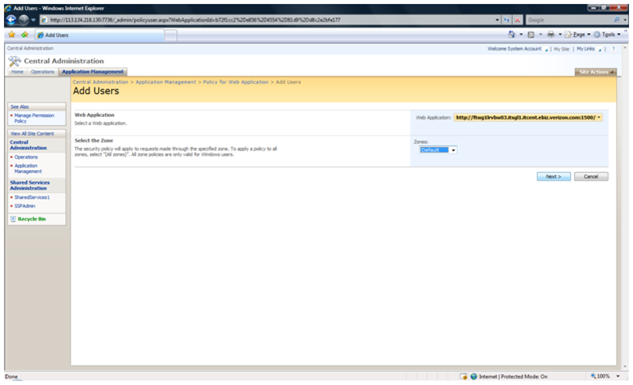
Choose Next
Use the People Picker to set your administrator
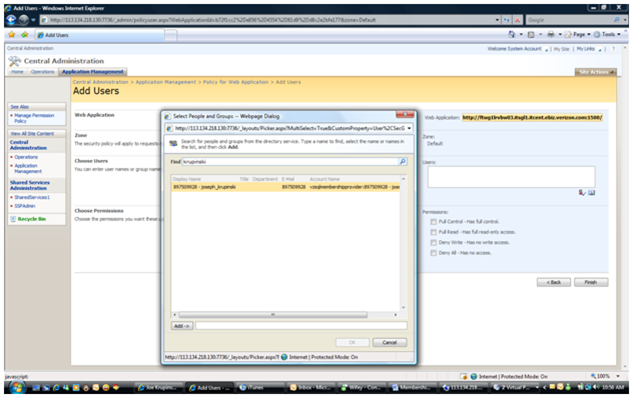
Choose Full Control and click on Finish.