Provision a New List with Data
This is going to be a first in a larger series related to the SharePoint provisioning concept that may be re-written in a more organized fashion, but I figured while it was on my mind, the prerogative of a blogger J
So as many of you may or may not have heard the way to deploy new "stuff" in SharePoint is by means of a feature deployments and this phantom thing called "provisioning". We will go over specific feature deployments in a later post but for now, I wanted to take the easy way and show you how to take the pre-built definitions for VSE and build a new list complete with data.
Let us say I want to create a new list that has lookup data in it (Wait for another post and you will be awed and amazed at how we will build on top of this listJ.
We will store Types of People in this list so I will split it up for now between Business Contacts and Personal Contacts. We will also store some other piece of information related to this obscure level of data. Let's make it Send Christmas Cards Boolean. I know that typically this would be stored at a contact level, but just appease me here. We'll assume that this will be a default and that individuals can override the base setting.
So essentially our list is going to look something like:
Contact Type |
Send Christmas Cards |
Business |
FALSE |
Personal |
TRUE |
Pretty easy so far right? It really is, however, as a colleague of mine recently stated: "this type of info seems kinda hard to find, like it is some kind of arcane tribal knowledge not-often shared with outsiders".
So first things first, let's go ahead and download the SharePoint Extensions for Visual Studio 2005 located at: https://www.microsoft.com/downloads/details.aspx?familyid=19F21E5E-B715-4F0C-B959-8C6DCBDC1057\&displaylang=en.
Before we move on, I have to say if this is your first development experience inside of MOSS, you may want to read my article on MOSS Development 101.
Now open Visual Studio 2005 and create a new Project. You will notice some new cool templates when this occurs.
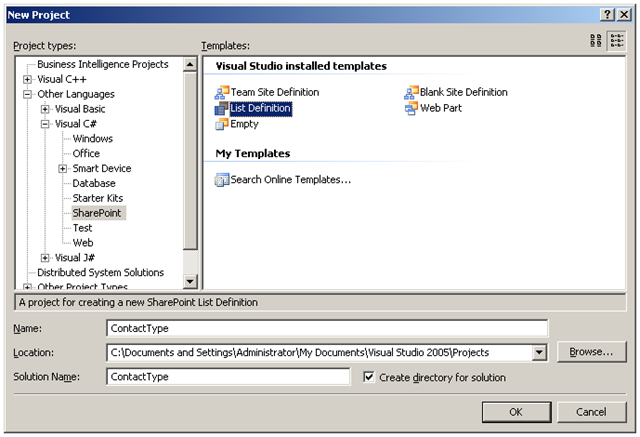
Pretty cool stuff yes? Now, in a later post, I will outline some of the stuff this will be doing for you behind the scenes but this is just basics right now.
You will get a pop-up when you choose ok with a drop-down and two checkboxes.
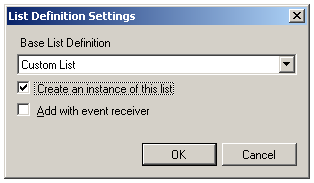
The drop-down outlines which SharePoint list you wish to inherit from. Depending on what you choose, we will get different fields pulled in. For purposes of this example we will be choosing "Custom List".
The first checkbox essentially is asking if you want to pre-populate this list with values. Note that these values can be changed once this list is provisioned or created in the site. For this example we definitely want to do this.
The second checkbox is asking if you want to write code when an event fires for this list. We are not going to do this for this list but we will be doing this in a later post.
After choosing ok on this window, Visual Studio will create all the necessary code to create a list and deploy this list in a solution package. We do, however, need to configure it the way we wish.
This will be done in two steps:
- Configure the Fields we want to use
- Configure the Data we want to pre-populate
For the first step, we are going to focus on the newly created schema.xml file.
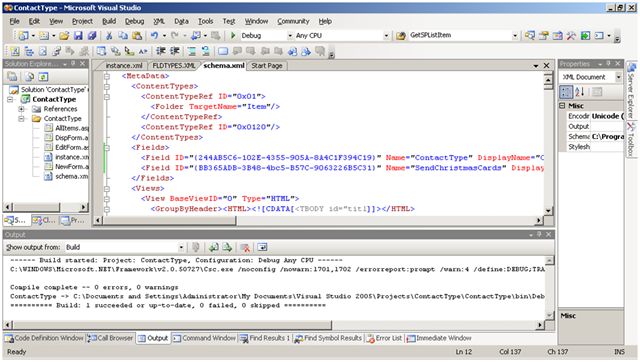
Note specifically the <Fields> Section. Here is the actual:
<Fields> <Field ID="{244AB5C6-102E-4355-905A-8A4C1F394C19}" Name="ContactType" DisplayName="Contact Type" Type="Text" Group="Sample Fields" /> <Field ID="{BB365ADB-3B48-4bc5-B57C-9063226B5C31}" Name="SendChristmasCards" DisplayName="Send Christmas Cards?" Type="Boolean" Group="Sample Fields" /> </Fields> |
Notice the IDs. You may wonder where I got these. Well, truth be told, I made them up, or rather, I had Visual Studio do this for me.
Creating New GUIDs: To create new GUIDs, simply open up Visual Studio 2005, choose Tools, Create New Guid and select Registry setting. Then copy to clipboard and paste. Ta-da! Keep in mind that some items in SharePoint require the curly braces {} and some do not. |
Now for step two (Creating the Data):
Here we are going to focus on the newly created instance.xml.
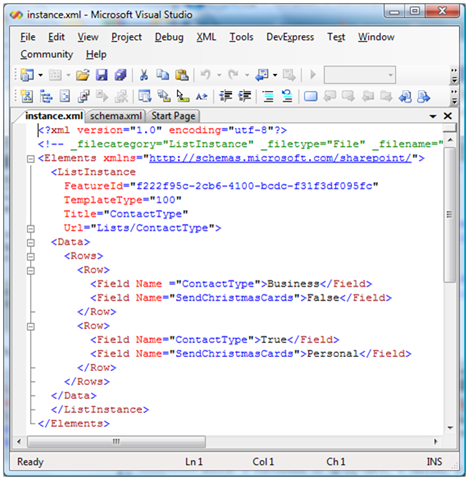
In this case, you will notice that we added the <Data> tags. We can at this point build and deploy. When building it will create a set.bat in the debug/release folder and you can modify this to point to the correct site.