Updating a SharePoint 2007 WSP in Visual Studio 2010
For this scenario, we have a WSP file that was packaged a few years ago and deployed to a production SharePoint 2007 environment. After the original WSP deployment, changes and additional files were pushed out directly to the file system. This brings up a couple concerns:
- If there was a full DR scenario where all the boxes in the farm died, we would require a file system backup in order to restore service for the application based on the customizations
- Doing a database migration to SharePoint 2010 was going to be painful as we would have to manually copy files to multiple machines
Since there was not an automated build process for packaging the WSP file, we needed a way to both validate what is in the WSP, as well as update the WSP file to deploy the changes that were made after the package was originally built. With the release of Visual Studio 2010, the Import SharePoint Solution Package project allows you to import a WSP, and create a SharePoint 2010 solution project. We decided to give this a try in building a WSP that would deploy to SharePoint 2007, and it worked out really well. Since the Visual Studio project is targeted at SharePoint 2010, and we were deploying back to SharePoint 2007, there were a couple problems we ran into. [Seems like a long list, but in reality it’s not that bad…] Once we got through the issues below, we were able to add new files and features easily, and build a WSP that would install and deploy on SharePoint 2007.
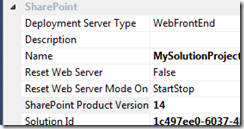
- SharePointProductVersion property in Manifest.xml. When you create the project, it is targeting SharePoint 2010. The Manifest.xml file that it creates has an attribute named SharePointProductVersion, and it is set to a value of 14. SharePoint 2007 will fail to validate the Manifest due to this property resulting in a failed AddSolution command. Luckily this is easy to change.
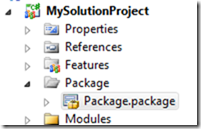
In the Solution Project, expand Package, and double-click Package.package. This opens the designer for the Manifest.xml
In the Properties pane, clear out the SharePoint Product Version property, and save the file
To see the change, click the Manifest tab at the bottom of the Package Designer. When you clear out the SharePoint Product Version property and save the file, the attribute will be removed.
- Reorganize files deployed to the Template folder. in our case, when we imported the WSP, a Template mapped folder was created; However, there were some files and DLL’s that were placed in an “Other Imported Files” folder that belonged in the Template folder. This was an easy fix of dragging the files to the appropriate location in the mapped Template folder.
- SafeControl entries. Like adding a feature [listed next], this is really an issue with being familiar with the new project structure.
- Double-click the Package.Package file
- Click the Advanced tab on the bottom
- Select the DLL, click Edit
- Under Safe Controls, click “Click here to add new item.”
- Fill in the information, then click on either Source Path or Location to be able to click OK. If you don’t click in a text box outside of the Safe Controls list, the OK button will remain disabled.
- If you need to add a feature, you add the Elements.xml and supporting files into a new Module located in the Modules folder of the project. The Feature.xml goes into the Features folder. The main trouble with this area is really in how familiar you are with the feature implementation in the Visual Studio 2010 Solution Project. Here’s a quick walkthrough of importing an existing feature.
- Right-click Modules, select Add…, then New Item
- Select Module in the SharePoint 2010 object list, give it a meaningful name
- Delete the Sample.txt file, add your elements.xml and supporting files
- Right-click the Feature folder, click Add Feature
- Right-click the Feature, select Rename and give it a meaningful name
- Double-click the .Feature file, this opens the Feature designer
- Give the Feature a Title and scope
- Select the Element you added previously, click the right arrow “>” to associate it with the feature
- If you need to manually add something to the Feature.xml file, click the Manifest tab, then expand Edit Options
- Save the feature
- The Visual Studio project will let you easily create a feature receiver [Right-click the Feature, select Add Event Receiver]. In our scenario we had to build a feature receiver to deploy a master page that was not part of the original solution, but was added via SharePoint Designer. This brings up the last few issues we hit that both stem from the SharePoint DLL references in the project are for the SharePoint 2010 version. If you don’t add a feature receiver in this manner and you use your SharePoint 2007 dev environment, you likely won’t hit this.
In SharePoint 2010, they made a change to the SPFeatureReceiver class to avoid having to override functions that you are not going to use. They changed the functions in SPFeatureReceiver to Virtual instead of Abstract. When you create an Event Receiver in the Visual Studio project, the functions are commented out. You need to override all 4 SharePoint 2007 feature receiver events that SharePoint 2007 is expecting in your feature receiver:
- FeatureActivated
- FeatureDeactivating
- FeatureInstalled
- FeatureUninstalling
Remove the following line from the FeatureReceiver class:
using Microsoft.SharePoint.Security;
Then you need to reference the SharePoint 2007 Microsoft.SharePoint.dll file.
- Remove the existing Microsoft.SharePoint.dll and Microsoft.SharePoint.Security.dll references.
- Then add a reference a point to the 200 Microsoft.SharePoint.dll. In our case, we referenced the file off of a share from an existing SharePoint 2007 server like [\\Sp2007server\c$\](file://\\Sp2007server\c$\)program files\common files\microsoft shared\web server extensions\12\isapi\microsoft.sharepoint.dll

