Using PowerShell to implement a Farm-wide Global Navigation solution from the Managed Metadata Term Store in SharePoint 2013
Co-Written by John R. Spinella & Daniel Setlock
We had a requirement at a customer to provide unified Global Navigation across their SharePoint 2013 farm, ideally that was fed through the Term Store they had already developed within the Managed Metadata Service. It was a struggle to find a solution that was easy enough to maintain, and provided the experience that users desired, and we thought others might like to take advantage of it.
The purpose of this post is to demonstrate how to export the Managed Metadata Term Store via PowerShell to a SiteMap, and import that SiteMap into a multi-tiered dropdown into the Structured Navigation within SharePoint through a code-less method.
It is possible to use the Term Store to push Global Navigation across Site Collections within SharePoint, however anyone who has attempted it has likely run into issues. The most common being that it is possible to pin a term set to a Site Collection, but only a single Site Collection. You can pin the same Term Set, however that provides a read-only copy, and the link in the navigation is not updated when the link is updated within the Term Store. It is possible to have multiple Term Sets, each for a different part of the organization, however it is less friendly to use a single Term Set across all of the Site
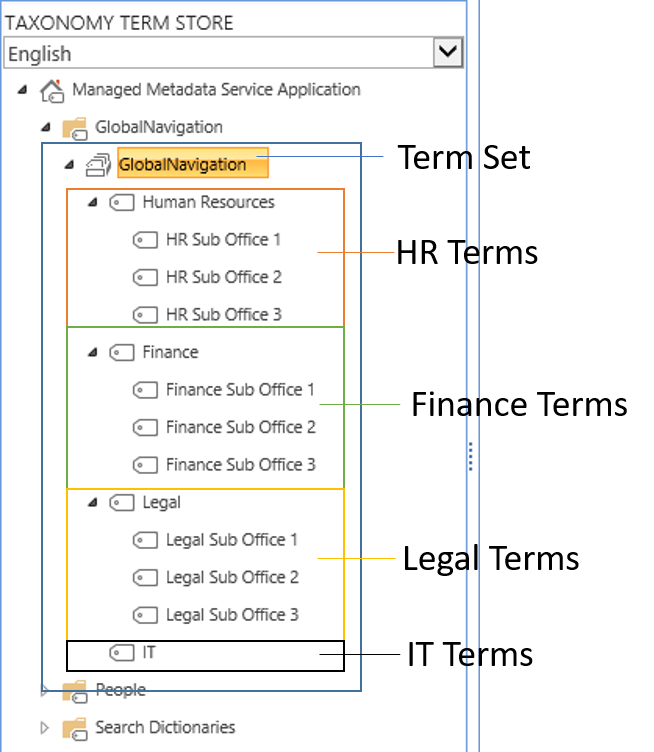
It is a few clicks to provide the Human Resources Site Collection with its own navigation, same with Legal, and so forth. However once on the Human Resources Site Collection, via the traditional method, you would lose the links to Legal, IT, and Finance. The goal is to provide a single navigation across all Site Collections, at the top level (Term Set) to provide access to Terms, and child terms, without the need to copy Terms around, or pin read-only terms.
There are solutions involving managed code and master page modifications to introduce Global Navigation, however most often this involve injecting the navigation into the SuiteLinks bar and presents its own challenges, and is not what users have come to expect in SharePoint.
To start, a Term Set needs to be created as if it was going to be used in a single location, much like the example above. A link to the proper location needs to be included (Navigation Tab > Simple Link or Header) for each of the terms.
Once a Term Set has been created, it is time to export it as an xml document via PowerShell.
Exporting the Term Set
The script below is modified from a posting by Alan Parsons found here.
Add-PSSnapin “Microsoft.SharePoint.Powershell” –ErrorAction SilentlyContinue
#Variables start
$siteUrl = 'https://SharePoint2013' #Update your site URL
$termSetStoreDesc = 'Managed Metadata Service Application' #Ensure you type your MMS correctly
$groupDesc = 'GlobalNavigation' #Replace with your Group Name
$termSetName = 'Global Navigation' #Replace with your Term Set name
$saveLoc = 'C:\temp\navigation\Nav.xml' #Update your directory here
$session = new-object Microsoft.SharePoint.Taxonomy.TaxonomySession($siteUrl)
$LocalProperty = '_Sys_Nav_SimpleLinkUrl'
$XML = ''
#Variables end
#Functions start
function buildNode ($myTerm)
{
#Write-Output $myTerm.LocalCustomProperties['_Sys_Nav_ExcludedProviders']
$myXML += '
<Node Id="" Title="' + $myTerm.Name + '" IsVisible="'
If ($myTerm.LocalCustomProperties.ContainsKey('_Sys_Nav_ExcludedProviders'))
{
$myXML += (-not($myTerm.LocalCustomProperties._Sys_Nav_ExcludedProviders.Contains('GlobalNavigationTaxonomyProvider')))
}
Else
{
$myXML += $true
}
$myXML += '">
<Url>' + $myTerm.LocalCustomProperties['_Sys_Nav_SimpleLinkUrl'] + '</Url>
<CreatedDate>' + $myTerm.CreatedDate + '</CreatedDate>
<Description></Description>
<UrlFragment></UrlFragment>
<vti_navsequencechild>true</vti_navsequencechild>
<UrlQueryString></UrlQueryString>
<NodeType>Heading</NodeType>
<LastModifiedDate>' + $myTerm.LastModifiedDate + '</LastModifiedDate>
'
If ($myTerm.TermsCount –gt 0)
{
Foreach ($term in $myTerm.Terms)
{
$myXML += buildNode ($term)
}
}
$myXML += '</Node>
'
return $myXML
}
#Functions end
$termStore = $session.TermStores[$termSetStoreDesc]
$group = $termStore.Groups[$groupDesc] # | Where-Object {$_.Name -like "Global Navigation"}
$termSet = $group.TermSets[$termSetName]
$terms = $termSet.GetTerms(200)
#Update your Site and Server Relative URLs - This print at the top of the XML Document
$XML = '<Site url="https://SharePoint2013">
<Web serverRelativeUrl="/">
<Navigation>
<Global IncludeSubSites="False" IncludePages="False">
'
Foreach ($term in $terms)
{
$XML += (buildNode $term)
}
$XML +=
' </Global>
</Navigation>
</Web>
</Site>
'
$XML | out-File –FilePath $saveLoc
The key to the script above is that it creates the Navigation NodeType as a ‘Heading’, rather than a link. The ‘Heading’ NodeType allows for additional nested navigational objects, whereas ‘Links’ do not. However, when viewing the Structured Navigation (Via the GUI) under Navigation in Site Settings, it is not possible to nest Headings, you must do this programmatically. As a result, you cannot add additional items under the navigation once it is in place, and you would have to remove the navigation and run the scripts again.
With that you should have an exported SiteMap file that looks something like the below image: 
Please note that the URLs in this example are all set to the same via the Managed Metadata Service Application, yours will be different and unique.
Importing the SiteMap
Once you have the XML file available, the next step is to import it. We did this through using the ‘Import-SPNavigation’ cmdlet. This is a custom cmdlet available via Aptillion that we already had installed, and is available at Github here.
The script to iterate through the SharePoint farm and enforce the global navigation is as follows. It consumes the XML SiteMap generated in the previous script, and is targeted to a Web Application.
Add-PSSnapin Microsoft.SharePoint.Powershell –ErrorAction SilentlyContinue
$path="C:\temp\nav.xml"
#$path2="C:\temp\nav.xml"
$sites = Get-SPSite -limit all -WebApplication https://sharepoint2013 | ? {$_.Url -notlike "*/personal/*"} |Get-SPWeb -Limit All
ForEach ($sites in $Sites)
{
# The URL to the Site
$spWeb = $sites.url
#Relative url
$relativeUrl = $sites.ServerRelativeUrl
#Get Global Nav XML and write new file based on current site
[xml]$XmlDocument = Get-Content -path $path
$XmlDocument.Site
$XmlDocument.site.url = $spweb
$xmldocument.site.Web.serverRelativeUrl =$relativeUrl
$XmlDocument.Save($path)
#Import new Global Nav
Get-SPWeb $sites.url | Import-SPNavigation -InputFile $path -ErrorAction SilentlyContinue
$sites.Dispose()}
After that has been completed, you should see Structured Navigation within the Webs that looks like the following: 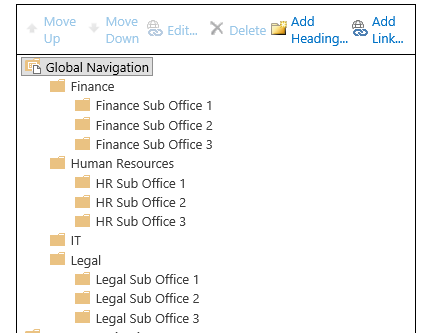
Note that all objects are folders, which indicate a heading, rather than a link. If you have a navigation that extends past two tiers, you cannot see them on this screen, however they will be represented on the Global Navigation across the sites, as shown below. 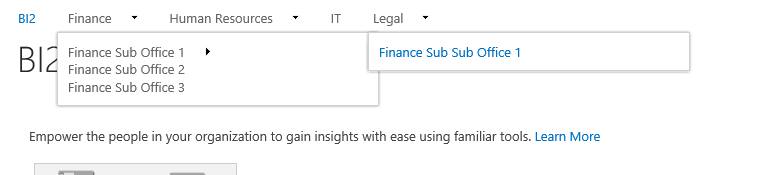
Updating the drop-down levels
If you need to extend the drop-down list past the first fly-out, you would need to modify the masterpage. In general, the ‘MaximumDynamicDisplayLevels is set to ‘2’, which would display as shown above. If you needed a ‘Finance Sub Sub Sub Office 1’ you would need to update the value to 3, or do 4 for good measure. 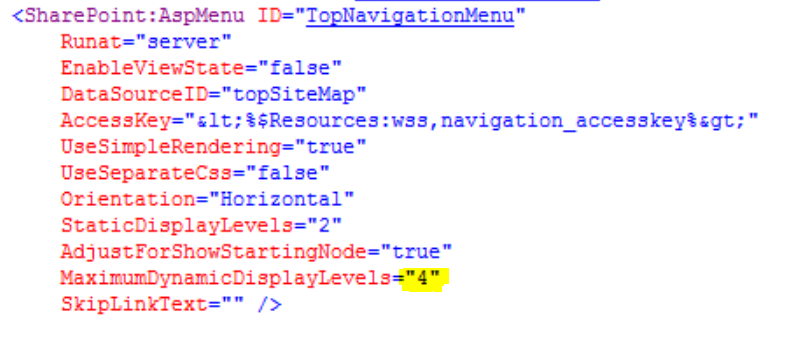
Additional Styling
Depending on the length of the first-tier terms, it may cause child terms to wrap on the navigation as shown below. 
If this becomes an issue, adding the following styles to the masterpage /stylesheet would provide the appropriate width for navigation as seen previously in the post.
ul.dynamic {
width: auto !important;
white-space: nowrap;
}
Or
ul.dynamic {
width: 300px !important;
white-space: nowrap;
}
Delete Structured Navigation
It is possible to put the scripts on a PowerShell scheduled task to enforce Global Navigation, and it would be possible to delete the current navigation within the population script. If it is necessary to delete the navigation across the SharePoint farm, the script below can be utilized.
#It may be necessary to run this multiple times to completely clean out navigation
Add-PSSnapin “Microsoft.SharePoint.Powershell” –ErrorAction SilentlyContinue
#Update the identity with your own Web Application
$Sites = Get-SPWebApplication -Identity https://SharePoint2013 | Get-SPSite -Limit All | Get-SPWeb -Limit all
#Iterate through sites
ForEach ($site in $Sites)
{
#Iterate through webs
ForEach ($web in $site)
{
#Delete existing navigation
Foreach($node in ($web.Navigation.TopNavigationBar))
{ write-host $web.Title "--" "Node title : "$node.Title
$node.Delete() }
}
$sites.Dispose()
}
Conclusion
And that is how you can create a SiteMap through the Term Store, and use that to generate a Farm-wide Global Navigation solution to provide a uniform experience, code-free.
Depending on the tools and knowledge available to you, there are many ways to accomplish the same thing. It is possible to leverage a custom SiteMap provider, programmatically display the Term Store across multiple Site Collections, create a solution that reads from a list or database, or utilize hardcoded navigation in the masterpage.
This solved a need for a customer, and based on our experience we thought others could leverage this information to provide similar results.
Happy Coding!