Creating a Site to Site VPN Connection in ARM through the new Azure Portal
In the ever changing and improving world of Microsoft Azure, there has officially been a shift to the new Azure portal as the primary tool for interacting with Azure. On December 2, 2015 an official announcement was made that the portal located at portal.azure.comwas officially taken out of “preview” and made generally available (or “GA”).
There is still not complete feature parity between the original (now referred to as “classic” or “v1”) portal and the new portal but changes are being made to provide additional functionality on a very fast paced schedule. There are still features that only work in one portal or the other, but that will be a whole other blog posting because there is a lot of material there.
In this blog I want to talk specifically about one new function that is an important action that has recently changed. In the world of hybrid cloud deployments and extending the corporate datacenter into the cloud, a key piece of that environment is the actual connection between the on-premises data network and the virtual network (VNET) created in Azure. This is often accomplished through the use of a Site to Site (S2S) virtual private network (VPN).
In the process of writing this blog post, I discovered that Keith Mayer created a posting on his site that gives a high level overview of the process that I will be describing here. If you are fairly confident in your Azure skills and are looking for a quick overview, his post can be found here . If you are looking for a more in-depth and detailed description of the process to create this ARM based Site to Site VPN, then by all means please continue reading.
In the classic portal, the GUI provided all the steps needed to set up and configure a Site to Site VPN through the Azure Service Management (ASM) API. The new portal is focused primarily on Azure Resource Manager (ARM) as the new API for Azure management. The primary way to complete this task in the ARM model in the past has been through PowerShell (for which there is a great article here). Up until the past few weeks, there were not sufficient options through the new portal to complete all the required steps to create an S2S VPN through the portal GUI. This has now changed. You now have the option to use the GUI or use PowerShell, whichever you prefer. Since there is already documentation linked above on the PowerShell option, this blog will walk through the GUI option.
To create as S2S VPN to Azure regardless of which method you choose, there are a few prerequisites that need to be seen to first.
1. You need to have an Azure subscription. Everything is Azure is based around a subscription. If you are looking to create a connection between your corporate datacenter and Azure, this subscription should belong to your organization. If you are just wanting to set something up for test, you can use a free one-month trial subscription or, if you have an MSDN subscription, you have access to $150 of Azure credit every monthas part of your benefits. You must have the ability to sign in to the Azure portal with a valid username and password for whatever subscription you are going to be using.
2. You need to have a device in your on-premises network that can negotiate one end of the S2S VPN tunnel. This can be either a VPN gateway device (such as a Cisco ASA) or it can be a Server 2012R2 system with Routing and Remote Access Services (RRAS) installed. For a list of devices that Microsoft has tested and for configuration data from other manufacturers, please check this page.
3. You need to have an available private IP address space that does not overlap with any existing address spaces in your on-premises network. This address space should be large enough to accommodate at least 2 subnets, although the size of the address space is really determined by the number of resources you intend to host in Azure.
Once these prerequisites are appropriately addressed, you can begin the process of creating your S2S VPN connection.
Azure Virtual Network
You begin the process by creating a new Virtual network or VNET in the Azure portal. From the main page of the portal, choose the New button in the top left corner.
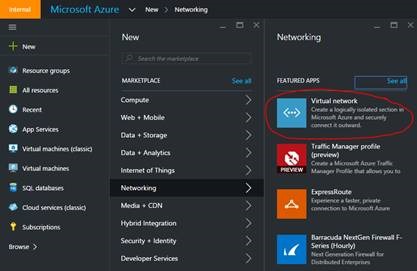
On the blade that slides out from there choose Networking and on the next blade choose Virtual network as shown in the graphic below.
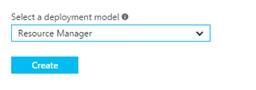
A new blade will open describing what a Virtual Network is. At the bottom of the blade you will have an option to choose your deployment model. It will default to Classic. Use the drop down arrow and choose Resource Manager. This choice ensures that you are creating this VNET as an ARM VNET, not a Classic VNET. (It also demonstrates that you do have the ability to control many of the classic portal functions from the new portal as well.) Then click on the blue Create button.
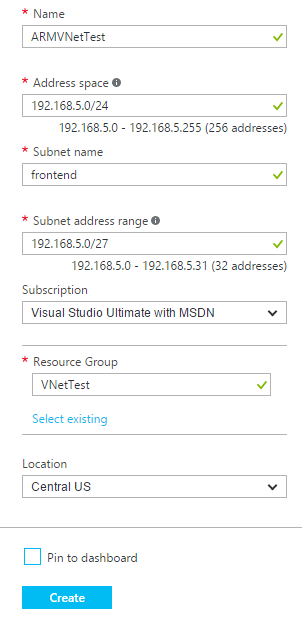
Another blade will slide out and give you a series of options for the creation of this VNET.
|
The VNet needs a name. Choose one that is appropriate for your needs. One of the prerequisites for this process was an available private IP address space. Use the address space box to identify that range of IP’s At least two subnets are required. You must create one subnet here making sure that some room is left for another subnet which the Gateway will use. Name your subnets appropriately for your use. This box should contain the information about your specific subscription. Resource groups are used in the ARM API as logical containers for objects that can be managed together. You can create a new Resource Group here by assigning a name to it, or you can choose to select an existing Resource Group. This option allows you to choose the datacenter that your Azure Resources will primarily reside in. You can choose to pin a shortcut for this object to your Azure main dashboard or not. Click the blue Create button when complete |
The opened blades will close and when the deployment is complete, the notification icon in the toolbar across the top of the screen will turn from black to green.

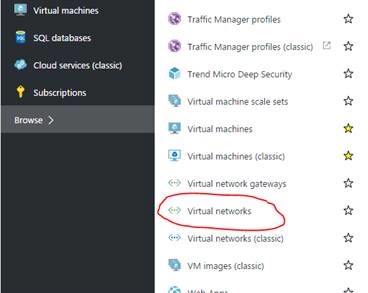
You can check to confirm the creation of the VNet by clicking the Browse button from the main portal page, scrolling down and clicking on Virtual Networks. This should open a blade that lists the Virtual Network that you just created.
At this point you have created a Virtual Network or VNet in Azure inside of a resource group. You can now use that VNet and Resource Group to create and deploy VM’s in Azure that you will be able to connect to your onsite network once this process is completed.
Gateway Subnet
I have said a couple of times that you need at least two subnets in this VNet. At least one is for the VM resources that will live in Azure. You can of course have more than one subnet to organize your VMs according to your needs, but on top of that there is one more subnet that is required. The VPN gateway that Azure we will create a few steps from now needs its own subnet. So we need to add at least that subnet to the VNet. Just for fun we will create two – one additional subnet for use with VMs and one for the gateway. Since we have just browsed to our VNet, we need to change the settings. There is a Settings button at the top of the blade.

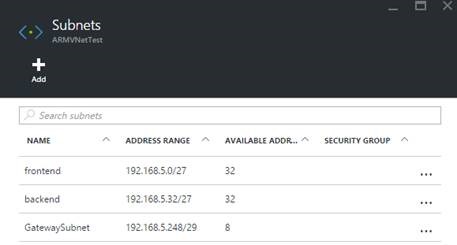
Clicking the Settings button will open a new blade that will list out several objects including Subnets. I initially created a /27 subnet that I labeled “frontend” when we created the VNet. I have since added another /27 that I called “backend” at 192.168.5.32/27 as you can see from this screen shot. To add a subnet, you use the Add button at the top. Simple enough. All you need to do is supply a name and a valid CIDR notated address range that is within the overall VNet address space.
The critical piece to remember when creating the gateway subnet for the VNet is that it needs to be named “GatewaySubnet”. If you do not use this name – Azure will not recognize the subnet. It also must be a /29 or larger CIDR block.
Local Network Gateway
At this point we have defined the VNet in Azure. Now we need to define your local network in Azure as well so that routing can be established between your on-prem network and the VNet. We do this by creating a Local Network Gateway.
Again start by choosing the New button in the top left corner of the screen. Instead of navigating through the menu, you can also choose to type into the search box at the top of the first blade. If you just type the word “local”, you should see an option from a drop down box to pick Local Network Gateway.
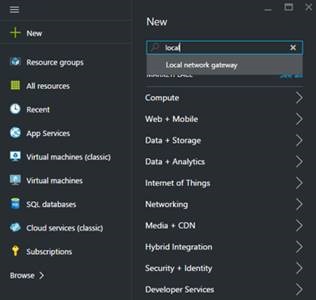
If you choose Local Network Gateway, you will see a blade that again gives you a blue Create button (but you already know this part by now J)
|
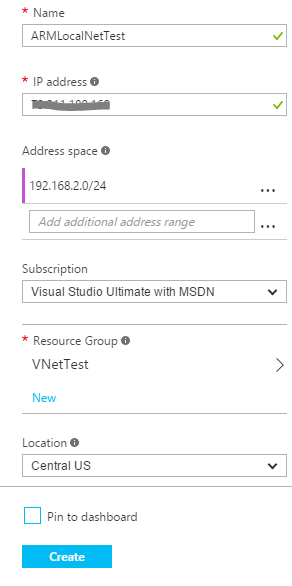
The Local Network Gateway needs a name so it can be referenced later. This is the public IP address of your on-premises VPN gateway or firewall. Use your own – I am not sharing mine J You need to define the subnet or subnets that are part of your LAN environment that Azure resources will connect to. Subscription information should be the same as before. You should place your Local Network Gateway in the same Resource Group as the VNet. In this case you would Select Existing option and choose the VNet used for the VNet. The location will auto populate once you have chosen the Resource Group because the group has a location. You again have the option to pin this object to the dashboard or not. You know what to do with the blue button. |
Virtual Network Gateway
Alright, we have defined a network and subnets in Azure that we can put resources in and we have defined a gateway subnet for connection to our on-premises network. We have also defined in Azure the local network we want to connect to and the address of the gateway that exists in that on-premises network. So what we need to do now is create the Virtual Network Gateway that will live in our GatewaySubnet. This will be the Azure equivalent of the gateway device in your local DMZ.
A note before we begin the creation process regarding types of VPN tunnels and a recent nomenclature change within Azure. There are two main types of VPN tunnels. In the world of Azure classic they are referred to as Static and Dynamic. The difference between the two is that Static VPN connections support one and only one VPN tunnel. You can create a S2S VPN as a static route, but if you want to have more than one VPN tunnel (eg. with a second carrier for redundancy) or if you want create a Point to Site (P2S) connection as well – Static VPN routing will not work for you. Dynamic routing allows for multiple S2S and P2S connections to connect to the same VPN gateway. In the Azure ARM world, the terminology has changed to better match up with what many of the VPN appliance and gateway manufacturers have been using. Static VPN routing is now referred to as Policy-based VPN. Dynamic VPN routing is now called Route-based VPN. Robert Waggoner has a great posting that explains this in much more detail. Your on-premises VPN device will support one or the other or possibly both types of routing. You need to know the capabilities of your on-prem device before proceeding with the next steps.
Again from the main portal page choose the New button, and in the search box at the top of the blade that slides out, type what you are looking for – Virtual Network Gateway and hit the Enter key. Find and select the Virtual Network Gateway option from the results of your search.
When you select the option from the list, you will get another blade -no surprise there and you should be expecting that by now ;-) where you will get a description of what a VNet Gateway is and at the bottom the now oh so familiar blue Create button.
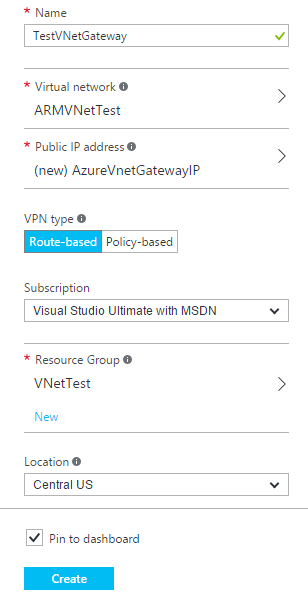
|
You need to supply a name for the object to identify it in your subscription You need to use the arrow to select the VNet that we have already been working on at this point. Use the arrow to pop out a new blade that will allow you to create a new public IP, and name it Your local VPN gateway will support either Route-based (Dynamic) or Policy-based (Static) connections. Choose the one your gateway supports and that matches your requirements. See above note in italics for details. Standard stuff you know by now Use the arrow and select the Resource Group that we have been using for all these different components so far. Location should be the same as all the other bits. Seen this before… Click. |
Please be advised that the process of actually creating this gateway could take anywhere from 5 to 20 minutes. The last one of these I did with a customer took 35 minutes but that was on the ASM (classic) side. So, if it is not done when you think it should be, then in the immortal words of Ace Ventura, “just wait longer”. Part of the reason for this delay is that not only are we creating a software defined VPN gateway, but it is created in an extremely hardened fashion so as to be as secure as possible.
Once the deployment is completed, you need to go and check on the details of the gateway because one of the things we asked the deployment to do was to generate a Public IP address for the gateway. You will need to record this Public IP address so that it can be added to the configuration of your local VPN gateway. If you close all open blades that will take you back to the Azure portal home page. In the left side navigation pane, you will see an option called Recent. Click on it to find a link to the newly created gateway.
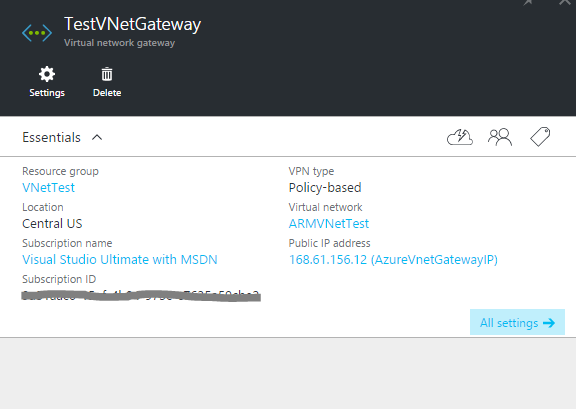
You can see from the above screen shot that the Public IP address is clearly identified. Of course since it is actually a real IP address, I have obfuscated it with X’s. I have also obscured my subscription ID for security purposes. But this is where you would go in your VNet Gateway to get the public IP address for your deployment.
What we have created so far can be represented visually as below with one exception.
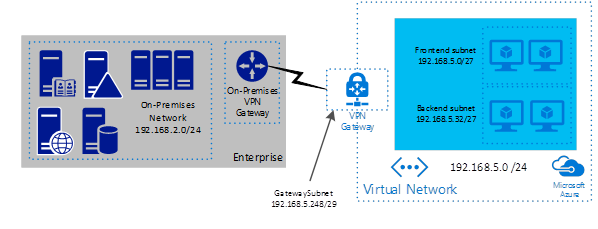
The piece that we have not created yet, is the lightning bolt connector between the local gateway and the Azure gateway. That is our next item.
Connection
We are again back at the New button in the top left corner. Use the search box at the top of the blade to find the Connection object.

Click on it and use the now all too familiar blue button to Create.
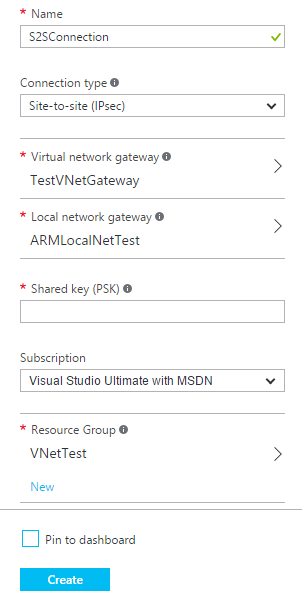
|
This should be getting pretty standard now. Objects need names. The options in the drop down list are VNet-to-VNet and Site-to-Site (IPsec). Choose Site-to-Site since that is our purpose. Use the arrow to select the VNet that we have created. Use the arrow to select the Local Network Gateway that we have created. Authentication between the Azure VNet Gateway and your on-premises VPN gateway is based on a pre-shared key. If your on-prem device has provided one, enter it here. Otherwise, create one here and use it in the config of the local gateway. Choose the same Resource Group we have been using all along. The rest of this you already know. |
We have now defined the VPN connection from the Azure side. Before we can expect a connection to be successfully made, configuration of the on-premises gateway has to also be completed. There are far too many manufacturers and models for me to go into any detail on the configuration of these devices as a part of this blog posting. Several of the different manufacturers have created sample of the configuration scripts for their products for either Policy-based or Route-based VPN tunnels and have placed them here.
Once you have correctly configured your local gateway, you should be able to see the status of your Connection change from connecting – which it will do until it connects – to connected. Once you have a connected status – you have successfully created a VPN tunnel to your Azure VNet. You should now be able to create connections between systems in your on-premises network and VM’s running in Azure. Communication will be routed from your local LAN defined in the Local Network Gateway to the subnet(s) defined in the Azure VNet and you have successfully extended your local LAN out into the cloud.
Hope this helps with your Azure deployments!
Dave “head in the Azure cloud” Newman PFE.