Deep Learning for Emojis with VS Code Tools for AI
This post is the first in a two-part series, and is authored by Erika Menezes, Software Engineer at Microsoft.
Visual content has always been a critical part of communication. Emojis are increasingly playing a crucial role in human dialogue conducted on leading social media and messaging platforms. Concise and fun to use, emojis can help improve communication between users and make dialogue systems more anthropomorphic and vivid.
We also see an increasing investment in chatbots that allow users to complete task-oriented services such as purchasing auto insurance or movie tickets, or checking in for flights, etc., in a frictionless and personalized way from right within messaging apps. Most such chatbot conversations, however, can seem rather different from typical conversational chats between humans. By using allowing the use of emojis in a task completion context, we may be able to improve the conversational user experience (UX) and enable users to get their tasks accomplished in a faster and more intuitive way.
We present a deep learning approach that uses semantic representation of words (word2vec) and emojis (emoji2vec) to understand conversational human input in a task-oriented context.
In this blog post, we show how to use embeddings created via deep learning techniques to build a recipe prediction model from any input containing text and/or food emojis by using Visual Studio Code Tools for AI.
Embeddings – What, Why, How?
Word embeddings have been exceptionally successful in many Natural Language Processing (NLP) tasks and are a building block for deep NLP models. Word embeddings transform sparse vector representations of words into a dense, continuous vector space that can encode semantic representations of words and phrases and identify similarities between them.
There are several ways to learn these representations. They can be learned implicitly as part of some task such as document classification or explicitly through an unsupervised process. The two most popular algorithms for unsupervised learning of representations are word2vec from Google and GloVe from Stanford. The main difference between these algorithms is that word2vec captures local context while GloVe tries to capture global context (a detailed analysis of these algorithms is beyond the scope of this blog post). The next section covers how we used the word2vec embeddings.
Word2vec
Word2vec is one of the most popular word embedding models developed by Tomas Mikolov, et al at Google in 2013. Word2Vec is famous for demonstrating local linear properties on analogy tasks like: " King – Man + Womanresults in a vector very close toQueen " , showing that word vectors are surprisingly good at capturing the syntactic regularities in language and that each relationship is characterized by a relation-specific vector offset. This allows vector-oriented reasoning based on the offsets between words. You can read the paper here.
The Word2vec paper proposed two different architectures for learning embeddings:
- Continuous Bag-of-Words (CBOW): Learns by predicting the current word based on its context.
- Skip-gram: Learns by predicting the surrounding words given a current word.
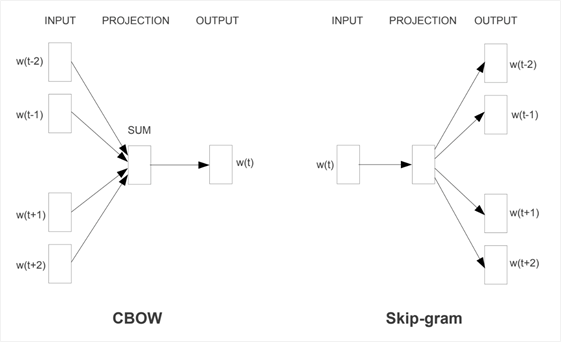
Taken from "Efficient Estimation of Word Representations in Vector Space", 2013
Google has published pre-trained vectors trained on a part of the Google News dataset (about 100 billion words). The model contains 300-dimensional vectors for 3 million words and phrases. You can download the pre-trained word2vec embeddings from here.
Emoji2vec
Most pre-trained word embeddings contain few or no emoji representations. Emoji2vec provides pre-trained embeddings for all Unicode emojis which are learned from their description in the Unicode emoji standard. These pre-trained emoji embeddings map emoji symbols into the same 300-dimensional Google news word2vec embeddings and can thus be used in addition with the word2vec embeddings. This work was by developed Eisner, et al at University College London (UCL) in 2016. They have made their pre-trained emoji vectors available here.
Emojis to Recipes 🍔 🍟🥤🍨
The most straightforward way to do this would be to use hand-crafted rules to understand individual emojis. This approach would require significant manual labor that would increase exponentially for inputs with multiple emojis. Can we do better? Yes! The answer = Embeddings. Using embeddings we can find a recipe that is most semantically similar to the input with emojis.
Emoji2recipe is a prediction model that predicts a recipe given a text input that may contain an arbitrary number of emojis. It uses word2vec and emoji2vec to create a semantic space of recipes. Below are step-by-step instructions.
Step 1: Get the Data
We found a great dataset of recipes that you can download from here. The recipes are in JSON format and contain the following fields: Recipe_URL (hashed), Title, Ingredients, Instructions as shown in the figure below.
Step 2: Get the Embeddings
We will be using pre-trained embeddings for words and emojis. You can download from here the Google word2vec embeddings that have been trained on the Google News Dataset (about 100 billion words). The embeddings for emojis are available here. We will be using the genism library to load the binary embedding files.
Step 3: Pre-Process Data
We need to do some data pre-processing to extract the relevant (ingredient) information from the recipes. To run the pre-processing on the dataset you need to run "python preprocess.py". The pre-processing steps are discussed in more detail below.
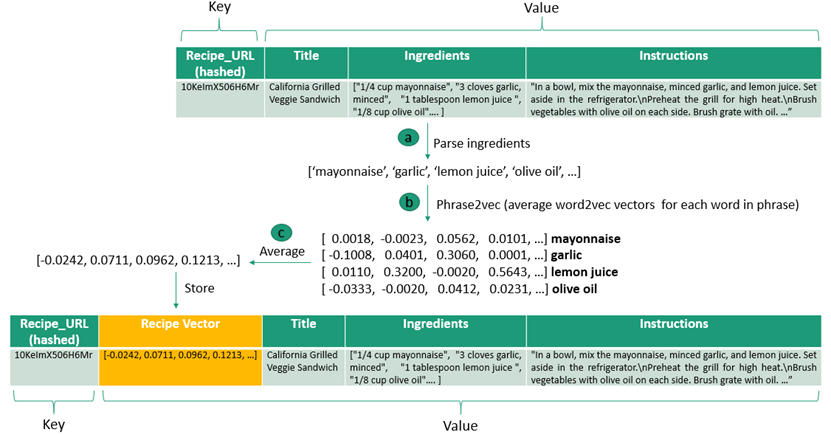
Step 3a: Parse Ingredients
The following pre-processing steps were applied to the ingredients information.
Eg: ["1/4 cup Mayonnaise", "1 tablespoon Lemon Juice ", "1/8 cup Olive Oil"…]
- Convert to lower case => [ "1/4 cup mayonnaise", "1 tablespoon lemon juice ", "1/8 cup olive oil"…]
- Remove punctuation => [ "14 cup mayonnaise", "1 tablespoon lemon juice ", "18 cup olive oil"…]
- Remove numbers => [ "cup mayonnaise", "tablespoon lemon juice ", "cup olive oil"…]
- Remove measurements => [ "mayonnaise", "lemon juice ", "olive oil"…]
- Remove stop words => [ "mayonnaise", "lemon juice ", "olive oil"…]
Step 3b: Phrase2vec
We do a lookup on each phrase in the ingredients using phrase2vec. Essentially what this is doing is, for a phrase like "lemon juice" it will look up the word2vec (300 dimensional) vectors for "lemon" and "juice" and return the resulting average vector of the two vectors as the vector for "lemon juice".
Step 3c: Average Vectors
Once we have the word2vec vectors for each individual ingredient we average this to get the recipe vector and store this in a new json field called Recipe Vector.
Step 4: Recipe Prediction Model 😋
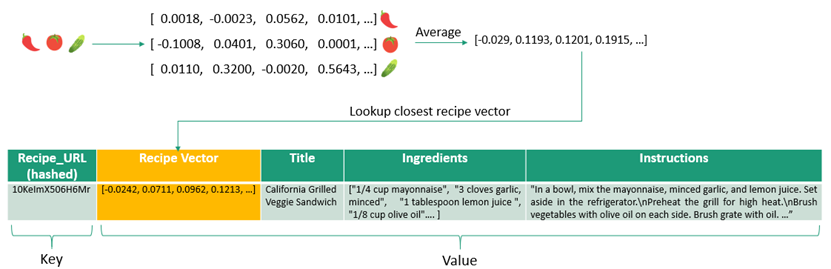
Given an arbitrary length input query of ingredients expressed by text or emojis we can predict a recipe by doing a lookup on the nearest recipe vector. Here's how:
For each input token (emoji / word) we do a lookup for the respective embedding using emoji2vec and/or word2vec and then average the individual embedding vectors to compute the query recipe vector.
The model then takes this vector and computes the nearest recipe vector using Euclidean distance to measure similarity between vectors. To speed up this search, you can index the recipes and find the approximate nearest neighbor using Locality Sensitive Hashing (LSH). This is left as an exercise for the reader.
Getting Started with Visual Studio Code Tools for AI
Visual Studio Code Tools for AI is an extension to build, test, and deploy Deep Learning / AI solutions. It seamlessly integrates with Azure Machine Learning for robust experimentation capabilities, including but not limited to submitting data preparation and model training jobs transparently to different compute targets. Additionally, it provides support for custom metrics and run history tracking, enabling data science reproducibility and auditing.
Step 0: Install
First, install Visual Studio Code then install Tools for AI extension by pressing F1 or Ctrl+Shift+Pto open command palette, select Install Extension and type Tools for AI.
Step 1: Create a New Project from the Sample Explorer
Visual Studio Code Tools for AI comes with a Sample Explorer via integration with Azure Machine Learning. The Sample Explorer makes it easy to discover samples and try them with only a few clicks.
Note: You will need Azure Machine Learning Workbench to be installed. See instructions at How to install Azure Machine Learning Workbench.
To open the explorer, do as follow:
Open the command palette (View > Command Palette or Ctrl+Shift+P).
Enter "ML Sample".
You get a recommendation for "Machine Learning: Open Azure Machine Learning Samples Explorer", select it and press enter.
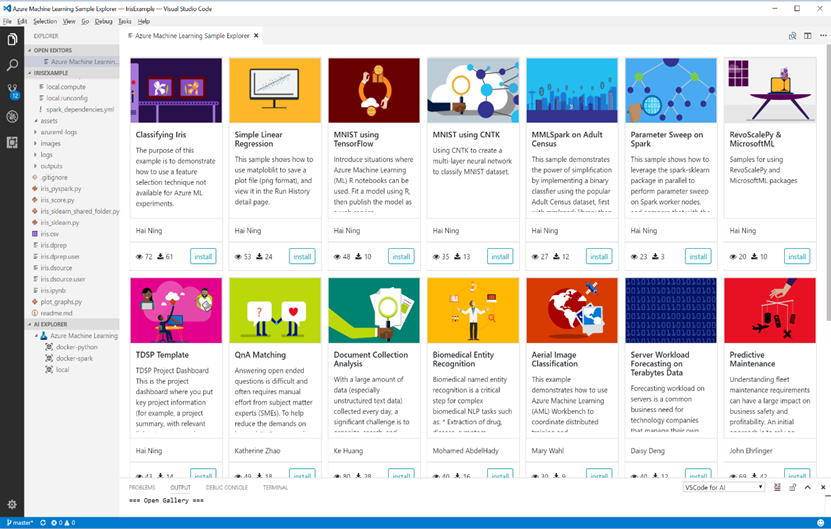
You can browse different samples and get more information about them. Let's browse until finding the "Classifying Iris" sample. To create a new project based on this sample do the following:
- Click install button on the project sample, notice the commands being prompted, walking you through the steps of creating a new project.
- Enter a name for the project, for example "emoji2recipe".
- Enter a folder to create your project and press enter.
- Select an existing workspace and press enter.
The project will then be created.
Note : You will need to be logged-in to access your Azure resource. From the embedded terminal enter " az login " and follow the instruction.
Step 2: Build Your Own Model
The code for this project is available here https://github.com/Microsoft/Emoji2recipe.
- Clone this repo and add copy the code over to your newly created project.
- Download the data and pre-trained word2vec and emoji embeddings to the same directory.
- Add the paths to the raw data and embeddings in config.py.
- To pre-process the data and store the result in JSON format run the following command in the Azure ML – Open Terminal (press Ctrl + Shift + P and search for Azure ML):
az ml experiment submit -c local Emoji2recipe/preprocess.py
Alternatively, you can run it with: python Emoji2recipe/preprocess.py - This is will preprocess the raw recipes and store the results with the recipe vectors in a JSON file recipes.json and store the model as a pickle file model.pkl. Add the paths of these files to your config.py.
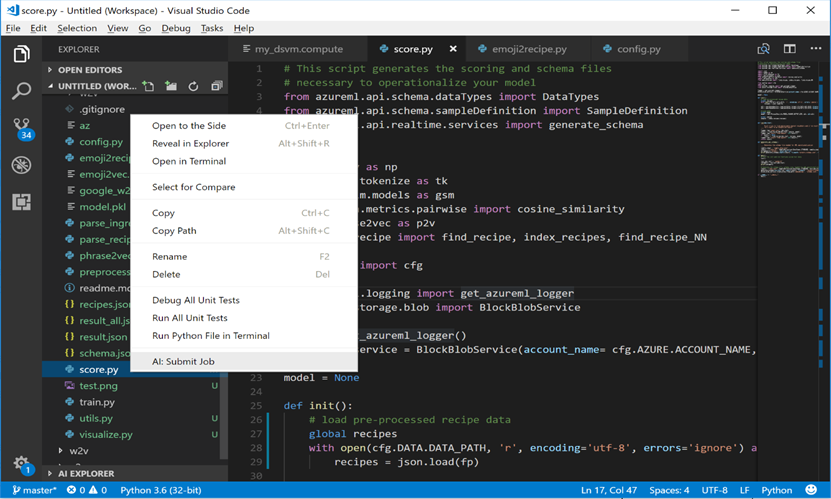
Step 3: Scoring = Recipe Prediction
Now you can predict a recipe from a given input text by calling the run() function in score.py. The code for this is in Emoji2recipe/score.py. You can submit this as a job by right-clicking on score.py and selecting AI:Submit Job and then choosing the local compute environment. Alternatively, you can also run the following command in the Azure ML – Open Terminal (press Ctrl + Shift + P and search for Azure ML):
az ml experiment submit -c local Emoji2recipe/score.py
VS Code Tools for AI Commands
The VS code Tools for AI extension provides several commands in the Command Palette for working with deep learning and machine learning:
- AI: List Jobs: View list of recent jobs you've submitted and their details.
- AI: Open Azure ML Sample Explorer: Quickly get started with machine learning and deep learning experimentation by downloading sample projects you can run and modify to meet your needs.
- AI: Azure ML - Set Subscription: Set your Azure Subscription to use for Azure Machine Learning experimentation.
- AI: Azure ML - Open Terminal: Open Azure CLI terminal to access full Azure feature set.
- AI: Add Platform Configuration: Configure Azure Machine learning compute target.
Summary
In this blog post, we showed you how to build a recipe prediction model using Visual Studio Code Tools for AI. This provides a framework for agile experimentation with fast iterations and provides an easy path for scaling up and out to remote environments such as Data Science VMs with GPUs.
This approach using embeddings can be applied to building conversational user experiences for language understanding in a task completion context. Here we show a recipe use case, but you can imagine this being applied for anything from booking a flight to shopping assistants for building chatbots that have been deemed as the "apps of tomorrow".
In the next part we will look at how to operationalize this model using Visual Studio Code Tools for AI and Azure Machine Learning! Stay tuned J.
Erika
Acknowledgements
Special thanks to Ryan Lee for making the recipes dataset available; to Ben Eisner, Tim Rocktaschel and the team from UCL that made the pre-trained emoji embeddings available; and finally to Wee Hyong Tok for his guidance and for reviewing this article.
Resources
- The code for this project can be found here.
- Visual Studio Code Tools for AI docs.
- Azure Machine Learning documentation.
- Word2vec: Download embeddings from here.
- Emoji2vec: Pre-trained emoji embeddings here created and made available by Ben Eisner and Tim Rocktaschel from UCL.
- Dataset from here created and made available by Ryan Lee.