Deep Learning for Emojis with VS Code Tools for AI – Part 2
This post is authored by Erika Menezes, Software Engineer at Microsoft.
In Part 1 of this blog series, we created a recipe prediction model to predict recipes from a text input that may contain an arbitrary number of emojis. In this post we will go over how to operationalize this model as a web service that will be exposed as a REST API. We will be using Visual Studio Code Tools for AI to do this. We will also show you recommended practices for operationalizing large sized models and ways to troubleshoot your operationalization workflow. We present a step-by-step walkthrough, right from setting up your Azure Machine Learning account to exposing your ML model through a web endpoint.
Prerequisites
To complete this tutorial, you need:
- An Azure subscription. If you don't have an Azure subscription, create a free account before you begin.
- An experimentation account and Azure Machine Learning Workbench installed as described in this quickstart.
- The classification model from Part 1.
- A Docker engine installed and running locally. Learn more here.
Getting Started with Azure Machine Learning
Azure Machine Learning (AML) provides data scientists with a tool set to help you experiment and deploy faster. It is comprised of two Azure services:
- AML Experimentation service (see configuration documentation).
- AML Model Management (see manage and deploy documentation).
In this post, we are going to use the Model Management service to manage and deploy our recipe prediction model. We will do a step-by-step walk through to show you how to publish and operationalize your models.
Operationalization
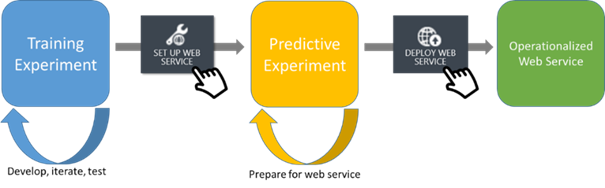
Operationalization refers to the process of deploying models and code in the form of a web service and the subsequent consumption of these services within client applications to affect business results. Once we have a Representational State Transfer (REST) endpoint, we can use this to integrate it with a chatbot to create a Recipe chatbot. This is beyond the scope of this post.
Step 1: Open the Azure ML Terminal in Visual Studio Code
Open the command palette (View > Command Palette or Ctrl+Shift+P).
Enter AI:Azure ML.
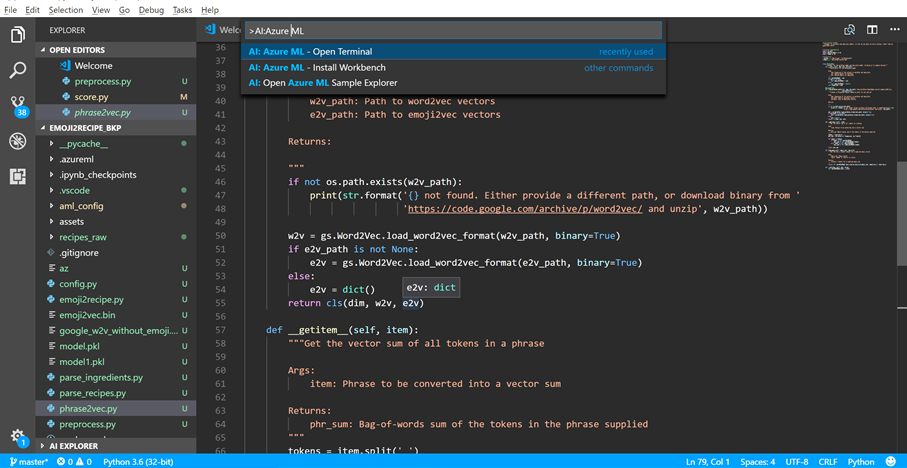
Select AI:Azure ML – Open Terminal.
Step 2: Login and Set Subscription
- To login type the following command and follow instructions on terminal to login:
> az login - If you know the name of your subscription, skip this step. To get a list of your subscriptions do:
> az account list - Set your subscription to the one where you created your machine learning model management account:
> az account set -s <YOUR_SUBSCRIPTION_NAME>
Step 3: Environment Setup
You need to register a few environment providers by entering the following commands:
> az provider register -n Microsoft.MachineLearningCompute
> az provider register -n Microsoft.ContainerRegistry
> az provider register -n Microsoft.ContainerServiceTo deploy and test your web service
- Locally
> az ml env setup -l [Azure Region, e.g. eastus2] -n [your environment name] [-g [existing resource group]] - OR on a cluster (Optional)
> az ml env setup --cluster -n [your environment name] -l [Azure region e.g. eastus2] [-g [resource group]]
- Locally
Note: supported location for now is westcentralus, eastus2, and australiaeast
- To check the status of an ongoing cluster provisioning, use the following command:
> az ml env show -n [environment name] -g [resource group] - After setup is complete, you need to set the environment to be used for this deployment. Use the following command:>az ml env set -n [environment name] -g [resource group]
Step 4: Create Your Model Management Account
- To create a new account:
>az ml account modelmanagement create -l [Azure region, e.g. eastus2] -n [your account name] -g [resource group name] --sku-instances [number of instances, e.g. 1] --sku-name [Pricing tier for example S1] - Set your account to this newly created or existing account:
>az ml account modelmanagement set -n [your account name] -g [resource group it was created in]
Step 5: Generate the Schema File
The schema.json file is needed to specify the input format to the web service. To generate the schema file, run the score.py file. The lines show below are used to generate the schema.json file.

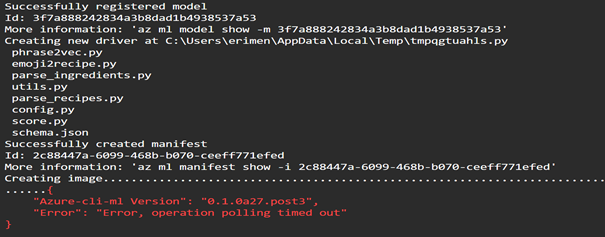
Step 6: Create an Image
We want to package all of our code and dependencies including the embedding files that are typically large in size (~ GB)
> Az ml image create -f score.py -m model.pkl -r python -s schema.json -n emoji2recipetestwebservice -d phrase2vec.py -d emoji2recipe.py -d parse_ingredients.py -d utils.py -d parse_recipes.py -d config.py -d "<SAS_URL_WORD2VEC>" -d "<SAS_URL_EMOJI2VEC>" -d "<SAS_URL_RECIPE.JSON>"-c aml_config\conda_dependencies.ymlTip: The recommended way to use large files in your container is to create SAS URLs for these files and pass them in as dependencies with the -d flag. Learn more about SAS URLs.
Depending on the size of your image, you may see this indicating that the image creation polling service has timed out. No need to worry, proceed to the next step.
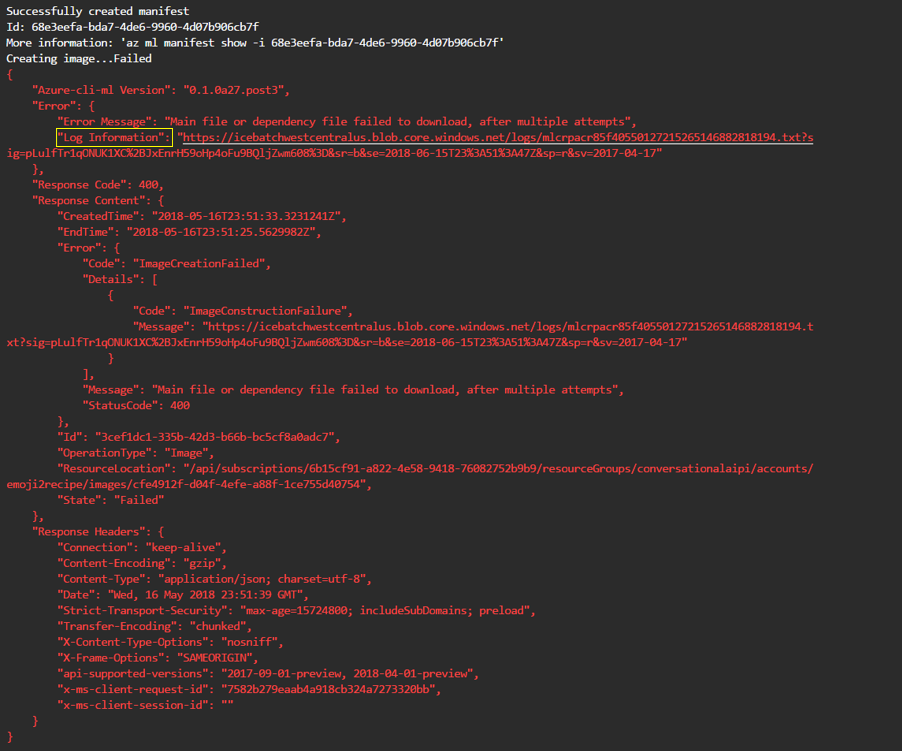
If there is an error in your code, you may see something like this. To debug the cause of the error, download the log file using the URL in the "Log Information" field highlighted below.
To get a list of images created run (optional)
> az ml image list -o table
You will see a table with the service name and its current state which can be Running, Succeeded or Failed.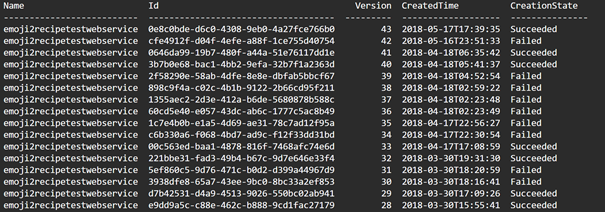
(Optional) To see more details of the image. > az ml image show –-image-id <image_id> -v Note: Use the image_id from the results returned in the previous step.
(Optional) Test image with bash
> docker run -it <image_location> /bin/bash. Note: Use the image_location from the result returned in the previous step.
> cd /var/azureml-app
> ls to check if all your dependencies are present and exit to exit
(Optional) Credentials
Sometimes you may run into: "Error response from daemon: no basic auth credentials"
> az ml env get-credentials -g [resource group name] -n [your environment name]
>Docker login -u <username> -p <password> <loginServer> using fields returned in previous command
(Optional) Customize the container
If you would like to customize the container used, please refer to the documentation here.
Step 7: Create and Deploy the Web Service
We're almost there! Now that we have a recipe prediction model we can operationalize it by exposing it as a REST endpoint using the following command
> az ml service create realtime -n <service_name> –image-id <image_id> -v
This will take some time to execute.
- To view service usage information> az ml service usage realtime -i <service_name>
Scoring URL:
Headers:
Content-Type: application/json
Swagger URL:
https://127.0.0.1:32782/swagger.json
- (Optional) To view service logs> az ml service logs realtime -i <service_name>
We can test our endpoint using the Postman client as shown below that gets a recipe for tomato pizza 😋
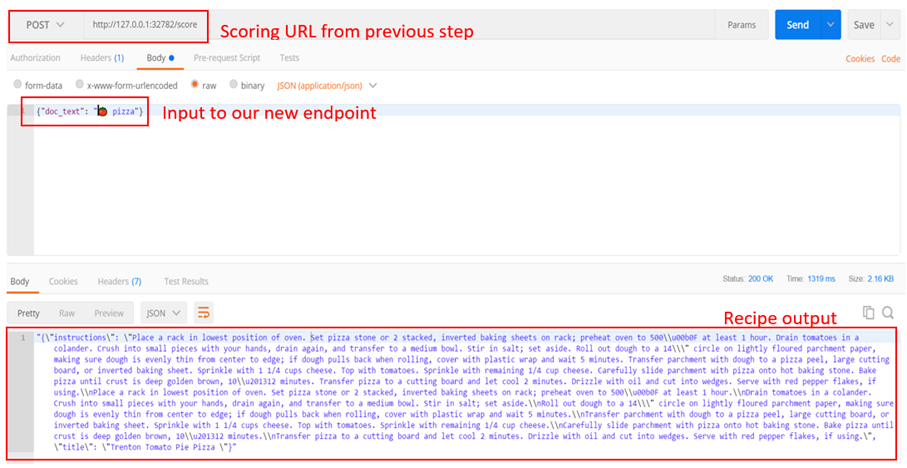 Reprinted with permission © Postdot Technologies Inc. All rights reserved.
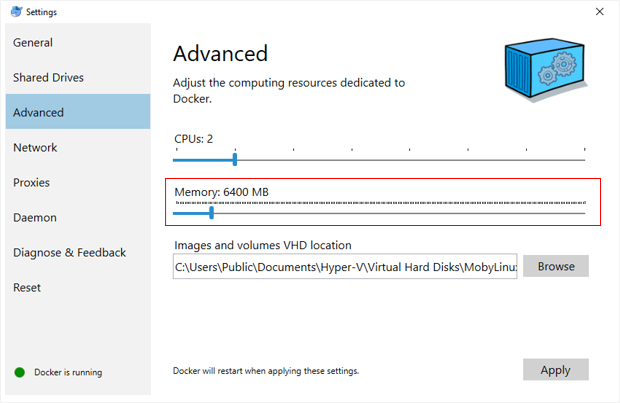
Tip: If you are deploying locally, we recommend increasing your docker memory to at least 6GB due to the large size (GB) of the embedding models. To do this do to Docker> Settings > Advanced and adjust the slider for memory.
Note: Keep in mind that when deploying to a cluster the default cluster has only 2 nodes with 2 cores each. Some cores are taken for system components. AML Workbench asks for 1 core per service. To deploy multiple services into this cluster, specify the CPU requirement in the service create command as (--cpu 0.1) to request 10% of a core. For more troubleshooting documentation see here.
Summary
Tips and Tricks
- To use large sized models, create a SAS URL for this and pass this in as a dependency (-d) to the service creation command.
- If you notice issues when deploying locally, try increase your docker memory. To do this do to Docker> Settings > Advanced and adjust the slider for memory.
- The most useful debugging step for me was to test the image created with bash. Refer to step 6 (iii) and (iv).
In this blog post, we showed you how to operationalize a recipe prediction model using Visual Studio Code Tools for AI. You're all set to build and deploy your own models! 😊
Erika
Resources
- The code for this project can be found here.
- Visual Studio Code Tools for AI docs.
- Azure Machine Learning documentation.
- See Deep Learning for Emojis with VS Code Tools for AI - Part 1.
Acknowledgements
Special thanks to Pavel Dournov, Ritwik Bhattacharya, Travis Angevine, Hai Ning, Kevin Riehm, George Iordanescu and Raymond Laghaeian for their help with debugging and testing, and to Wee Hyong Tok, Mathew Salvaris and Serina Kaye for their guidance and for reviewing this article.