“Snip Insights” – An Open Source Cross-Platform AI Tool for Intelligent Screen Capture
This post is authored by Tara Shankar Jana, Senior Technical Product Marketing Manager at Microsoft.
What if we could infuse AI into the everyday tools we use, to delight everyday users? With just a little bit of creativity – and the power of the Microsoft AI platform behind us – it's now become easier than ever to create AI-enabled apps that can wow users.
Introducing Snip Insights!
An open source cross-platform AI tool for intelligent screen capture, Snip Insights is a step change in terms of how users can generate insights from their screen captures. The initial prototype of Snip Insights, built for Windows OS and released at Microsoft Build 2018 in May, was created by Microsoft Garage interns based out of Vancouver, Canada.
Our team at Microsoft AI Lab, in collaboration with the Microsoft AI CTO team, took Snip Insights to the next level by giving the tool an intuitive new user interface, adding cross-platform support (for MacOS, Linux, and Windows), and offering free download and usage under the MSA license.
Snip Insights taps into Microsoft Azure Cognitive Services APIs and helps increase user productivity by automatically providing them with intelligent insights on their screen captures.
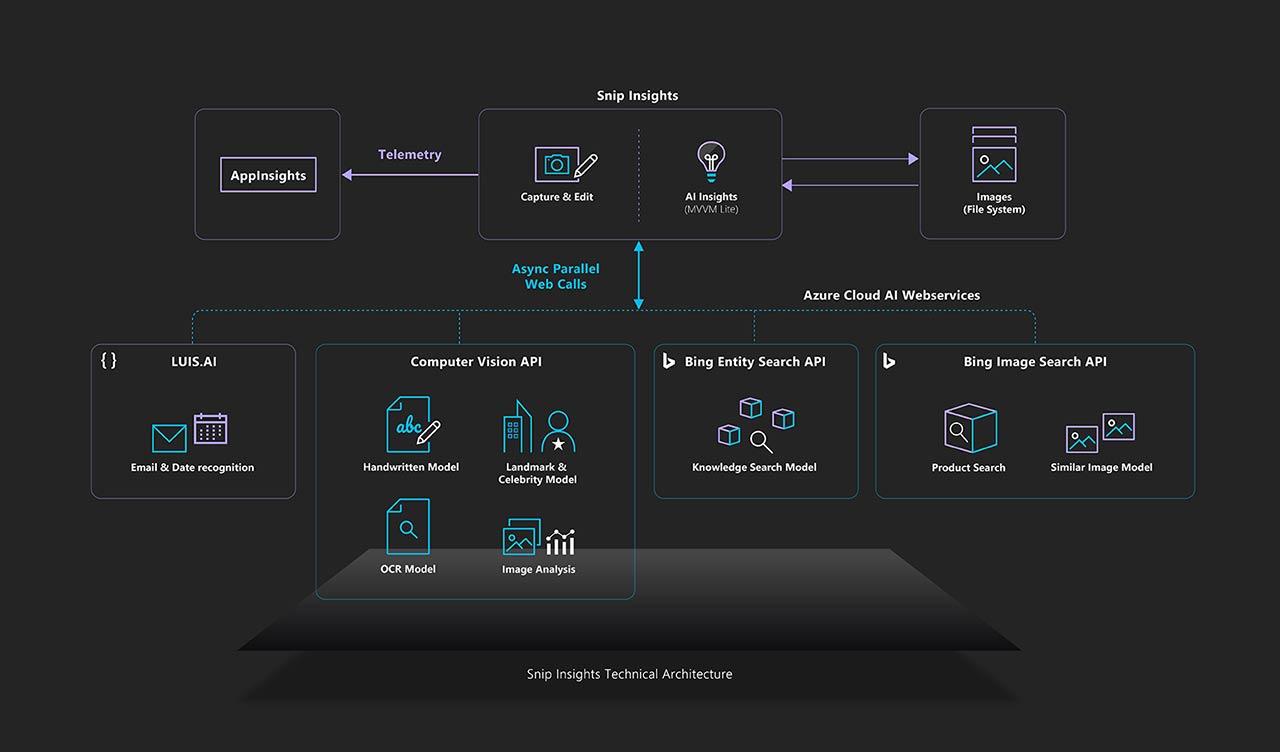
Solution Overview
Snip Insights taps into cloud AI services and – depending on the image that was screen-captured – can convert it into translated text, automatically detect and tag images, and provide smart image suggestions that improve the user workflow. This simple act of combining a familiar everyday desktop tool with Azure Cognitive Services has helped us create a one-stop shop for image insights.
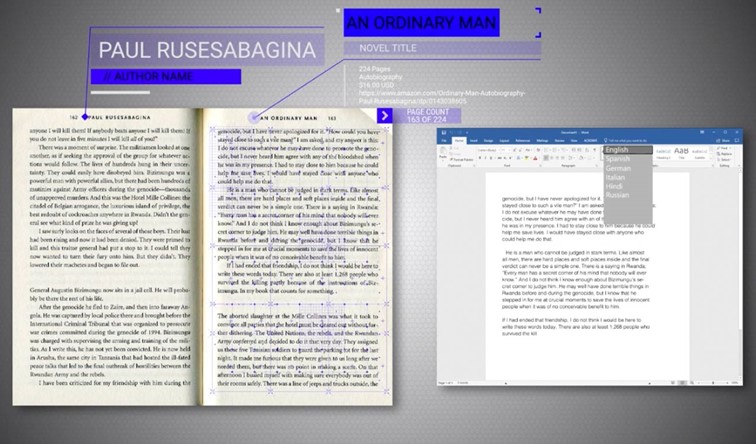
For instance, imagine that you've scanned a textbook or work report. Rather than having to manually type out the information in it, snipping it will now provide you with editable text, thanks to the power of OCR. Or perhaps you're scrolling through your social media feed and come across someone wearing a cool pair of shoes – you can now snip that to find out where to purchase them. Snip Insights can even help you identify famous people and popular landmarks.
In the past, you would have to take the screen shot, save the picture, upload it to an image search engine, and then draw your conclusions and insights from there.
This is so much smarter, isn't it?
Key Capabilities
Celebrity Search: Snip a celebrity image and the tool will provide you with relevant information about them.

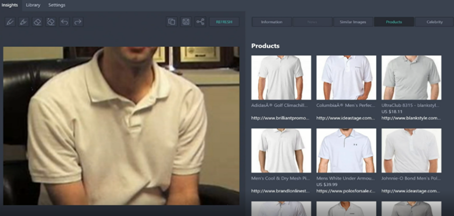
Object Detection and Bing Visual Search: You dig that T-shirt your friend is wearing in their latest social media post and want to know where you can buy it from. No problem! Just use Snip Insights and you can see matching product images and where to buy them from – all in a matter of seconds!
OCR, Language Translation and Cross-Platform Support: You find a quotation or phrase in English and wish to convert that to French or another language. Just use Snip Insights and you can do so effortlessly. What's more, the tool is free and works on Windows, Linux and MacOS, so everybody's covered!
Supported Platforms
Snip Insights is available on these three platforms:
- Universal Windows Platform (UWP)
- Mac OS
- Linux
Xamarin
Xamarin.Forms enables you to build native UIs for iOS, Android, macOS, Linux, and Windows from a single, shared codebase.
You can dive into app development with Xamarin.Forms by following our free self-guided learning from Xamarin University. Xamarin.Forms has preview support for GTK# apps. GTK# is a graphical user interface toolkit that links the GTK+ toolkit and a variety of GNOME libraries, allowing the development of fully native GNONE graphics apps using Mono and .NET. Learn more here: Xamarin.Forms GTK#.
Installation
Windows
- Download the zip from here.
- Install the certificate (".cer" file) according the instructions in the Install Certificate section.
- Install Snip Insights by double clicking the .appx package file.
Linux
- Install Mono by following the appropriate steps based on your Linux distro, https://www.mono-project.com/download/stable/#download-lin.
- Install the .deb package from here.
- Launch the app from applications section.
Mac OS
- Download and install Mono (Stable channel): https://www.mono-project.com/download/stable/. This includes GTK#, the UI toolkit which Xamarin.Forms relies on, for this project.
- Install the .pckg as a normal macOS application from here.
- Snip Insights app is available in the applications section on macOS.
Requirements
Using Your Own Subscription
To add the keys to Snip Insights, a Microsoft Garage Project, start the application. Once running, click/tap the Settings icon in the toolbar. Scroll down until you find the "Cognitive Services, Enable AI assistance" toggle, and toggle it to the On position. You should now see the Insight Service Keys section.
- Entity Search: Create new Entity Search Cognitive Service. Once created, you can display the keys. Select one and paste into "Settings".
- Image Analysis: In Azure, create a **Computer Vision API** Cognitive Service and use its key.
- Image Search: In Azure, create a Bing Search v7 API Cognitive Service and use its key.
- Text Recognition: You can use the same key used in Image Analysis above. Both Image Analysis and Text Recognition use the Computer Vision API.
- Translator: Use the Translator Text API Cognitive Service.
- Content Moderator: Use the Content Moderator API Cognitive Service.
For the LUIS App ID and Key, you will need to create a Language Understanding application in the Language Understanding Portal at https://www.luis.ai. Use the following steps to create your LUIS App and retrieve an App ID:
- Click on Create new app button.
- Provide an app name. Leave Culture (English) and Description as defaults.
- Click Done.
- In the left navigation pane, click Entities.
- Click Manage prebuild entities.
- Select datetimeV2 and email.
- Click Done.
- Click the Train button at the top of the page.
- Click the Publish tab.
- Click the Publish to production slot button.
- At the bottom of the screen, you will see a list with a Key String field. Click the Copy button and paste that key value into the LUIS Key field in settings for Snip Insights.
- Click the Settings tab (at the top).
- Copy the Application ID shown and paste into the LUIS App Id field in Settings for Snip Insights.
You can now paste each key in the settings panel of the application. Remember to Click the Save button after entering all the keys.
NOTE: For each key entered there is a corresponding Service Endpoint. There are some default endpoints included (you can use these as an example) but when you copy each key, also check and replace the Service Endpoint for each service you are using. You will find the service endpoint for each Cognitive Service on the Overview Page. Remember to Click the Save button after updating all the Service Endpoints.
In Summary
If you made it this far, and followed the above steps, you will have a fully working application to get started. Congratulations! We hope you have fun testing the project and thanks in advance for your contribution! You can find the code, solution development process and other details on GitHub.
We hope this post inspires you get started with AI today, and motivates you to become an AI developer.
Tara

