(Part 1) – Motorola XR450 and BizTalk RFID: Hands On
Continuing the (much delayed) postings on putting together basic end to end systems with RFID readers and BizTalk RFID, I’m going to delve into how to configure and deploy Motorola’s XR450 RFID reader. As usual, the primary steps covered are:
Setting up the reader (from the shipping box to the network)
Performing native firmware updates
Connectivity and configuration with Biztalk RFID
Building a basic business logic and reporting interface
Setting up the reader (from the shipping box to the network)
Every RFID reader is a little different in terms of power, network and antenna, so being familiar with the specifics of the readers you employ in your solutions is vitally important. While Biztalk RFID does an excellent job of abstracting away many of the software and management related details, all the software in the world won't help if you can't turn the reader on! :)
From Motorola’s web site:
Motorola’s XR450 RFID reader is an industrial-class, fixed RFID reader designed for business-critical, dense-reader deployments. With both mono-static and bi-static antenna operation capability, it has the flexibility to meet a wide range of application and environment needs.
The XR450 fixed reader provides ease of integration and rich application support while reading tags reliably and efficiently. It provides comprehensive application flexibility, including support for direct application hosting; standard back-end platforms from IBM, Microsoft, SAP and others; and the ability to interact with industrial automation equipment such as conveyors.
Some of the key features of this device include:
- Operation in bi-static or mono-static modes (this is fairly new in the XR series line, especially for North American targeted readers).
- Support for LLRP (Low Level Reader Protocol) as well as Motorola’s native API. Note: the XR450 can only support one concurrent interface type (i.e. either LLRP _or_ native API – but not both at the same time).
Documents and Software:
Connecting the Serial Connection
When setting up a reader for the first time, or performing low-level debugging a serial connection is invaluable. If your PC or laptop does not have a built-in serial port, I would highly recommend purchasing a USB-to-serial adapter such as this one. Note that most big-box retailers or computer stores will carry a similar product in stock. In addition to the physical connection, you'll need a terminal adapter program. Note that since Hyperterminal is not a part of Windows Vista, you likely don't have a built-in one available. I like a number of different (freeware) products, such as TeraTerm Pro. After downloading and installing Tera Term Pro, start the application.
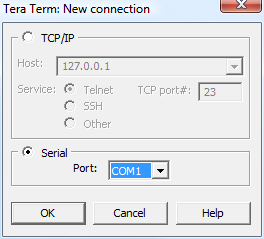
Select the appropriate COM port (if using a USB-to-serial converter see the manufacturer documentation for details), and click OK. Built-in COM ports are usually COM1. Click on Setup, then Serial port to configure the serial port settings.
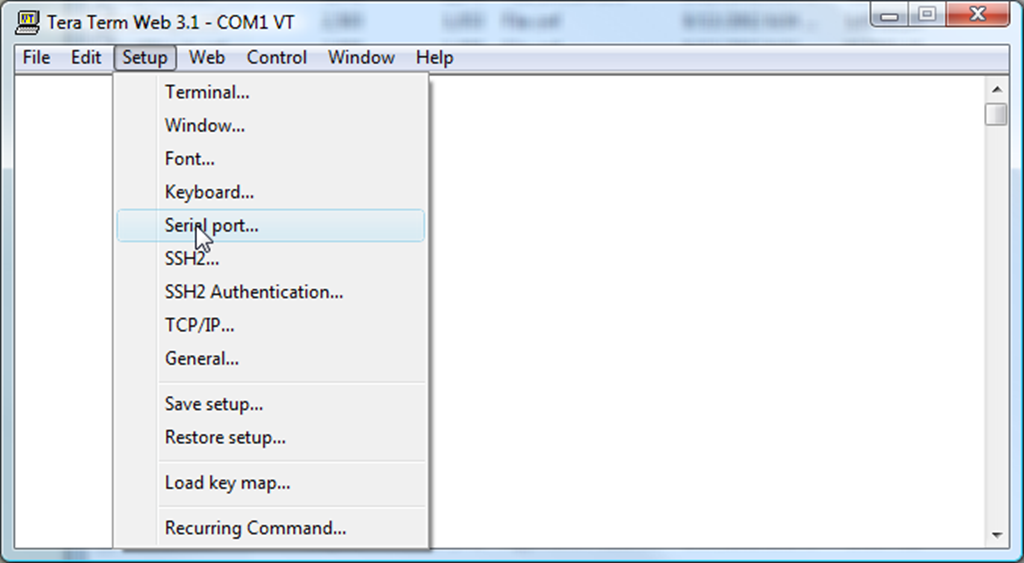
The serial communication settings for the Motorola XR450 are 38400 8N1 (or, 38400 baud rate, 8 bit data, none parity, 1 bit stop, none flow control).

Powering the Reader
If we can’t successfully power the reader, this is going to be a very short blog post. The XR series readers use a 24 VDC @ 2.5 A transformer “brick” with an connector that securely fastens to the reader by way of turn-and-lock mechanism. As of the time this article was written, the adapter is a GlobTek Inc ITE Power Supply.
- Connect an Ethernet cable between an available network hub, and the 10/100 Base-T port on the XR450 reader.
- Connect a serial cable between the SERIAL port (not the GPIO port) on the Speedway Reader and your computer’s serial port.
- Connect an antenna to one of the available antenna ports (TX1 - TX4).
- Note: this assumes that we’ll be using the reader in mono-static or single TX/RX port configuration. If not, connect another antenna to the matching RX1 – RX4 port.
- Plug one end of the transformer into an available power outlet, and the other into the +24 VDC port on the XR reader.
Clearing SDRAM ... Complete

}}}BootStrap of XR400 V 4.01.0000

Copyright 1999-2005, Symbol Technologies

Copying Monitor image to RAM ...
|
Run Monitor_0 ....}}}Flash Info: wMfgId=0x89, wDevId=0x891C

Flash Info: flashDeviceSize=0x2000000, blockSize=0x20000, bootBlockSize=0x8000

Done: P30 Flash Unlocked
Check BootData to Update system ......

Do nothing for recovery.

Copying CE image to RAM ...
|
Booting Windows CE ...
Unlike other models of readers the management console will NOT automatically appear! In order to display the management console, type AdvancedReaderConsole, or ARC for short, then hit enter.
ARC
****** Symbol XR450 RFID Reader Serial Console ******
Please enter user name:
The default username and password are admin and change. Entering these brings up the serial option console. If you get the username and password wrong, you need to type ARC again to bring up the login screen.
Current Configuration:
Serial Number: C80507AF82805945 MAC Address: 00:A0:F8:C2:02:D5
1 -- DHCP : ON
* -- IP Address : 172.27.166.75
3 -- BSP Port : 3000
* -- Network Mask : 255.255.255.0
* -- Gateway : 172.27.166.1
* -- DNS Host : 157.54.14.146
7 -- Web Server Mode : HTTP
8 -- HTTP Port : 80
9 -- Shell Type : Telnet
10 -- File Transfer Mode : FTP
11 -- Watchdog : Enabled
12 -- Trusted Hosts Only : OFF
13 -- Commit Change
14 -- Discard Change
15 -- Exit
16 -- Reboot
17 -- Show system log
18 -- Trace system log : OFF
19 -- TCP Timeout (mins) : 0
20 -- BSP Mode : Unsecured
21 -- HTTPS Port : 443
22 -- BSP User Auth : OFF
* These are current system values and cannot be changed while DHCP is ON

Select the menu number to change the item value:
From this console you can change the network configuration, interface options, view the system log and reboot the reader. You cannot read tags, change the password, etc. The purpose of this interface is to get the reader network-accessible, and then perform additional diagnostics using the web console.
Once logged into the device, you may use the following commands:
| Configuring the device to use DHCP | 1 <Enter> Toggles DHCP on and off |
| Configuring the device to use a static IP address | Turn off DHCP 2<Enter> [new IP address] 4<Enter> [new netmask] 5<Enter> [new gateway] |
| Rebooting the reader | 16<Enter> |
Scanning Tags
I always recommend checking for tag scans with the lowest number of moving parts (i.e. if tag reads aren't showing up in a report there are many potential sources of failure - tag, antenna, reader, network, middleware, database and the report itself). Scanning tags using the web console involves these key steps:
- Ensuring that the reader has active/enabled antennae.
- Ensuring that the reader is in native-API (i.e. not LLRP) mode. In LLRP mode the reader will only scan tags with a connected LLRP client (such as BizTalk RFID).
- Enabling polling (such that the reader is autonomously scanning for tags)
- Querying the internal tag list.
Ensuring that the reader has active/enabled antennae.
To ensure that the reader has active/enabled antennae:
- Open an Internet Explorer window and browse to the IP address of the reader.
- Log in with the username and password (defaults are username admin and password change).
- From the Reader Administration Console, click on Status. We want to make sure that the reader has active/enabled antennae. In the status summary of the reader, ensure that at least one read point (aka antenna or antenna pair) is enabled (i.e. Read Points / Enabled >= 1).

Ensuring that the reader is in native-API (i.e. not LLRP) mode
Open an Internet Explorer window and browse to the IP address of the reader.
Log in with the username and password (defaults are username admin and password change).
From the Reader Administration Console, click on Maintenance, then on Communication. If LLRP is Running is displayed, then we need to deactivate it by clicking on the Deactivate LLRP button.

Since none of the changes will take effect until committed (i.e. saved), we need to commit changes by clicking on the Commit/Revert menu option, then click the Commit button.

Enabling Polling
Open an Internet Explorer window and browse to the IP address of the reader.
Log in with the username and password (defaults are username admin and password change).
From the Reader Administration Console, click on Scan Control.
If Reader is not polling is displayed, click on Enable Polling.
Since none of the changes will take effect until committed (i.e. saved), we need to commit changes by clicking on the Commit/Revert menu option, then click the Commit button.
Querying the internal tag list
Open an Internet Explorer window and browse to the IP address of the reader.
Log in with the username and password (defaults are username admin and password change).
From the Reader Administration Console, click on Query.

An alternate method of querying the visible tags is by browsing to the URL https://[ip address of device]/cgi-bin/dataProxy?oper=queryTags:

Updating the Device Firmware
Updating the device firmware on the XR series readers can be a little tricky the first time, due to the need to set up a FTP server to host the firmware update files. However, once that server is in place and functional, performing the updates becomes a fairly trivial process.
Installing a FTP Server (Windows Server 2003)
The FTP server functionality included in IIS is the easiest method for enabling native firmware updates. To install IIS with the FTP server extensions:
Click on Start, Control Panel, Add/Remove Programs to bring up the Add or Remove Programs dialog.
Click on Add/Remove Windows Components.
From the Windows Components Wizard, click on Application Server, then click the Details button (IIS will already have been installed as part of the BizTalk RFID installation).
From the Application Server dialog, click Internet Information Services (IIS) , then click the Details button.
From the Internet Information Services (IIS) dialog, ensure that the File Transfer Protocol (FTP) Service is checked, then click OK until you return to the Windows Components Wizard dialog.
Click Next to update the computer’s configuration, then Finish to close the wizard.

Configuring the FTP Server (Windows Server 2003)
Once the FTP Server has been installed, we need to create an FTP site with the appropriate security settings and firmware files. For the purposes of this article, we’ll use the default FTP site that’s created when the FTP service is installed.
- From the IIS Manager, right-click Default FTP Site (under FTP Sites), then click on Properties.
- From the Default FTP Site Properties dialog, click on the Security Accounts tab. Ensure that Allow anonymous connections is checked. Note: to configure the service with user accounts for extra security, refer to https://msdn.microsoft.com/en-us/library/6ws081sa.aspx.
- Click on the Home Directory tab. This should display the FTP site directory as being C:\inetpub\ftproot. We’ll add the appropriate Motorola firmware update files under this directory.
- Create the directory C:\inetpub\ftproot\Moto.
- Download one of the XR Software releases from the Motorola web site for the XR450, such as version 3.3.10. Download and unzip this package into the directory c:\inetpub\ftproot\Moto\3.3.10\ . This directory should resemble the image below.

- To create a firewall exclusion for the FTP service, execute the following firewall rule (opens port 21)
netsh firewall add portopening TCP 21 "FTP Server"
Testing the FTP Server
From a different machine on the network (NOT the FTP Server itself!), connect to the FTP server to ensure that the Motorola firmware update files can be accessed. The easiest way to do this is via Internet Explorer, using the ftp URL syntax. From the Internet Explorer address bar enter the URI ftp://[IP address of server]/Moto/3.3.10/. If you have configured everything properly, you should see a directory listing similar to:

Performing the Update
- From the reader’s web management console, click on Maintenance, then Version to bring up the Version Control panel.
- In the FTP server text box type in the full FTP URL to the firmware files (i.e. ftp://[ip address]/Moto/3.3.10/
- For the username enter Anonymous.
- For the password enter ftp@ .
- Click on Start Update to start the firmware update.

The reader will then start the process of retrieving and installing the firmware update, which you may observe from the web console. This process usually takes about 5 minutes, so go grab a coffee or either suitably caffeinated beverage.
