Assigned Access with Intune and AssignedAccess CSP – Part II
Hello all,
Back with part two of our blog dealing with Assigned Access profiles leveraging the AssignedAccess CSP. If you haven't read Part I of this blog, you can read it here:
Summary
In the previous blog, we discussed Assigned Access, the use cases for Assigned Access, discussed the AssignedAccess CSP documentation, and walked through how to build the XML that we need for our Assigned Access policy in Intune. In this part of the blog, we'll discuss Windows 10 Autopilot settings, configuring and deploying the policy in Intune, and spend some time validating our results on the device.
Ok, a little bit of additional background for our example. In our example, recall we are configuring a policy for the use case of an administrator who wants to restrict activity on devices for a subset of multiple users across different devices. In this scenario, the administrator only wants to give the users access to the following applications:
- Microsoft Edge (UWP app)
- Calculator (UWP app)
- OneNote (UWP app)
- Notepad (desktop app)
If you've already looked at the provided sample XML from part one of this blog, you've seen the XML has already been configured for the scenario mentioned above. If you haven't, challenge yourself by building the XML on your own by following along in part one of this blog.
Windows 10 Autopilot and Devices
Recall we discussed Windows 10 Autopilot briefly. The one caveat about your Windows 10 Autopilot profile is that the user account type setting must be set to Standard. There are a couple of reasons for this:
- Per our AssignedAccess CSP documentation, it's not supported and we are warned that we may experience inconsistent results if an Assigned Access profile is deployed to an administrator account
- Per our AssignedAccess CSP documentation, several additional settings are automatically configured when the Assigned Access profile is applied. Namely, the Start menu Show All Apps list button is hidden. If an Assigned Access profile is applied to an administrator account, some settings, namely this one, will not apply properly and a user will be able to access all applications from the Start menu. This doesn't mean the apps will run, they won't based on the Assigned Access policy. However, when a user clicks on an app icon, they'll get a pop-up saying the app is not allowed. This is not an ideal user experience and may prompt a helpdesk call from the user.
As mentioned in the Part I, ensure you are leveraging an Enrollment Status Page to keep the device in OOBE until the Assigned Access profile is applied. In this manner, when the user logs in for the first time, the Assigned Access profile will be applied and configured from start.
Recall we also discussed leveraging physical devices. The reason for this recommendation is because if you use a VM, at least a Hyper-V VM, when the Windows 10 Autopilot configures the user account as a standard user account, that account will not have rights to log on remotely, you will effectively be locked out of the VM, and the configuration will not complete. You can use a Hyper-V VM for testing, but the Windows 10 Autopilot profile must have the user account type set to administrator. Your policy will apply in this manner, but recall it will not set all the settings as mentioned earlier. It is recommended to leverage physical devices for testing so you get the full effect of your Assigned Access policy and you can evaluate the policy as an end user to understand if you need to tweak your policy at all.
Create and Deploy the Assigned Access Policy in Intune Portal
Remember our XML from part I? Go ahead and get that ready.
- Open up a browser and navigate to your Intune portal
- In the Intune blade, click Device Configuration
- In the Device Configuration blade, click Profiles
- In the Device Configuration - Profiles blade, click the Create Profile button
- On the Create Profile blade, in the Name field, name the profile accordingly. In the Platform drop-down, choose Windows 10 and later. In the Profile type drop-down, choose Custom
- The Custom OMA-URI Settings blade will appear. Click the Add button
- On the Add Row blade, in the Name field, name the settings accordingly.
- In the OMA-URI path, copy and paste ./Device/Vendor/MSFT/AssignedAccess/Configuration
- In the Data type drop-down, choose String
- In the Value text box, copy and paste the XML you created in part I
- Click OK to close the Add Row blade
- Click OK to close the Custom OMA-URI Settings blade and click Create to create your policy
- Once created, click the policy. On the Policy blade, click Assignments
- On the Assignments blade, in the Assigned to drop-down, select Selected Groups and then click Select groups to include
- On the Azure AD Groups blade, choose your Windows 10 Autopilot devices group. NOTE: This would have been completed already as part of your pre-requisites in Part I of this blog
- On the Assignments blade, click Save
Provision a Windows 10 Autopilot Device and Validate the Result
- Boot a test device into OOBE and click through the screens
- When you reach the Add an Account screen, use your work account to Azure AD Join the device and enroll the device in Intune
- At this point, you'll see the Enrollment Status Page
- Wait a bit for the process to complete
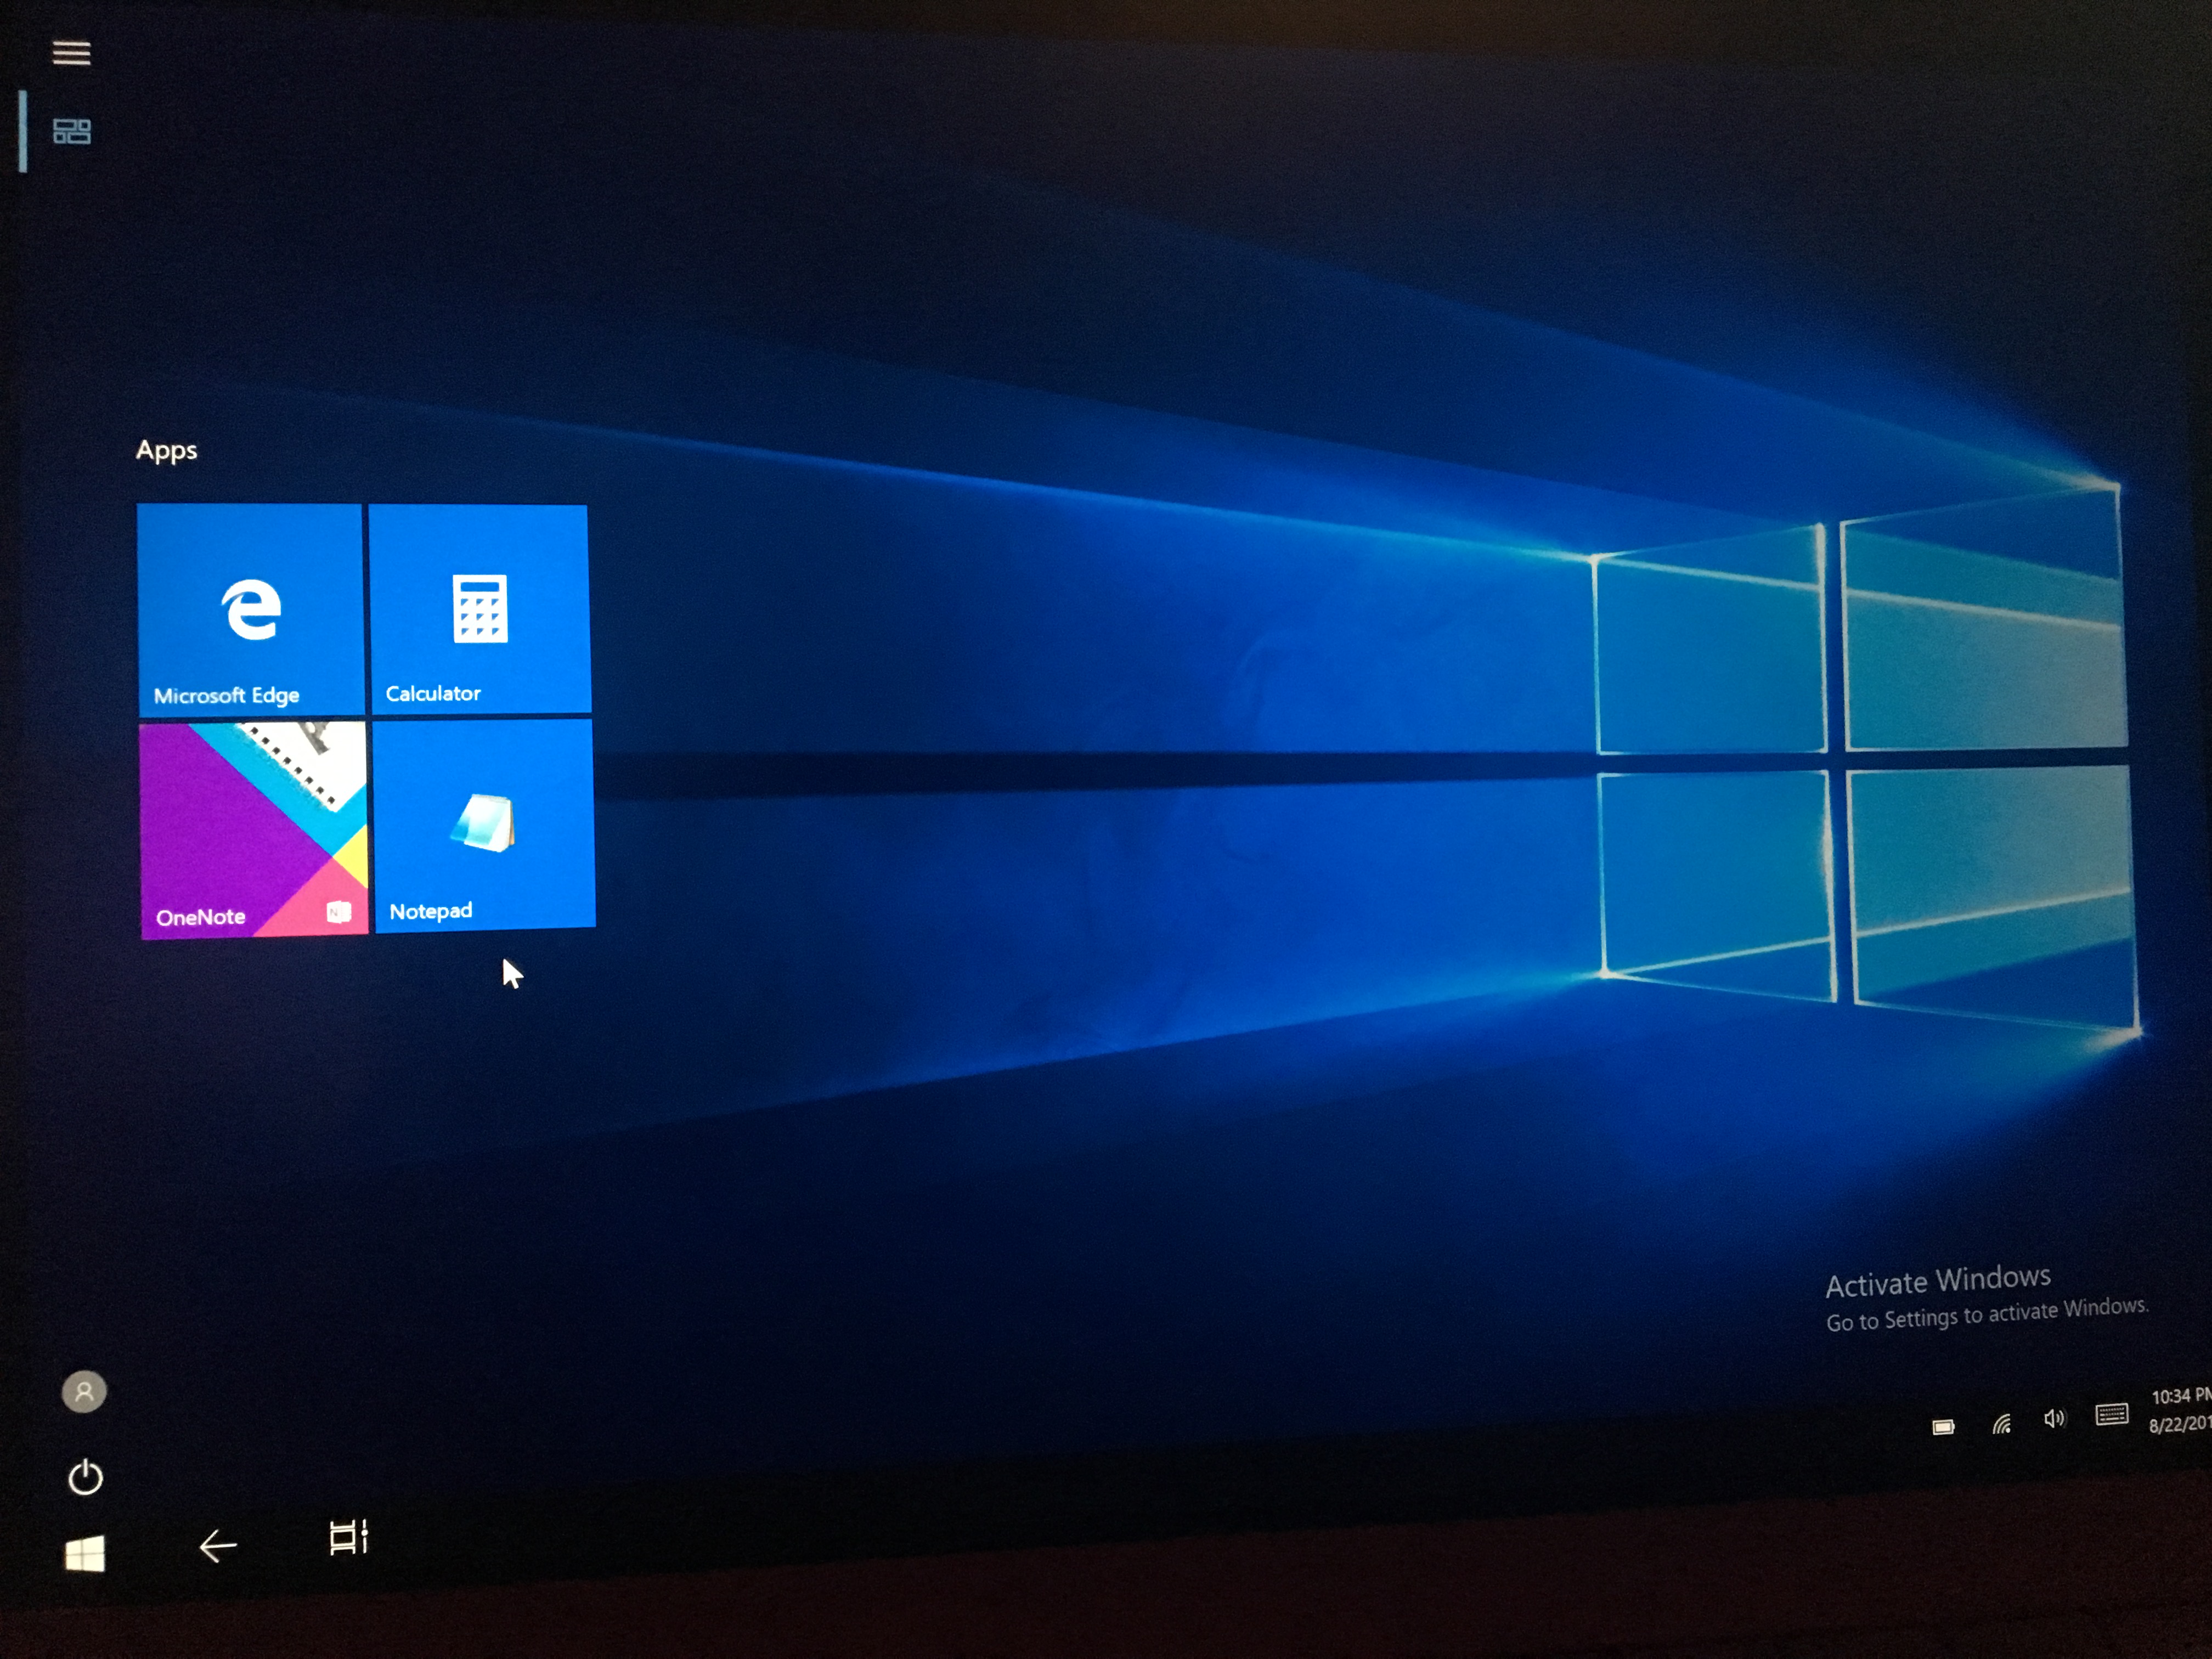
- Once complete, the user should be auto-logged in and you should see your Assigned Access profile has been applied successfully. It should look a little something like the screens below
As you can see, the Assigned Access profile was successfully applied and we only see the 4 Start menu icons we configured for our allowed apps.
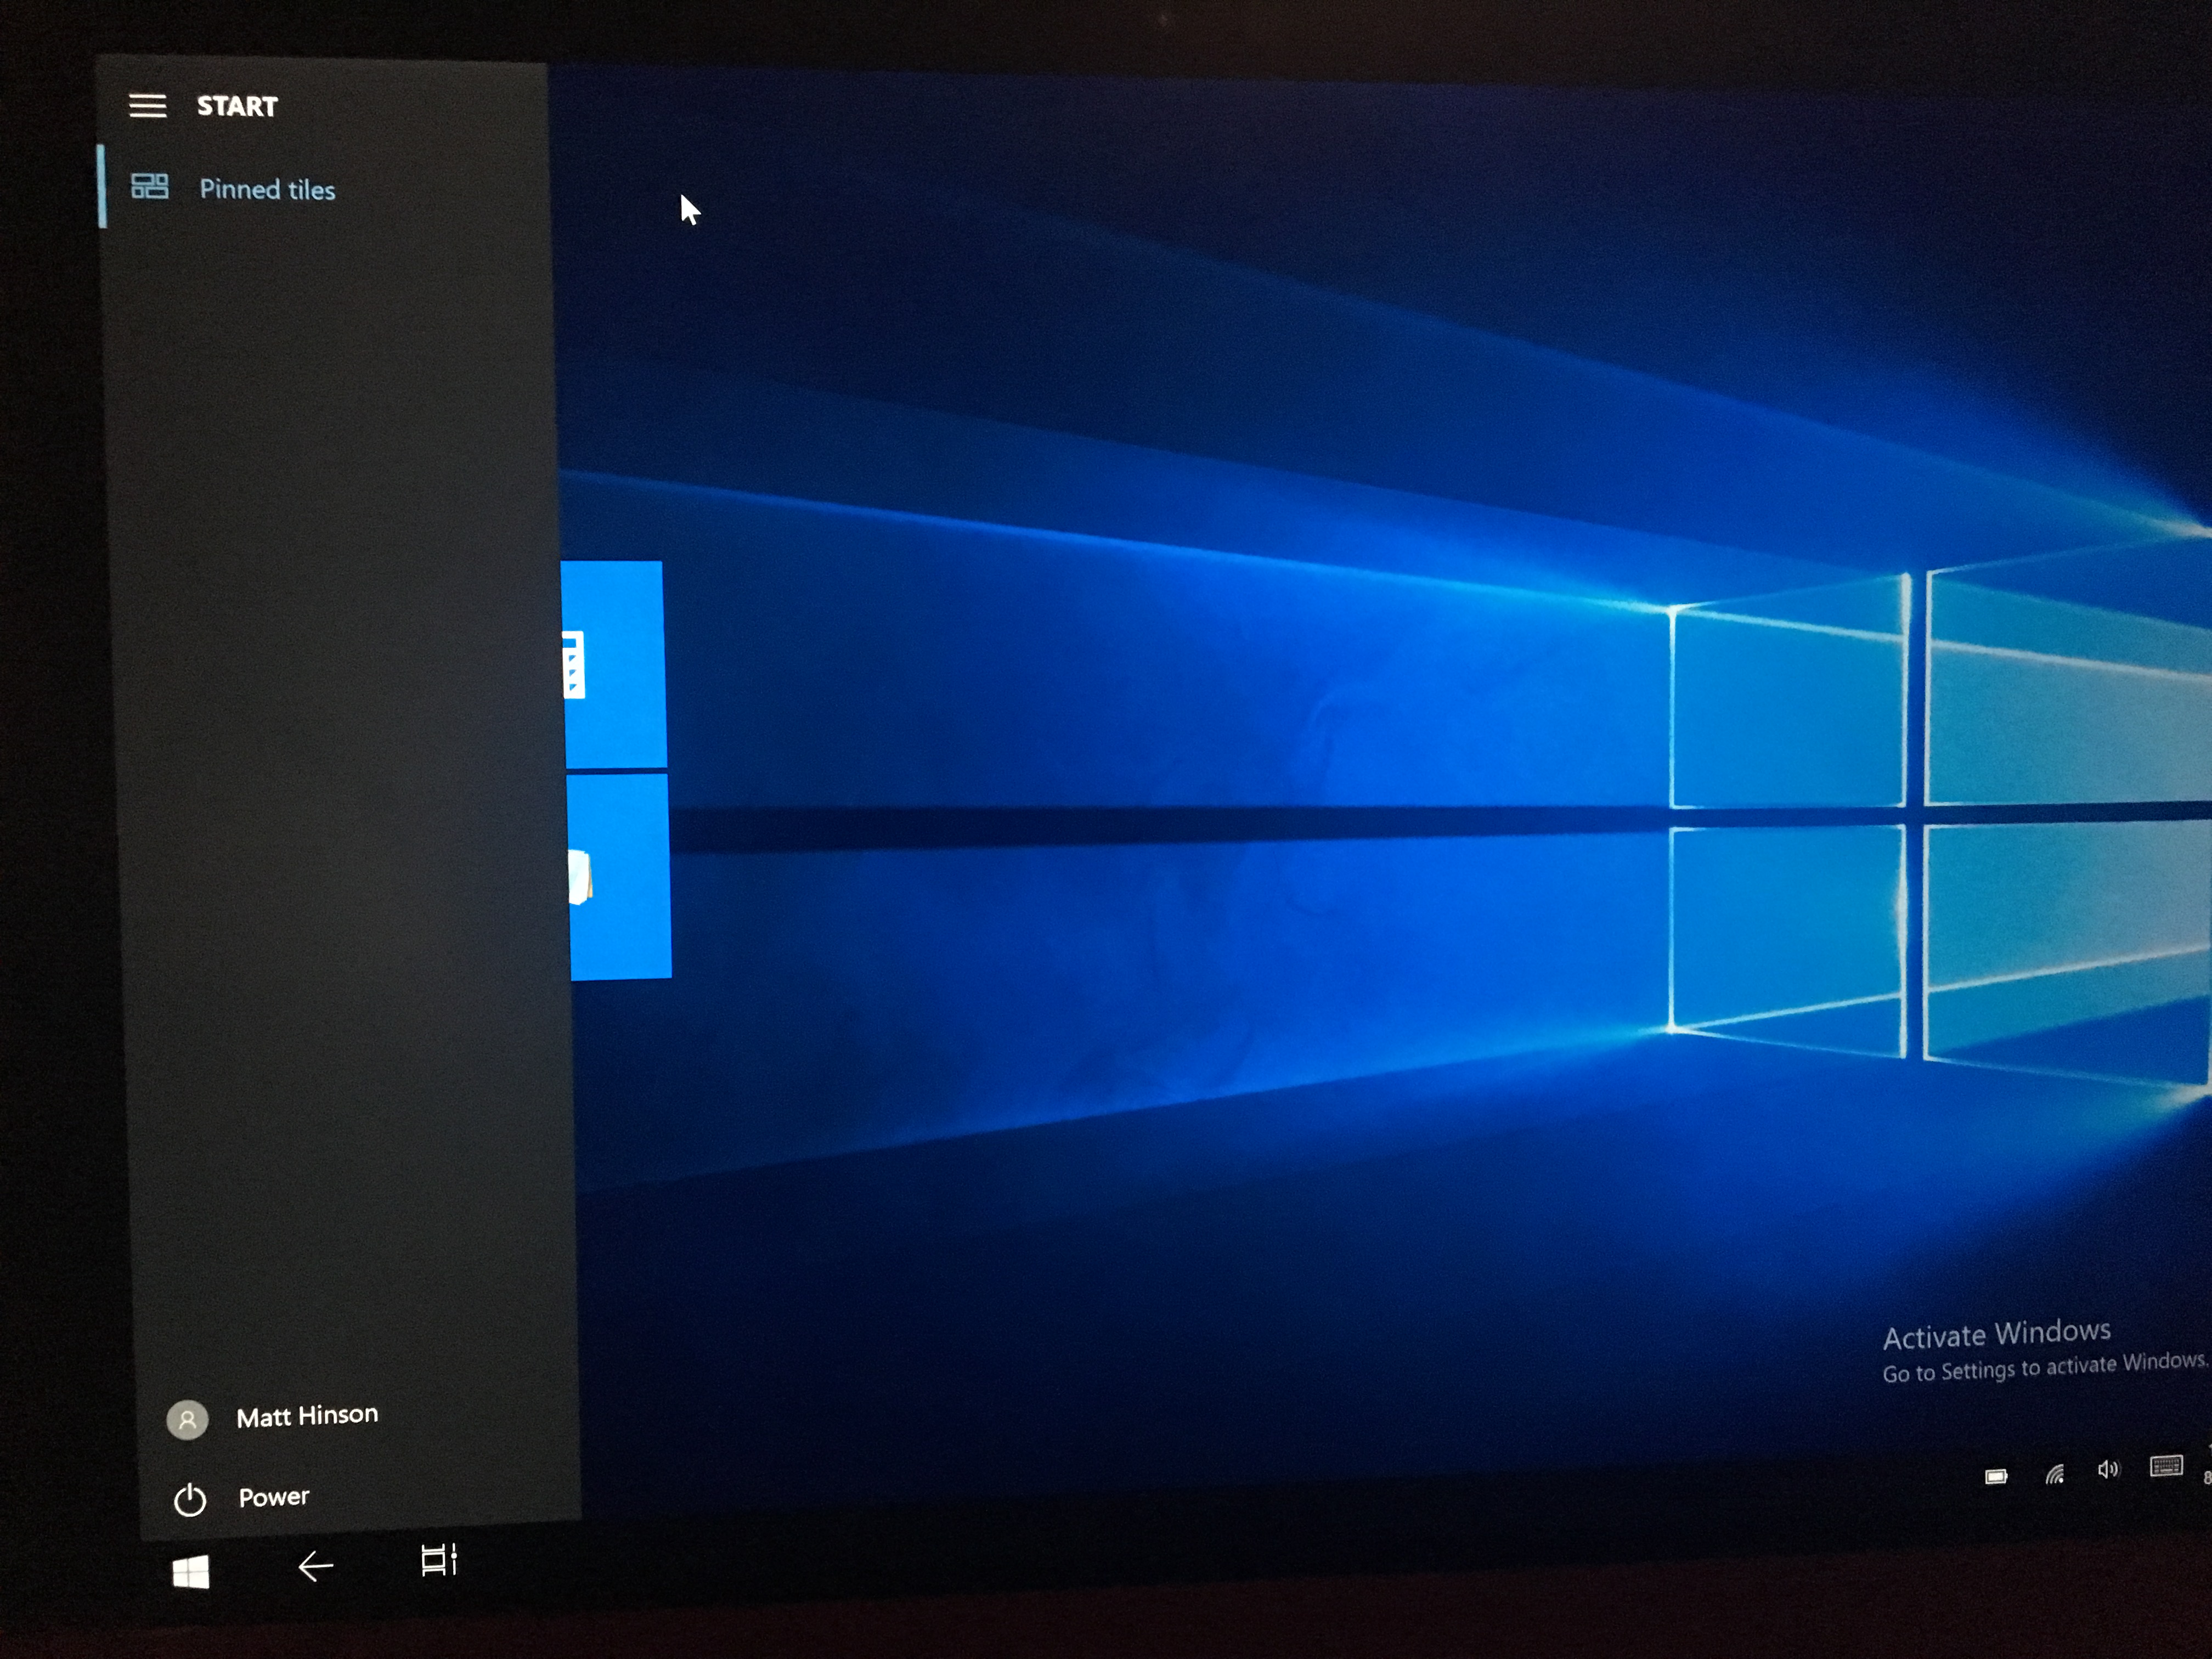
In this screen, notice I do not have the Start menu Show All Apps button. I all I have is the Pinned Tiles button
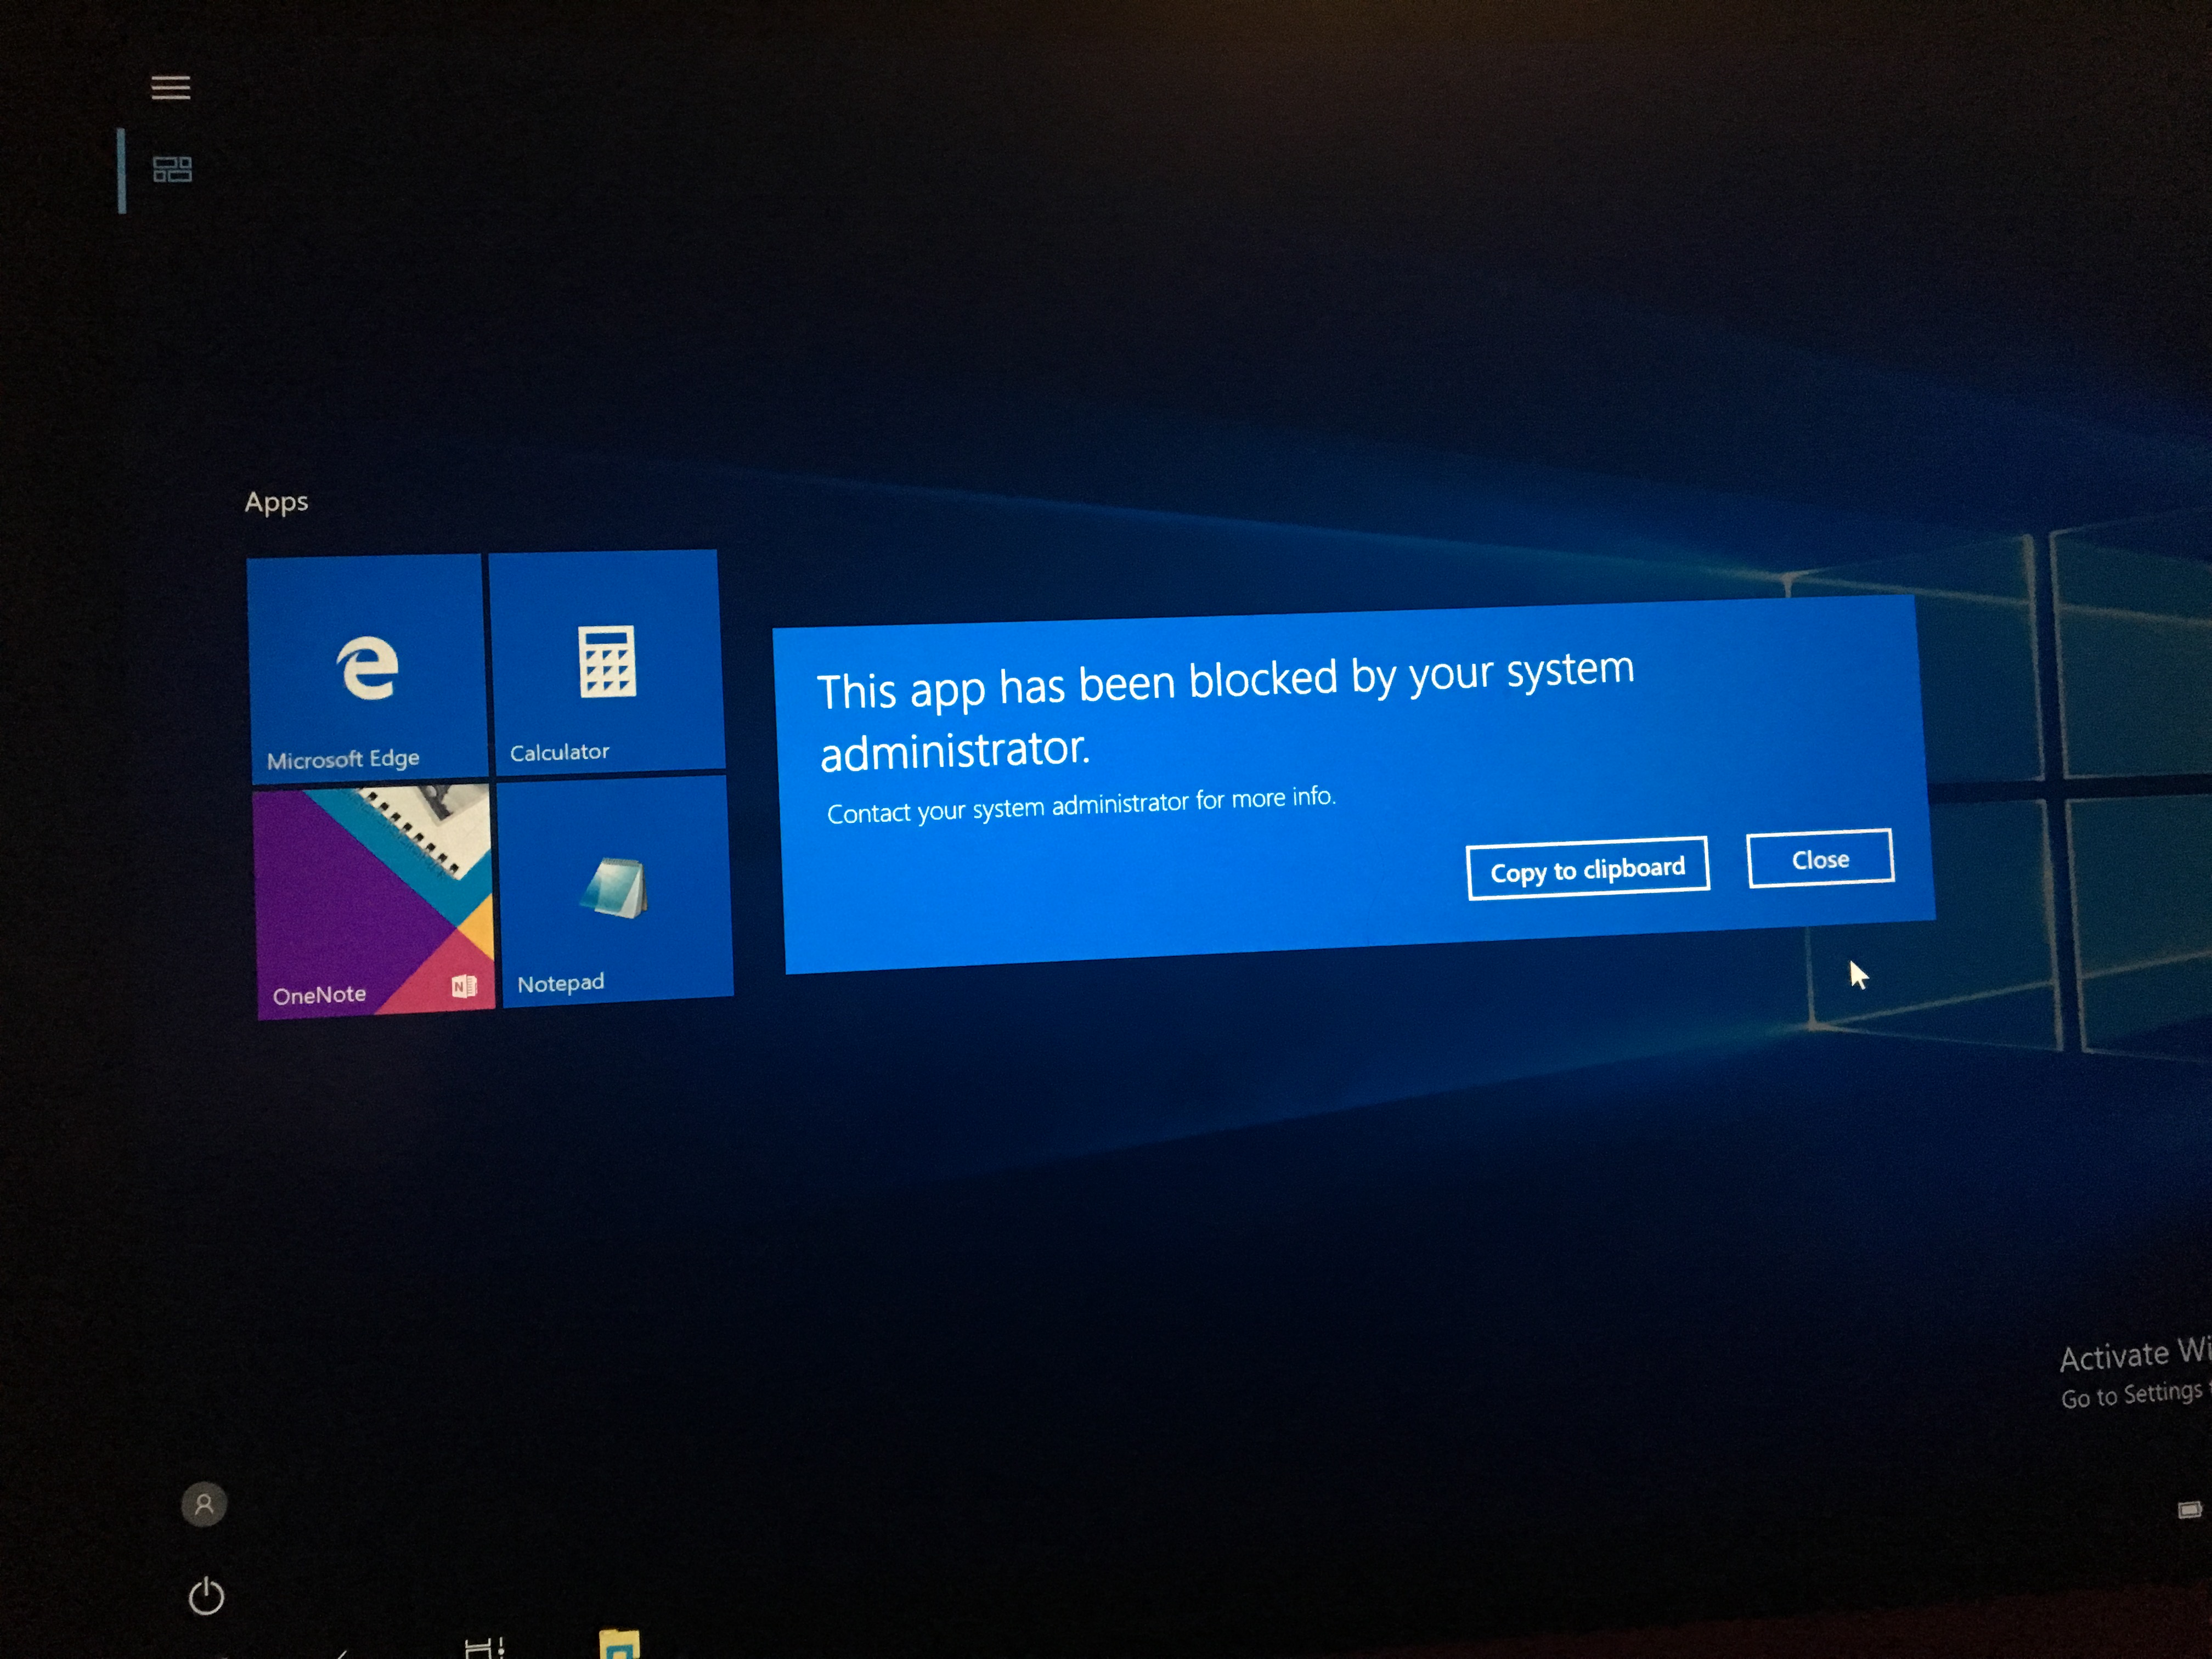
Lastly, a user can still swipe in from the right and attempt to access the Settings app, but guess what? Yep, that's right, it's blocked!
Once you get to this point, kick the tires a little bit and see if you can beat the Assigned Access profile!
Troubleshooting
If for some reason your AssignedAccess CSP policy isn't working as expected, check the Device status for the policy in the Intune portal.
- Open up a browser and navigate to your Intune portal
- In the Intune blade, click Device Configuration
- In the Device Configuration blade, click Profiles
- Click your AppLocker Policy. On the Policy blade, click Device status
- On the Device status blade, review the results. If you see an error, click the entry to drill down. If the error comes back as Remediation Failed, you have a malformed XML string value. A good way to check to see if your XML is malformed or not, open up the XML file in Internet Explorer. If you don't see the familiar XML formatting, but rather a blank page, you have a malformed XML. Go back and review the XML value you copied into the policy. Review the sections in the blog series that discusses the XML value
Wrap Up
Alright, that's it! I hope you had as much fun as I did! Always cool to see the power of Intune at work. The unfortunate aspect of this blog is what I mentioned in part I, as Windows 10 1803 becomes standard across organizations and Intune's kiosk mode evolves into a generally available feature, all of our hard work here is rendered moot. But hey, it sure was cool tinkering and engineering a stop-gap while we wait for that evolution to occur. Until next time!