Encrypting Information in SharePoint Lists
Encrypting the information contained in SharePoint lists is a common request that I have heard from colleagues and customers. SharePoint does not provide any built-in mechanism for encrypting the information that is contained in the content database.
Sometimes a list might contain sensitive information, such as the social security number for an individual. Once this information is entered into a SharePoint list, it is stored in the content database in plain sight of anyone that is able to view the database. We should implement stringent security to limit who can access the database, but it can also be good to add another layer of security protection for the sensitive data. It would be nice if we could encrypt the private information in the content database, while still allowing the authorized users of the SharePoint site to view the unencrypted values. Well, this can be done pretty easily by creating a custom field for SharePoint lists.
A primer on custom fields can be found here. I am going to walkthrough the creation of a custom single-line text field that will encrypt the information entered before storing it in the content database, and then decrypt it when a user views the list item.
NOTE: For the purpose of this example, the "encryption" that is used is not really encryption. We will just be converting the entered string value to a Base64String that will be stored in the database, but it can easily be changed to use whatever encryption mechanism that might be needed.
The first thing to create is the "EncryptedTextFieldControl.ascx" user control. This will be what is shown to the user when editing or adding the field.
1: <%@ Control Language="C#" %>
2: <%@ Assembly Name="CustomFieldsAssembly, Version=1.0.0.0,
3: Culture=neutral, PublicKeyToken=xxxxxxxxxxxxxxxx" %>
4: <%@ Register TagPrefix="SharePoint" Assembly="Microsoft.SharePoint,
5: Version=12.0.0.0, Culture=neutral, PublicKeyToken=71e9bce111e9429c"
6: Namespace="Microsoft.SharePoint.WebControls" %>
7:
8: <SharePoint:RenderingTemplate ID="EncryptedTextFieldRendering" runat="server">
9: <Template>
10: <asp:TextBox runat="server" ID="txtData" MaxLength="255" class="ms-long"/>
11: </Template>
12: </SharePoint:RenderingTemplate>
Next we create the "EncryptedTextFieldControl.cs" class. This will provide the code for rendering the user control that we created above. This will handle how the value is rendered to the user when the field is either viewed, added, or edited.
1: using System;
2: using System.Web.UI;
3: using System.Web.UI.WebControls;
4: using Microsoft.SharePoint.WebControls;
5:
6: namespace CustomFieldsAssembly
7: {
8: // Inherits from BaseFieldControl
9: public class EncryptedTextFieldControl : BaseFieldControl
10: {
11: // This will reference the textbox in the user control.
12: protected TextBox txtData;
13:
14: // This is the ID for our custom field rendering template.
15: protected override string DefaultTemplateName
16: {
17: get { return "EncryptedTextFieldRendering"; }
18: }
19:
20: // This gets or sets the texbox value.
21: public override object Value
22: {
23: get
24: {
25: EnsureChildControls();
26: return txtData.Text;
27: }
28:
29: set
30: {
31: EnsureChildControls();
32: txtData.Text = value.ToString();
33: }
34: }
35:
36: // This handles a call to Focus on our control.
37: public override void Focus()
38: {
39: EnsureChildControls();
40: txtData.Focus();
41: }
42:
43: // This overrides the default behavior of CreateChildControls
44: protected override void CreateChildControls()
45: {
46: if (Field == null) return;
47: base.CreateChildControls();
48:
49: // Don't render the textbox if we are just displaying the field.
50: if (ControlMode == SPControlMode.Display)
51: return;
52: // Get the reference for the user control textbox.
53: txtData = (TextBox)TemplateContainer.FindControl("txtData");
54: // Handle the case where we can't find it.
55: if (txtData == null)
56: throw new NullReferenceException("txtData is null");
57: // If we are adding a new value (not editing), then set the
58: // value of the textbox to an empty string.
59: if (ControlMode == SPControlMode.New)
60: txtData.Text = String.Empty;
61: }
62:
63: // This override handles the rendering of the value when
64: // the field is being viewed.
65: protected override void RenderFieldForDisplay(HtmlTextWriter output)
66: {
67: // Get the value of the field
68: string fieldValue = base.Field.GetFieldValueAsText(this.ItemFieldValue);
69: // If a value exists, write the value to the output.
70: // If not, then just output an HTML space.
71: if (!string.IsNullOrEmpty(fieldValue))
72: output.Write(fieldValue);
73: else
74: output.Write(" ");
75: }
76: }
77: }
Now we need to implement the encryption/decryption mechanism for our field. For this example, I just created a simple static class called "EncryptionHelper.cs" to expose extension methods for doing the encryption and decryption. This is where you would place your own custom encryption.
1: using System;
2: using System.Text;
3:
4: namespace CustomFieldsAssembly
5: {
6: internal static class EncryptionHelper
7: {
8: // Perform the encryption
9: internal static string Encrypt(this string plainText)
10: {
11: // Check for an actual value in plainText
12: if (!String.IsNullOrEmpty(plainText))
13: {
14: // This is where you would do your own custom encryption.
15: // For this example, we just Base64 encode the string.
16: byte[] bytes = Encoding.ASCII.GetBytes(plainText);
17: string cryptText = Convert.ToBase64String(bytes);
18: // We add a prefix to the value that will be stored,
19: // signifying that this encrypted text.
20: return String.Format("CRYPT:{0}", cryptText);
21: }
22: else
23: {
24: // If plainText was null or empty, we just return it.
25: return plainText;
26: }
27: }
28:
29: // Perform the decryption
30: internal static string Decrypt(this string cypherText)
31: {
32: // If cypherText is not prefixed, then it is not
33: // encrypted text, so just return it.
34: if (!cypherText.StartsWith("CRYPT:"))
35: return cypherText;
36:
37: // Check for an actual value in cypherText
38: if (!String.IsNullOrEmpty(cypherText))
39: {
40: // Strip the prefix so that all we have is the
41: // encrypted value.
42: cypherText = cypherText.Remove(0, 6);
43: // This is where you would do your own custom decryption.
44: // For this example, we just Base64 decode the string.
45: byte[] bytes = Convert.FromBase64String(cypherText);
46: return Encoding.ASCII.GetString(bytes);
47: }
48: else
49: {
50: // If cypherText was null or empty, we just return it.
51: return cypherText;
52: }
53: }
54: }
55: }
The last class that we have to write is the "EncryptedTextField.cs" class. This is where we actually define the functionality of our field and perform the encryption and decryption.
1: using Microsoft.SharePoint;
2: using Microsoft.SharePoint.WebControls;
3:
4: namespace CustomFieldsAssembly
5: {
6: // Inherits from SPFieldMultiLineText. We are only creating a singleline
7: // field, but the SPFieldText base class maps to an nvarchar(255) in the
8: // content database. This would limit the amount of plain text that
9: // could be entered to well less than 255. By using the SPFieldMultiLineText
10: // base class, our field is mapped to an ntext in the database. To limit
11: // the user from entering more than 255 characters, we use the MaxLength
12: // property on the TextBox in the user control.
13: public class EncryptedTextField : SPFieldMultiLineText
14: {
15: // Do nothing constructor
16: public EncryptedTextField(SPFieldCollection fields, string fieldName)
17: : base(fields, fieldName)
18: { }
19:
20: // Do nothing constructor
21: public EncryptedTextField(SPFieldCollection fields, string typeName, string displayName)
22:
23: : base(fields, typeName, displayName)
24: { }
25:
26: // This is where we point to the user control for field rendering.
27: public override BaseFieldControl FieldRenderingControl
28: {
29: get
30: {
31: BaseFieldControl fieldControl = new EncryptedTextFieldControl();
32: fieldControl.FieldName = this.InternalName;
33: return fieldControl;
34: }
35: }
36:
37: // This method validates the value that the user entered before
38: // being stored in the database. This is where we will perform
39: // the encryption.
40: public override string GetValidatedString(object value)
41: {
42: return value.ToString().Encrypt();
43: }
44:
45: // This method is called to get the field value. Here we
46: // perform the decryption of the value.
47: // NOTE: This will normally be getting the encrypted value,
48: // but this cannot be guaranteed. This method is called twice
49: // when getting the value for viewing, so we don't want to
50: // decrypt the value twice, so that is why we used a prefix
51: // in the encryption routine.
52: public override object GetFieldValue(string value)
53: {
54: return value.Decrypt();
55: }
56: }
57: }
Now we need to create the "fldtypes_custom.xml" XMLfile that defines our custom field. I will point out the interesting parts of this file by line number:
13: We cannot enable sorting since we are inheriting from SPFieldMultiLineText
17: Here is where we define the rendering pattern that will be used in the list view. This is just a simple CAML expression that displays "(Encypted Text)" if there is a value. The rendering of the value in the list view can only be customized with CAML so we cannot do any decryption to display the plain text value here like we could in the list item view and the edit form.
1: <?xml version="1.0" encoding="utf-8" ?>
2: <FieldTypes>
3: <FieldType>
4: <Field Name="TypeName">EncryptedTextField</Field>
5: <Field Name="ParentType">Note</Field>
6: <Field Name="TypeDisplayName">Encrypted Text</Field>
7: <Field Name="TypeShortDescription">Encrypted Text</Field>
8: <Field Name="UserCreatable">TRUE</Field>
9: <Field Name="ShowOnListCreate">TRUE</Field>
10: <Field Name="ShowOnSurveyCreate">TRUE</Field>
11: <Field Name="ShowOnDocumentLibrary">TRUE</Field>
12: <Field Name="ShowOnColumnTemplateCreate">TRUE</Field>
13: <Field Name="Sortable">FALSE</Field>
14: <Field Name="Filterable">TRUE</Field>
15: <Field Name="FieldTypeClass">CustomFieldsAssembly.EncryptedTextField, WSSFields,
16: Version=1.0.0.0, Culture=neutral, PublicKeyToken=xxxxxxxxxxxxxxxx</Field>
17: <RenderPattern Name="DisplayPattern">
18: <Switch>
19: <Expr>
20: <Column/>
21: </Expr>
22: <Case Value="">
23: </Case>
24: <Default>
25: <HTML><![CDATA[(Encrypted Text)]]></HTML>
26: </Default>
27: </Switch>
28: </RenderPattern>
29: </FieldType>
30: </FieldTypes>
Once this is compiled and strong named, there are just a few simple step for installing the custom field into SharePoint.
- Install the assembly into the GAC
- Copy the "EncryptedTextFieldControl.ascx" file to "C:\Program Files\Common Files\Microsoft Shared\Web Server Extensions\12\TEMPLATE\CONTROLTEMPLATES\"
- Copy the "fldtypes_custom.xml" file to "C:\Program Files\Common Files\Microsoft Shared\Web Server Extensions\12\TEMPLATE\XML"
- Run the command "iisreset" from the command line
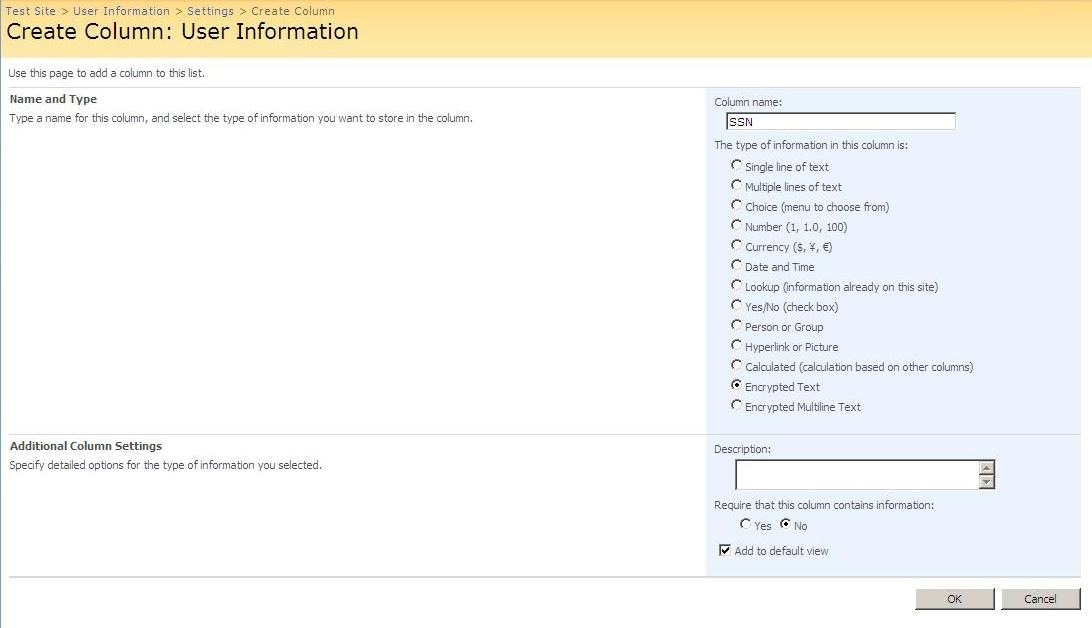
Now you are ready to use your custom encrypted text field in SharePoint lists. When adding a column to the list, the new field type will be available, as shown below (creating an SSN field):
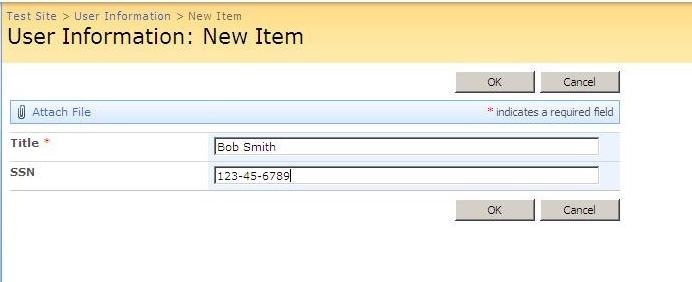
The following image show the field when adding a new item to the list:
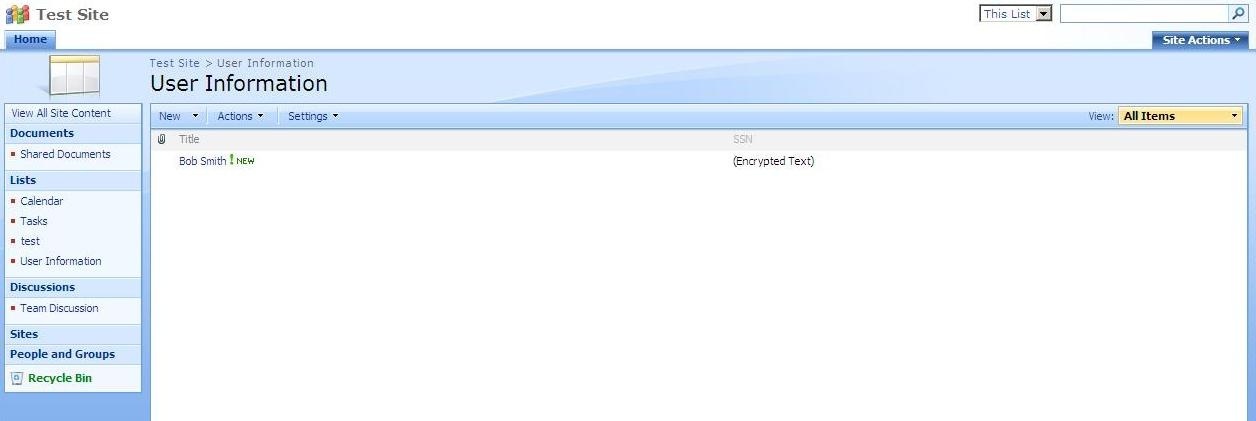
The following image show the field when viewing the list. Notice that the field shows up as "(Encrypted Text)" in this view.
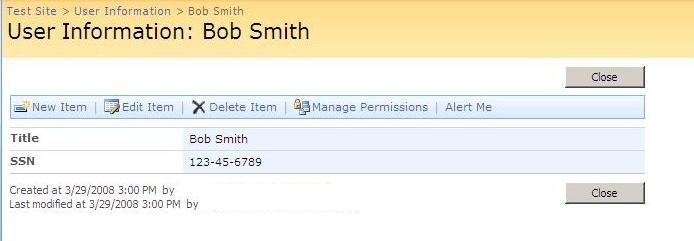
Now we can click on the list item to view it as shown below. Notice that we can now see the plaintext value for SSN.
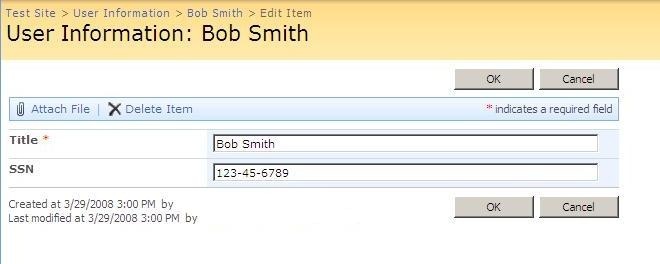
The following image show the field when editing the list item:
And the next image shows how the text looks in the database. Notice that "Bob Smith" is in plaintext, while the encrypted SSN value is unreadable.

This also works with queries that are done via the WSS Object Model or the WSS Web Services. The authenticated user will be able to retrieve the plaintext value if they have permission to access the list data.
So there you go...we have successfully created a custom field that implements an extra layer of security for sensitive information that we might need to store in SharePoint. This turned out to be a long post, but I hope you find it interesting.