Windows Azure – Remove Virtual Disks
This is very famous issue when you create many Virtual Machines on Windows Azure, after deleting the VMs the virtual disks (VHD files) are still there.
So far there is no way to remove these VHD files using the GUI interface, so I started to search how can I do it through PowerShell. The challenge of Azure PowerShell is that most of the resources available for developers using Visual Studio, for me any thing starts with Visual Studio is sort of mystery (The nice story that one of my developer friends identify SharePoint Site Collection: is a site contains collections is true story) that should be left to wisdom men (like this friend) who can understand it ![]() .
.
For Infrastructure guys like me, the following are step by step of how to use PowerShell to connect to Azure and then delete the VHDs:
Step 1: Management Certificate:
In simple words we will need a certificate to connect with PowerShell to Azure, this certificate should be 2048 bits at least, self signed certificate is good option for testing and labs.
Creating Self Signed Certificate can be done by many ways, the easiest way is using the normal PowerShell:
1. Open PowerShell (as an Administrator).
2. Type the following cmdlet:
New-SelfSignedCertificate -DnsName azure -CertStoreLocation cert:\LocalMachine\My
This cmdlet will create new self signed certificate and place it in the local machine store, check the following snapshots:
Let’s make sure that the certificate is created:
1. From Run > Type mmc.
2. Click File > Add/Remove Snap-in.
3. Select Certificate and Click Add.
4. Select Computer Account > Finish.
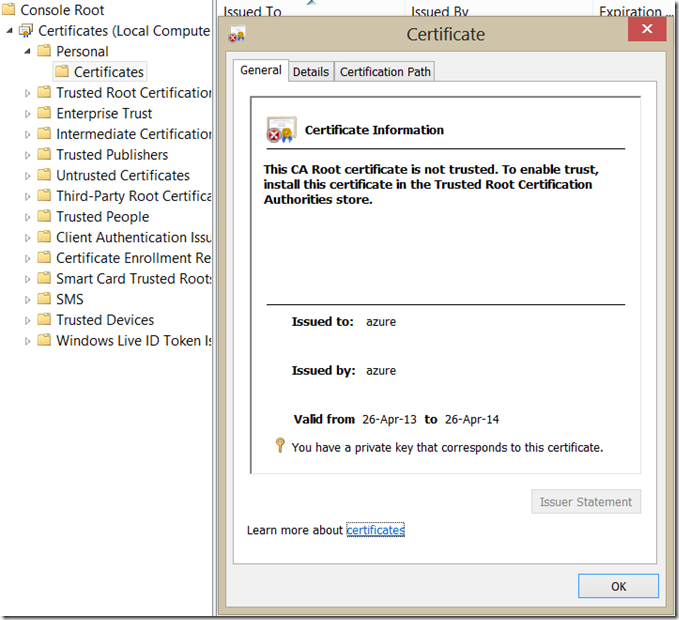
5. Under Personal > Certificate > you should find the new certificate “azure”:
The next step is to upload this certificate with private key (the PFX file) to Windows Azure, in order to do that you will need to export the PFX file (the certificate with the Private Key) first:
1. From the same Snap-in.
2. Right click the certificate > All Tasks > Export.
3. Click Next > Select “Yes Export the Private Key” > Click Next.
4. On Export File Format click next > Then provide the password.
5. Browse to the location where you will save the certificate.
From Azure Management Portal create a new Cloud Service to use it with the certificate:
After having the PFX file we will need to upload it to Windows Azure:
Log into the Management Portal.
In the navigation pane, click Cloud Services, and then click the service for which you want to add a new certificate.
On the ribbon, click Certificates, and then click Upload a Certificate.
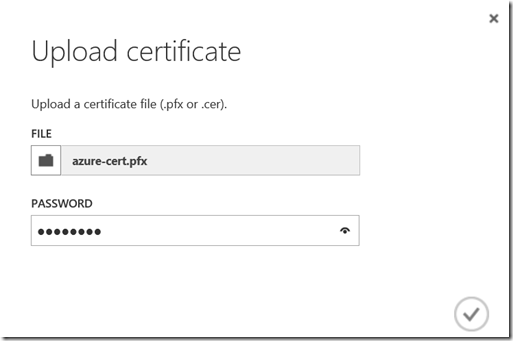
In the Upload certificate dialog, click Browse For File, go to the directory containing your certificate, and select the .pfx file to upload.
Type the password of the private key for the certificate.
Click OK.
Step 2: Install Azure PowerShell
To install Windows Azure PowerShell:
- Download Windows Azure PowerShell: https://go.microsoft.com/?linkid=9811175&clcid=0x409
- Install Windows Azure PowerShell.
Step 3: Connect to Azure:
Before we start using the Windows Azure cmdlets to remove the VHDs or anything else, we will need to configure connectivity between the workstation and Windows Azure. This can be done by downloading the PublishSettings file (this file will setup the PowerShell environment to use Windows Azure) from Windows Azure and importing it. The settings for Windows Azure PowerShell are stored in: <user>\AppData\Roaming\Windows Azure PowerShell.
From Windows Azure PowerShell type the following cmdlet:
Get-AzurePublishSettingsFile
A browser window opens at https://windows.azure.com/download/publishprofile.aspx, where you can sign in to Windows Azure.
Sign in to the Windows Azure Management Portal, and then follow the instructions to download your Windows Azure publishing settings. Use your browser to save the file as a .publishsettings file to your local computer. Note the location of the file.
In the Windows Azure PowerShell window, run the following command:
Import-AzurePublishSettingsFile FileName.publishsettings
Step 4: Remove the VHDs (Finally)
Once we are connected now to Azure, we can manage Azure with PowerShell and do anything we need, if you forgot what was the purpose of this article this is the time you will need to scroll up and read it again ![]()
Run the following cmdlet to see all the virtual disks (the VHD file):
Get-Azuredisk
In the above snapshot this is the disk that I want to remove (you will need to make sure that is not connected to any Virtual Machine), then run the following cmdlet:
Remove-AzureDisk <DiskName>
Now you will probably decide to leave the VHDs and not delete them which is easier ![]() , I don’t blame you for that. But you will have this article as reference in case one day someone asked you the question: How can I remove the unused VHD file.
, I don’t blame you for that. But you will have this article as reference in case one day someone asked you the question: How can I remove the unused VHD file.
for more details about Azure PowerShell: https://msdn.microsoft.com/en-us/library/windowsazure/jj156055.aspx
for more information about Azure Management Certificate: https://msdn.microsoft.com/en-us/library/windowsazure/gg981929.aspx


