Building Intelligent Delay Within Orchestrator Runbook Solutions: Activity Looping
Often times when automating a multi-step process, there is a need to build into this automation a certain amount of delay. For instance, if I have rebooted an application server, we not only need to wait for the OS to come back online, but also the application host services to come back online before adding the application server back into the host pool. This is to say, after rebooting the server; we need to delay before executing the next step in the process.
System Center Orchestrator comes with built in delay functionality through establishing a trigger delay on any activity link. When setting this delay the process will pause between activities for the specified time. This is great, however as Anders Bergstrom has pointed out both here, the trigger delay functionality is difficult to track, as the pause is subsurface or does not manifest itself in any viewable form. Anders further solves this shortcoming by using a custom activity for introducing delay into Rubook solutions.
I would like to expand on both triggered delays and customs activity based delays by introducing the concept of intelligent delays. As I create Runbook solutions, it is my goals to include as few as possible timed delays, instead, relying on intelligent delays. Taking the example as detailed above in which a server is rebooted, before moving on with the automation, the IIS service must be started. Simply using a timed delay here would be quite inefficient. Instead if we were to monitor the IIS service, looping on this monitor activity until the service has started, and only then moving onto the next automation step, we have introduced a controlled and intelligent delay.
This is but one simple example of using an Orchestrator activity to intelligently control delay. During this blog posting I will be detailing at a greater depth this example, as well as introducing two additional methods which include using WMI data and PowerShell as intelligent delay mechanisms.
Ultimately the benefits of using intelligent delays are as follows
- Removing any inefficient guess work around timing
- Greater control over delay mechanics - delay only when a delay is needed and for only as long as the delay is required
- Greater reporting or visibility into the delay - we can track how many times a loop has triggered
- Greater error control on the delay – we have the ability to exit if the delay loop has exceeded a determined threshold
Intelligent Delay on Service Status:
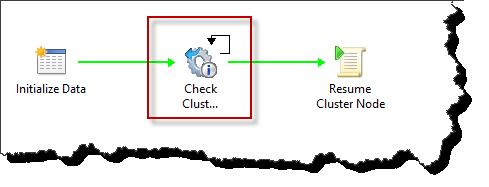
In this first example scenario we have a cluster node that has just been patched and rebooted (Runbook automation). Once ready, this cluster node needs to be joined back into the cluster. Before doing so we want to delay until the Windows Failover Cluster service has been started. In the below screen shot we have the sequence of activates to be executed, the Check Cluster Service (boxed in red) activity is our intelligent delay. This is simply a ‘Get Service Status’ activity found under the native monitoring activities.
Looking at the properties, no surprises here, we have a computer name that is passed in using published data, and then the service name, in this case ‘Cluster Service’.
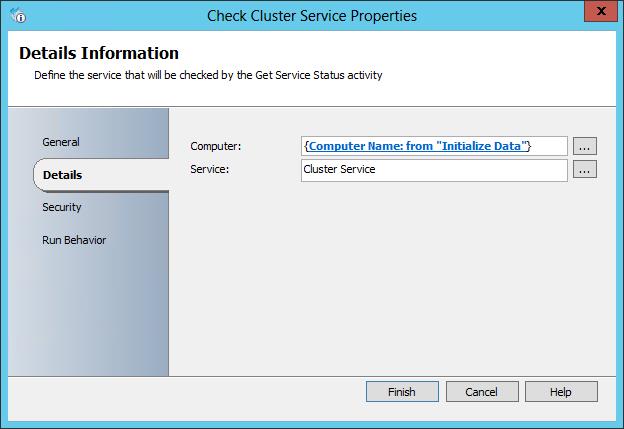
Finally if I right click on the activity and select ‘Looping..’, we can see the ‘exit sequence’. So in this case the loop will exit when the Service status for the Cluster Service equal ‘Service Running’. Until a time at which the service is running, the activity will continue to loop – Intelligent Delay.

Ok, that example was kind of week on the wow factor, but demonstrates a very simple intelligent delay method which can be expanded well beyond server status using many of the native Orchestrator monitor activities. I will turn up the technological wiz bang in the next two examples.
Delay on WMI data:
For my next example, the scenario is that a computer has been added to a Configuration Manager collection, and is then targeted with a set of software updates. A policy refresh job is then executed against the computer. Any seasoned Configuration Manager engineer would agree that there is no prescribed time in which one could expect this policy refresh process to complete. Because of this, using a timed delay here would be wildly inefficient and ultimately cause unpredictable results at Runbook execution time (been there, done that).
To combat this need for a delay, however lack of predictable policy retrieval time, we can snoop WMI on the client for the arrival of the policy. Once WMI data has indicated that the policy has arrived we can move on with the next set of activates in the Runbook solution - Intelligent Delay.
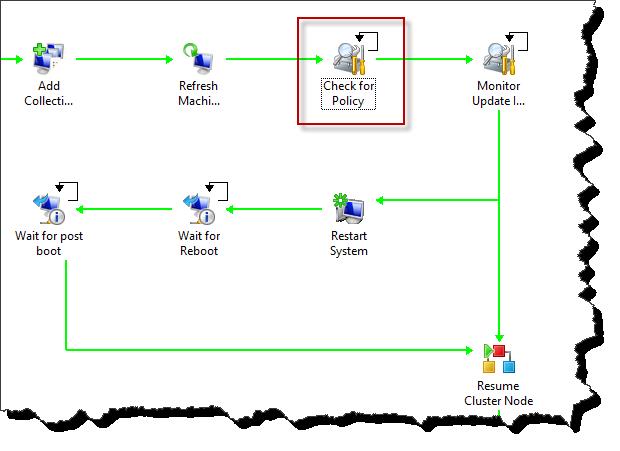
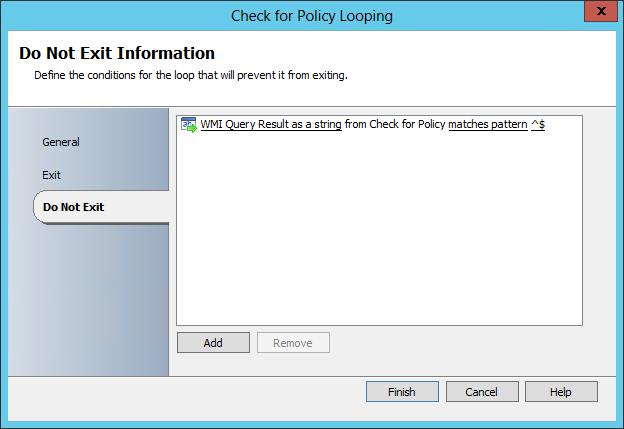
In the below screen shot we can see the scenario as described above. The boxed in red activity ‘Check for Policy’ is serving as the Intelligent delay - this is a standard Query WMI activity.
Looking at the properties of this Query WMI activity, we have a basic WMI query. in this example we are returning all information about deployments applied to a computer via. Configuration Manager Policy. Basically, if the query returns a NULL value then the policy has not yet arrived and we would like to delay or loop. If the query returns anything other than NULL, the policy has arrived, and the delay will end (loop will exit).
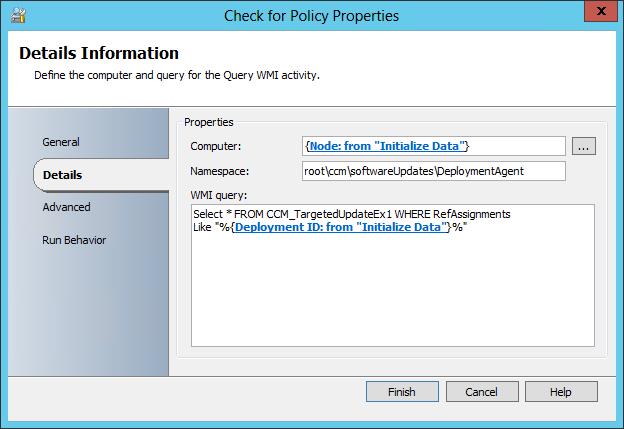
Here we can see the Do Not Exit condition which is checking for empty or NULL policy (matches patter ^$) indicating that the specific policy has not yet been applied. The delay loop is configured to Exit when the WMI query returns 'success' and contains any data, indicating that policy has arrived.

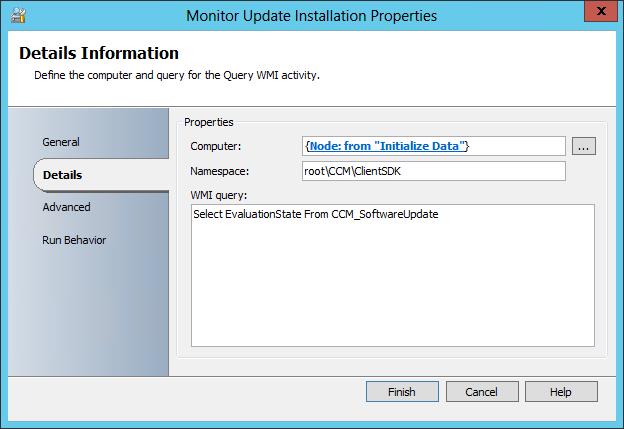
In the previous WMI example we were simply looking for the existence of data in WMI. If the data does not exist, loop until it does – Inelegant Delay. This can just as easily be configured to look for specific data. So for instance, if I was looking to loop until the software update installation process had completed, instead of a select all statement, I would simply be returning a specific piece of data. In the below screen (another Query WMI Activity) I am returning EvaluationState, which will indicates progress into the software update installation.
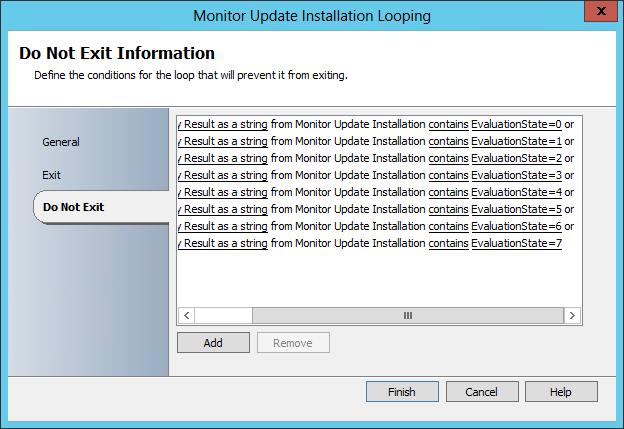
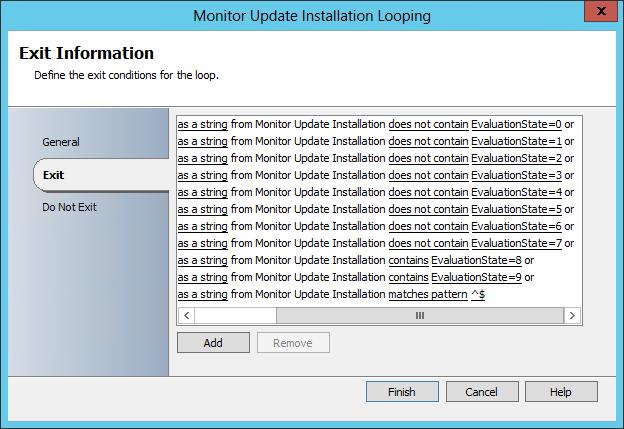
With the WMI query results now loaded onto the Orchestrator databus, we can use these values in our conditional looping. In the example of evaluation state, there are several values that would indicate updates are in the process of being installed. I have each one of these defined as Do Not Exit criteria, or in other words if updates are being installed loop – Intelligent Delay. Finally there are several values that would indicate the installation process has been completed. Upon returning one of these, the loop ends, and the next action in the automation is executed.
Ill take a moment here just to clarify that both of these examples have focus on Configuration Manager and Software Updates. This process works with ANY data that can be sniffed from WMI.
Delay on PowerShell Published Data:
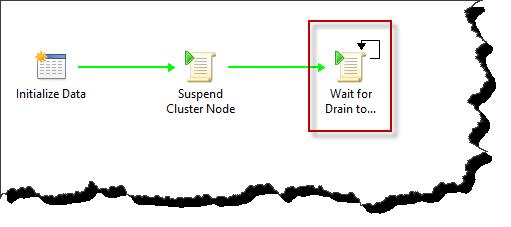
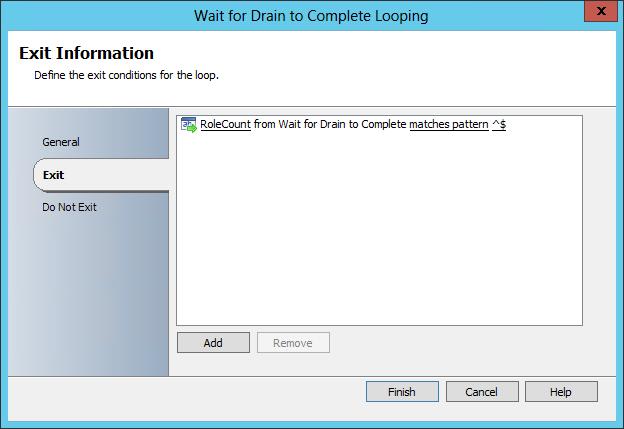
Finally I have an example of using data loaded onto the databus with a PowerShell script as the delay mechanism. The scenario is that we are draining all roles from a Windows Failover Cluster node. We would then like to perform maintenance on this node, however need to ensure that the drain has completed before starting any maintenance. Using PowerShell we can query the node for any hosted roles, gather a count of these roles, publishing this data to the Orchestrator databus. Once we have access to this data (count in this case) on the Orchestrator databus we will loop on the data until the value is empty (the cluster node has been drained of all roles).
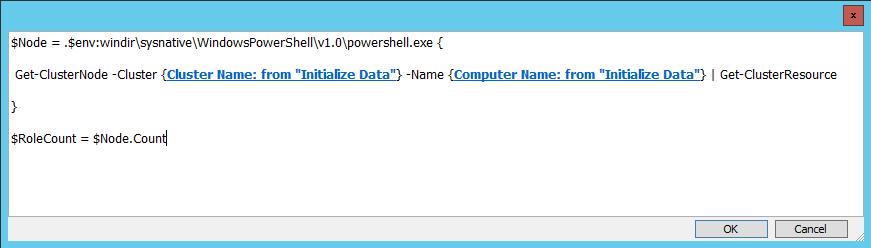
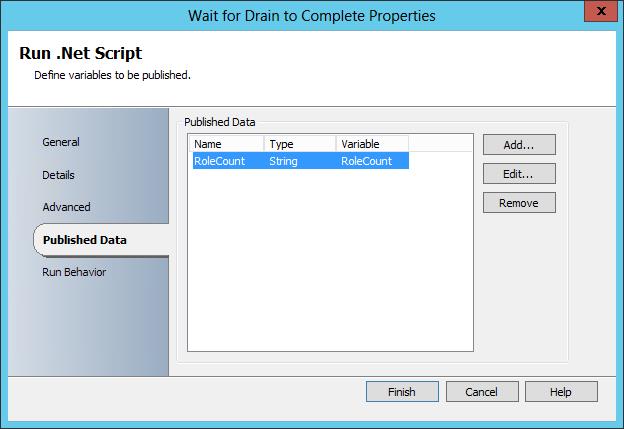
In the below Runbook example, the ‘Wait for Drain to Complete’ activity is serving as our intelligent delay. This is a standard Run .NET Script activity executing a very simple PowerShell script – basically placing the count of cluster node roles into a variable $RoleCount.
Click Image to enlarge:
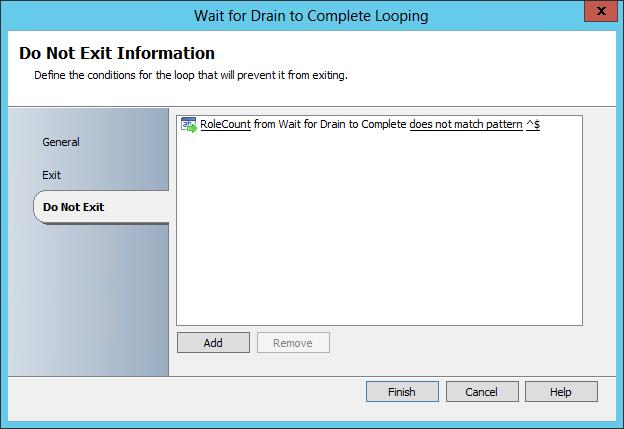
Our Do Not Exit loop criteria is set to loop (not exit) when RoleCount is any other value then NULL (does not match patter ^$). Basically if there is any role present on the node, loop – Intelligent Delay. The loop will exit once the RoleCount data is equal to NULL (matches pattern ^$) indicating that all roles have been drained from the cluster node.
Closing:
There you have it, pretty basic, however maybe not painfully obvious strategy for Intelligent Delay. While there may be a time and place for timed delays using either a link trigger delay or custom activity, it is my opinion that any opportunity to insert some intelligence into Runbook delay makes a smarter and more flexible Runbook execution experience.
As always, twitter subscripting link is on this page, check it out for updating on any new posting to technet.com/neilp.
neilp