Bicycle Computer #5 – UI continued – Custom Controls
This is the fifth in a series of articles demonstrating how someone with modest .NET programming capabilities can now write applications for embedded devices using the .NET Micro Framework and Visual Studio. To jump to the initial article, click here. I am still working on getting this project posted out to CodePlex or somehow made available to you in total. I know I said that before but I am waiting on input from another group inside Microsoft. Remember, you can help determine what we cover in the series with your questions and suggestions. What do you want to see covered? Programmers are often very particular and opinionated – what do you think should have been done differently. This is a great place to share your experiences. The series is getting lots of readers but relatively few comments.
I started to think about the settings view – the UI where the user sets up the application. Right now, I can only think of two settings that I need: the units and the size of the wheel. Both of these only needs to be set once and likely rarely changed. I could use a drop down but looking at the number of tire sizes, that would be too unwieldly. What I have decided to do is to create my own control using software buttons. I don’t recommend this as good UI practice but it will make a good demonstration case for building rich UI on these small devices.
What I would actually recommend is that if you need to do something that is not supported in the base product that the first place you look is at Jens Kühner’s Rich Media Extensions Component Suite for NTEMF. You can find it at: https://www.innobedded.com. Jens has put together an impressive set of useful extensions. I would use them if the point wasn’t to demonstrate how you use the product.
UpDownArrowButton
For setting the tire size, the user is selecting from a long list. For setting the display units (Metric or English) you are selecting from a much shorter list but we can use the same control for both. I will create a list selection control that displays the current selection with an up and down arrow to change the selection. The selections are contained in a SettingsTable object which always has a label. The TireSize SettingsTable adds a circumference property. (I didn’t just compute this because it gets complicated with different style rims having different circumferences at the point that the tire sits as well as different size tires so the easiest thing is to compute that once and put it in the table. For example, the 700A and the 700B tires are both listed as 28x1-3/8 but the circumference of the rim where the tire sits (the ‘bead’) is 2016 mm on one and 1955 mm on the other. Besides, this gives us a good example of polymorphism. )
public class Settings
{
private string settingsLabel;
public string Label
{
get
{
return settingsLabel;
}
}
public Settings(string label)
{
settingsLabel = label;
}
}
public class TireSize : Settings
{
public double Circumference;
public TireSize(string label, double circ)
: base(label)
{
Circumference = circ;
}
}
public class Units : Settings
{
public Units(string label)
: base(label)
{
}
}
Settings can be table driven so that they can have an arbitrary and easily changed set of contents. The behavior is that they behave as a circular list so the you can reach all elements by going either up of down.
public class SettingsTable
{
private Settings[] settingTableData_;
private int settingIndex_;
public SettingsTable(Settings[] tableData)
{
settingTableData_ = tableData;
settingIndex_ = 0;
}
public Settings Current()
{
return settingTableData_[settingIndex_];
}
public Settings Next()
{
settingIndex_++;
if (settingIndex_ >= settingTableData_.Length)
{
settingIndex_ = 0;
}
return settingTableData_[settingIndex_];
}
public Settings Previous()
{
settingIndex_--;
if (settingIndex_ <= 0)
{
settingIndex_ = settingTableData_.Length - 1;
}
return settingTableData_[settingIndex_];
}
}
Here is the code for the actual control:
using Microsoft.SPOT.Input;
using Microsoft.SPOT.Presentation.Controls;
namespace NETMFBikeComputer
{
public class UpDownArrowButton : ContentControl
{
Text _labelText;
SettingsTable _settingsTable;
Image _arrowUp;
Image _arrowDown;
bool _upSelected;
bool _downSelected;
//--//
public UpDownArrowButton(SettingsTable settingsTable)
{
_settingsTable = settingsTable;
StackPanel basePanel = new StackPanel(Orientation.Vertical);
basePanel.SetMargin(2, 2, 2, 2);
_arrowUp = new Image(Resources.GetBitmap(Resources.BitmapResources.UpArrow));
_arrowDown = new Image(Resources.GetBitmap(Resources.BitmapResources.DnArrow));
_labelText = new Text(Resources.GetFont(Resources.FontResources.miramob), _settingsTable.Current().Label.ToString());
_labelText.SetMargin(0, 5, 0, 5);
basePanel.Children.Add(_arrowUp);
basePanel.Children.Add(_labelText);
basePanel.Children.Add(_arrowDown);
Child = basePanel;
}
protected override void OnTouchDown(TouchEventArgs e)
{
int xUp, yUp, xDn, yDn;
e.GetPosition(_arrowUp, 0, out xUp, out yUp);
e.GetPosition(_arrowDown, 0, out xDn, out yDn);
lock (this)
{
_upSelected = false;
_downSelected = false;
if (xUp < _arrowUp.ActualWidth && yUp < _arrowUp.ActualHeight)
{
_arrowUp.Bitmap = Resources.GetBitmap(Resources.BitmapResources.UpArrowOn);
_upSelected = true;
}
else if (xDn < _arrowDown.ActualWidth && yDn < _arrowDown.ActualHeight)
{
_arrowDown.Bitmap = Resources.GetBitmap(Resources.BitmapResources.DnArrowOn);
_downSelected = true;
}
}
}
protected override void OnTouchUp(TouchEventArgs e)
{
bool upSelected;
bool downSelected;
lock (this)
{
upSelected = _upSelected;
downSelected = _downSelected;
if (upSelected)
{
_arrowUp.Bitmap = Resources.GetBitmap(Resources.BitmapResources.UpArrow);
_upSelected = false;
}
else if (downSelected)
{
_arrowDown.Bitmap = Resources.GetBitmap(Resources.BitmapResources.DnArrow);
_downSelected = false;
}
}
string text = "";
if (upSelected)
{
text = _settingsTable.Next().Label;
}
else if (downSelected)
{
text = _settingsTable.Previous().Label;
}
_labelText.TextContent = text;
}
}
}
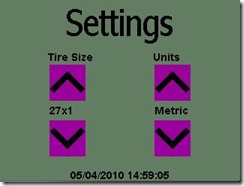
And the resulting view is:
The table works to go through a large number of available tire sizes or just to switch between ‘Metric’ and ‘English’ units.
In the next article, I will move off from the UI and get back to talking about the sensors we need and how we will select the final hardware.
