Office Graph API and Cortana - Chapter 2: how to make queries by code to the Office Graph
![]() French version / Version française
French version / Version française
Preface
Welcome to the second chapter of this section dedicated to the integration of the Office Graph API within an application .net Windows Phone 8.1 and Cortana. In the previous chapter, we saw what is the syntax to call web services and to achieve its company graph results. In this chapter, we will now see how to connect to the Office Graph and perform queries in .net.
You can DOWNLOAD THE SOURCE CODE in the joined ZIP file, available at the end of each chapter.
This article is published to the TechDays 2015, which will take place from 10 to 12 January 2015 to the Palais des Congrès de Paris. This year I would have the chance to co-animate the session dedicated to Office Graph with Alexandre Cipriani and Stéphane Palluet. Enjoy many of our session for this example and many more.
Chapter 1: Introduction to the Graph Office
Chapter 2: How to make queries by code to the Office Graph? (this article)
Chapter 3: Integration with Cortana
Prerequisites
In our example, we will use three major technical components, which can be represented by the following schema:
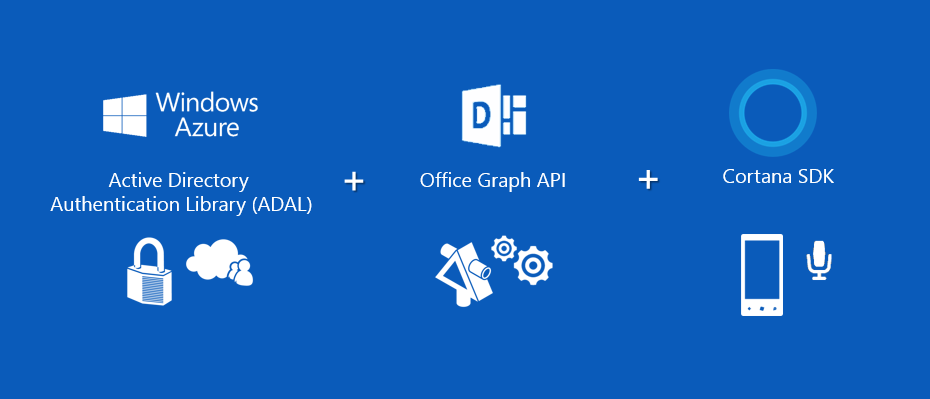
More details about these components:
- ADAL (Active Directory Authentication Library) : is a library to support authentication to the Azure Active Directory underlying Office 365. ADAL will bring us the flexibility to be able to authenticate the user to securely, without storing the login / password for the user. It will allow to rest on the oAuth authentication concepts, with levels specific and transparent access to your data.
- Office Graph API: as detailed in the previous article, this is the entry point of the web services that will allow us to browse the social graph
- Windows Phone 8.1 Store Apps & Cortana SDK: allow us to easily develop an application with an interface written in XAML c#, easily compatible with Windows 8.1. It will also allow to define and capture voice commands to query the Office Graph to the voice.
To develop the App, we will need on our workstation :
- Visual Studio 2013
- Visual Studio 2013 Update 4
- Windows Phone 8.1 SDK
These components are installed with most versions of Visual Studio, or in free express version at the following address:
https://dev.windows.com/en-us/develop/download-phone-sdk
Last important point, we need a Windows Phone 8.1 or an emulator (included in the SDK) containing Windows Phone 8.1 with the Cortana feature.
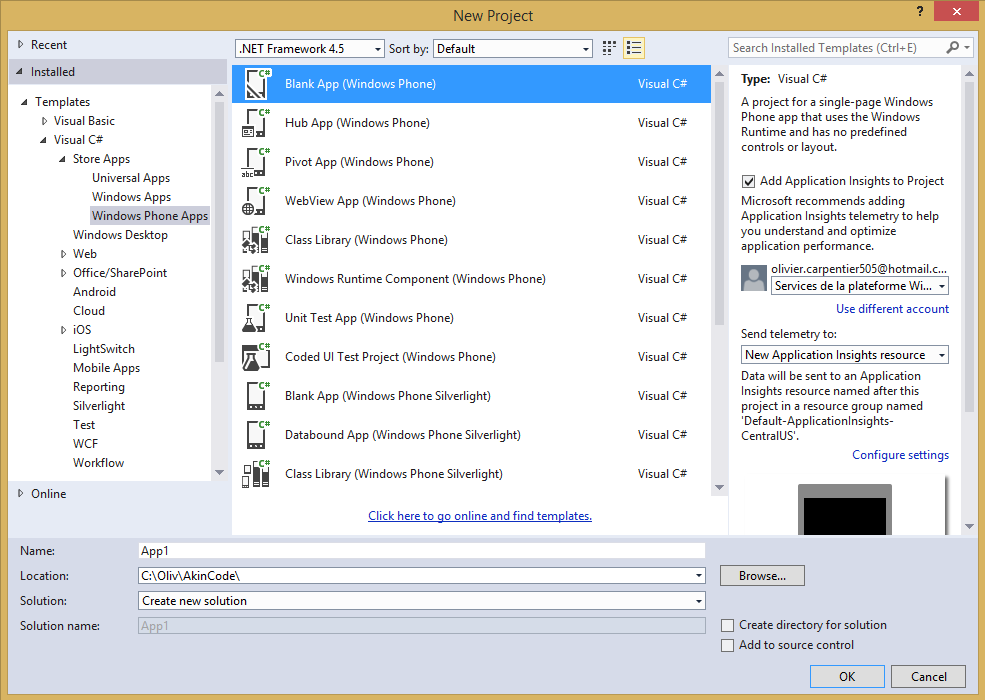
Visual Studio project template
To create a Windows Phone project 8.1 using Cortana and the Office Graph, you can choose the model of project of type Windows Phone Apps in the "Apps Store" section. This type of application, appeared with Windows 8.1 and Windows Phone 8.1, allows us to create applications that aren't in Silverlight, well written in XAML:
Authentication with ADAL
To be able to perform queries on the Office Graph, we must be first authenticated. To do this, we can retrieve an Azure Active Directory authentication token, that we can provide to our requests.
With Azure Active Directory, it is possible to easily create an application that can benefit from existing authentication systems to the platform. For example, we will not have to store the login / password for the user: we will leave Azure to certify and support authentication.
Install ADAL in your Visual Studio solution
To simplify the task of the developer, Microsoft has created ADAL (Active Directory Authentication Library), which is a code library available on many platforms (.Net, Javascript, Cordova, Xamarin, etc.). This library will allow to simply add an authentication process in our application.
To use ADAL, you need to first import the library into our solution. The process is very simple thanks to the Visual Studio nuggets system .
The ADAL package is available at the following address:
https://www.nuget.org/packages/Microsoft.IdentityModel.Clients.ActiveDirectory/
You can install it in your Visual Studio solution using the following command:
PM>Install-Package Microsoft.IdentityModel.Clients.ActiveDirectory -Version 2.13.112191810
Declare the Application in Azure
To be able to communicate with Azure Active Directory, we need to declare a new app in our Azure tenant. Declare an application in Azure returns to save the information of our application and get in return a key called "ClientId" which will serve us within our application.
This can be done by several ways:
- the Azure management portal: The full procedure to register an application is detailed on the following article: https://azure.microsoft.com/en-us/documentation/articles/mobile-services-windows-store-dotnet-adal-sso-authentication/
- Use the interface of Visual Studio to register the Application for you, thanks to the Office 365 SDK extension. In fact, if you install this extension in Visual Studio, you can add to your App a "Connected Service" as Office 365, which comes with a Wizard for the automatic registration of Apps in Azure.This procedure is described in detail in the following link: https://msdn.microsoft.com/en-us/office/office365/howto/adding-service-to-your-Visual-Studio-project
The 2nd technical is relatively simple. To use it, you simply need to download the Office 365 extensions for Visual Studio 2013, from here:
https://aka.ms/OfficeDevToolsForVS2013
Once installed, simply right click on your Visual Studio solution, and then click on "Add", then "Connected Service":
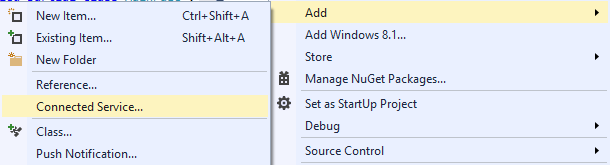
You can then access the Services Manager that allows to manage Office 365 services. You can login with your account Office 365 for save your App on your holding of company:
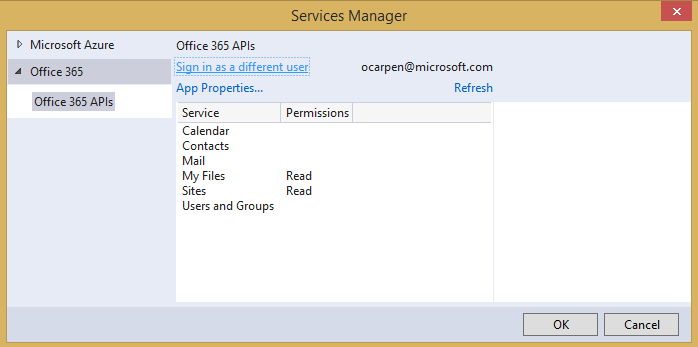
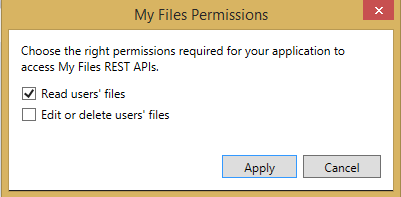
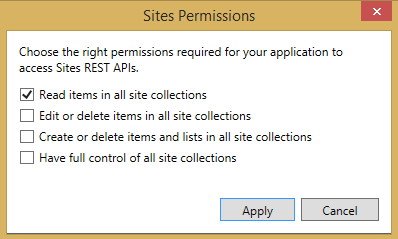
With this wizard, you can select the levels of approval required to the application on the different Office 365 resources. To read the Office Graph, we have at least read permissions on the 'My Files' and 'Sites '. Just click on the service name, and then select the right of reading:
When you post the window, Visual Studio will save your application in Azure, as you would via the Azure management portal. It will also insert the keys needed to your application (such as the ClientId or authentication authority) in App settings. In the case of a Windows Phone 8.1 App Store, the parameters are automatically inserted in the App.xaml file, as a resource of the application, as for example:
 <Application.Resources>
    <x:String x:Key="ida:ClientID">b53a731a-2638-49a9-8122-1bc9ea233995</x:String>
    <x:String x:Key="ida:AuthorizationUri">https://login.windows.net</x:String>
...
</Application.Resources>
Manage the connection in c# .net
Now that we have seen how to register the App, we are ready to implement the authentication ADAL system in our .Net classes.
To use ADAL in our classes, we need to include the following namespaces:
 using Microsoft.IdentityModel.Clients.ActiveDirectory;
using Windows.Security.Authentication.Web;
To add support for authentication to a page, we must prepare this page to manage the recovery process.Following authentication with Azure, we will have a return to our application that can continue treatment. To simply implement this principle, we can create the IWebAuthenticationContinuable interface, and it will suffice to inherit our page of this interface:
 /// <summary>
/// Implement this interface if your page invokes the web authentication
/// broker
/// </summary>
interface IWebAuthenticationContinuable
{
    /// <summary>
    /// This method is invoked when the web authentication broker returns
    /// with the authentication result
    /// </summary>
    /// <param name="args">Activated event args object that contains returned authentication token</param>
    void ContinueWebAuthentication(WebAuthenticationBrokerContinuationEventArgs args);
}
public sealed partial class MainPage : Page, IWebAuthenticationContinuable
{
…
Within our page, authentication will be supported through the AuthenticationContext class, which allows you to create an authentication context to an authority, and to negotiate the tokens acquisition.
AuthenticationContext ac = null;
To create the context, we will need to provide to ADAL the redirection address for our application. This address is a specific address, but can be easily acquired by the method GetCurrentApplicationCallbackUri of the WebAuthenticationBroker class, like this:
Uri RedirectUri = WebAuthenticationBroker.GetCurrentApplicationCallbackUri();
We also provide authentication authority. With Office 365 and Azure Active Directory, the address is of this kind : « https://login.windows.net/<yourtenantdomain> »
string Authority = "https://login.windows.net/yourtenantdomain.com";
If you use the Office 365 SDK to reference your application, you can retrieve the key from resource with the following syntax:
string Authority = App.Current.Resources["ida:AuthorizationUri"].ToString() + "/ yourtenantdomain.com ";
The last parameter to provide for authentication is client key of your application that we generated in the previous section. This key is in the form of a GUID:
string ClientID = "[your-app-id as for example ‘b6ea739a-2608-4919-8123-12asd233b65’";
If you use the Office 365 SDK to reference your application, you can retrieve the client ID from the resources key with the following syntax:
string ClientID = App.Current.Resources["ida:ClientID"].ToString();
To initialize the context, you must use the CreateAsync method on the page OnNavigatedTo event:
 /// <summary>
/// Invoked when this page is about to be displayed in a Frame.
/// </summary>
/// <param name="e">Event data that describes how this page was reached.
/// This parameter is typically used to configure the page.</param>
protected override void OnNavigatedTo(NavigationEventArgs e)
{
      ac = AuthenticationContext.CreateAsync(Authority).GetResults();
}
We also need to implement the method allowing the resumption of activity following the redirect. To do this, we add the following code:
 public async void ContinueWebAuthentication(Windows.ApplicationModel.Activation.WebAuthenticationBrokerContinuationEventArgs args)
{
      await ac.ContinueAcquireTokenAsync(args);
}
Now create the Login method that will be called when the user clicks on the button "Login" from our interface.The Login method will first try to acquire the token for authentication of "silently". This means that we try to authenticate us without calling the interface connection. If the user is already logged in, we will have its cached token and may give access directly. This is possible through the call to the method AcquireTokenSilentAsync of the AuthenticationContext object.
 private async void Login()
{
      AuthenticationResult result = await ac.AcquireTokenSilentAsync(Resource, ClientID);
      if (result != null && result.Status == AuthenticationStatus.Success)
          LoadApp(result);
      else
          ac.AcquireTokenAndContinue(Resource, ClientID, RedirectUri, LoadApp);
}

private void LoadApp(AuthenticationResult ar)
{
     var AuthToken = ar.AccessToken;
     this.Frame.Navigate(typeof(CortanaPage), AuthToken);
}
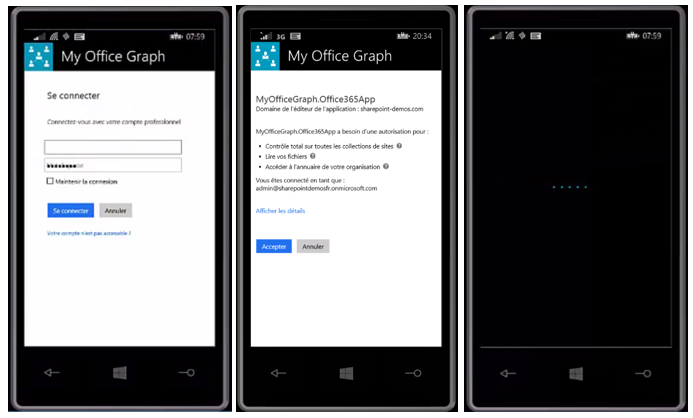
If the authentication result is not successful, we will call the AcquireTokenAndContinue method, which will redirect the user to the graphical interface for authentication of its holding. The experience of connection will take place in 2 to 3 times: before the login, enter the password (separate from the login if the tenant uses a redirect SSO), acceptance of the terms of use, then redirection to our application:
When the identification is completed, the result of authentication (via the AuthenticationResult class) contains the token authentication via the AccessToken property. We can use token in our REST of the office Graph queries.
How to query the Office Graph in C# and XML
Now that we have recovered our authentication token, we can generate http query on the Office Graph.
To do this, add the following namespaces:
 using System.Net.Http;
using System.Net.Http.Headers;
We will use the HttpClient class to perform queries. Take a few simple examples.
Example 1: find the actor ID of your manager
To find items from our manager, we need first to find his Actor ID. We can make the following query by providing the authentication token. After reading the result, we can easily get a list of results and retrieve column 'DocId' (which is the Actor ID in Office Graph):
 String query = "https://<your-tenant-url>/_api/search/ query?Querytext=%27*%27&Properties=%27GraphQuery:ACTOR(ME\\,action\\:1013)%27&SourceId=%27b09a7990-05ea-4af9-81ef-edfab16c4e31%27&SelectProperties=%27UserName,DocId%27";
HttpClient httpClient = new HttpClient();
httpClient.DefaultRequestHeaders.Authorization = new AuthenticationHeaderValue("Bearer", AuthToken);
httpClient.DefaultRequestHeaders.Accept.Add(new MediaTypeWithQualityHeaderValue("application/atom+xml"));
HttpResponseMessage response = await httpClient.GetAsync(query);
if (response.IsSuccessStatusCode)
{
     Stream resultStream = response.Content.ReadAsStreamAsync().Result;

      // process response..
      XDocument oDataXML = XDocument.Load(resultStream, LoadOptions.None);
      XNamespace atom = "https://www.w3.org/2005/Atom";
      XNamespace d = "https://schemas.microsoft.com/ado/2007/08/dataservices";
      XNamespace m = "https://schemas.microsoft.com/ado/2007/08/dataservices/metadata";

      List<XElement> items = oDataXML.Descendants(d + "query")
                                             .Elements(d + "PrimaryQueryResult")
                                             .Elements(d + "RelevantResults")
                                             .Elements(d + "Table")
                                             .Elements(d + "Rows")
                                             .Elements(d + "element")
                                             .ToList();
      var searchResults = from item in items
         select new
         {
         DocId = item.Element(d + "Cells").Descendants(d + "Key").First(a => a.Value == "DocId").Parent.Element(d + "Value").Value
         };

}
In this sample, searchResults contains the list of the players returned by the query.
Example 2: find popular elements around you (as the Delve home page)
Are now trying to reassemble all the popular elements around us, as is the case on the homepage of Delve. The method is identical to the previous example, but this time we will operate the properties related to documents such as the title, the way, the extension, the parent site, etc.
 string query = "https://<your-tenant-url>/_api/search/query?QueryTemplate=%27((NOT%20HideFromDelve%3ATrue)%20AND%20(FileExtension%3Adoc%20OR%20FileExtension%3Adocx%20OR%20FileExtension%3Appt%20OR%20FileExtension%3Apptx%20OR%20FileExtension%3Axls%20OR%20FileExtension%3Axlsx%20OR%20FileExtension%3Apdf%20OR%20ContentTypeId%3A0x010100F3754F12A9B6490D9622A01FE9D8F012*%20OR%20contentclass%3AExternalLink))%27&Properties=%27TitleBasedSummaries%3Atrue,IncludeExternalContent%3Atrue,GraphQuery%3Aand(actor(me%5C%2Caction%5C%3A1021)%5C%2Cactor(me%5C%2Cor(action%5C%3A1021%5C%2Caction%5C%3A1036%5C%2Caction%5C%3A1037%5C%2Caction%5C%3A1039%5C%2Caction%5C%3A1052%5C%2Caction%5C%3A1048))),GraphRankingModel%3Aaction%5C%3A1021%5C%2Cweight%5C%3A1%5C%2CedgeFunc%5C%3Aweight%5C%2CmergeFunc%5C%3Amax%27&SelectProperties=%27Author,AuthorOwsUser,ContentClass,ContentTypeId,DefaultEncodingURL,DocId,DocumentPreviewMetadata,Edges,EditorOwsUser,FileExtension,FileType,HitHighlightedProperties,HitHighlightedSummary,LastModifiedTime,LikeCountLifetime,ListID,ListItemID,MediaDuration,OriginalPath,Path,PictureThumbnailURL,PrivacyIndicator,Rank,SPWebUrl,SecondaryFileExtension,ServerRedirectedPreviewURL,ServerRedirectedURL,SitePath,SiteTitle,Title,ViewCountLifetime,siteID,uniqueID,webID%27&RankingModelId=%270c77ded8-c3ef-466d-929d-905670ea1d72%27&RowLimit=36&ClientType=%27PulseWeb%27&BypassResultTypes=true&EnableQueryRules=false&ProcessBestBets=false&ProcessPersonalFavorites=false";
HttpClient httpClient = new HttpClient();
httpClient.DefaultRequestHeaders.Authorization = new AuthenticationHeaderValue("Bearer", AuthToken);
httpClient.DefaultRequestHeaders.Accept.Add(new MediaTypeWithQualityHeaderValue("application/atom+xml"));
HttpResponseMessage response = await httpClient.GetAsync(query);
if (response.IsSuccessStatusCode)
{
     Stream resultStream = response.Content.ReadAsStreamAsync().Result;

      // process response..
      XDocument oDataXML = XDocument.Load(resultStream, LoadOptions.None);
      XNamespace atom = "https://www.w3.org/2005/Atom";
      XNamespace d = "https://schemas.microsoft.com/ado/2007/08/dataservices";
      XNamespace m = "https://schemas.microsoft.com/ado/2007/08/dataservices/metadata";

      List<XElement> items = oDataXML.Descendants(d + "query")
                                             .Elements(d + "PrimaryQueryResult")
                                             .Elements(d + "RelevantResults")
                                             .Elements(d + "Table")
                                             .Elements(d + "Rows")
                                             .Elements(d + "element")
                                             .ToList();

            var graphResults = from item in items
    select new
    {
        Title = item.Element(d + "Cells").Descendants(d + "Key").First(a => a.Value == "Title").Parent.Element(d + "Value").Value,
        Author = item.Element(d + "Cells").Descendants(d + "Key").First(a => a.Value == "Author").Parent.Element(d + "Value").Value,
        HitHighlightedSummary = item.Element(d + "Cells").Descendants(d + "Key").First(a => a.Value == "HitHighlightedSummary").Parent.Element(d + "Value").Value,
        Path = item.Element(d + "Cells").Descendants(d + "Key").First(a => a.Value == "Path").Parent.Element(d + "Value").Value,
        Ext = "Assets/Ext/" + item.Element(d + "Cells").Descendants(d + "Key").First(a => a.Value == "SecondaryFileExtension").Parent.Element(d + "Value").Value + ".png",
        ViewCount = item.Element(d + "Cells").Descendants(d + "Key").First(a => a.Value == "ViewCountLifetime").Parent.Element(d + "Value").Value,
        ServerRedirectedURL = item.Element(d + "Cells").Descendants(d + "Key").First(a => a.Value == "ServerRedirectedURL").Parent.Element(d + "Value").Value,
        ServerRedirectedPreviewURL = item.Element(d + "Cells").Descendants(d + "Key").First(a => a.Value == "ServerRedirectedPreviewURL").Parent.Element(d + "Value").Value,
        SiteTitle = item.Element(d + "Cells").Descendants(d + "Key").First(a => a.Value == "SiteTitle").Parent.Element(d + "Value").Value,
        UniqueID = item.Element(d + "Cells").Descendants(d + "Key").First(a => a.Value == "uniqueID").Parent.Element(d + "Value").Value,
        SiteID = item.Element(d + "Cells").Descendants(d + "Key").First(a => a.Value == "siteID").Parent.Element(d + "Value").Value,
        SiteUrl = item.Element(d + "Cells").Descendants(d + "Key").First(a => a.Value == "SPWebUrl").Parent.Element(d + "Value").Value,
        WebID = item.Element(d + "Cells").Descendants(d + "Key").First(a => a.Value == "webID").Parent.Element(d + "Value").Value
    };
}
How to get the documents thumbnails
In the interface of Delve, most displayed documents have thumbnails with a visual overview of the element. Develop such a feature 'from' scratch could be tedious, but once again the Office Graph API just help us.
To generate a PNG thumbnail of a document you can call an address that will generate us a picture (when possible). We can call the following address with the parameters indicating the file and context information (UniqueID, WebID and SiteID):
From a Windows Phone application, we can easily make a HTTP request to download the image, there still providing the authentication token:
 var httpClient = new HttpClient();
httpClient.DefaultRequestHeaders.Authorization = new AuthenticationHeaderValue("Bearer", AuthToken);
var contentBytes = await httpClient.GetByteArrayAsync(DocumentPreviewImage);
We could then display this image in a control of type Image by writing the contents of the image in an object of type BitmapImage:
 var ims = new InMemoryRandomAccessStream();
var dataWriter = new DataWriter(ims);
dataWriter.WriteBytes(contentBytes);
await dataWriter.StoreAsync();
ims.Seek(0);
BitmapImage bitmap = new BitmapImage();
bitmap.SetSource(ims);
Display the graph results in a ListBox
Now that we have seen how to retrieve the results of the Office Graph, as well as the miniatures of the documents, we can display them on a XAML page.
For this, we used in this example a ListBox to display the results as a list, one below the other.
To display the fields of the items returned by the Office Graph, we can for example use the command {{Binding Title}} to automatically display the corresponding property of the object.
We can also use the control MenuFlyout to display a shortcut menu on each item select long.
The code of our XAML view could be formed as follows:
 <!--TODO: Content should be placed within the following grid-->
<Grid Grid.Row="1" x:Name="ContentRoot" Margin="19,9.5,19,0">
    <Grid.Resources>
        <DataTemplate x:Name="resultListTemplate">
            <StackPanel Holding="StackPanel_Holding" >
                <FlyoutBase.AttachedFlyout>
                    <MenuFlyout>
                        <MenuFlyoutItem Text="Ouvrir" />
                        <MenuFlyoutItem Text="Ouvrir le site" />
                        <MenuFlyoutItem Text="Envoyer par email" />
                        <MenuFlyoutItem Text="Partager sur Yammer" />
                    </MenuFlyout>
                </FlyoutBase.AttachedFlyout>
                <Grid Loaded="Grid_Loaded" Background="#FFFFFEFE" Margin="0,0,0,10">

                    <Grid.RowDefinitions>
                        <RowDefinition Height="Auto" />
                        <RowDefinition Height="Auto" />
                        <RowDefinition Height="Auto" />
                        <RowDefinition Height="Auto" />
                        <RowDefinition Height="Auto" />
                    </Grid.RowDefinitions>

                    <Grid.ColumnDefinitions>
                        <ColumnDefinition Width="*" />
                    </Grid.ColumnDefinitions>

                    <TextBlock Grid.Row="0" Grid.Column="0" TextWrapping="Wrap"
                                    Text="{Binding Title}"
                                    Foreground="Black" FontSize="30" Height="Auto" Margin="5"  />

                    <Image  Grid.Row="1" Grid.Column="0"
                                    Stretch="UniformToFill"
                                    Source="{Binding DocumentPreviewImage}" Loaded="Image_Loaded" Margin="5" />

                    <TextBlock Grid.Row="2" Grid.Column="0" TextWrapping="Wrap"
                                    Text="{Binding Author}"
                                    Foreground="Gray" FontSize="20" Height="Auto" Margin="5"/>

                    <StackPanel Grid.Row="3" Grid.Column="0" Orientation="Horizontal" Margin="5" HorizontalAlignment="Right">
                        <TextBlock
                                    Text="{Binding ViewCount}"
                                    Foreground="Gray" FontSize="20" />
                        <TextBlock Text=" vues" Foreground="Gray" FontSize="20"></TextBlock>

                    </StackPanel>

                    <StackPanel Grid.Row="4" Grid.Column="0" Orientation="Horizontal" Margin="5">
                        <Image
                                    Width="32" Height="32" Stretch="UniformToFill"
                                    Source="{Binding Ext}"/>
                        <TextBlock TextWrapping="Wrap"
                                    Text=" - "
                                    Foreground="Gray" FontSize="20" Height="Auto"/>
                        <TextBlock
                                    Text="{Binding SiteTitle}"
                                    Foreground="Blue" FontSize="20" />

                    </StackPanel>

                </Grid>
            </StackPanel>

        </DataTemplate>
    </Grid.Resources>

    <!-- actual list content goes here -->
    <ListBox Name="ResultsList" Grid.Row="0"
                    ItemTemplate="{StaticResource resultListTemplate}"
                    ItemsSource="{Binding}" Background="#FF0086D8" FontFamily="Global User Interface">
        <ListBox.ItemContainerStyle>
            <Style TargetType="ListBoxItem">
                <Setter Property="HorizontalContentAlignment" Value="Stretch"/>
            </Style>
        </ListBox.ItemContainerStyle>
    </ListBox>

</Grid>
With this sample code, we are able to display the elements as vignettes like the interface of Delve. When the user long clicks an item context menu will allow to perform certain actions on the element, as shown in the following screenshots:
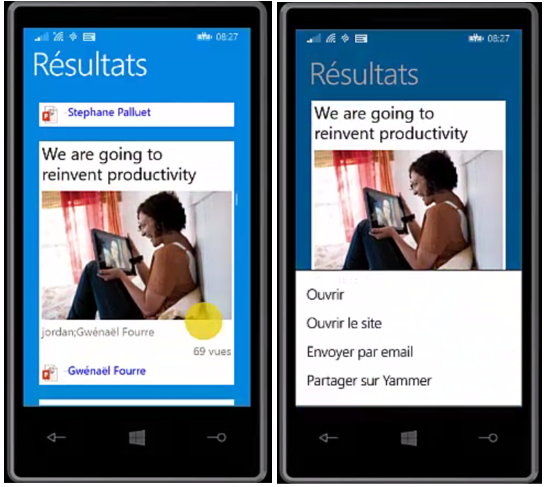
If we click on the menu items, you can:
- Open the document in web mode (Internet Explorer opened to the page corresponding to the address of the document with Office Online)
- Open with Internet Explorer the site containing the document
- Create a mail to be sent containing the address of the document to share
- Share the link of the document within a Yammer group
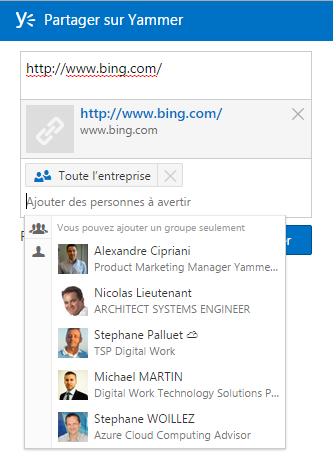
To share content in Yammer, the operation is actually easier than others. In fact, Yammer has an address dedicated to applications for recommending content.
To display a Yammer sharing window, it is just that we open a page with the address formatted as follows:
https://www.yammer.com/messages/new/?status=<url-encodée-du-lien-a-partager>
For example, the address bing.com sharing will display us the sharing window shown below, allowing us to share the link with groups and colleagues:
https://www.yammer.com/messages/new/?status=http%3A%2F%2Fwww.bing.com%2F
We have seen in this chapter how to query the Office Graph in c# .net within a Windows Phone 8.1 application.We are now able to perform queries to display elements of the graph. We are also able to get the essential properties of the documents as well as a thumbnail picture. We just so more to 'connect' our calls to the Office Graph with voice commands of Cortana!
Go to the 3rd and final chapter of this article to read more: