Creating a simple custom workflow to send confirmation email
( Loreen La Penna is site manager of an internal Microsoft Office SharePoint 2007 site and a technical trainer who, at the start of her Microsoft career, fielded Windows 3.0 and Excel 4.0 support calls. Now, when she’s not nagging people to update their pages or delivering training, she can be found in the Redmond area catering to the needs of two very demanding cats.)
I work in the Office Content Publishing group and manage a large internal Microsoft Office SharePoint 2007 site. Recently, I had the task of putting together a list for requests that would be populated by people outside of our organization. To let these people know their requests were being monitored, we wanted to send them a simple confirmation email after they entered their request in the list – something like, “Thanks for your request. We will contact you shortly.”
I discovered how easy it is to do this by setting up a simple custom workflow using SharePoint Designer 2007. You can actually set up quite complex custom workflows in SPD, but I’m going to stick to this simple example of sending a confirmation email upon the addition of an item to a list.
Note: This procedure assumes you have a SharePoint-compatible email program such as Microsoft Outlook 2007.
Let’s assume you have a list created with the columns you want.
1. In SharePoint Designer, open the site that contains your list.
2. On the File menu, point to New, and then click Workflow.
3. In the Define Your New Workflow dialog box, type a descriptive name for your workflow, and then select your list under What SharePoint list should this workflow be attached to?
4. Under Select Workflow Start Options for items in <name of your list> , select the Automatically start this workflow when a new item is created.
5. Click Next.
6. Click the Actions button, and choose Send an Email.
7. Click the this message link in the Email this message string that displays next to the Actions button.
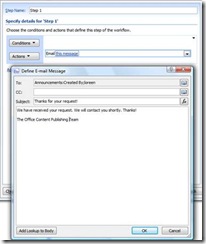
8. In the Define Email Message dialog box, click the address book button next to the To: field.
9. In the Select Users dialog box, select User who created current item and click Add.
10. Select other users, or type the email address of specific users to whom the email should also go to and click Add. When you’re finished adding users, click OK.
11. In the Subject line of the Define Email Message dialog box, type a descriptive subject line. Or, you can click the Function button next to the field to find and use a value from a field, such as the Title from the current item.
12. Finally, type your message in the text box, or click the Add Lookup to Body button at the bottom of the dialog box to insert a value from a field in the list.

13. Click OK.
14. Click Finish, and you’re done!
Now test out your workflow by adding an item to the list. How easy is that?