Exchange 2013 Auto Reseed
Exchange 2013 includes a great new high availability feature that is part of the Database Availability Group. This feature will reseed a database in case of disk failure from a "pool" of volumes that were pre-configured for this propose. In case that the failed drive contained an active database, Exchange will failover to one of the other passive copies and reseed the database. In case that the failed drive contained one of the passive copies, Exchange will reseed the database on the same drive.
AutoReseed reduces the need for Exchange Administrator or any other operator, to be on site at the moment of the drive crash and replace it as soon as he can in order to preserve the healthy copies structure.
The AutoReseed process acts as the following:
1. The Microsoft Exchange Replication service periodically scans for copies that have a status of "FailedAndSuspended" for 15 minutes in a raw.
2. The Microsoft Exchange Replication service try to resume copy 3 times.
3. The Microsoft Exchange Replication service try assigning a spare volume for 5 times (every 1 hour).
4. The Microsoft Exchange Replication service try InPlaceSeed with SafeDeleteExistingFiles 5 times (every 1 hour).
5. Once all retires failed, the process stops.
6. After 3 days when the copy is still in "FailAndSuspend", the process resets and starts over from step 1.
The prerequisites for AutoReseed to take place:
1. The copy is not ReseedBlocked or ResumeBlocked.
2. Logs and EDB are on the same volume.
3. The Logs and Database folder structure matches required naming convention
4. There are no active copies running on the failed volume.
5. All copies on the volume are in FailedAndSuspend status.
6. No more than 8 FailedAndSuspend copies on the server.
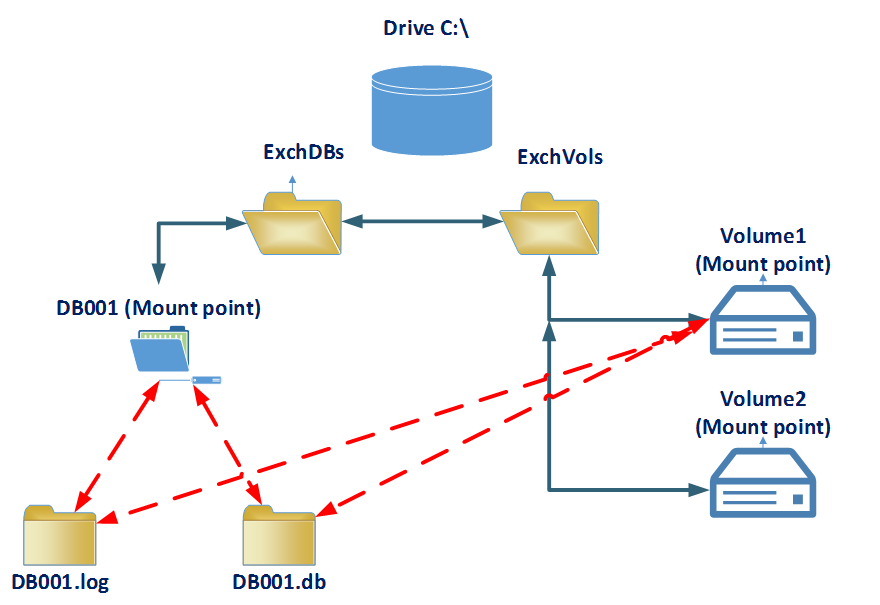
So how does it work? Very simple. In the next example I will explain the idea behind the configuration, while this example describes a one database configuration in one server at the DAG out of 2 or more servers in the DAG configuration. A basic component when working with AutoReseed mechanism, is Mount Points. The idea is based on a pre-configured "cartridge" of volumes (like online spare), on each server for the databases that are replicated to the server. In case that the ESE engine has an issue writing to a specific volume according to the check list above, a new volume becomes active instead of the "problematic" one. In order to configure the "cartridge" of volumes we will create a directory called "ExchVols" which will host the different volumes. The Databases will be listed under the "ExchDBs" folder, each database will have 2 folders - one for logs and one for the database:
Components legend:
1. ExchDBs: Folder that "hosts" the databases root folders. Each of the databases root folder is located on a mount point.
2. ExchVols: Folder that "hosts the volumes "cartridge". Under this folder, we will be able to list the volumes that are in production to host the databases folders and the "online spare" volumes.
3. DB001: A folder that hosts the database and logs folders for DB001. For every database, there is a folder with the same format - DBXXX and underneath a folder for database - DBXXX.db and folder for logs - DBXXX.log
In case of DB001, The folders underneath (DB001.edb & DB001.log) are the same folders that exists below Volume1. That means that DB001 and Volume1 are pointing to the same location - 2 folders with the same mount point.
The Auto Reseed configuration includes 3 new main parameters for every Exchange 2013 DAG:
- AutoDagVolumesRootFolderPath (ExchVols in our example): Includes the mount point containing all volumes for databases and the "Online Spare". The default location is: C:\ExchangeVolumes
- AutoDagDatabasesRootFolderPath (ExchDBs in our example): Is the mount point that containing all the databases. The default location is: C:\ExchangeDatabases
- AutoDagDatabaseCopiesPerVolume: Is the number of databases copies per volume. The default is 1 database per volume.
Now after we go over the Auto Reseed components and the concepts around this high availability feature, let's see how to configure AutoReseed step by step.
The environment containes 2 mailbox servers E15MBX1 and E15MBX2, CAS server named E15CAS1 and one domain controller. The DAG name is DAG13.
How to configure DAG for AutoReseed:
1. Configure the DAG with the AutoDagVolumesRootFolderPath to point to ExchVols and AutoDagDatabasesRootFolderPath for ExchDBs. In order to do it, run the commands:
Set-DatabaseAvailabilityGroup DAG13 - AutoDagDatabasesRootFolderPath C:\ExchDbs
Set-DatabaseAvailabilityGroup DAG13 - AutoDagVolumesRootFolderPath C:\ExchVols

2. We don't need to configure the AutoDagDatabaseCopiesPerVolume value since we use the default of 1 database per volume. In case that you have more than 1 database per volume, for example 4, you should run the next command :
Set-DatabaseAvailabilityGroup DAG13 -AutoDagDatabaseCopiesPerVolume 4
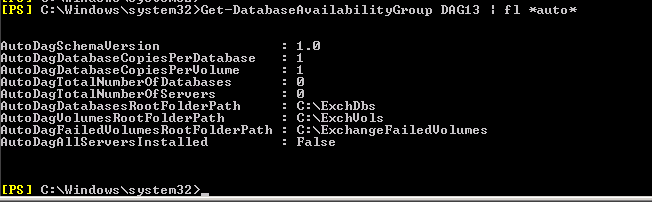
3. In order to verify that your DAG is configured correctly, run the next command:
Get-DatabaseAvailabilityGroup DAG13 | fl *auto*
4. Now create 5 folders, one for ExchDBs, One for ExchVols, one for the database (DB001), and 2 for the volumes (Volume1 & Volume2) that will be used for the database files and for "Online Spare" in case of drive crash. You can create the folders using Windows Explorer or by running the 3 commands from CMD (in example we will create all 5 folders by running only 3 commands):
md C:\ExchDBs\db001
md C:\ExchVols\Volume1
md C:\ExchVols\Volume2
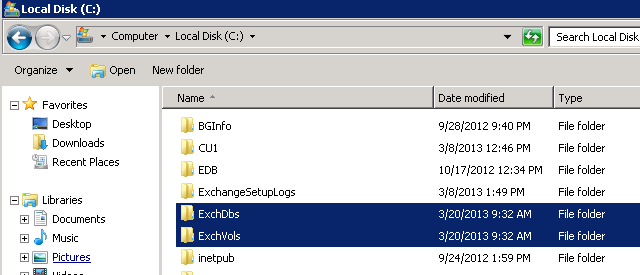
5. Verify that the root folders ExchDBs & ExchVols folders were created:
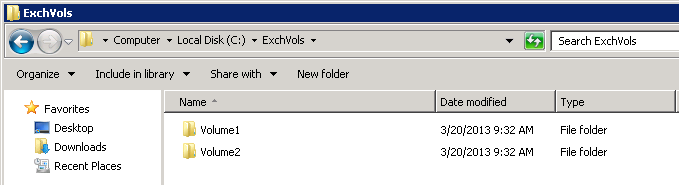
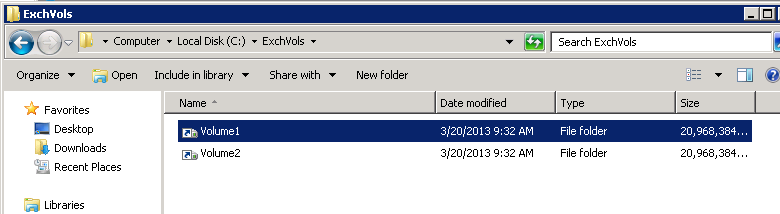
6. Verify that the volume folders Volume1 & Volume2 were created:
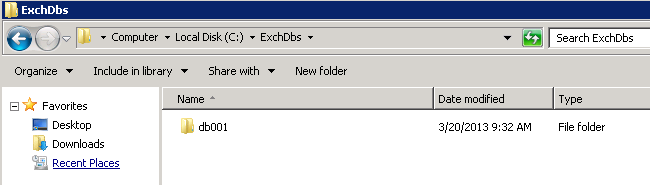
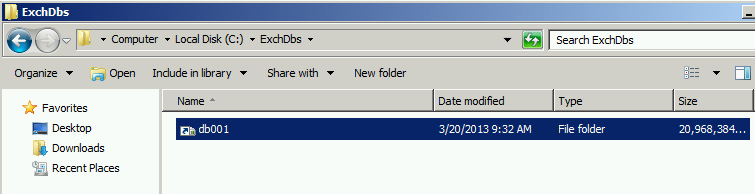
7. In addition verify that the database folder db001 was created as well:
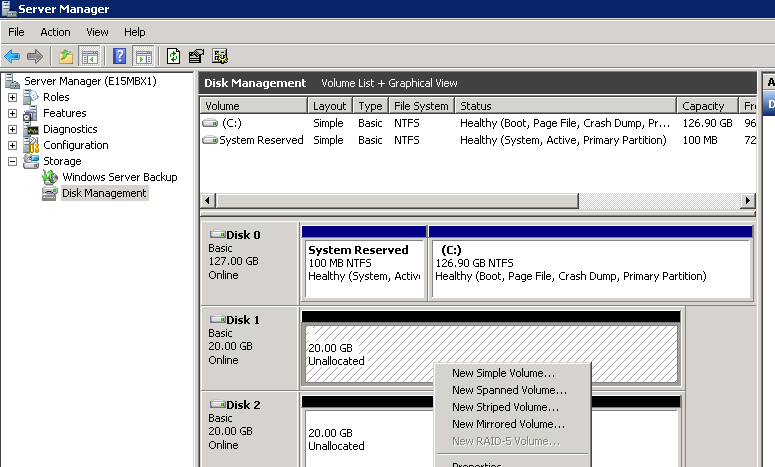
8. Now open Windows Disk Management (diskmgmt.msc) in order to create the Volume1 mount point which will be used for hosting a database. For this purpose I pre-configrued 2 disks - one for each volume. Right click Disk 1 and choose New Simple Volume:
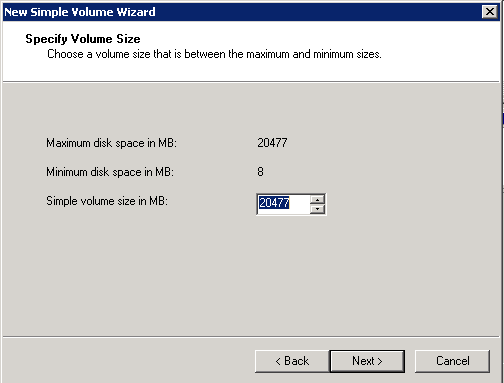
9. Choose the size of your volume and click Next. In my example I choose the whole size of the disk - 20GB:
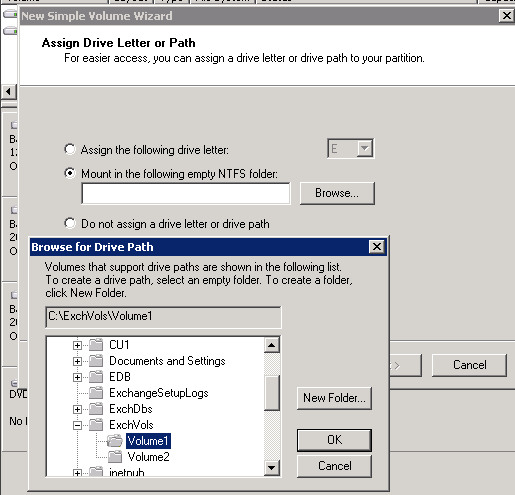
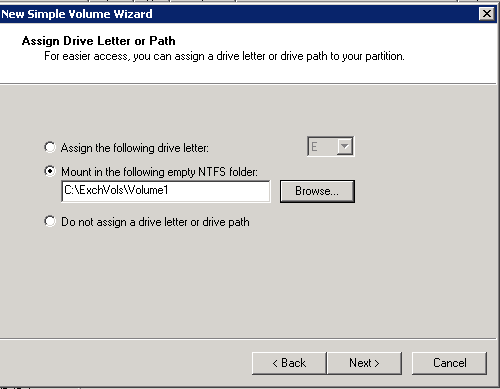
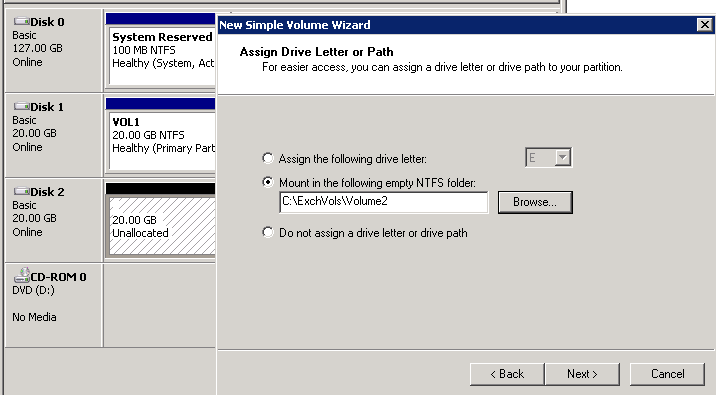
10. Now instead of giving the drive a letter, choose the Mount in the following empty NTFS folder into Volume1 as a mount point at the next path: C:\ExchVols\Volume1 and click OK:
11. Now click Next:
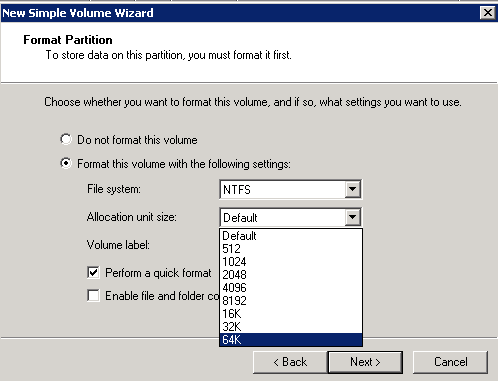
12. Since an Exchange database and transaction logs are going to be hosted on that drive / volume, it is better to format the drive with 64KB and not as the default. In order to do that, at the Format this volume with the following settings tab , open the Allocation unit size and choose 64KB:
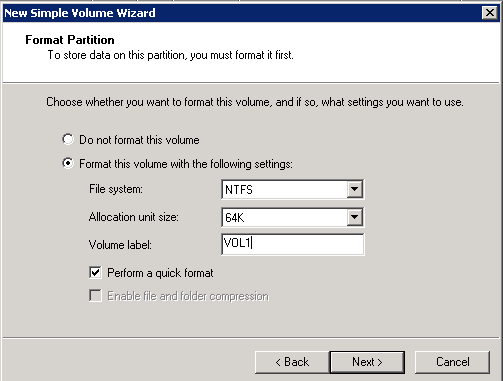
13. In order to make things easier when troubleshooting drive issues (not must), name the volume at the Volume Label location with VOL1 and click Next.
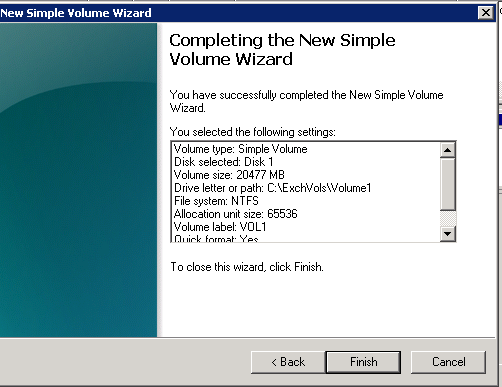
14. Verify that all the parameters were configured correctly and click Finish:
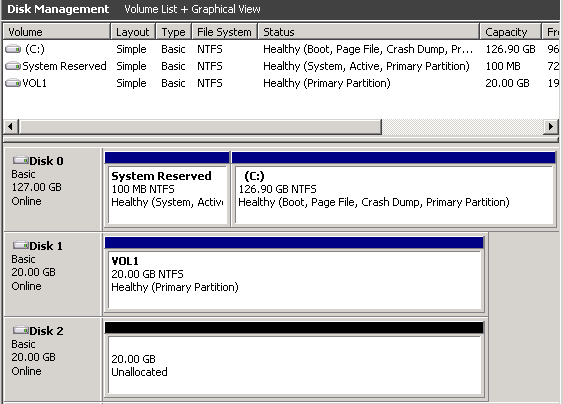
15. At the end of the Volume1 configuration, it should look as following:
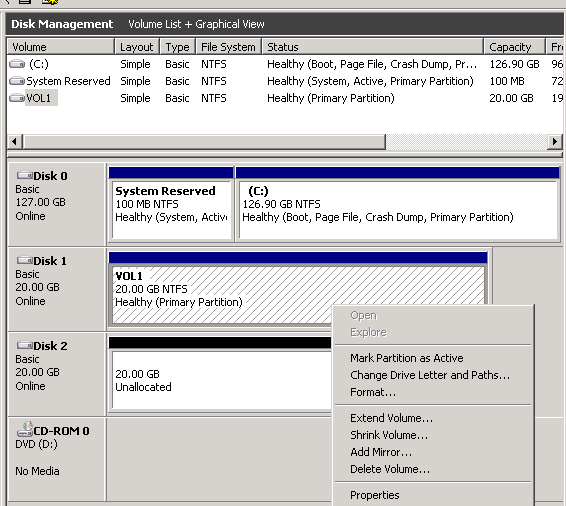
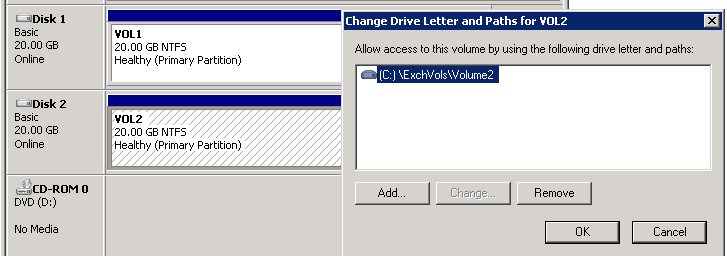
16. The next step is pointing the volume as a second mapping to a different location - db001 folder. In order to do that, right click the volume you have just created and select Change Drive Letter and Paths... :
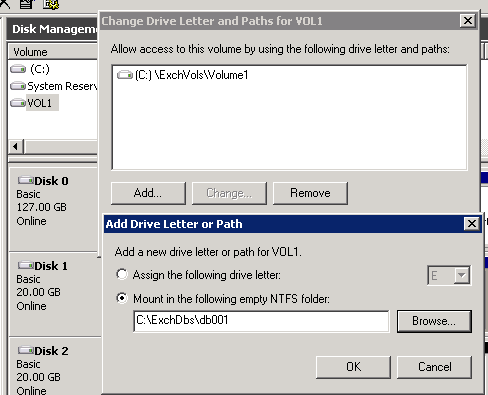
17. At the properties screen, select Add and choose the Mount in the following empty NTFS folder option. Click Browse and navigate to C:\ExchDBs\db001. Choose db001 folder and click OK:

18. At the next screen click OK again:
19. Verify that the both paths are listed: C:\ExchVols\Volume1 and C:\ExchDBs\db001 like the next example and click OK:
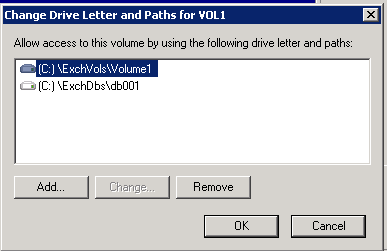
- Note: This action will point both C:\ExchVols\Volume1 and C:\ExchDBs\db001 to VOL1 drive.
20. Now repeat steps 8 - 15 for the second volume (Volume2) in order to add it as an "Online Spare" in case that Volume1 will crash. In order to it, right click on the second drive and mount it to C:\ExchVols\Volume2.
Notice that you DO NOT NEED to repeat steps 16 - 19 since Volume2 is an " Online Spare" drive and not yet used for a production database:
21. In order to verify that Volume2 has been configured correctly, right click Disk2 and select Change Drive Letter and Paths... you sholud see the next path C:\ExchVols\Volume2
22. After you have configured both volumes and mounted them to the correct locations, you should see the folders icons were changed to mount points icons as following :
Now we will create all the needed steps in order to create and adjust the databases paths and copies. Please note that if you have already have databases created on your Exchange 2013 DAG environment with active mailboxes, you will have to move mailboxes to the new databases or to use the Move-DatabasePath PowerShell command in order to move the database and transaction logs to the mount point location.
23. Create 2 directories under Volume1 folder, which is actually the same location as db001 mount point. The 2 directories, 1 for database and 1 for transaction logs, should be with the same syntax:
C:\< VolumeFolderName>\VolumeX\<dbname>.db (In our example it would be - C:\ExchVols\Volume1\db001.db)
C:\< VolumeFolderName>\VolumeX\<dbname>.log (In our example it would be - C:\ExchVols\Volume1\db001.log)
You can create the folders using Windows Explorer or use CMD for that. In my example, I used the 2 commands in order to create db001.db & db001.log directories:
md C:\ExchVols\Volume1\db001.db
md C:\ExchVols\Volume1\db001.log
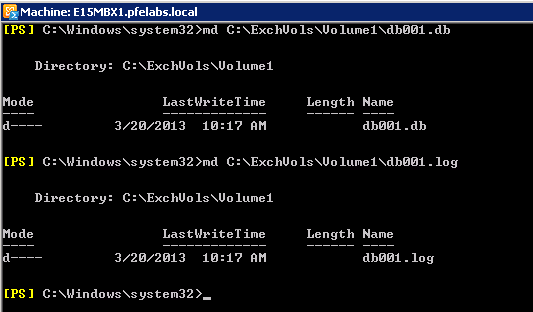
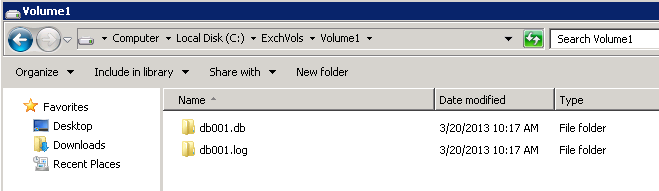
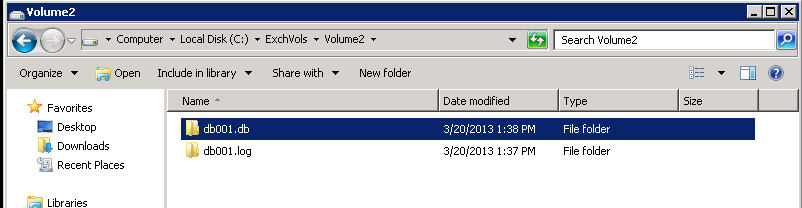
24. The directories structure should look as following:
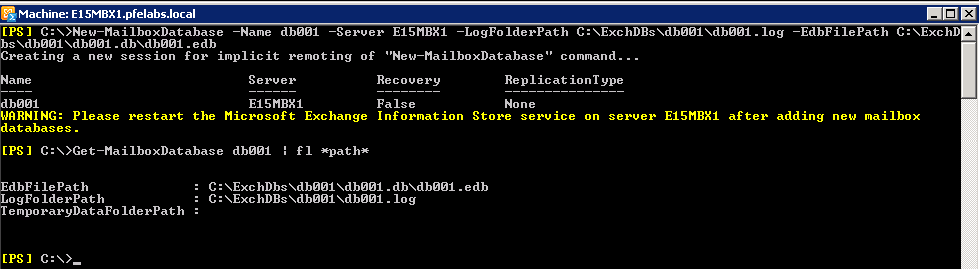
25. Now we will create a new database named db001 on a mailbox server named E15MBX1 and we will point the database and logs to the folders we created at the previous step according to the syntax of the directories structure:
26. The next step is to mount the new database. You can use powershell command or use the EAC (Exchange Administration Center). Under the Servers menu, choose Databases, right click the new database db001 and click Mount:

27. Now we will add a copy for the newly created database. From the EAC, under the Servers menu, choose Databases, right click the new database db001 and click Add Database Copy:
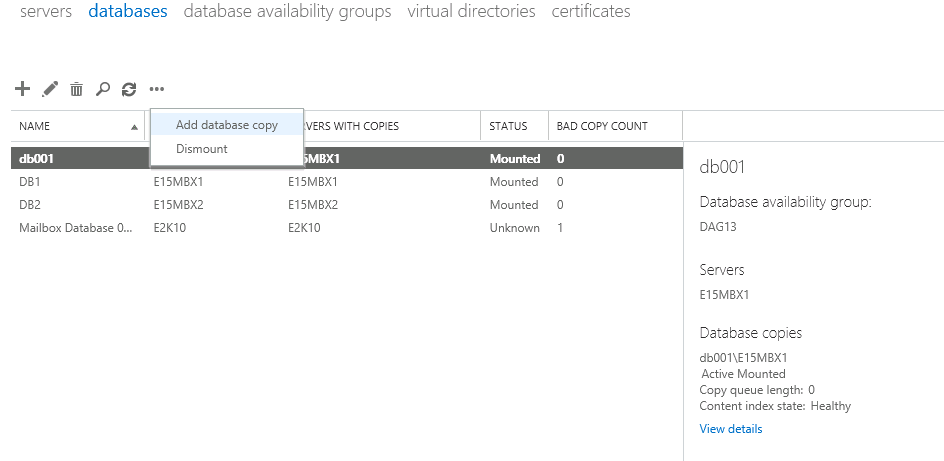
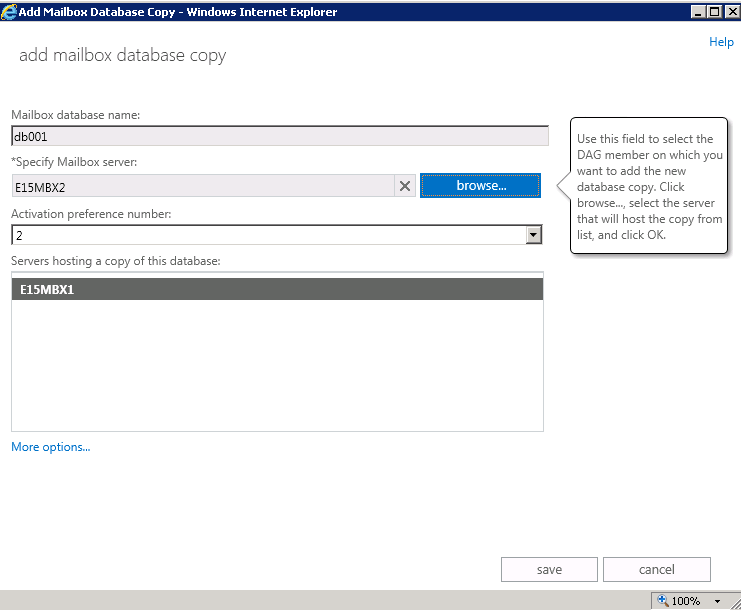
28. Choose the mailbox server that you would like to add as an additional copy. In our example it would be E15MBX2, click on Browse and choose the mailbox server:
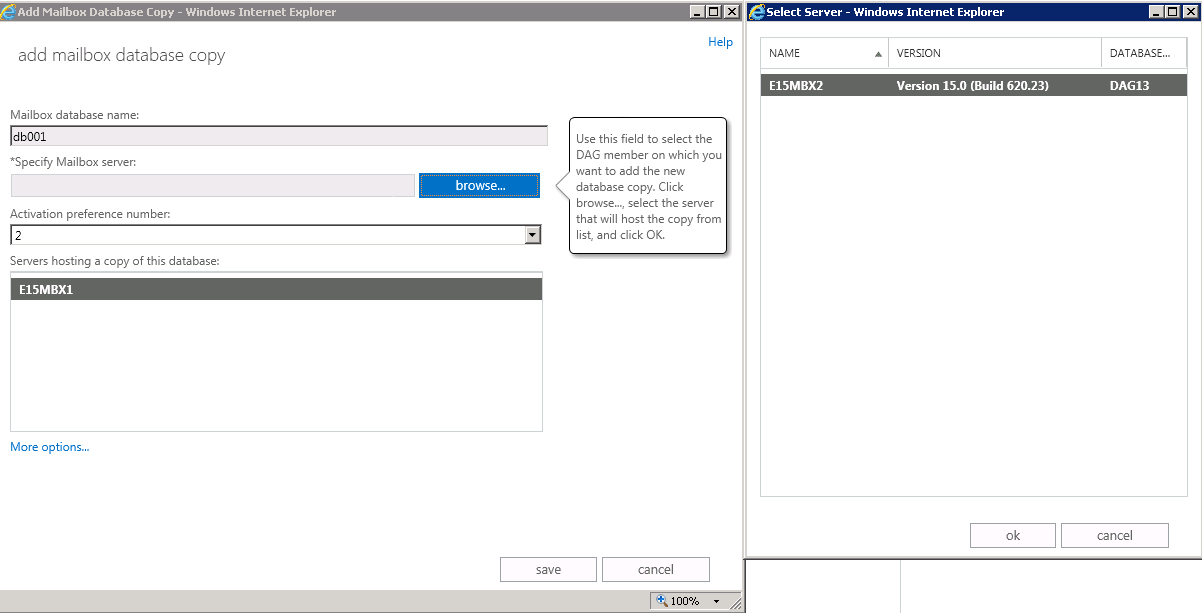
29. After selecting the additional copy, click on Save:
30. Verify that the copy was added and that the copy is in a Healthy state. As you can see, the database db01 is now mounted on E15MBX1 and has a valid and healthy copy at E15MBX2:

31. So currently we are having a database named db001 which is mounted at E15MBX1 and has also a copy at E15MBX2. Each server has 1 volume (Volume1), which hosts the database and transaction logs and 1 volume as an "Online Spare" (Volume2). In that case no matter if Volume1 will fail on E15MBX1 or E15MBX2 - Volume2 on each server will be replaced automatically by the system and take place of the failed drive.
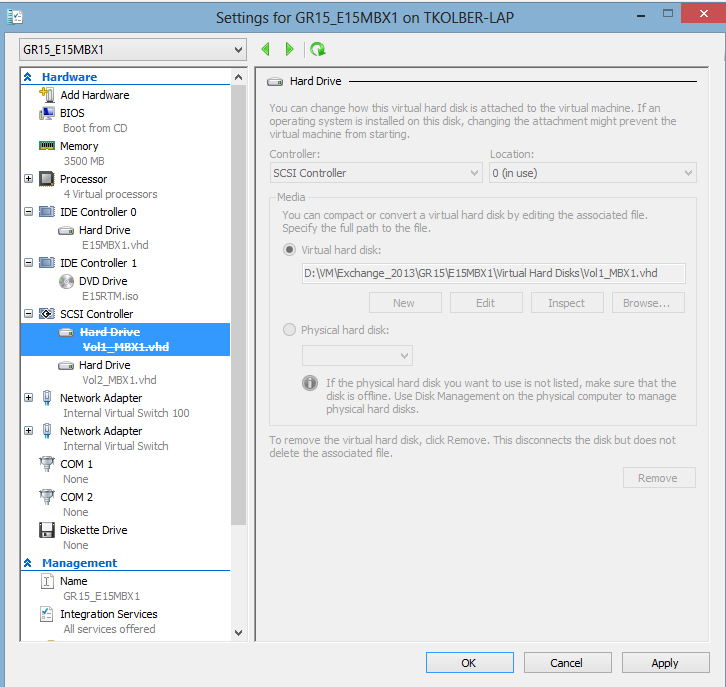
32. At this step we will simulate a "disk failure" in Volume1 on server E15MBX1 - this volume hosts the mounted database. In order to simulate a failure in Volume1, we will remove the drive from the Hyper-V settings of E15MBX1. Acting that way will eliminate Volume1 without any delay from the server:
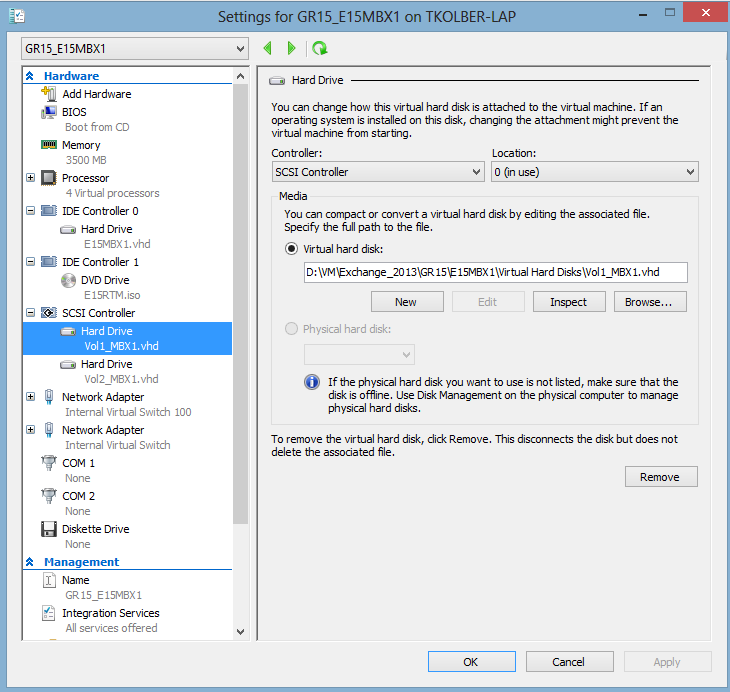
33. You are able to see that the Hard Drive Vol1_MBX1.vhd was disconnected from E15MBX1:
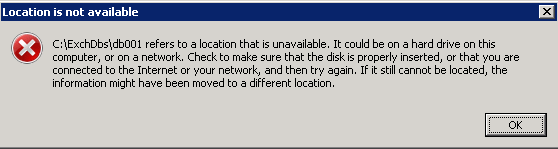
34. As a result, the drive will not be available to the system, therefore we will get the next error message at E15MBX1:
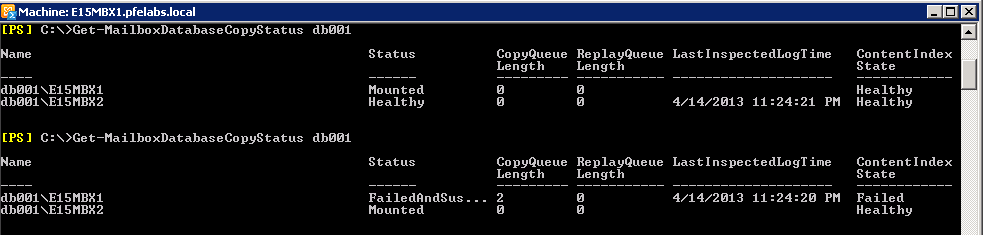
35. After the "disk failure" we can see that the mounted database was automatically activated on E15MBX2 (the healthy copy) because of the disk failure and that the copy on E15MBX1 (which was at mounted state), was changed to "FailedAndSuspend":
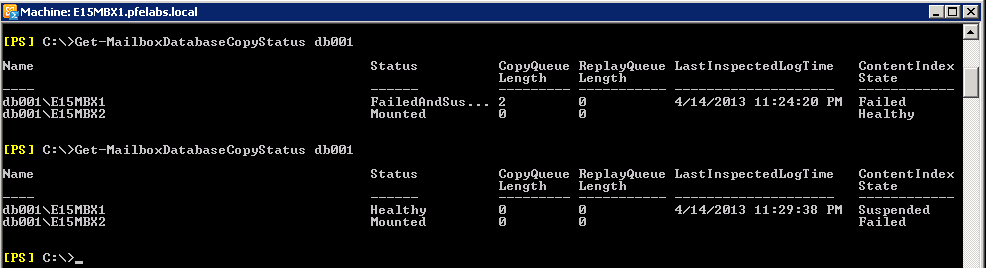
36. Since the replication service scan all the databases every 15 minutes look for a "FailedAndSuspend" state, the server which experiences a disk failure, will automatically replace the failed volume (disk) and automatically reseed the database from the active database. In our example we can see that after a while, the "FailedAndSuspend" copy on E15MBX1 was changed automatically after reseeding to a "Healthy" copy:
37. At the next screen shot, we can see that after Volume1 failed on E15MBX1, Volume2 was automatically activated and db001 was automatically reseed:
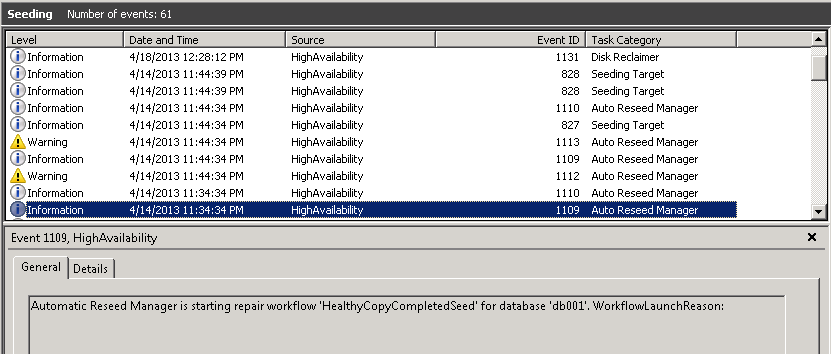
38. In order to follow the AutoReseed process, we should look at the next location: Event Viewer\Applications and Services Logs\Microsoft\exchange\HighAvailability\seeding
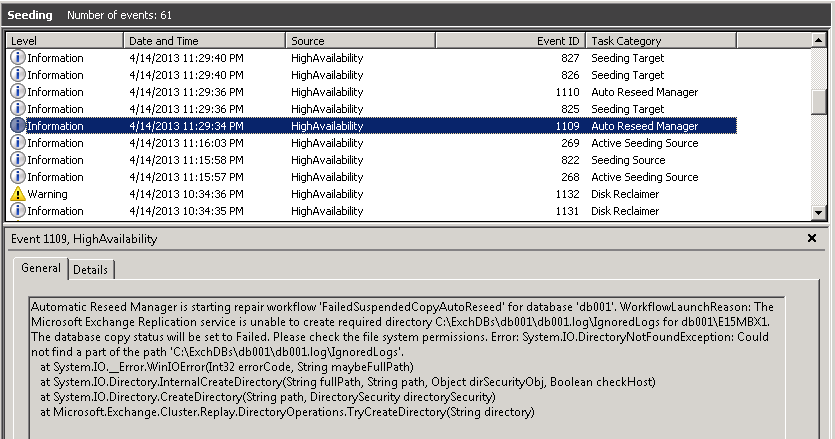
39. At the event viewer at the above mentioned location, event id 1109 will appear and inform that the replication service discovered that there is a disk failure and that there is no possibility to write to the database and logs location of db001: C:\ExchDBs\db001.
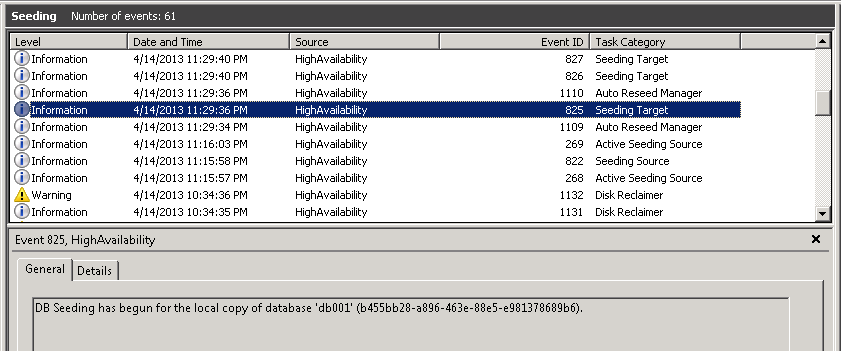
40. Event id 825 indicate that the seeding process was started:
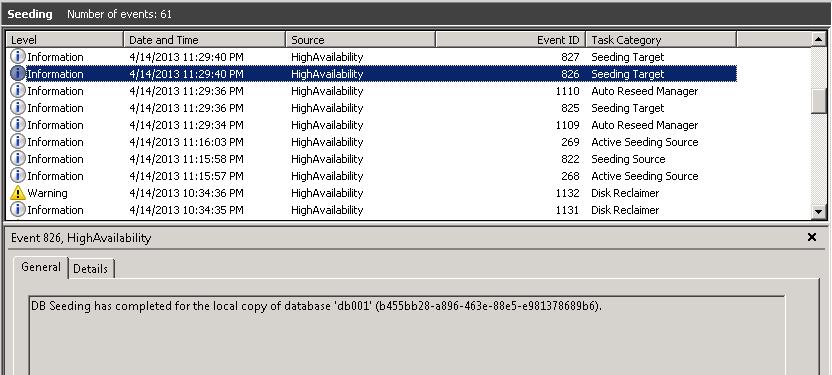
41. Event id 826 indicate that the seeding process was completed:
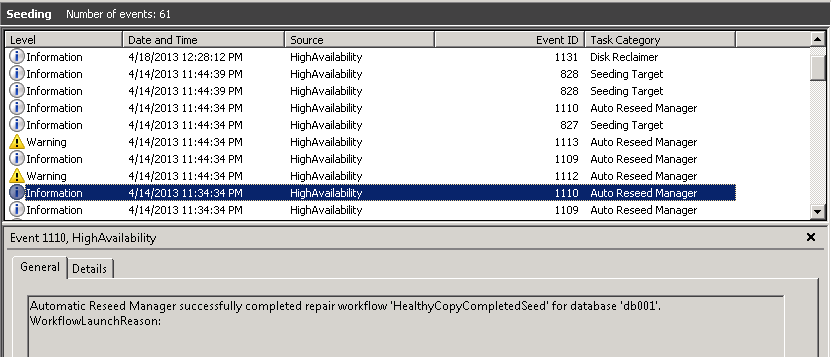
42. Event id 1109 describes the last checks for the database:
43. Event id 1110 claims that the last checks for the database were completed successfully:
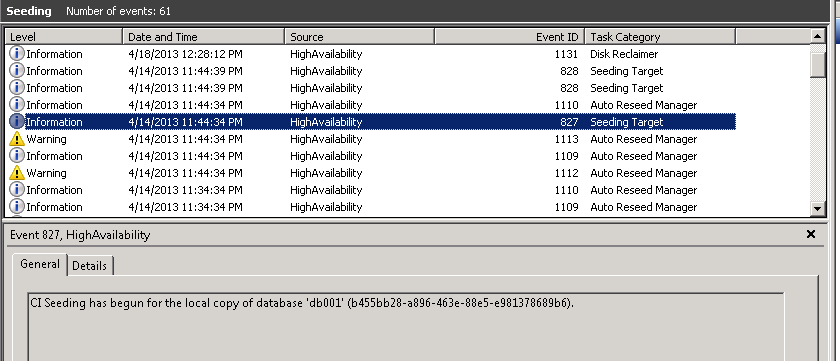
44. The final step in the database seeding is the Content Indexing (CI) seeding. Event 827 indicates that the CI seeding was started:
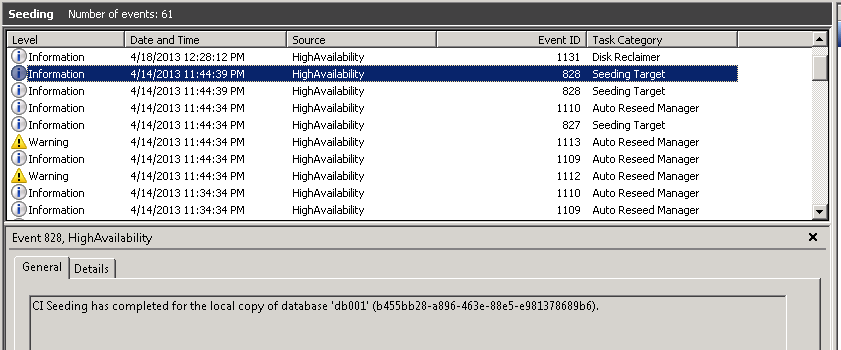
45. Event 828 indicates that the CI seeding was finished successfully:
After the database was reseeded automatically, the administrator should replace the failed disk in order to keep the cartridge volumes available for the next disk failure event.
Summery:
AutoReseed mechanism in Exchange 2013 keeps the messaging service up and running with high nonstop availability. The Exchange administrators can sleep well now and replace the failed drives in the morning instead of waking up in the middle of the night.
I would like to thank Heiko Pohl (Microsoft - Principle PFE) & Danijel Klaric (Microsoft - Senior PFE) for the assistance. .