Dynamics 365 - Prospect to Cash Integration
Introduction
Disconnected Sales (front office) and Operations (back office) systems is a problem that existed ever since business applications existed. Organizations often acquire these solutions from different software vendors and tries to stitch them together with an integration project. As time goes on, it becomes increasingly difficult to maintain. In this blog I will discuss how Microsoft is providing an integrated experience with Dynamics 365, connecting the Customer Engagement Platform (CRM / front office) to the Finance & Operations (ERP / back office) systems.
Prospect to Cash Pre-Requisites
The following are required for you to run through the rest of the blog.
- Microsoft Dynamics 365 for Finance and Operations (F&O), Enterprise edition July 2017 update with Platform update 8.
- Dynamics 365 Sales (CE), Enterprise Edition, version 8.2 or above.
- Prospect to Cash Solution installed in CE, you can install the solution from AppSource from here
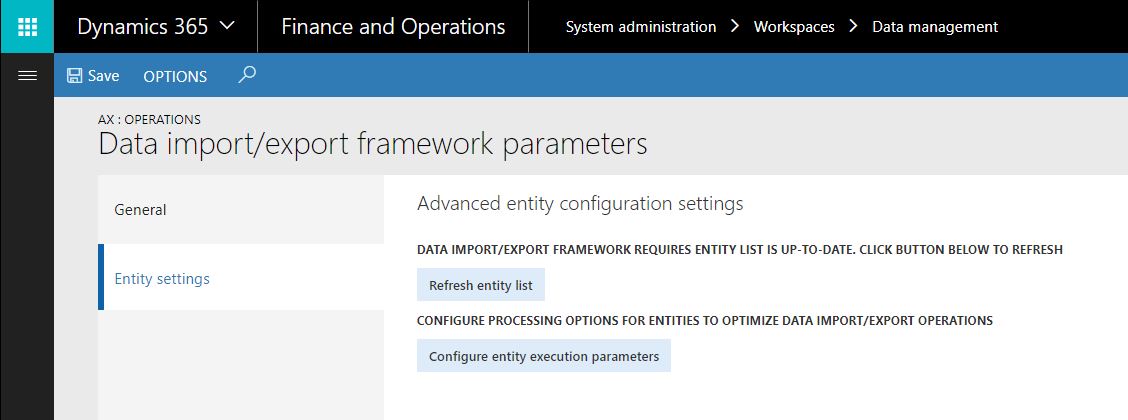
- Refresh the entity list on F&O by navigating to Data Management --> Framework Parameters --> Entity Settings and by hitting "Refresh Entity List: button as below.
Setting up your connections
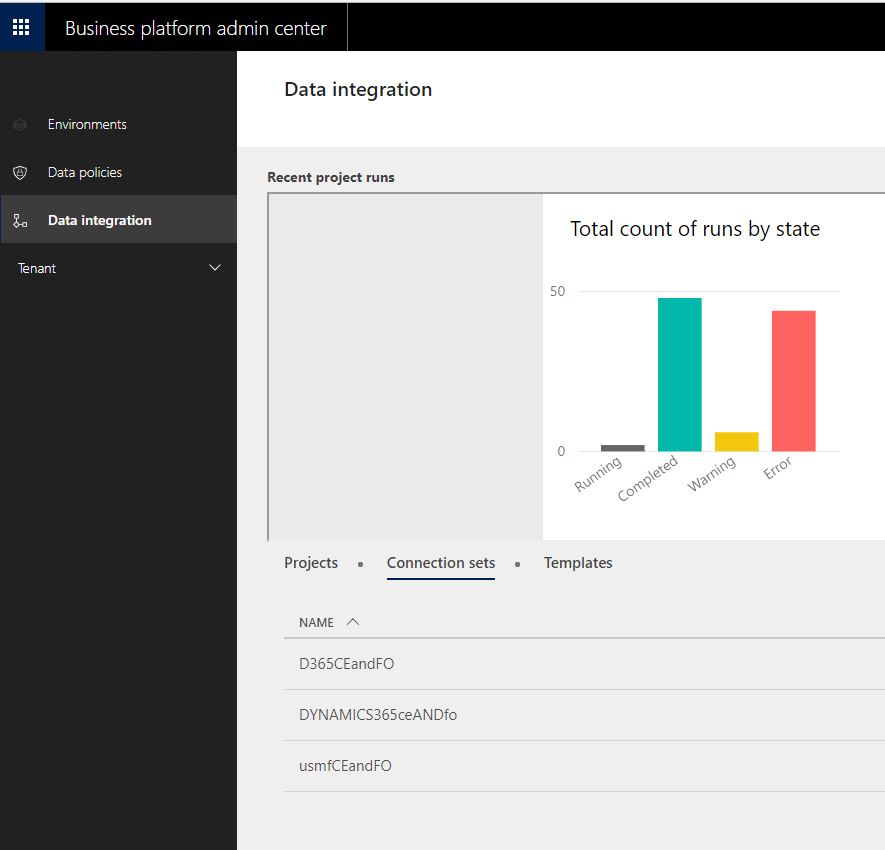
Before we can synchronize data between CE and F&O databases, we need to setup connections that maps between these two environments. Navigate to the Business Platform Admin Center .
Click on the Data Integration tab and then Connection Sets as below and create a New Connection Set.
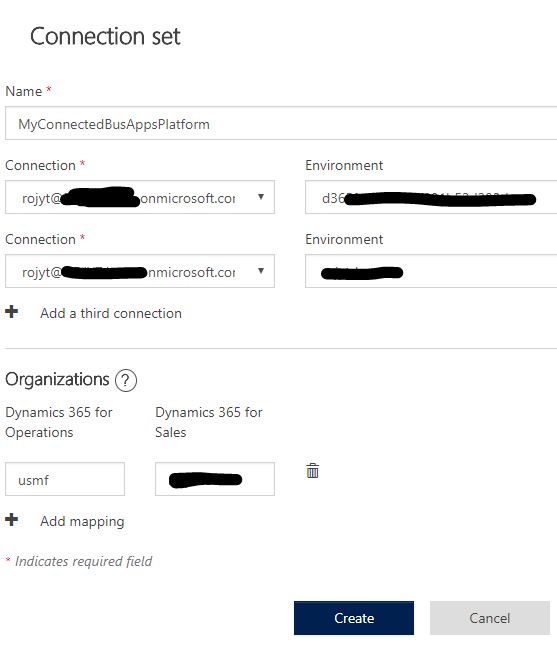
Select One Connection For CE and another for F&O as below. It is also important to map the Organizations section, for Dynamics 365 for Operations (FO) this is the Legal Entity where you would like to have the synchronization and Dynamics 365 for Sales (CE) this is the Business Unit mapping.
- Business Unit in CE: Settings --> Security --> Business Units.
- Legal Entity in F&O: Organization Administration --> Organizations --> Legal entities
Setting up your Projects
Now that we have the connections made between CE and F&O, it is now time for us to setup synchronizations between them. Before we create the projects, review the integrations that are supported out of the box.
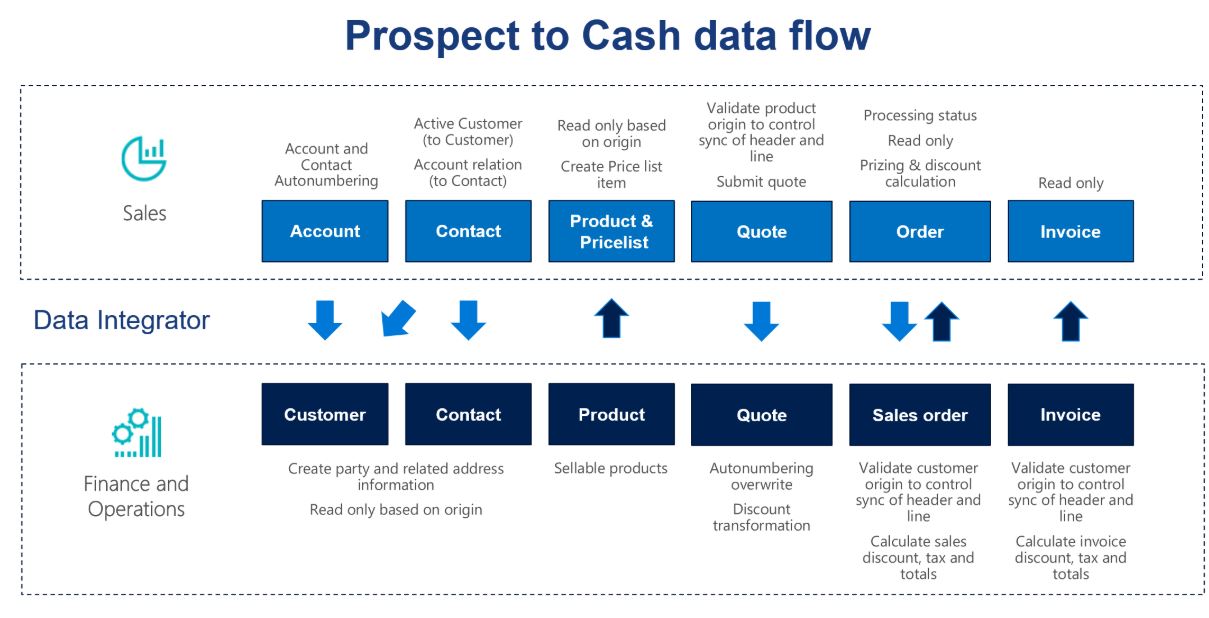
Accounts (CE) to Customer (F&O)
Create a New Project in the Business Platform Admin Center . Click on the Projects tab and continue creating a new project. Select Account (Sales to Fin and Ops) - Direct template.
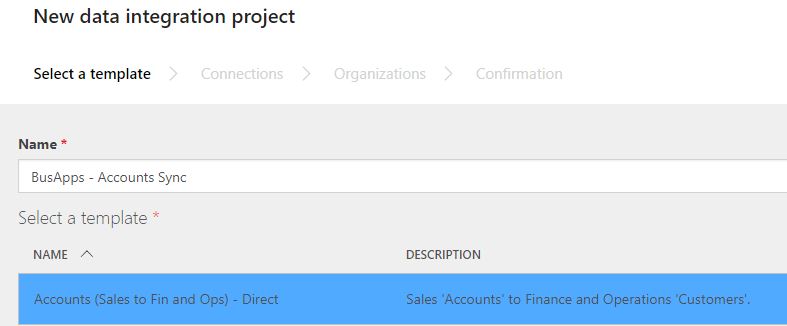
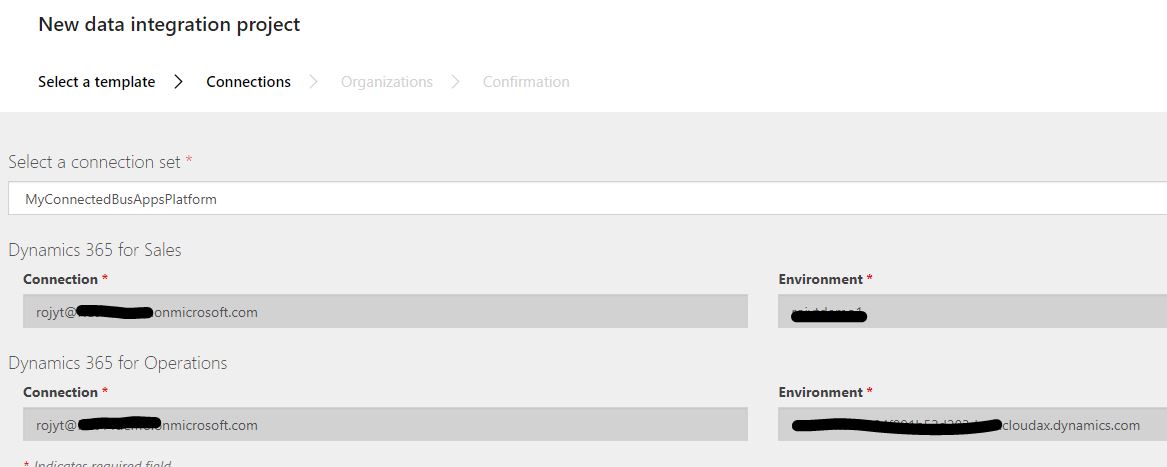
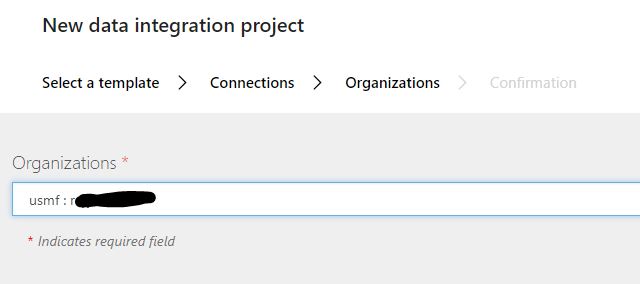
In the next steps, select the Connection Set and Organizations connections we created in the earlier step
Click Next to create the project. Once the project is created, before we run the project a few things needs to be checked.
- Click on the "Refresh Entities" icon to make sure the mapping between CE and FO tasks are correct.
- The Accounts synchronization templates expects the customer group that is in the mapping exists in F&O. By default a value of 10 is being sent, so either change the value (On the Tasks mapping) to a value that you are expecting or make sure the value exists in F&O (Accounts Receivables --> Setup --> Customer groups)
Now that the project is created and mapping is done, let's run the Accounts Synchronization Project by clicking on the "Run Project" Icon.

The execution history shows the status of the execution and any errors.

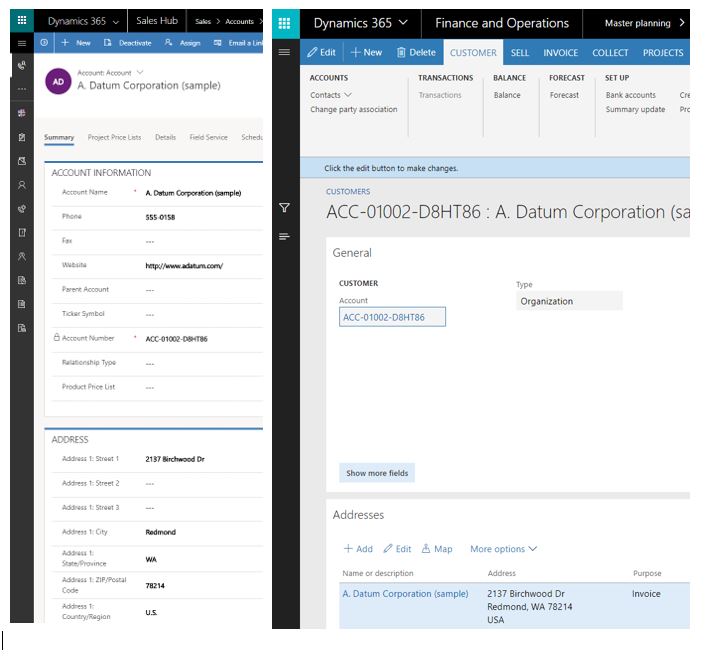
As you can see there were 4 upserts and 6 Errors. You may review the errors by clicking on the row, in my case it was duplicate accounts that caused the 6 errors to occur. Now let's take a look at how a successful synced account look in both systems.
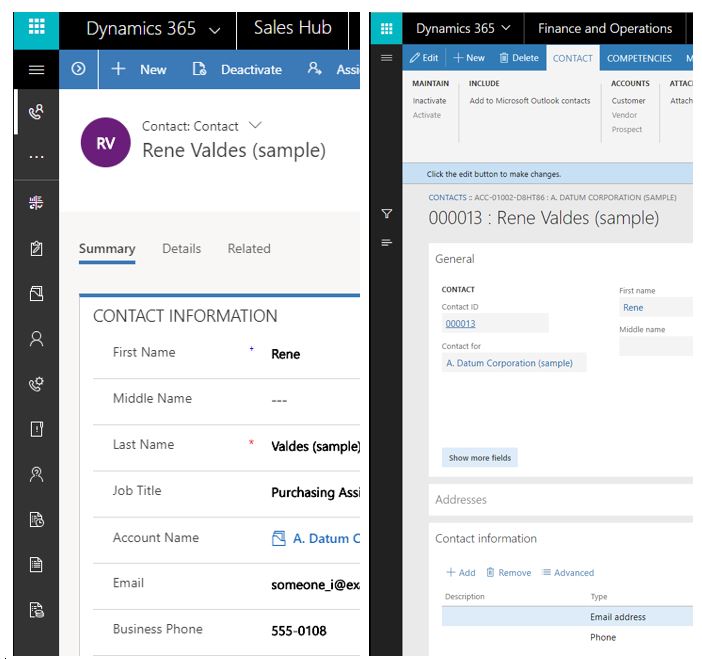
Contacts (CE) to Contact (F&O)
Now that we have Accounts synchronized, let's synchronize Contacts.
Note: You may also synchronize Contacts from CE as Customers in FO through the template "Contacts to Customer (Sales to Fin and Ops) - Direct". In this example let's synchronize using "Contacts (Sales to Fin and Ops) - Direct.
Run the project and review errors if any. Otherwise let's take a look at a Synchronized Contact.
Products (F&O) to Products & Pricelists (CE)
Before you synchronize any sales documents, synchronize the products & pricelists from F&O to CE. There are quite a few variables in play before the synchronization can run. Let's review them.
- Only Released Products from F&O are synchronized.
- A one time job of Product Distinct Table needs to be populated . (Product Information Management --> Periodic Tasks --> Populate distinct product table).
- If you like to have the products that are integrated from F&O to be automatically published in CE check the Settings --> Administration --> System Settings --> Sales tab and make sure "Created products in active state" is marked as Yes.
- Unit of Measure is crucial in the product synchronization. These values has to match or the products that references to that unit will fail. An example below
- F&O : Organization administration --> Setup --> Unit
- CE : Settings --> Product Catalog --> Unit Group --> Click on the unit group --> Units

Run the project and review errors if any. If the products are not set to publish automatically, then go into products and Publish them so they can be used in Sales Documents such as Opportunity , Orders etc.
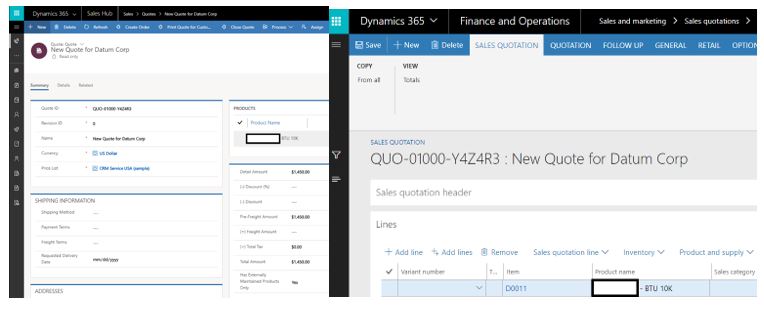
Quotes (CE) to Quotations (F&O)
Before we can synchronize Quotes to F&O, check these following settings.
- Go to Settings > Administration > System settings > Sales, and make sure that the following settings are used:
- The Use system prizing calculation system option is set to Yes.
- The Discount calculation method field is set to Line item
- Only Active Quotes are used for synchronization.
Run the project and review errors if any. Let's review a synchronized Quote.
Orders (CE) to Sales Orders (F&O)
- Before we can synchronize Orders to F&O, the settings mentioned in the Quotes section above is applicable for Orders as well.
- Only Active Orders are used for synchronization.
Run the project and review errors if any. Let's review a synchronized Order. Notice that the Processing Status on the Order in CE is Active 
Sales Orders (F&O) to Orders (CE)
- Once the Sales Order is processed in F&O, the details of the Sales Order is sent back to CE. In this example we will create an Invoice for this Sales Order in F&O. This sets the status of the Sales Order from Open Order to Invoiced in F&O. Running this job will update the status of the Order to be Invoiced in CE.
- Go to Sales and marketing > Periodic tasks > Calculate sales totals, and set the job to run as a batch job. Set the Calculate totals for sales orders option to Yes. This step is important, because only sales orders where sales totals are calculated will be synchronized to Sales. The frequency of the batch job should be aligned with the frequency of sales order synchronization.
- Go to Settings > Security > Teams, select the relevant team, select Manage Roles, and select a role that has the desired permissions, such as System Administrator
Run the project and review errors if any. Let's review the synchronized Order Status from F&O in CE. Notice the Processing Status on the order in CE is Invoiced 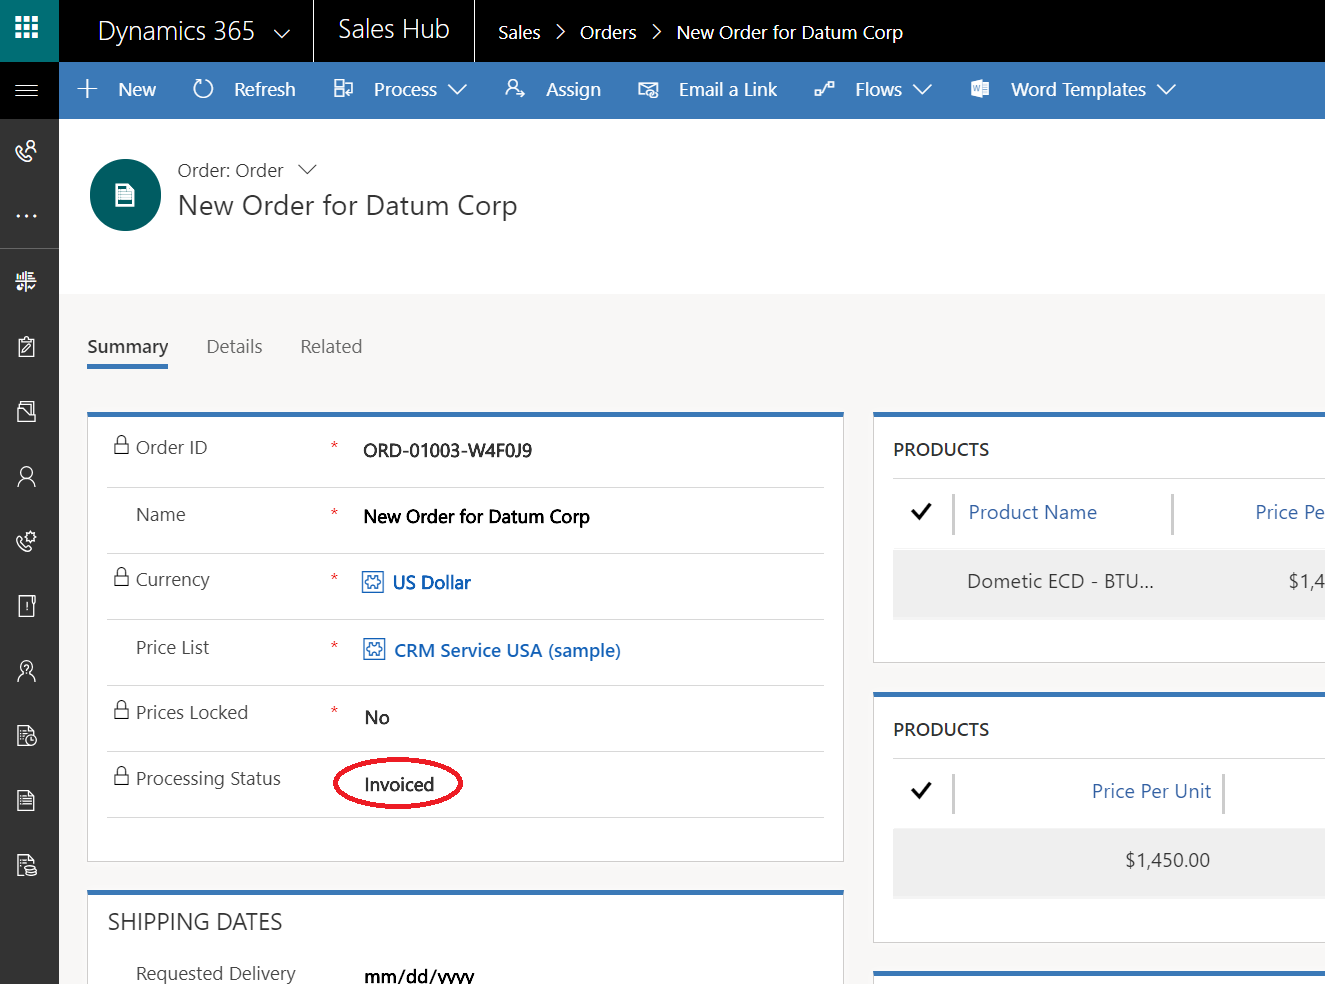
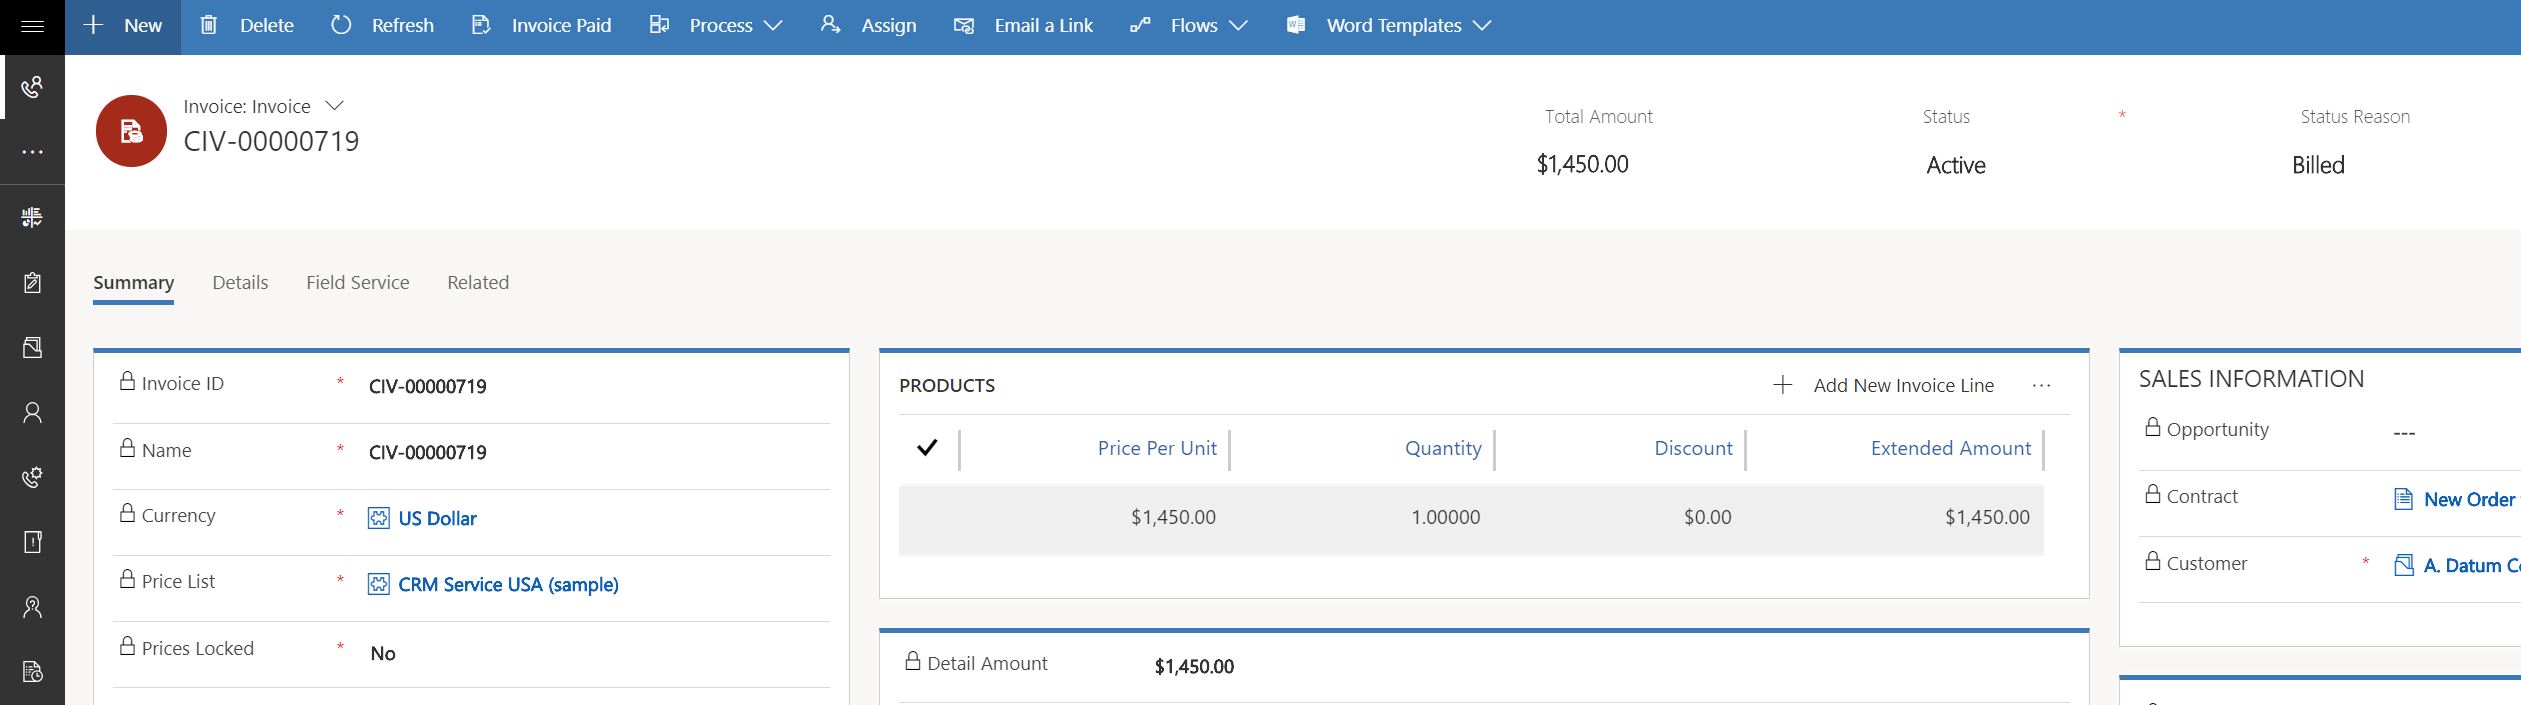
Invoice (F&O) to Invoices (CE)
The pre-reqs for Invoices to sync to CE is taken care of the Quotes and Orders section, then you should be able to run the project without any pre-reqs.
Run the project and review errors if any. Let's review the synchronized invoice in CE.
Scheduling, Templates & Monitoring Jobs
Now that we have gone through the solution templates / projects manually, let's look at scheduling, saving templates and monitoring the jobs.
Scheduling
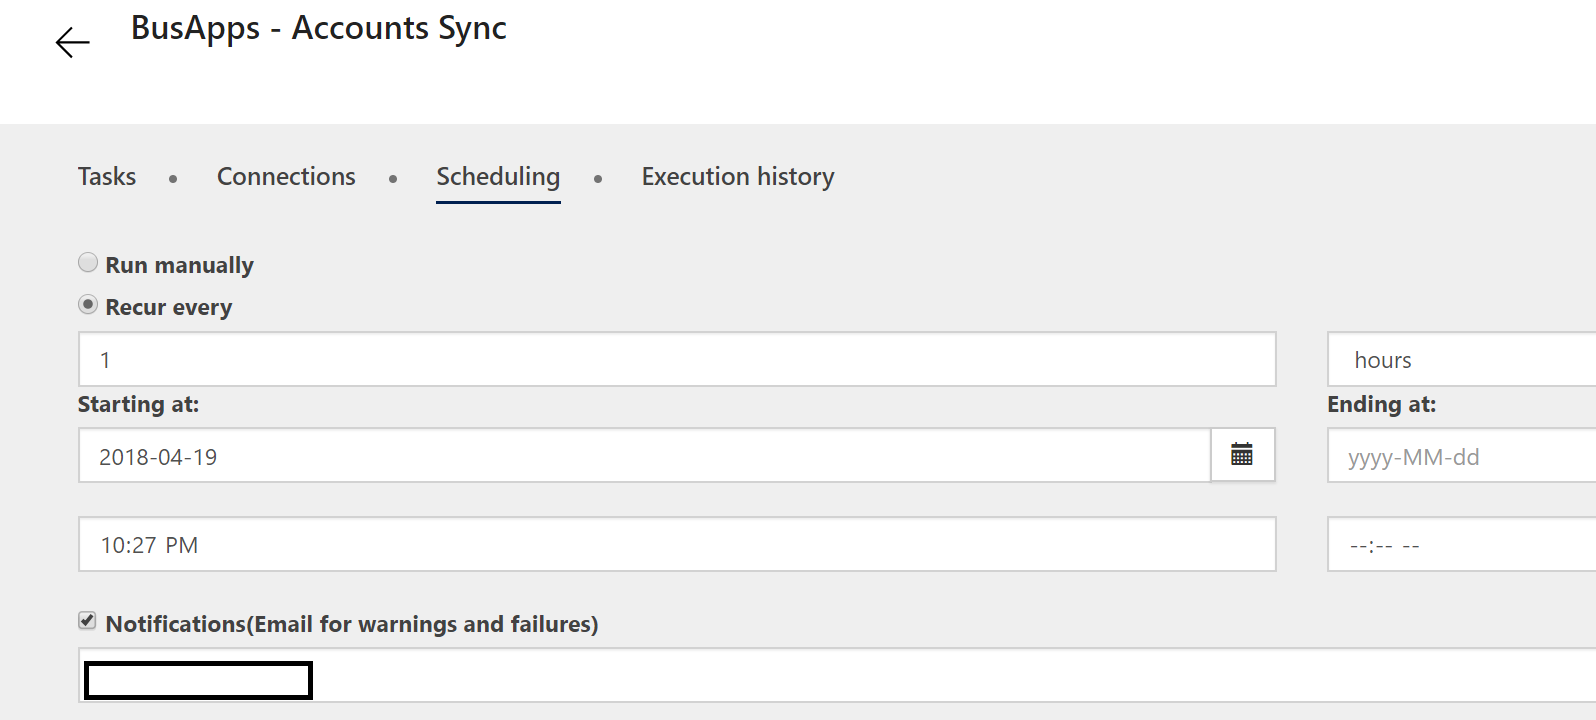
Navigate to the Business Platform Admin Center .Click on the Data Integration tab and then click on a Project that we setup and then the Scheduling tab. You can run as frequent as every 1 minute and be alerted if there are errors or warnings.
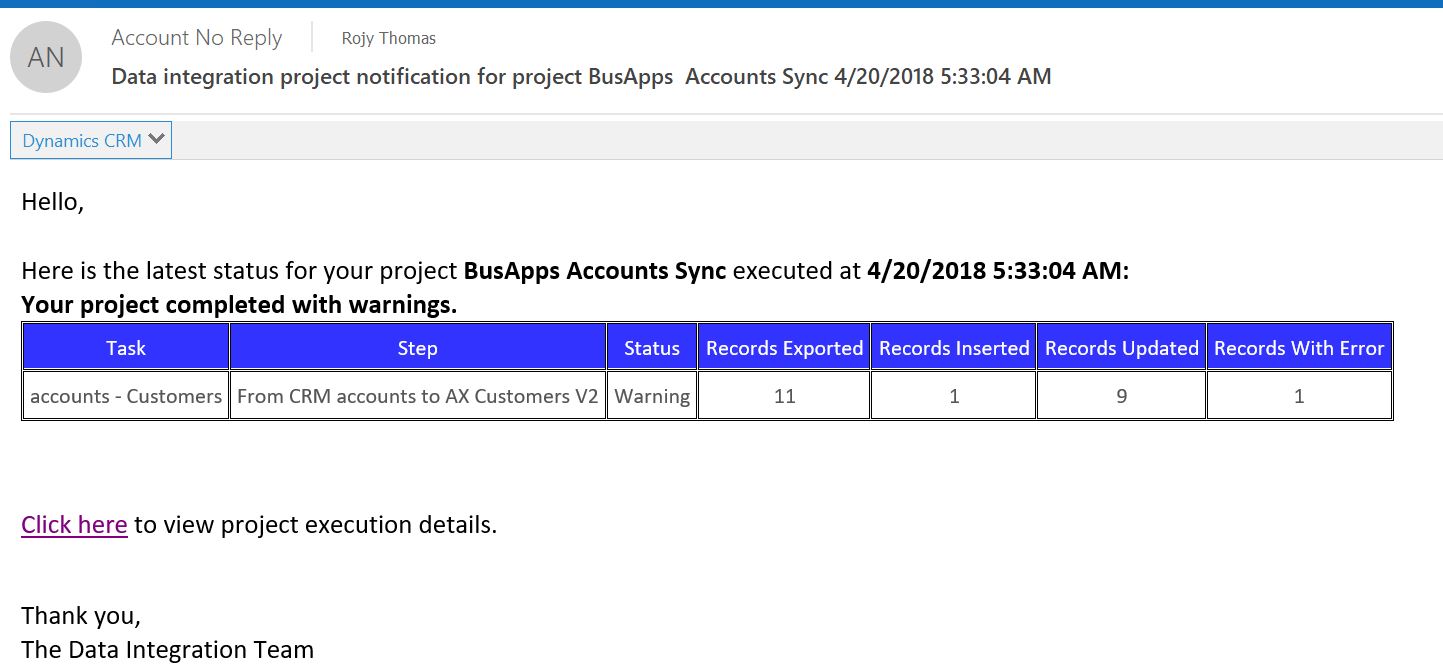
Example of the alert email below.
Templates
If you would like to save your settings on an existing project, you can save the projects tasks mapping, connection sets etc into a template. See below.
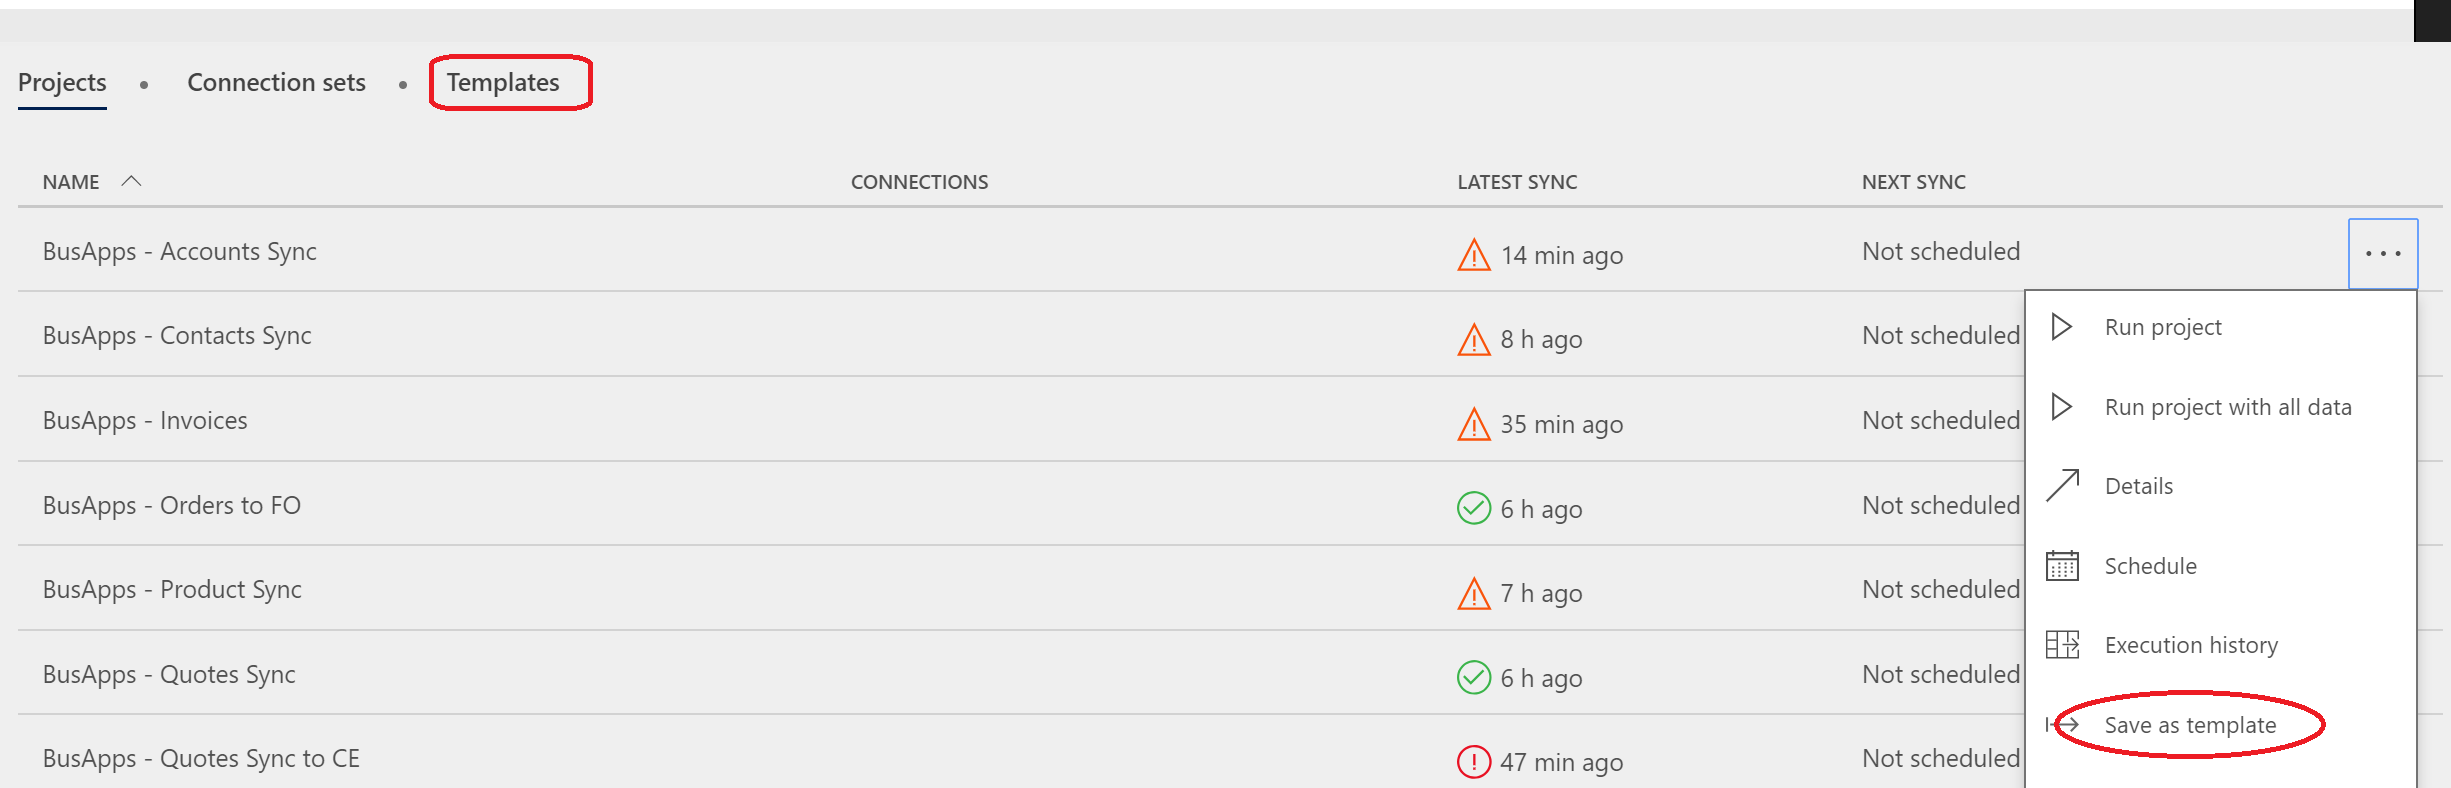
The save templates can be viewed on the Templates tab.
Monitoring Jobs
Even though the admin center provides status to the jobs, there will be times you need to know more of what is happening. Here are the areas that you need to check to see what is happening with your import/export job.
CE: Settings --> System Jobs
F&O: System Administration --> Workspaces --> Data Management. Click on the specific job you are interested in and look for the Execution Details and the "View Execution Logs" for more details.
I hope you enjoyed reading my blog on Dynamics 365 - Prospect to Cash Integration.