Custom Sign In control – Redirection from HTTP site HTTPS
Happy New Year – 2012 ![]()
Recently I had worked with my good friend Bobby on a special requirement for one of his customers. Customer has a SharePoint web application created in the default zone enabled with SSL and the same web application was published to a different zone (Internet) for anonymous users.
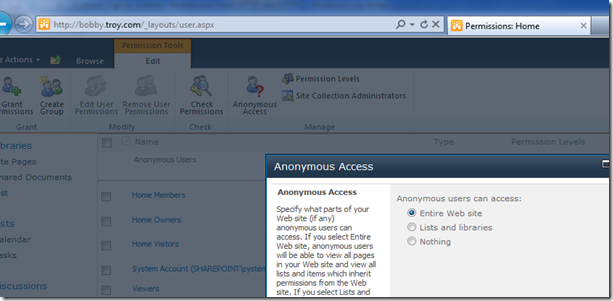
Below screenshot will give a better picture. Both web applications were using same URI except the default zone was configured to use NTLM authentication & SSL, and the internet zone was configured to allow anonymous access and non-SSL (HTTP).
When you enable anonymous authentication on a Web site, you allow anonymous users (and authenticated users who have not been granted access to the site) to browse the entire Web site, including any list, library, folder within a list or library, list item, or document that inherits its permissions from the Web site but not to contribute. For more information please look at here, I have enabled anonymous access for the entire website.
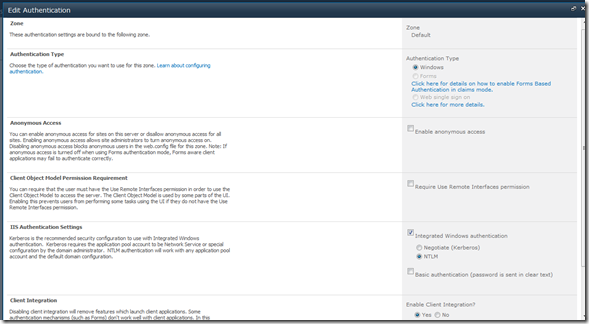
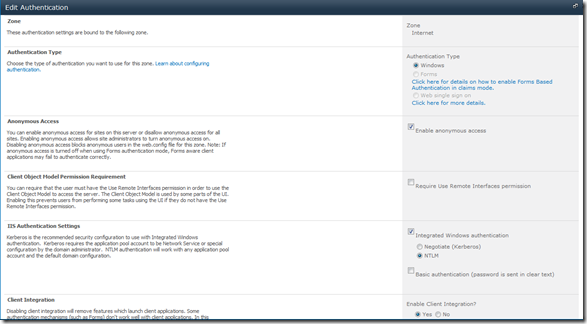
Authentication configuration for above mentioned web applications are given below.
Default Zone (https://bobby.troy.com)
Internet Zone (https://bobby.troy.com)
So, here begins the actual scenario , since both websites were published outside the corpnet, both anonymous users and authenticated users can access the website. If any user try to hit the URL https://bobby.troy.com, it will ask for credentials and any authenticated users can login and do any modifications. But, take a scenario where an actual AD user trying to access https://bobby.troy.com (Internet), it will not ask for credentials and it will allow the user to navigate to the sites and its contents as an anonymous user, and users can’t modify any content.
In this situation if user want to sign in to the site and do some modification in the site, by default if he or she click on the “Sign In” button (red box in the above screen) it will show user login prompt and it will allow the user to login to the same site which is using (HTTP). But to make it secure we have to login to the web application which was created in default zone (using HTTPS). So here simple work around is manual modification of the browser URL from HTTP to HTTPS, which is not a good work around as all end users won’t do that. We were discussing about a work around for this to make it automatic.
Work around was make the “Sign In” button to do some magic, for that we have to customize it. “Sign In” button is rendered via a user control called “Welcome.ascx” which located under \14\tempalte\ControlTemplates location. Once we open it you can see that welcome.ascx hosts many other controls as well, like user personalization control.
“Sign In” link is rendered by a control called “ExplicitLogin”, so what we have to do is change the control logic. By default this control has a property “ApplicationPageFileName” which configured to “Authenticate.aspx” which located under _layouts directory. By default , when we click on the “sign in” link it is hitting on Authenticate.aspx page to do the authentication.
 <SharePoint:ApplicationPageLink runat="server" id="ExplicitLogin"
     ApplicationPageFileName="Authenticate.aspx" AppendCurrentPageUrl=true
     Text="<%$Resources:wss,login_pagetitle%>" style="display:none" Visible="false" />
In the above screen shot of the welcome controls, you can see that I have modified “ExplicitLogin”control.
In order to implement this solution, you have to create a custom user control which will be a copy of out-of-the-box welcome control except the changes in “ExplicitLogin” control. Also you have to override OnLoad method of the user control and implement the following code in below code snippet.
 using System;
 using System.Web.UI;
 using System.Web;
 using Microsoft.SharePoint;

 namespace CustomWelcome.CONTROLTEMPLATES.CustomWelcome
 {
     public partial class CustomWelcome : UserControl
     {
         protected override void OnLoad(EventArgs e)
         {
             if (!this.Page.IsPostBack)
             {
                 if (HttpContext.Current.User.Identity.IsAuthenticated)
                 {
                     this.ExplicitLogout.Visible = true;
                     this.ExplicitLogin.Visible = false;
                     return;
                 }
                 this.ExplicitLogin.Visible = true;
                 if (SPContext.Current != null && SPContext.Current.Web != null && SPContext.Current.Web.UIVersion == 3)
                 {
                     this.ExplicitLogin.Attributes.CssStyle.Add("display", "block");
                     return;
                 }
                 this.ExplicitLogin.Attributes.CssStyle.Add("display", "inline");
                 this.ExplicitLogin.CssClass = "s4-signInLink";

                 if (!HttpContext.Current.Request.IsSecureConnection)
                 {
                     string postbackUrl = HttpContext.Current.Request.Url.AbsoluteUri.Replace("http", "https");
                     ExplicitLogin.NavigateUrl = postbackUrl;
                     ExplicitLogin.Visible = true;
                 }

             }
         }

     }
 }
Code is primarily changing the navigationUrl property of the ExplicitLogin control. It will check the current context is using secure connection or not if not it will replace the HTTP to HTTPS.
 if (!HttpContext.Current.Request.IsSecureConnection){
  string postbackUrl = HttpContext.Current.Request.Url.AbsoluteUri.Replace("http", "https");
  ExplicitLogin.NavigateUrl = postbackUrl;
  ExplicitLogin.Visible = true;
    }
once you are done with the custom user control you have to deploy it to controltemplates directory. Next step is to load it in the master page. By default , once you open v4.master you can see out-of-the-box welcome control registration (check below screenshot). It is always safe to create a custom master page by taking a copy of v4.master and just modify this line point to the custom user control that we developed.
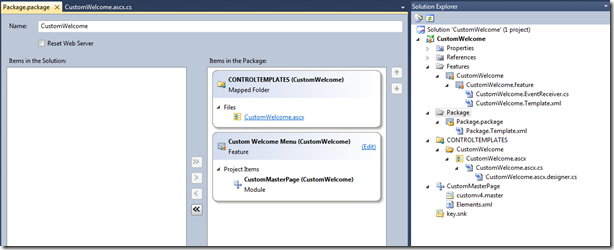
Now, to make it as a reusable package and make it easier to manage , I have a developed a Visual Studio 2010 solution.
Solution contains below artifacts.
1. A mapped file – which is our user control (customwelcome.ascx)
2. A custom master page which configured to load the custom welcome control
3. A feature with activated & deactivating event handler
Once you deploy the .WSP file, it will deploy the customwelcome.ascx in the controltemplates directory, also the feature is scoped to site collection level, whenever you need this feature in your site collection go ahead and activate it, once you activate the feature it will provision the customv4.master to the master page gallery also it will apply it automatically. Once you deactivate the feature it will apply out-of-the-box v4. master.
Package structure is given below.
I have attached the complete source code with this post below. If you have this kind of requirement you can download and test it out in a test environment and do further modifications. Once you deploy it then once you visit anonymous site, in my scenario https://bobby.troy.com when any user want to login to the secured site to do some modification then while clicking on the “sign in” button , our custom code will execute and user will get navigate to the secured site (in my case https://bobby.troy.com )
Hope this will help someone else as well !


