Using SAN Volumes in Project REAL
Introduction
As we started Project REAL, we were fortunate to be able to use multiple machines and SAN devices to test different configurations. At the same time, this presented a challenge in that we needed to keep track of what information was on what SAN volumes even as those volumes could be switched from one machine to another. This note describes some techniques we learned for managing the various SAN volumes.
This is a topic I write about with some trepidation. Will it simply expose me as an inexperienced DBA? That would be true since I’m really a Program Manager. This write-up is most likely to be useful to you if you’re new to the SAN business.
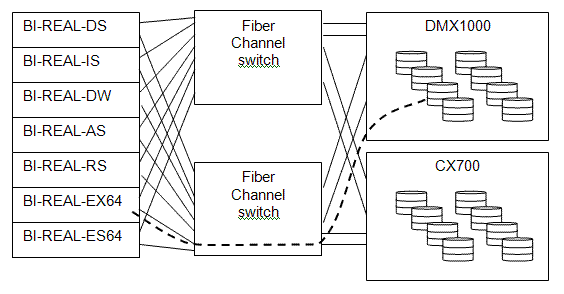
In our lab for Project REAL, we had a collection of machines and a collection of SAN volumes. The volumes were spread over two physical SAN storage units – an EMC Clariion CX700 and an EMC Symmetrix DMX1000. A pair of fiber channel switches provided alternate routes between the servers and the storage for high performance and reliability. The configuration is illustrated in the diagram below. From each machine on the left, there are at least two (and often many) routes to a SAN unit on the right.
SAN 101
Within each SAN unit are many physical disk drives. Spaces from the drives are allocated and collected into logical storage units called volumes. A volume is presented to the server computer, and to the server a volume appears as a disk drive.
To someone not immersed in SAN technology, the various ways of creating a volume from a collection of disks in the SAN can appear somewhere between arcane and incomprehensible. In Project REAL we did not create volumes on the SAN ourselves; EMC did it for us. Depending on your level of expertise, you may establish a similar relationship with your SAN vendor. What’s important to realize is that not all SAN volumes are created equal, even if they are on the same SAN device. Just as physical disks can be striped (RAID 0), mirrored (RAID 1), placed in groups with parity drives (RAID 5) and so on, all these configurations and many more are possible within the SAN. Various configurations will have different characteristics in terms of fault tolerance, speed, and other options such as the ability to split off a mirror as a point-in-time snapshot. It’s helpful to be clear with your SAN expert what the purpose of each volume is. Does this volume need fast random I/O? Is it going to be used for sequential writes? Is it primarily to hold a back-up coy of some data? What volumes are likely to be under high loads at the same time? This information will help your SAN expert create an optimal allocation of SAN storage into your volumes.
Volume Names
We found it helpful to assign logical names to the volumes that reflect their roles in the project. For example, the ten volumes that held the relational data warehouse files might be called DW1-01 through DW1-10. The volume created for the log for the same relational data warehouse was called DW2. (If I were doing this again, I would call it DW1-log1.) Likewise, a volume created to hold an Analysis Services database might be called AS3.
One interesting aspect of Project REAL was that we had multiple copies of the same database on different servers at the same time. This allowed us to do “mix and match” configurations by having EMC re-map volumes from one server to another. It may sound like a rare luxury to have that amount of storage available, but you might encounter similar situations where you want to build and test a database on one server and then deploy it to another with the database intact. At the risk of stating the obvious: Don’t give two volumes the same name just because the fill the same role on different machines. You may want to move the volume later. A volume created to hold an Analysis Services database on server BI-REAL-AS might be AS1 and a similar volume on the server BI-REAL-ES64 might be AS2. Now if we decide to move them, we can.
Mounting Volumes
You already know that Windows by default likes to assign drive letters to volumes, so you get E:, F:, W:, etc. For a large-scale environment I recommend mounting the volumes on empty NTFS folders instead. Give the folders the same name as the logical volumes that will be mounted on them, so DW1-01 is mounted on C:\Mount\DW1-01 and so on. Then you can easily tell what is in any volume, regardless of what machine it is currently mounted on.
For attaching SQL Server database files, there is another benefit of this convention. Suppose a collection of volumes, DW1-01 through DW1-10 and DW2, is moved from one machine to another. If the naming convention is followed, then the paths to the files will be the same on the new machine. When it’s time to re-attach the database via SQL Workbench, it is only necessary to give the name the primary file, e.g., REAL_Warehouse_01.MDF. SQL Server can find all the other files because the paths are still valid.
If you need to restore a database to a different set of volumes, it’s also easy to adjust the restore script if the naming convention is consistent. In the script below, the only parts that need changing to use alternate volumes are the characters highlighted in green:
exec master.dbo.xp_restore_database
@database = 'REAL_Warehouse',
@filename = 'c:\mount\RS3\REAL_Warehouse_20060918_1433.BKP',
@filenumber = 1, @with = 'RECOVERY', @with = 'NOUNLOAD', @with = 'STATS = 10',
@with = 'MOVE N''Active01'' TO N''C:\Mount\DW1-01\REAL_Warehouse_01.ndf''',
@with = 'MOVE N''Active02'' TO N''C:\Mount\DW1-02\REAL_Warehouse_02.ndf''',
@with = 'MOVE N''Active03'' TO N''C:\Mount\DW1-03\REAL_Warehouse_03.ndf''',
@with = 'MOVE N''Active04'' TO N''C:\Mount\DW1-04\REAL_Warehouse_04.ndf''',
@with = 'MOVE N''Active05'' TO N''C:\Mount\DW1-05\REAL_Warehouse_05.ndf''',
@with = 'MOVE N''Archive06'' TO N''C:\Mount\DW1-06\REAL_Warehouse_06.ndf''',
@with = 'MOVE N''Archive07'' TO N''C:\Mount\DW1-07\REAL_Warehouse_07.ndf''',
@with = 'MOVE N''Archive08'' TO N''C:\Mount\DW1-08\REAL_Warehouse_08.ndf''',
@with = 'MOVE N''Archive09'' TO N''C:\Mount\DW1-09\REAL_Warehouse_09.ndf''',
@with = 'MOVE N''Archive10'' TO N''C:\Mount\DW1-10\REAL_Warehouse_10.ndf''',
@with = 'MOVE N''Dimension_dat'' TO N''C:\Mount\DW1-01\REAL_Warehouse_Dimensions.ndf''',
@with = 'MOVE N''Primary_dat'' TO N''C:\Mount\DW1-01\REAL_Warehouse_Primary.mdf''',
@with = 'MOVE N''Primary_log1'' TO N''C:\Mount\DW2\REAL_Warehouse_Log1.ldf'''
Volume Sizes
Try to establish a pattern for laying out database files on volumes, then size the volumes appropriately – and stick to the convention until there are clear reasons to change it. Early in Project REAL we had a 1 TB database implemented as four 250 GB files. We wanted to back up the database and restore it on a different machine. The target machine had plenty of space – it had 10 150 GB volumes. Unfortunately none of the 250 GB database files would fit in the available volumes! Having had this experience, we established a pattern that our major relational databases would be stored as 10 data files (.MDF and .NDF), and each file would then be placed in its own volume (for performance reasons).
Wrap-up
None of this has been rocket science, but hopefully some of our experiences in Project REAL will help you with a good SAN implementation. To summarize:
- Establish a usage pattern for your storage volumes that lets you and your SAN expert predict what will be needed.
- Follow a naming convention that gives each volume a name indicating what it is for. Volume names should be unique over all machines.
- Mount the volumes on NTFS folders that follow the same naming convention.
- Keep in communication with your SAN expert about the usage patterns for your storage.
- Len Wyatt