Building Windows Server Failover Cluster on Azure IAAS VM – Part 2 (Network)
Hello, cluster fans. In my previous blog, I talked about how to work around the storage block in order to implementing Windows Server Failover Cluster on Azure IAAS VM. Now let’s discuss another important part – Network in cluster on Azure.
Before that, you should know some basic concepts of Azure networking. Here are a few Azure terms we need use to setup the cluster.
VIP (Virtual IP address): A public IP address belongs to cloud service. It also serves as an Azure Load Balancer which tells how network traffic should be directed before being routed to the VM.
DIP (Dynamic IP address): An internal IP assigned by Microsoft Azure DHCP to the VM.
Internal Load Balancer: It is configured to port-forward or load-balance traffic inside a VNET or cloud service to different VMs.
Endpoint: It associates a VIP/DIP + port combination on a VM with a port on either the Azure Load Balancer for public-facing traffic or the Internal Load Balancer for traffic inside a VNET (or cloud service).
You can refer to this blog for more details about those terms for Azure network: https://blogs.msdn.com/b/cloud_solution_architect/archive/2014/11/08/vips-dips-and-pips-in-microsoft-azure.aspx
OK, enough read, storage is ready and we know the basic of Azure network, can we start to build the cluster?
Yes! The first difference you will see is that you need start the cluster with one node and then add the other nodes as the next step. This is because the cluster name object (CNO) cannot be online since it cannot acquire a unique IP address from the Azure DHCP service. Instead, the IP address assigned to the CNO is a duplicate address of node who owns CNO. That IP fails as a duplicate and can never be brought online. This eventually causes the cluster to lose quorum because the nodes cannot properly connect to each other. To prevent the cluster from losing quorum, you start with one node cluster. Let the CNO’s IP fail and then manually set up the IP address.
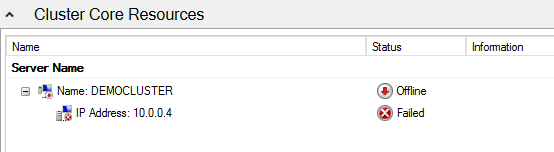
Example:
CNO DEMOCLUSTER is offline because IP Address is failed. 10.0.0.4 is VM’s DIP, which is where CNO’s IP duplicates from.
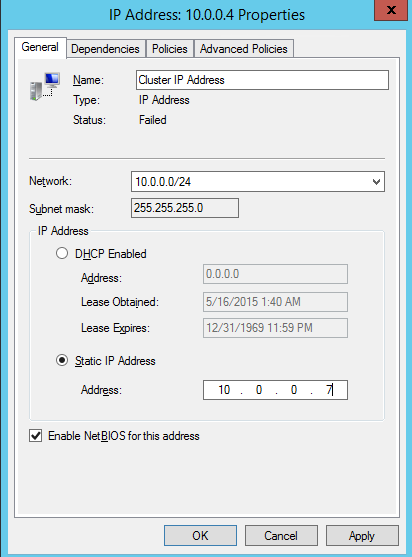
In order to fix this, we will need go into the properties of the IP Address resource and change the address to another address in the same subnet that is not currently in use, for example, 10.0.0.7.
To change the IP address, choose the Properties of the IP Address and specify the new address.
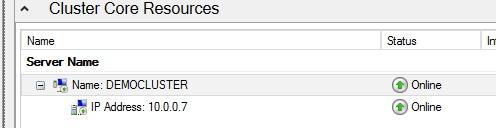
Once the address is changed, right click on the Cluster Name resource and tell it to come online.
Then you can add more nodes to the cluster.
Another way to resolve this issue is to use New-Cluster PowerShell cmdlet and specify static IP during cluster creation.
Take the above environment as example:
New-Cluster -Name DEMOCLUSTER -Node node1,node2 -StaticAddress 10.0.0.7
https://technet.microsoft.com/en-us/library/hh847246.aspx
Note: The Static IP address that you appoint to CNO is not for network communication. The only purpose is to bring the CNO online due to the dependency request. Therefore, you cannot ping that IP; cannot resolve DNS name; cannot use CNO for management since its IP is an unusable IP.
Now you’ve successfully created a cluster. Let’s have a highly available role inside it. For the demo purpose, I’ll take File Server as an example since this is the most common role that lot of us can understand.
Note: In production environment, we do not recommend File Server Cluster in Azure because of cost and performance. Take this example as a proof of concept.
Different than cluster on-premises, I recommend you to pause other nodes and keep only one node up. This is to prevent the new file server role from moving among nodes forever because file server’s VCO (virtual computer object) will have a duplicated IP address automatically assigned as the IP on the node who owns this VCO. This IP fails and makes VCO not come online on any node and may eventually cause the failover cluster manager no response. This is a similar scenario as for CNO we just talked before.
Screenshots are more intuitive.
VCO DEMOFS won’t come online because failed status of IP address. This is expected because the dynamic IP address duplicates the IP of owner node.
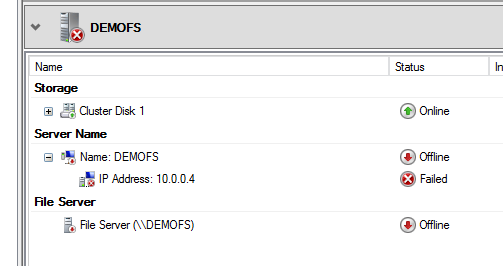
Manually edit the IP to a static unused 10.0.0.8 in this example, now the whole resource group is online.
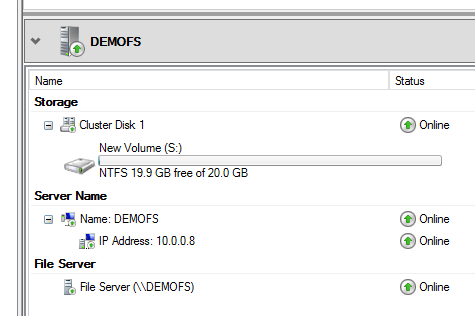
But remember, that IP address is the same unusable IP address as CNO’s IP – you can use it to bring resource online but that is not a real IP for network communication. If this is a File Sever, none of the VMs except the owner node of this VCO can access the File Share. Azure networking loops the traffic back to the node it was originated from.
Show time starts, we need utilize load balancer in Azure to make this IP be able to communicate with other machines in order to achieving the client-server traffic.
Load Balancer is an Azure IP resource that can route network traffic to different Azure VMs. The IP can be public facing as VIP, or internal only, like DIP. Each VM needs have the endpoint(s) so the Load Balancer can know where the traffic needs go to. In the endpoint, there are two kinds of ports. Regular port is used for normal client-server communications. For example, port 445 is for SMB file sharing, port 80 is HTTP, port 1433 is for MSSQL, and etc. Another kind of port is probe port. The default port number is 59999. Probe port is to find out which is the active node that hosts the VCO in the cluster. Load balancer sends the probe pings over TCP port 59999 to every node in the cluster, by default, every 10 seconds. When you configure a role in cluster on Azure VM, you need figure out what port(s) the application uses because you will add this port to the endpoint. And then you add the probe port to the same endpoint. After that, you need update the parameter of VCO’s IP address to have that probe port. Finally, load balancer will do the similar port forward task and route the traffic to VM who owns the VCO. All the above settings need complete using PowerShell as the blog was written.
Note: When the blog was written, Microsoft only supports one resource group in cluster on Azure with Active / Passive model only. This is because VCO’s IP can only use cloud service IP address (VIP) or the IP address of the Internal Load Balancer. This limitation is still in effect although Azure now supports the creation of multiple VIP addresses in a given cloud service.
Here is the diagram for Internal Load Balancer (ILB) in cluster which can explain the above theory better:
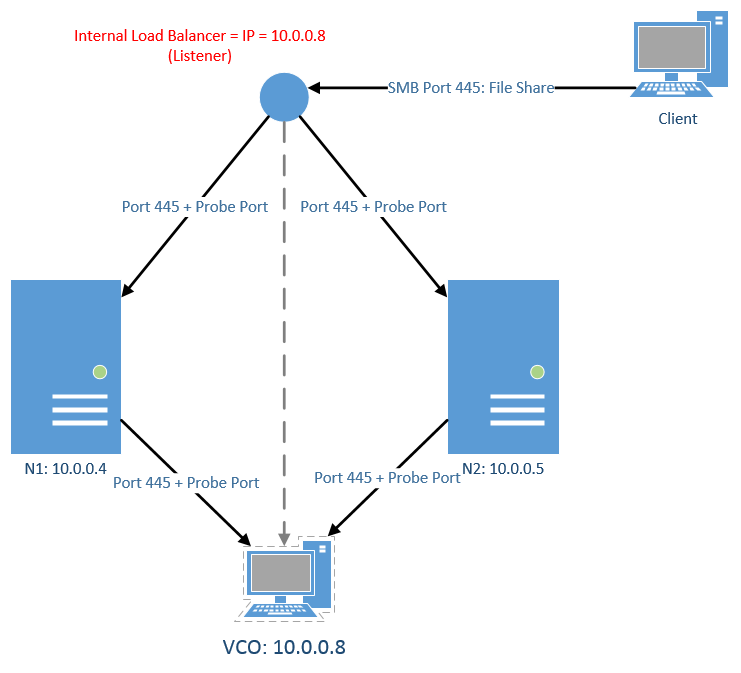
The application in this cluster is File Server. That’s why we have port 445. And the IP for VCO is 10.0.0.8, the same as the ILB. There are three steps to configure this:
Step 1: Add the ILB to the Azure cloud service.
Run the following PowerShell commands on your on-premises machine which can manage your Azure subscription.
# Define variables.
$ServiceName = "demovm1-3va468p3" # the name of the cloud service that contains the VM nodes. Your cloud service name is unique. Use Azure portal to find out service name or use get-azurevm.

$ILBName = "DEMOILB" # newly chosen name for the new ILB
$SubnetName = "Subnet-1" # subnet name that the VMs use in the VNet
$ILBStaticIP = "10.0.0.8" # static IP address for the ILB in the subnet
# Add Azure ILB using the above variables.
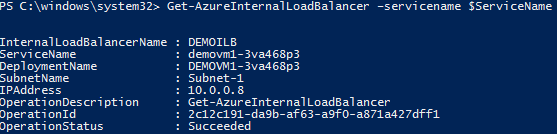
Add-AzureInternalLoadBalancer -InternalLoadBalancerName $ILBName -SubnetName $SubnetName -ServiceName $ServiceName -StaticVNetIPAddress $ILBStaticIP
# Check the settings.
Get-AzureInternalLoadBalancer –servicename "$ServiceName
Step 2: Configure the load balanced endpoint for each node using ILB.
Run the following powershell commands on your on-premises machine which can manage your Azure subscription.
# Define variables.
$VMNodes = "DEMOVM1", “DEMOVM2" # cluster nodes’ names, separated by commas. Your nodes’ names will be different.
$EndpointName = "SMB" # newly chosen name of the endpoint
$EndpointPort = "445" # public port to use for the endpoint for SMB file sharing. If the cluster is used for other purpose, i.e., HTTP, the port number needs change to 80.
# Add endpoint with port 445 and probe port 59999 to each node. It will take a few minutes to complete. Please pay attention to ProbeIntervalInSeconds parameter. This tells how often the probe port detects which node is active.
ForEach ($node in $VMNodes)
{
Get-AzureVM -ServiceName $ServiceName -Name $node | Add-AzureEndpoint -Name $EndpointName -LBSetName "$EndpointName-LB" -Protocol tcp -LocalPort $EndpointPort -PublicPort $EndpointPort -ProbePort 59999 -ProbeProtocol tcp -ProbeIntervalInSeconds 10 -InternalLoadBalancerName $ILBName -DirectServerReturn $true | Update-AzureVM
}
# Check the settings.
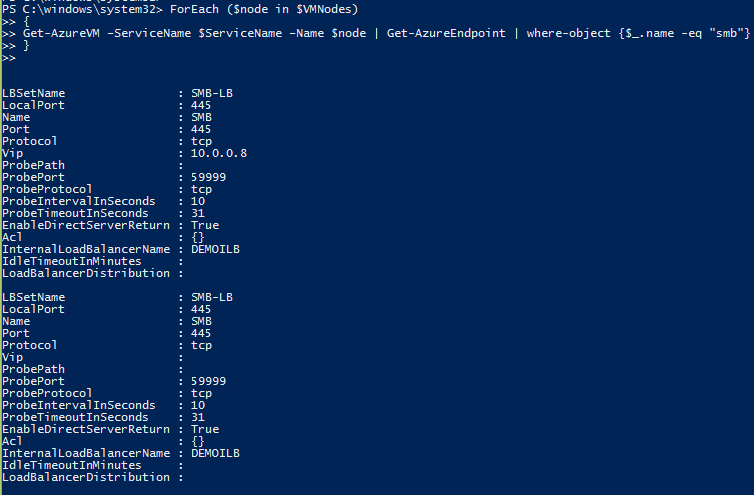
ForEach ($node in $VMNodes)
{
Get-AzureVM –ServiceName $ServiceName –Name $node | Get-AzureEndpoint | where-object {$_.name -eq "smb"}
}
Step 3: Update the parameters of VCO’s IP address with Probe Port.
Run the following powershell commands inside one of the cluster nodes.
# Define variables
$ClusterNetworkName = "Cluster Network 1" # the cluster network name (Use Get-ClusterNetwork or GUI to find the name)
$IPResourceName = “IP Address 10.0.0.0" # the IP Address resource name (Use get-clusterresource | where-object {$_.resourcetype -eq "IP Address"} or GUI to find the name)
$ILBIP = “10.0.0.8” # the IP Address of the Internal Load Balancer (ILB)
# Update cluster resource parameters of VCO’s IP address to work with ILB.
Get-ClusterResource $IPResourceName | Set-ClusterParameter -Multiple @{"Address"="$ILBIP";"ProbePort"="59999";"SubnetMask"="255.255.255.255";"Network"="$ClusterNetworkName";"OverrideAddressMatch"=1;"EnableDhcp"=0}
You should see this window:
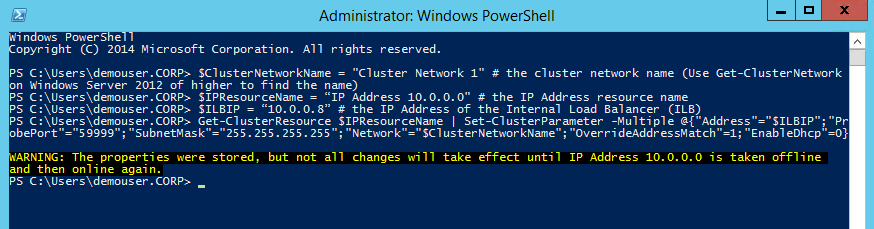
Take the IP Address resource offline and bring it online again. Start the clustered role.
Now you have an Internal Load Balancer working with VCO’s IP. One last task you need do is Windows Firewall. You need at least open port 59999 on all nodes for probe port detection; or turn the firewall off. Then you should be all set. It may take about 10 seconds to establish the connection to VCO at the first time or after you failover the resource group to another node because of ProbeIntervalInSeconds we set up before.
In this example, VCO has an Internal IP 10.0.0.8. If you want to make your VCO public-facing, you can use the cloud service’s IP address (VIP). The steps are similar and easier because you can skip Step 1 since this VIP is already an Azure load balancer. You just need add endpoint with regular port plus probe port to each VM (step 2); and then update the VCO’s IP in the cluster (step 3). Please be aware, your clustered resource group will be exposed to internet since VCO has a public IP. You may want to protect it by planning enhanced security methods.
Great! Now you’ve completed all the steps of building Windows Server Failover Cluster on Azure IAAS VM. It is a bit longer journey. However, you’ll find it useful and worthwhile. Please leave me comments if you have question. Happy Clustering!
Mario Liu
Support Escalation Engineer
CSS Americas | WINDOWS | HIGH AVAILABILITY