CRM - Azure Service Endpoint and Listener Deep Dive : Common Mistakes and Questions
This blog took me quite some time and is not one of my typical blogs. This is completely based on my experience setting up CRM-Azure integrations for my customers and the pain they have gone through and so did I ;)
As you know, CRM has an out of the box integration with Azure - via a Service Endpoint that you can set up using the Plugin Registration tool. This blog focuses on the tricky areas of this integration and what issues people face, and most of which are less documented, so you are basically stuck figuring out on trial and error. Hope this blog helps you out on those confusing and complex areas!
Note that I won't go in detail with basic stuff here so go back to MSDN for that ! Nor does this cover how to set up the certificates for CRM on premise servers for an Azure integration. These are steps post those basic things are done.
So first, if you open the Plugin Registration Tool, you'll find an option to Register a Service Endpoint -
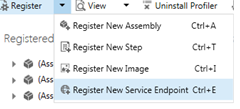
Once you've got this clicked, you'll get a window that is pretty different from what a Plugin Assembly registration window is.
The steps are completely explained here on what each parameter means inside this window - https://msdn.microsoft.com/en-us/library/gg328524.aspx
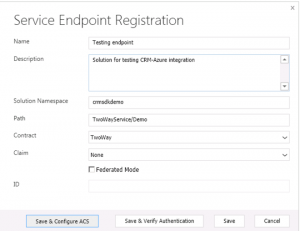
These seem straightforward, till you run into issues ! Here are some common mistakes and questions about each of these parameters -
Name - This can be any name that you want to give to your Service endpoint. Remember that this endpoint is what connects CRM to an Azure Service bus queue. So the name can be something like "MyServiceEndpoint" if you like.
Description: Anything you want to write!
Solution Namespace - No, this is not a CRM solution name. You need to have an Azure Service bus namespace created beforehand ie. before you go about registering this endpoint to speak to this Service bus queue, you need to have that namespace set up and ready.
For that, you need to make sure you DON'T go to the Azure portal and create the namespace using the GUI steps. It creates a version of Service bus namespace that is not compatible with CRM's integration. ACS is what is used as a validating authority to make sure clients like CRM can authenticate and send data to the Service bus. If you create the Service bus namespace using the portal, it runs under a SAS namespace which CRM is not compatible with through the Service endpoint that you are trying to set up. So what's the way to get this namespace created? Azure Powershell is the answer! It creates a Service bus namespace protected by ACS.
First - install Azure powershell on your machine/laptop. Then follow these steps on how to run the cmdlets https://msdn.microsoft.com/en-us/library/jj863635.aspx#Create_namespace for "Creating the namespace"
DO NOT Follow the steps in the next section of that link, which are Create a service identity, Create a rule, Create a scope and so on that are listed there. Those are required steps, but are handled by our Service endpoint registration step itself. Once you have the Service endpoint setup, it does all the scope and rules for you! So you just need to do the "Creating the namespace" step and stop there once it's created. Go to the Azure portal and check if it's created, if you want a UI confirmation also.
This is basically what the Cmdlets in Azure powershell look like -
> Add-AzureAccount
> New-AzureSBNamespace –Name YOUR_NAMESPACE -Location "YOUR_LOCATION" -CreateACSNamespace $true
Which will give you something like this in the output. Copy the Default key and the Service bus endpoint and keep it handy. The Default key is the unique key or the management key that is used to authenticate a client against this service bus endpoint that you just created.
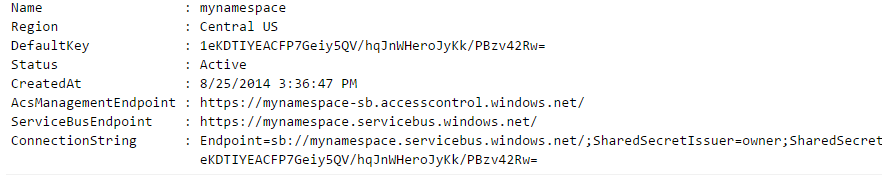
Whatever you've put as the "YOUR_NAMESPACE" above, is what you need to add into your Service endpoint's "Solution Namespace" value.
Path: This can be any path value you want - something like folder/path. The path means the path inside the Service bus endpoint where you will be posting your context data from CRM. So if your path is "MyPath/TestPath", the eventual SB endpoint would be something like - https://mysbnamespace.servicebus.windows.net/MyPath/TestPath". If you have multiple service endpoints, it would be ideal to have different paths so that they integrate with different endpoint paths. Keep this path handy, you will eventually know why!
At this moment the path is not important, cause you haven't done the integration yet so you'll read about it not being important. Once the integration ie. the service endpoint is setup and ready, this path is the most important for you to "listen" to data on the path endpoint.
Contract: This is pretty self explanatory. The endpoint type that you want to setup with CRM - whether you want a one-way endpoint , two way, REST or a queued endpoint. This is explained in detail in the CRM SDK documentation and MSDN as to what each endpoint means. You just need to make sure you're using the corresponding listening code to listen to the endpoint contract type. Your listener is an application that listens to the service bus to capture messages in the queue - if it's a queued contract, the listener can listen once in 10 minutes or so, no need to listen real time. One way and two way contracts are not queued and are real time, so the listener needs to be real time. You'll also find code in the SDK sample code for listeners that correspond to each of these contract types and you can just use those directly!
Claim: "None" is the first option and is default - this is to send the basic claim for authenticating against Azure ACS from CRM. If you choose other options you have User information that you can send additionally along with the basic claim. "None" would work in this scenario and is the default option, unless you have done something additional that you want to do at the Service bus level for authentication, and have user information also sent.
ID: This is auto-generated for your Service endpoint. It is read-only, and is unique per endpoint that you create and doesn't change once you have set up the endpoint.
So those are the parameters that you need to pass into the Service endpoint in the plugin reg tool. Hopefully you've gotten through all the issues we typically get on this window.
After that you have the buttons. What are those for? Really want to explain those in detail, if you aren't bored already ;)
Save & Configure ACS: You remember the step where you created the Service bus Namespace protected by ACS? This button is where you would go and make CRM be able to authenticate against that ACS. In short, CRM becomes a valid service identity that can communicate with ACS.
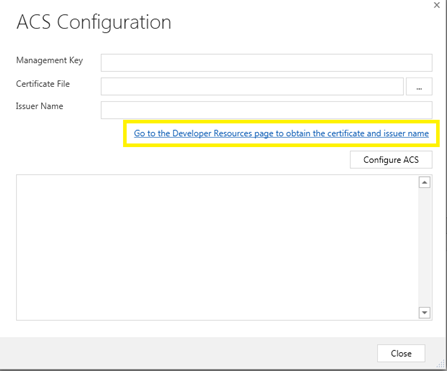
Once you click this button, you get a new window that makes you enter more data. Bad. And i stole this screenshot from Matt B's blog !
Here, what do you have? -
Management Key - When you created the service bus namespace in the initial steps, you copied the Default key. That key needs to be finally used somewhere, which is right here. Paste it inside the management key. What you are essentially telling here is that, CRM will connect to this service bus endpoint (which you specified with the unique management key).
Certificate file - CRM authenticates to the Service bus endpoint using the management key and it's certificate. What the product team has done for you is create a certificate for your CRM, and that is located in the Developer Resources page of your CRM web site. Go there and download the cert file - it should have the issuer name as "crm.dynamics.com". You are essentially telling Azure ACS that - hey ACS, crm.dynamics.com is a valid issuer and can communicate to the service endpoint with management key "blah blah"
Issuer name - No need to even guess, this will be crm.dynamics.com, which is the same as in the certificate your put in the second parameter. Again with this step, you are telling Azure ACS that - hey ACS, crm.dynamics.com is a valid issuer and can communicate to the service endpoint with management key "blah blah"
Configure ACS - This button is super important. What it does is, goes to ACS and registers your CRM issuer as a valid identity to connect to that service bus endpoint (based on the management key). I must have told this like what, 3 times now? ;)
What else does it do? You already have your namespace details of Service bus, so this step would take that from the management key, issuer name of CRM and create scopes and rules for CRM to communicate with that service bus endpoint. This is as simply as i can put it :) So you recall in the step for Solution namespace creation much above, where i said DO NOT follow the steps to create the scope, issuer, rules? Those things are done right here when you configure ACS! If all is good, it will show you that it has completed creating all these scopes, and rules. So with this, your CRM instance is going to be able to communicate with your Service bus endpoint. Hurray!
Issues i have seen here:
1. You already have set up another CRM as an issuer for this Service bus namespace before - This is easy. Go to the Azure ACS portal and look at the Service Identities. You will find crm.dynamics.com already there from your previous Service endpoint setup. Delete all or the single crm.dynamics.com identity that exists there, and do your Configure ACS step again. Issue resolved! This basically means, you can only have one issuer with crm.dynamics.com setup for that Service bus namespace.
2. Error saying certificate already exists for issuer crm.dynamics.com : This is only when you have Configured it once and try configuring it again. It will tell you that it already has a certificate there. This shouldn't be an issue , it just means that you have already set up the Service identity.
Once all this is done, you click on Close. You have completed the most important step of making CRM a valid Service identity for your ACS!
Next button on the Register Service endpoint screen:
Save & Verify Authentication: This button primarily uses CRM as a service identity, based on the success of the previous step, and tries to connect to your Service bus endpoint. If all in the previous Save and Configure ACS is setup perfect, this step goes on like a breeze and shows "Success". You should not face any issues here - the issues you would face can only be because your Configure ACS didn't go correct. I've always had issues related to ACS configuration being incorrect and hence the Service bus connection fails.
If you look closely back on the Service endpoint registration screen, which you have almost completed (yay!), you would notice the ID that has got populated with a GUID. This will remain the same even if you go and click Save and Verify authentication again. It's your Service endpoint's ID. You can go to CRM portal and check the Service endpoint created there in the Customizations->Service endpoint. This means, you have your Service endpoint ready to use!
Few points about a Service endpoint
1. It is used to connect to a Service bus endpoint on Azure
2. It acts like a plugin and is handled by the CRM Asynchronous Service
3. It has an Execute method that you can invoke through code, inside another plugin or Code activity
Example:
//Initialize the Service endpoint object, through the plugin or the code activity context object
IServiceEndpointNotificationService cloudService = (IServiceEndpointNotificationService)context.GetExtension<IServiceEndpointNotificationService>();
//Pass the service endpoint ID that got generated in the endpoint registration step, and pass the context from your plugin or code activity
var result = cloudService.Execute(new EntityReference("serviceendpoint", new Guid(serviceEndpointId)), pluginContextData);
Make sure you always add Retry logic to the Execute call you are doing above. This is cause i have seen situations where the connection just fails when you do it through code, and you have no way to know why it failed. If your plugin doesn't talk to the Service endpoint, your plugin itself will fail. So make sure a Retry attempt is done to handle those exceptions and reconnect to the Execute method.
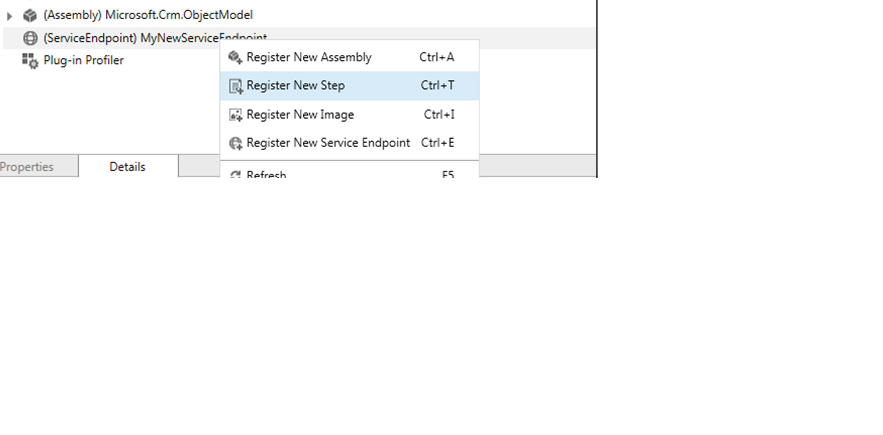
4. It can have steps under it, just like any other plugin, and this step can be setup for any message like Create/Update etc. and the context passed to your Service bus endpoint path, will be the IPluginExecutionContext from this event. For eg: Create of account, will send account data to the endpoint path. Like shown below you can add a plugin step to the Service endpoint!
What next?
You have your communication with CRM setup to send context data to the Service bus endpoint at the path you specified. Remember, the path is important now so keep it handy.
Next step, is to have an application that needs to get this data. You would have done this integration for sending data from CRM to some third party application, correct? That application needs to have code that "listens" to your Service bus endpoint path.
Like i already mentioned earlier, listener code exists in the SDK for one way, two way, REST based or Queued listeners based on the kind of endpoint contract you set up. Go to CRM 2016 SDK\SDK\SampleCode\CS\Azure.
Common questions and mistakes again? :
1. What is the listener code doing?
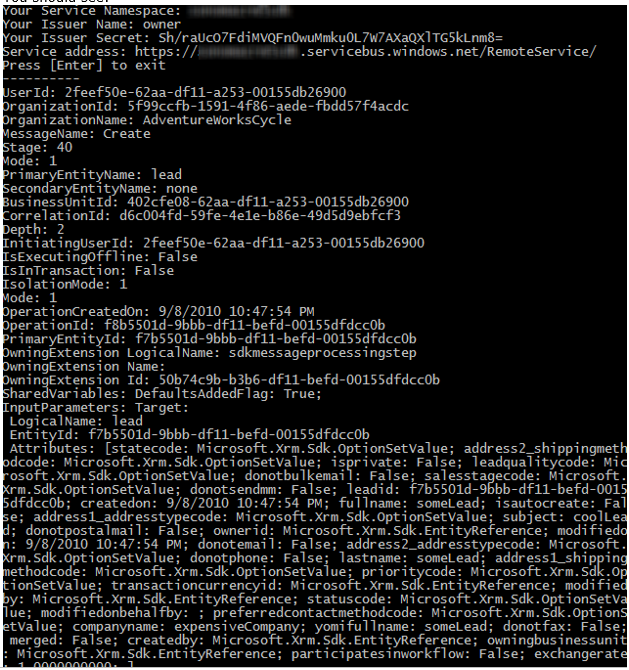
It's basically a WCF service that listens to your Service bus endpoint. If you read through the code you'll see that it uses the Microsoft.servicebus namespace. It uses the WS2007HttpRelayBinding binding in WCF to communicate with the service bus. It needs you to enter the Service bus namespace name (you already have that handy), your management key (you have that too), issuer name (owner is what we use here as the issuer name for this application), and it generates the Uri based on that data. The Uri is the endpoint that it will listen to. If you run this code after it builds successfully, you will get these prompts as part of the Console:

Enter the values as i told you, and you will get the Url generated and get a "Press Enter to Exit".
[DO NOT press Enter to Exit this screen. The listener needs to be running to constantly listen to the service bus endpoint. Unless it's a queued listener, for which you can run this listener later also. I believe it stores it in the queue for up-to 10 minutes and then sends it across to the listener. So in those cases, you can press Enter and exit for a while!]
Wait a minute, why is it saying RemoteService as the path? Odd, cause that's not the path you want. That's cause this code assumes that your path is "SB-endpoint/Remote Service". Tricky, right? Unless you really observe? You are never going to get anything on this path, cause you have configured your path in the Service endpoint as "MyPath/TestPath" in the first Service endpoint registration step. So, go into the code of the listener and change this part of the code:
// Create the service URI based on the service namespace.
Uri address = ServiceBusEnvironment.CreateServiceUri(Uri.UriSchemeHttps, serviceNamespace, "RemoteService");
Console.WriteLine("Service address: " + address);
Replace the "Remote Service" with your own path or else prompt the Console to accept the path from you! You're done.
Once you fix that, run the listener again and you'll get your correct URL without the RemoteService path, and your correct path!
What next? Listener is ready to pick up any data sent to this path. Now all you have to do, is to actually send data to the path! Trigger the step that you created that sends data to the Service endpoint, or call the Execute method. All explained above in the Service endpoint configuration steps.
Once you trigger the event, the data goes straight to your service bus endpoint path - now if you have a Queued listener, you won't get real time data into your listener. But if it's real time like the one way, two way ones, you will get CRM's plugin context right into the listener code:
So with that you have gone through all the struggle to get this working ! Now you can do what you want with the data in the listener, use it, eat it, store it !
Enjoy and post any questions you have!