Enumerating Free Disk Space on Remote Computers...with PowerShell
Here's a quick one for Saturday. A friend of mine mentioned that he was looking for a way to enumerate free disk space on remote computers and was hoping to use PowerShell. Instead of just emailing him the script, I thought I'd post it here.
First, we need to decide how to enumerate information about a remote machine... and what better way than WMI. Enter: Get-WmiObject . If you take a second to fire up your PowerShell console and run Get-Help Get-WmiObject, you should see something like this, hopefully without the red arrow.
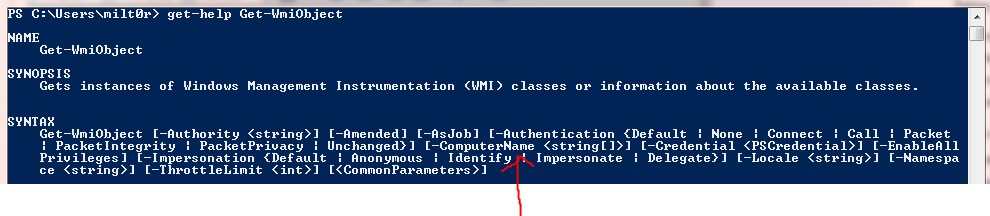
Based on that syntax, and the conspicuous red arrow, you can see that we're able to use -computername and a string array ( hence the two brackets) to connect to remote machines. The array part is important. What it means is that we're able to use -computername and a single name after, or we can use -computername and a comma-separated list of computers. We could also create an array prior to running the command at all, and pass that in.
Comma Separated List
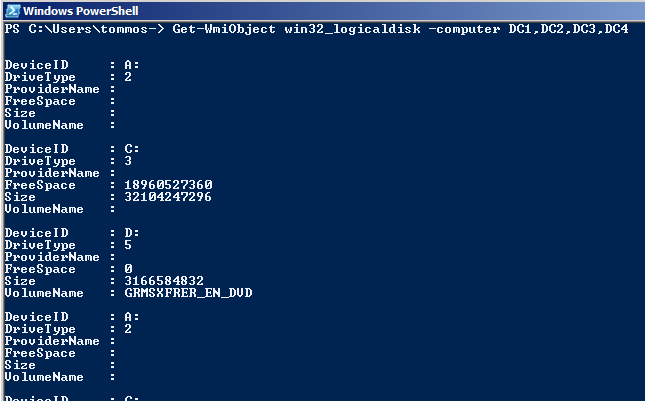
In the screen snip below, you can see that I'm able to pass a comma separated list to Get-WmiObject to find the free disk space on each of my DCs. Pretty straightforward.
Pre-Defined Array
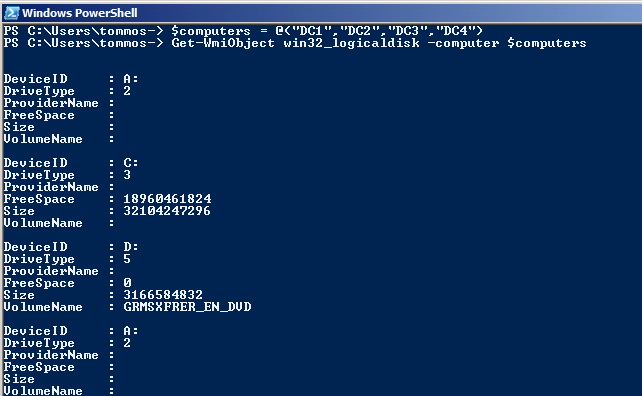
In this next example, I demonstrate the use of an array, stored in a variable, then passed to the Get-WmiObject cmdlet. What I've done is created a variable called $computers, then, using the array syntax, I add 4 strings to the array. Boom. A variable of type string[]. I run the Get-WmiObject cmdlet just like I did in the previous example, except after -computer (which is short for -computername, and valid to use), I pass in the $computers array.
For more on Arrays, type get-help about_arrays in your PowerShell console.
Where-Object
At this point you can see how to connect to multiple machines using Get-WmiObject, and how to get a list of all of the physical disks. We'll use what we've done so far to make the list a bit more readable. Unless you're living in the early 90s, you probably aren't concerned about the A drive. Also, the D drive, which in this case is optical media, isn't needed on the report. Using Where-Object, we can filter out those device types, or more specifically, only include the hard disks. To do that, we simply pipe the Get-WmiObject result to Where-Object and set the condition so that we only get back DriveType 3. It looks like this:
Get-WmiObject win32_logicaldisk -computername $computers | Where-Object { $_.DriveType -eq 3 }
As you probably guessed, that'll give us only fixed disks. Try it out yourself. I'll wait.
Ultimately, you could filter on anything there. You could change it to say Where-Object { $_.FreeSpace -lt 5GB }. That will only show servers where free disk space is less than five gigabytes (Side Note: Type 5GB, or 1MB, or 1024KB in your console and see what you get!)
Pretty cool, isn't it? But, you want a report of MANY computers and you want it to readable and sortable and sendable to managementable. That's understandable. Simple!
Export-Csv
With what you've done to this point, you can use the Export-Csv cmdlet to send the results of your query off to a spreadsheet. And who doesn't like spreadsheets? We take that bolded one-liner we ran above, and tack on one more thing:
Get-WmiObject win32_logicaldisk -computername $computers | Where-Object { $_.DriveType -eq 3 } | Export-Csv C:\temp\MyDiskSpace.Csv
Now, open up that spreadsheet and what have you got? I'll tell you what you've got: Goo.

Ok, that's not totally true. When you use a cmdlet such as Export-Csv (or Format-List *, or Format-Wide *, etc) it'll output all of the properties on that PowerShell object. In our case here, we dumped out every single property on the win32_LogicalDisk object. Management won't like that. And PowerShell was just doing what you told it to do. Now let's clean it up a bit.
Select-Object
Since we're just looking at free disk space on the disks, we probably only need the computer name, the drive letter, free space, total space, and for kicks we'll throw in the volume name. Looking at the spreadsheet that was just generated makes it easy to map out those values and what the property name will be on the object in PowerShell.
- Computer Name = SystemName
- Drive Letter = DeviceID
- Volume Name = VolumeName
- Free Space = FreeSpace
- Total Space = Size
By consulting get-help export-csv -full you can see that there's a way to get only those properties in to the output. Select-Object. If we pipe the result of our filtered Get-WmiObject cmdlet to Select-Object and then export to a csv, maybe we'll get somewhere.
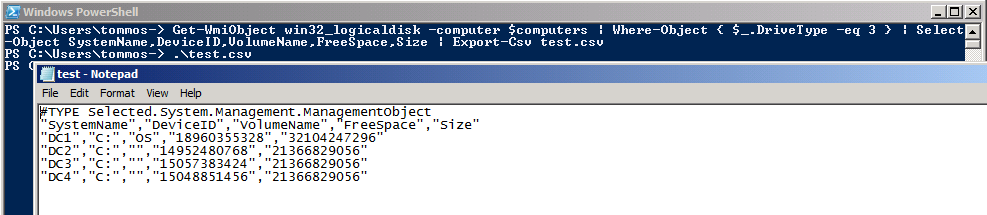
Get-WmiObject win32_logicaldisk -computername $computers | Where-Object { $_.DriveType -eq 3 } | Select-Object SystemName,DeviceID,VolumeName,FreeSpace,Size | Export-Csv C:\temp\MyDiskSpace.Csv
Now if we open up the resulting CSV in notepad, we get something a bit more useful. It'll be even more useful when you open it up in Excel, add some colors, and ship it off to the powers-that-be to show them exactly why you need to add 10TB to the SAN.
It's also worth mentioning that if you don't want that TYPE header in the CSV, you can add -NoTypeInformation to Export-Csv and it won't be in the CSV.
Conclusion
Based on everything I've showed you, I hope that you've got a better understanding of how to get information from a remote computer, filter that information based on certain criteria, extract just the pieces of information you need, then how to export that to a more friendly, readable CSV file, all with one line.
-Tom