Azure Functions – CI / CD DevOps Pipeline
In earlier parts of our Function Azure blog post series, we outlined the implementation of different artifacts of our research project on communication between the VSTS and LaunchDarkly with the Azure Function extensions.
In this one we will present how we have implemented continuous integration and deployment of our Azure Functions in Azure using Visual Studio Team Services.
Visual Studio solution and source control
Before we start talking about pipelines, a reminder of the composition of our Visual Studio solution.
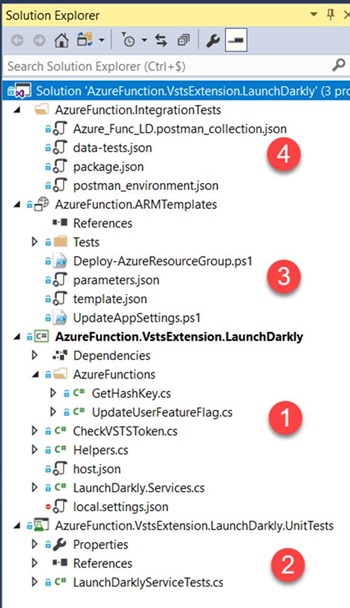
Our solution consists of 4 projects
- The Azure Function Projects that contain the C# code and helpers of the Azure Function (see building vsts extensions with feature flags for details).
- The Unit Tests projects that tests some methods in the Azure Function project (see azure functions prepare for continuous delivery for details.)
- The Azure ARM resource project that contain the ARM template for the provisioning of our Azure Function environment (see azure function provisioning and configuring our azure function infrastructure for details.)
- The Integration tests that contain the Postman Json collection and environment files (see azure function integration tests automation for details.)
The code of this solution is maintained, stored and versioned in this GitHub repository.
CI / CD DevOps pipeline in VSTS
Requirements
Before we create the build and release pipeline we need some requirements
- An Azure subscription
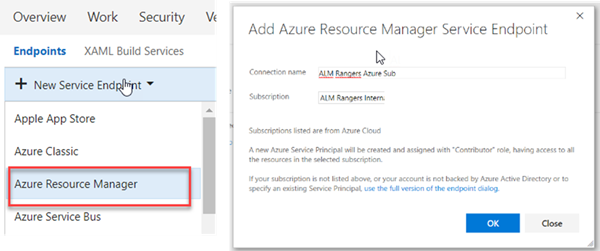
- An Azure Resource Manager (ARM) service endpoint in the VSTS Team Project connecting to the before mentioned Azure subscription
- A LaunchDarkly account with an existing project used for integration testing
Build definition
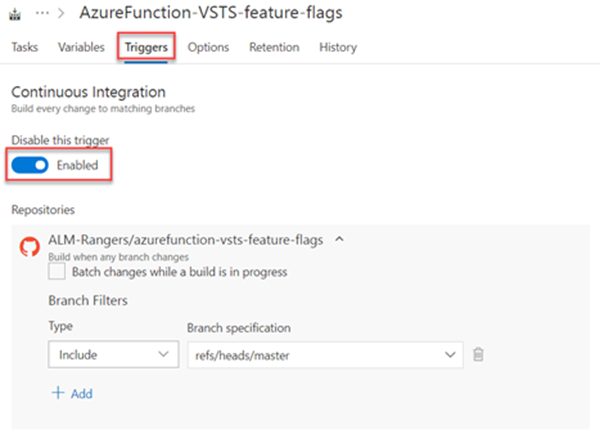
Continuous integration (CI)
CI is the first DevOps practice.
Build steps
The build definition for our Azure Function deployment performs the following steps:
- Build the C# solution code
- Run unit tests
- Publish the artifacts for the release
The build definition tasks are:
This build contains 4 main phases:
- Restore Nuget packages of the solution and build the Visual Studio Solution with msbuild
- Run unit tests and publish the results
- Create a zip file that contains the output of the Azure Function Project

- In the last steps the build publishes 3 artifacts: the zip file containing the Azure Function project, the ARM template and postman Json files
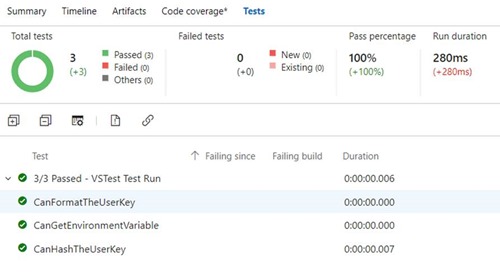
When the build is successful we get the following results:
- Summary tab with tests results:

- Tests tab with detailed unit tests results
- Artifacts tab that contain our 3 published artifacts:


With the build created and tested successfully we can proceed to the setup of our release definition.
Release definition
To maintain consistency with the pipeline of our VSTS extensions (see a really cool feature we noticed on vsts new release definition editor) we named the release environments with the same names:
- Early Adopters: Evaluation environment for our Azure Functions, called by our early adopter’s extension.
- Users: Production environment of our Azure Functions, called by our production extension.
![clip_image002[1] clip_image002[1]](https://msdntnarchive.blob.core.windows.net/media/2017/10/clip_image0021_thumb.png)
For each environment, the release process is:
- Update (or create) and configure the complete Azure environment infrastructure. This environment is composed of 2 slots: principal (named ‘production’) for the released Azure Function App and one sub slot for running integration tests
- Deploy the Azure Function App in the integration tests slot
- Run the integration tests
- If the integration tests are successful, then release the Azure Function App to the principal slot
The advantage of deploying to the sub slot first is that the code will not be deployed to the principal slot, if the integration tests fail.
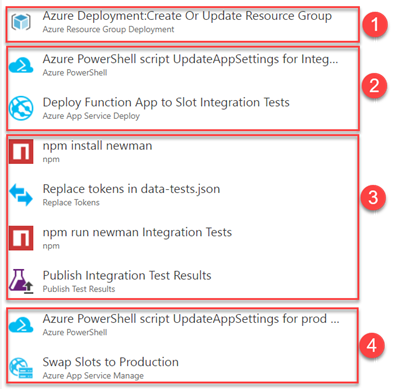
Here’s the release environment:
Œ?Ž? [1] Create or update of the Azure Function Infrastructure
![clip_image002[1] clip_image002[1]](https://msdntnarchive.blob.core.windows.net/media/2017/10/clip_image0021_thumb2.jpg) |
This task creates or update Azure resources using the ARM Templates (see azure function provisioning and configuring our azure function infrastructure) |
[2] Configure App Settings and Deploy to the “Integration Tests” sub slot
![clip_image002[3] clip_image002[3]](https://msdntnarchive.blob.core.windows.net/media/2017/10/clip_image0023_thumb1.jpg) |
Run the UpdateAppSettings.ps1 script (see azure function provisioning and configuring our azure function infrastructure) to update the “Integration Tests” Azure Function slot’s application settings |
![clip_image004[6] clip_image004[6]](https://msdntnarchive.blob.core.windows.net/media/2017/10/clip_image0046_thumb.png) |
Deploy the Azure Function App code (the Zip produced by the build) in the “Integration tests” sub slot |
[3] Run integration tests
![clip_image002[5] clip_image002[5]](https://msdntnarchive.blob.core.windows.net/media/2017/10/clip_image0025_thumb.jpg) |
Install Newman from package.json |
![clip_image004[1] clip_image004[1]](https://msdntnarchive.blob.core.windows.net/media/2017/10/clip_image0041_thumb.jpg) |
Replace all tokens in data-tests.json with environment variables that contain the integration tests environment values(see azure function integration ests automation) |
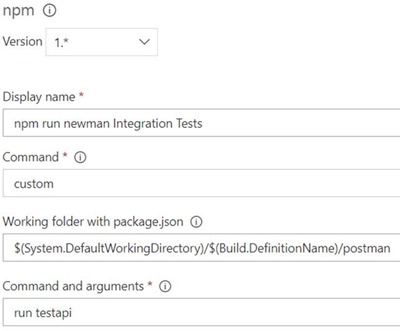 |
Run integration tests by executing the package.json script command : npm run testapi (see azure function integration tests automation).Tests will use the LaunchDarkly integration tests project created in requirementsThe test results will be exported in Junit Xml files. |
![clip_image008[1] clip_image008[1]](https://msdntnarchive.blob.core.windows.net/media/2017/10/clip_image0081_thumb.jpg) |
Publish integration test results to VSTS.This task is configured to always publish test results even if the previous task of test execution failed. |
[4] Configure App Settings and Deploy in Main slot (called production in Azure)
![clip_image002[7] clip_image002[7]](https://msdntnarchive.blob.core.windows.net/media/2017/10/clip_image0027_thumb.jpg) |
Execute the UpdateAppSettings.ps1 (see azure function provisioning and configuring our azure function infrastructure) script to update the Azure Function Application Settings for the ‘production’ slot |
![clip_image004[3] clip_image004[3]](https://msdntnarchive.blob.core.windows.net/media/2017/10/clip_image0043_thumb.jpg) |
Swap the content from “Integration Tests” slot to the ‘production’ Slot |
Early adopters and User environments are composed by the same task workflow. Different values between the environments are managed in the Release environment’s variables.
Environments Variables
To manage the environment’s variables, use the “Process variables”:
The pipeline Security
To prevent unauthorized deployments to Production and add a level of security, we configured Approvals in the “Users” environment
Release run
When the release is successful we get the following result:
The Tests tab with the published test results from the integration tests/
We can drill into the logs on the timeline for Newman integration test results.
When an integration test fails, the logs will highlight the failure, and the “Publish Test Results” task will still run to publish the results to VSTS, as is shown below:
Resultant Azure architecture
If the release went well, our Azure architecture described in the ARM Template will exist in our portal, with one Resource group for each environment.
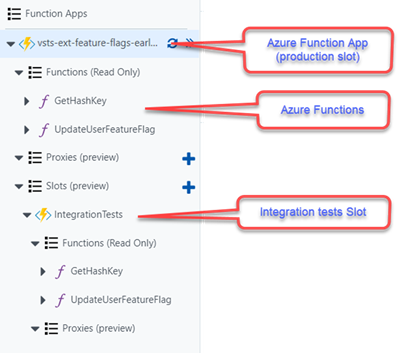
The Azure Function App
The Azure Function App contains the Azure functions developed in our Visual Studio Solution and one sub slot named “Integration Tests”
The Configuration of the Application Settings by slots
So, we managed to deploy our Azure Functions in a DevOps pipeline with:
- Continuous integration
- Running unit tests
- Provisioning and Configuring Azure Infrastructure
- Running Integration tests
- Deploying the Azure Function App
What’s Next …
We’re approaching the end of our series of Azure Function posts. In the next and final post, we’re going to look at another pivotal DevOps practice - monitoring.
THANK YOU REVIEWERS: Niel Zeeman, Hamid Shahid
![clip_image002[1] clip_image002[1]](https://msdntnarchive.blob.core.windows.net/media/2017/10/clip_image00211_thumb.jpg)
![clip_image002[9] clip_image002[9]](https://msdntnarchive.blob.core.windows.net/media/2017/10/clip_image0029_thumb.jpg)
![clip_image004[5] clip_image004[5]](https://msdntnarchive.blob.core.windows.net/media/2017/10/clip_image0045_thumb.jpg)
![clip_image006[7] clip_image006[7]](https://msdntnarchive.blob.core.windows.net/media/2017/10/clip_image0067_thumb.jpg)
![clip_image008[3] clip_image008[3]](https://msdntnarchive.blob.core.windows.net/media/2017/10/clip_image0083_thumb.jpg)
![clip_image010[1] clip_image010[1]](https://msdntnarchive.blob.core.windows.net/media/2017/10/clip_image0101_thumb.jpg)


