ASP.NET
Combine Web and Windows Services to Run Your ASP.NET Code at Scheduled Intervals
Andrew Needleman
This article discusses:
|
This article uses the following technologies: C#, .NET, ASP.NET, Windows |
Code download available at:SchedulingASPNETCode.exe(173 KB)
Contents
The Application Structure
Adding Scheduled Jobs to the Application
Building Your Web Service
Building the Windows Service
Expanding the Flow Layer to Handle Scheduled Jobs
Job Timing Information
Retrieving and Setting Job Timing Information
Calling the Job Timing Stored Procedures
Working with Scheduled Jobs
Conclusion
Suppose you've written a great n-tier application in ASP.NET and you want to extend it to perform scheduled tasks, such as sending e-mail to selected users in the database every two hours, or regularly analyzing the data in the ASP.NET cache for application health monitoring. You don't want to throw away your object model from your ASP.NET application or create too many dependencies between a separate scheduler and the ASP.NET application, so how can you avoid this but still have these apps work together?
In .NET Framework-based applications, timers are frequently used to perform activities at scheduled intervals, so using one would seem to be an appropriate solution. You could start a timer from the Application_Start handler in Global.asax to run your scheduled tasks. Unfortunately, this solution is not robust through application domain, process, or system restarts because a request must be made to the application to start the timer. ASP.NET is a passive programming paradigm that only responds to HTTP requests, so a process or user input must call the code for it to run.
A better solution is to use a Web service to provide an interface to your ASP.NET application and to build a Windows® service that calls to it at scheduled intervals. This way the ASP.NET application doesn't have to own the scheduling logic and only needs to be concerned with performing tasks it is already capable of performing. And since a Web service can run in the same application context as the rest of your ASP.NET application, it can execute in the same context that your existing code expects.
I'll be using a Windows service to initiate the Web service call because Windows services can start themselves when Windows boots up. So even if the server is restarted, the application will be able to start itself. This restart capability makes a Windows service a more robust solution for the task than a typical Windows-based application. It's also the reason why Windows services are used for many background processes (such as IIS).
In this article, I'll demonstrate how to do this while creating the smallest number of dependencies between your scheduling application and your ASP.NET application. The solution involves simplifying the scheduling application that initiates the ASP.NET job. In the scheduling application, there will be no logic called that is specific to the ASP.NET application except for the Web service endpoint that it calls. The Windows service will use an app.config file to store both the URL of the Web service and the interval that the Windows service should wait between calls to the Web service. By storing these two settings in the Windows service's app.config file, you can change them without having to recompile the Windows service. If you need to change the application's behavior when it is called, you can just change the logic in the ASP.NET application; however, you won't have to change the scheduling application's code. This means that the scheduling application will be isolated from changes in the ASP.NET application.
Note that this solution is based on the premise that there are some tasks that should only be executed in the context of a running ASP.NET application. If this is not a requirement for your tasks, you should strongly consider referencing the ASP.NET application's business logic assembly directly from your Windows service and bypassing the ASP.NET process to fire the tasks.
The Application Structure
A typical ASP.NET application is built with a series of independent layers that perform specific functions. In my particular example, I have database access classes, business logic classes, business flow classes, and ASP.NET pages that serve as the entry point to these layers (see Figure 1).
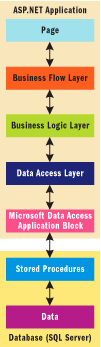
Figure 1** The Plan **
The ASP.NET pages are merely used to display and retrieve data. They are an interface into and out of the business flow classes which actually coordinate all of the work. The flow classes call the business logic classes in the proper order to complete a particular transaction, such as ordering a widget. For example, the flow class could first call the business logic to check inventory, then to order the widget, and finally to decrease the inventory to the proper level.
The business logic classes decide how to call the database access classes and process that result if necessary to get a final result that you can use for other operations. For example, business logic would be used to calculate the total price including the tax for a particular state. First you may need to retrieve the tax rate for that state and base prices from the database using the data access classes, then multiply them to find the total tax on each item.
The database access classes hold the logic to connect to the database and to return a resultset in a format such as a DataSet, DataTable, or a DataReader that can be consumed by the higher layers. These classes merely retrieve data from the database and update it according to the information they are fed; they do not process the result. For example, they may retrieve the tax rate for a particular state, but they would not calculate the total tax on the order.
The Microsoft® Data Access Application Building Block simplifies the data access classes by providing easier ways to communicate with the database and stored procedures (for the download, see Data Access Application Block). For example, you can make a call to its SQLHelper object's FillDataSet method to fill a DataSet from the output of a stored procedure using one line of code. Typically, you would have to write the code to create at least the DataAdapter and a command object, which would take at least four lines of code.
The Data Access Application Block connects to the stored procedures that are in the database. The stored procedures provide the SQL code that is needed to access and modify data in the database.
Adding Scheduled Jobs to the Application
An ASP.NET Web service will provide you with an interface into the existing ASP.NET application that holds the task logic. This will serve as the broker between it and the Windows service that calls the ASP.NET application into action. A Windows service will then call the ASP.NET application at scheduled intervals. By building an ASP.NET Web service in the existing ASP.NET application, the business objects and logic that were already created for the ASP.NET application can be reused in the scheduled jobs. Figure 2 shows the details of the application flow from the client Windows service application through the Web service initiating that run on the server, all the way through the execution of each scheduled task.
Figure 2 Run Scheduled Jobs
.gif)
As you can see in Figure 3, the process will require some modifications to the standard layering previously depicted. The Windows service will wake up the ASP.NET Web service at a specified interval. The ASP.NET Web service will then call a method in the Web application's flow layer that will actually determine which scheduled jobs should be run and will then run them. Once the basic solution is implemented, you'll use the client-side app.config file to determine the intervals at which the Windows service calls the Web service. Next, you'll add the functionality needed by the business flow layer in order to loop through and run jobs. You n-tier gurus out there will be much more interested in the flow tier than the remaining ones, so I'll save the database table, database stored procedure, data access code, and business logic for last.

Figure 3** Additions to App **
Finally, add the code to the existing layers of the application from the bottom (the database table level) to the middle (the business logic layer) in order to support the job functionality used by the flow layer.
Building Your Web Service
To build the Web service, first add the JobRun ASP.NET Web service to the ASP.NET application within the same layer as your existing ASP.NET code. Make sure that your ASP.NET project has a reference to the business logic, flow, and data access projects. Next, to create the RunJob Web service method in the JobRun Web service, the Web service method will need to call the flow layer's function that runs the proper jobs. This means that the RunJob method can start out as simply as this:
[WebMethod] public void RunJob() { Flow.JobFlow jf = new Flow.JobFlow(); jf.RunAllActiveJobs(); }
Use the RunJob function to create an instance of the JobFlow class (which is in the flow layer) and call its RunAllActiveJobs function. The RunAllActiveJobs of the JobFlow function does all the real work in coordinating the running of the jobs, while the RunJob function merely serves as an entry point into the sequence.
Note that this code does not prevent jobs from running on more than one thread at a time, which could happen if the Windows service scheduled tasks too frequently (faster than they could be run) or if some other application invoked the entry point. If the method is not thread safe and allows multiple threads through it at the same time, it may cause problems with the results of these jobs. For example, if job X sent an e-mail to Mary Smith, but hadn't yet updated the database when job Y queried the database to do its e-mails, then Mary could receive two e-mails.
To synchronize access to the function, I'll use the Mutex class from the System.Threading namespace:
private static Mutex mut = new Mutex(false, "JobSchedulerMutex");
Mutex provides for cross-process synchronization, so this will prevent multiple runs at the same time even if two different ASP.NET worker processes are involved. Now, let's change the RunJob method to use the Mutex to ensure that no other job is running before starting the jobs.
As you can see in the RunJob function in Figure 4, you call the WaitOne function of the Mutex to make this thread wait until it is the only one before executing. The ReleaseMutex function is then called to indicate that you are finished with the code that needs to run only in one thread. Of course, blocking here may not be the correct solution. You might choose to return immediately if another thread is already executing jobs, in which case you could specify a short timeout to the WaitOne method, and immediately return from RunJob if the mutex couldn't be acquired.Put all of the main actions of the function in a try-finally block so that ReleaseMutex is called even if an unexpected exception in the RunAllActiveJobs function causes the RunJob function to exit.
Figure 4 RunJob Web Service
[WebMethod] public bool RunJob() { bool ranJob = false; mut.WaitOne(); try { Flow.JobFlow jf = new Flow.JobFlow(); jf.RunAllActiveJobs(); ranJob = true; } finally { mut.ReleaseMutex(); } return ranJob; }
You'll want to secure your Web service using some form of authentication and authorization, possibly using Windows security, to ensure that no one runs the service without proper authorization, but I won't go into the details of that in this article.
Now that you have the Web service built so that you can call it from another app, let's build the Windows service that will use it.
Building the Windows Service
Start by creating a new Windows service project in another instance of Visual Studio® .NET and name it InvokingASPNetService.cs. Make sure that this service will start properly by adding a Main method as follows:
public static void Main() { ServiceBase.Run(new InvokingASPNetService()); }
Now add using statements for the following namespaces:
using System.Configuration; using System.Globalization;
Add an installer for the service by right-clicking the design surface of the InvokingASPNetService.cs and selecting Add Installer. You should change the created serviceInstaller1's StartType property to Automatic so that the Windows service starts when Windows boots. Set the ServiceName property of the serviceInstaller1 to InvokingASPNetService so it will be appropriately named in your Services Manager, and then change the serviceProcessInstaller1 Account property to Local Service.
The third step is to create a Web reference to the InvokingASPNetService Web service and then name it JobRunWebService. Change the JobRunWebService URL Behavior property to be Dynamic in order to have Visual Studio .NET automatically augment the app.config with your Web reference's URL. The proxy class generated will look to this configuration file for the Web service's URL, thus allowing you to point the Windows service at a different endpoint without recompiling.
Fourth, create a method in the Windows service to run the Web service every time it is called. The method will look like this:
private void RunCommands() { JobRunWebService.JobRunInterval objJob = new JobRunWebService.JobRunInterval(); objJob.RunJob(); }
As you can see, you'll declare the Web service proxy and create it just like any other .NET object. Then, call the Web service's RunJob method in order to run the jobs on the remote Web server. Note that neither step is different from using a local class even though you are using a Web service.
Fifth, you'll need to call the RunCommands function in the Windows service. You should call this method at a set interval of time based on how often you would like to run the jobs on the remote server. Use a System.Timers.Timer object to ensure that the RunCommands function runs at the proper intervals. The Timer's Elapsed event will allow you to trigger any function that you specify after each interval has elapsed. (Note that interval length is specified in the Interval property.) You'll use the triggered function to call the RunCommands function so you can automate this feature. By default, this timer class only triggers an event the first time that the timer expires, so you need to ensure that it repeatedly resets itself every time by setting its AutoReset property to true.
You should declare it at the service level, so that any function of the service can reference it:
private Timer timer;
Next, create a function that will initialize the timer and set all of its relevant values:
private void InitializeTimer() { if (timer == null) { timer = new Timer(); timer.AutoReset = true; timer.Interval = 60000 * Convert.ToDouble( ConfigurationSettings.AppSettings["IntervalMinutes"]); timer.Elapsed += new ElapsedEventHandler(timer_Elapsed); } }
To allow for the configuration interval to be changed without recompiling the application, I've stored the interval in the app.config file so that the InitializeTimer method can access it using ConfigurationSettings.AppSettings instead of having it hardcoded, as shown in the following:
<add key="IntervalMinutes" value="5" />
Make sure that the timer calls the timer_Elapsed function to handle the Elapsed event when the timer runs out. The timer_Elapsed method is very simple and calls the RunCommands function that was just built, as shown here:
private void timer_Elapsed(object source,System.Timers.ElapsedEventArgs e) { RunCommands(); }
Finally, you have to install the Windows service using the installutil command. The easiest way is to open the Visual Studio .NET command prompt, navigate to the service's directory, and run the installutil utility, specifying your assembly as the parameter.
Expanding the Flow Layer to Handle Scheduled Jobs
It is important to expand the flow layer to handle the needs of running scheduled jobs (assuming the jobs differ enough that they need to be coded rather than merely parameterized). This involves collecting all jobs from the database where the next start time in the database has passed and running them individually. Within the flow layer, you will create a base class called Job to provide all of the functionality that is common between jobs. This includes a mechanism to initialize and retrieve the JobID, a common method (RunSingleJob) to run the job and set the next time to run in the database after a successful run, and an overridable method (PerformRunJob) to be customized for each individual job.
The flow layer will also need to have job-specific classes built for each job it performs. These will inherit from the base Job class and will override the PerformRunJob function of the Job class to customize the execution of that particular job. You'll also need a factory class (JobFactory) to create and initialize the JobID of the correct Job class. The static CreateJob function will create the appropriate job based on the JobID passed into it. Finally, the flow layer will need to be able to determine which jobs need to run, loop through them, and run them. This is what the JobFlow class will provide through its RunAllActiveJobs method.
First, let's create the Job base class in the flow layer project, which will be the parent of each individual job class. The core of the Job abstract base class is shown in Figure 5. It allows the initialization and retrieval of its JobID, as well as ensuring that the database is updated if the job is run successfully. The JobID will not change for a given job after it is created, so you must ensure that after initialization the set function will not change the value. The JobFactory class that creates each Job class will set its JobID value.
Figure 5 Job Abstract Class
protected bool isInitialized = false; protected int mJobID; public int JobID { get { return mJobID; } set { if (!isInitialized) { mJobID = value; isInitialized = true; } else throw new InvalidOperationException("JobID already set."); } } public void RunSingleJob() { if (isInitialized) { PerformRunJob(); RecordJobSuccess(); } } protected abstract void PerformRunJob(); protected void RecordJobSuccess() { JobLogic jl = new JobLogic(); jl.UpdateJobDone(JobID); }
The RunSingleJob function determines that this job's JobID has been initialized, runs the job (PerformRunJob), and updates the database after successful runs with the RecordJobSuccess method. The isInitialized variable is used to make sure that each job has its JobID initialized before running the job. The PerformRunJob abstract method is implemented by derived Job classes and holds the actual logic for the task.
After a job's implementation (PerformRunJob method) runs successfully, the base class calls the RecordJobSuccess function, which uses the UpdateJobDone method of the Business Logic layer's JobLogic class to record the time that it ran in the database as well as the next scheduled time to run. I will create the JobLogic class of the Business Logic layer later.
The Job class provides both the ability to initialize the JobID variable and to update the database upon success with the next run time. Plus, you only have to override one function with class-specific code. This allows you to create the child classes of the Job class. To do so, you need to create two classes that will run a particular type of job and inherit from the Job class to obtain the rest of their functionality. Create a JobRunTest class and a JobEmailUsers class and make sure that each one inherits from the Job class, as shown in the following:
public class JobRunTests : Job
Now, override the PerformRunJob method for both classes as follows (using the JobRunTest class as a sample):
protected override void PerformRunJob() { ///Do RunTest specific logic here }
Place your job-specific logic inside this method. The rest of the code that runs the jobs and updates the next run time in the database is inherited from the Job base class. Your jobs will combine calls to the existing Business Logic classes in order to run complex processes. Now that you have the sample jobs, let's look at how to create these jobs using the JobFactory object.
The JobFactory class is used to create the corresponding child Job class for each JobID. The JobFactory class takes a JobID variable in its static CreateJob function and returns the appropriate Job subclass. Figure 6 shows the code in the JobFactory.
Figure 6 Job Factory
public static Job CreateJob(int currentJobID) { Job myJob; switch(currentJobID) { case 1: myJob = new JobEmailUsers(); break; case 2: myJob = new JobRunTest(); break; default: return null; } myJob.JobID = currentJobID; return myJob; }
The CreateJob function takes a currentJobID and uses it in a case statement to determine which child class of the Job class should be returned. It then initializes the current JobID and returns the Job-derived class. Now that you have the Job base class, its job-specific children, and a way to select which class to create, you can look at how to pull it all together using the JobFlow class.
To create a class called JobFlow that will gather and execute the appropriate jobs, add a function called "RunAllActiveJobs" to loop through each job that you need to run and call their individual RunSingleJob functions. You'll need the RunAllActiveJobs function to grab a list of the jobs that are due to run from the database through the business layer, data access layer, and stored procedures, and then run them using their respective RunSingleJob functions. The following code shows how the RunAllActiveJobs method of the JobFlow class accomplishes these goals:
JobLogic jl = new JobLogic(); DataSet jobsActiveData = jl.GetAllActiveJobs(); foreach (DataRow jobsActive in jobsActiveData.Tables[0].Rows) { int currentJobID = Convert.ToInt32(jobsActive["JobID"]); Job myJob = JobFactory.CreateJob(currentJobID); myJob.RunSingleJob(); }
Basically, you would store the jobs in the database with information on the last time that they ran as well as the interval that the code should wait between runs. The jobs that need to be run are then retrieved through the JobLogic class of the BusinessLogic layer with the GetAllActiveJobs method. Each active job's ID is used to get a Job object, whose RunSingleJob method can be used to execute the task as previously described.
Job Timing Information
Determining which scheduled jobs should be run means that you need to store basic information about them such as the interval between runs, the last time that they ran, and the next time that they should run. In order to do this, create a job table in a SQL Server database (see Figure 7).
Figure 7 Job Table
| Column | Datatype | |
|---|---|---|
|
|
JobID | int identity |
| JobTitle | varchar(500) | |
| JobInterval | datetime | |
| DateLastJobRan | datetime | |
| DateNextJobStart | datetime | |
The JobID column holds the unique identifier for each job in the job table. The JobTitle column contains the job name so that you can determine which job is being run. The JobInterval column holds the interval between jobs. This is the date and time interval greater than 1/1/1900 that should be added to the current time after a job succeeds to calculate when the next job should be run. For example, a value of 1/2/1901 in the JobInterval field would mean that one year and one day would be added to the time that the job last ran.
The DateLastJobRan column contains a datetime value for the date and time that the job last ran. The last column, DateNextJobStart, contains the next time that the job should run. While this column should be a computed column which is equal to JobInterval plus DateLastJobRan, you can understand the application layers more vividly if you set this up as a regular datetime column.
Retrieving and Setting Job Timing Information
To retrieve and set job timing information through the new stored procedures in the SQL Server database, the stored procedures must find all of the jobs in the database that need to be run by the application, update a single job's information in the database to indicate that it has run, and set the next job-run date for that job. Each job has a DateNextJobStart column in the database that indicates the date and time at which the job should run. If the current date and time is past that of the DateNextJobStart column, then the job should be run in the process. The stored procedure that selects the jobs that should be run is shown here:
CREATE PROCEDURE dbo.Job_SelectJobs_NextJobStartBefore @DateNextJobRunStartBefore datetime AS SELECT * FROM JOB WHERE DateNextJobStart < @DateNextJobRunStartBefore
This selects all of the columns of the Job table for the jobs that have a DateNextJobStart value that is before (less than) that of the @DateNextJobRunStartBefore DateTime parameter. To find which jobs should run, simply pass in the current date and time through the stored procedure's parameter. Now that you can select the jobs that need to run, you can switch to building the procedure to update them after they run.
The stored procedure that updates the database with a single job's last run date and next run date is as follows:
CREATE PROCEDURE dbo.Job_Update_StartEnd_CalcNext @JobID int, @DateLastJobRan datetime AS UPDATE JOB SET DateLastJobRan = @DateLastJobRan, DateNextJobStart = @DateLastJobRan + JobInterval WHERE JobID = @JobID
This procedure updates the job that is identified by @JobID with a new DateLastJobRan and calculates the DateNextJobStart value by adding the JobInterval to the @DateLastJobRan that was passed in. This procedure should only run after the job referenced in @JobID is run and should be called with the @DateLastJobRan parameter equal to the date and time that the job ran last.
Calling the Job Timing Stored Procedures
You can extend the data access layer to call the job timing stored procedures by adding a new class called JobAccess. The role of functions in the data access layer is to translate the parameters passed to it by the business layer into a stored procedure database query and return the result to the business layer. The parameters in the data access layer's functions will mirror those of the stored procedures that they access because they do not perform any Business Logic on the values.
You'll be accessing the database through Microsoft Data Application Building Block's SQLHelper class. This class contains functionality that simplifies data access code, making your code more concise and readable.
To change the data access layer to run the scheduled jobs, first add a JobAccess class to the existing data access layer to hold the functions that are needed to schedule jobs. Next, create a function in the JobAccess class that returns a DataSet of the jobs that need to be run through calling the Job_SelectJobs_NextJobStartBefore stored procedure. You'll also need to create a function in the JobAccess class to call the Job_Update_StartEnd_CalcNext stored procedure without returning a result.
First add the JobAccess class to the data access layer. Then, edit the JobAccess class to add the following "using" statements:
using System.Data; using System.Data.SqlClient; using Microsoft.ApplicationBlocks.Data;
Let's look now at how to add the SelectJobsBeforeDate function, which retrieves the list of jobs that need to be run. Here is the signature of the SQLHelper's ExecuteDataset function:
public static DataSet ExecuteDataset( string connectionString, string spName, params object[] parameterValues)
The following is the SelectJobsBeforeDate function, which uses ExecuteDataset to invoke the Job_Update_StartEnd_CalcNext stored procedure, returning a DataSet of the results:
public DataSet SelectJobsBeforeDate(DateTime beforeDate) { return SqlHelper.ExecuteDataset( ConnectionInfo.connectionString, "Job_SelectJobs_NextJobStartBefore, myparams); new object[]{new SqlParameter("BeforeDate", beforeDate)}); }
After jobs have been run, you'll need to execute the stored procedure which updates status information about the jobs. The method that accomplishes this, UpdateJob, will use the SQLHelper class's ExecuteNonQuery method. Here is the signature:
public static int ExecuteNonQuery( string connectionString, string spName, params object[] parameterValues)
The UpdateJob method can be written as follows:
public void UpdateJob(int jobID, DateTime dateLastJobRan) { string connStr = ConnectionInfo.connectionString; string spName = "Job_Update_StartEnd_CalcNext"; SqlParameter myparam1 = new SqlParameter("JobID", jobID); SqlParameter myparam2 = new SqlParameter("DateLastJobRan",dateLastJobRan); object[] myparams = {myparam1, myparam2}; SqlHelper.ExecuteNonQuery(connStr, spName, myparams); }
The UpdateJob function in the JobAccess class is supposed to mirror the parameters that are passed to the stored procedure that it uses. Therefore, the UpdateJob function has a jobID parameter and a dateLastJobRan parameter with the same datatypes as those in the Job_Update_StartEnd_CalcNext stored procedure. Using the jobID and the dateLastJobRan parameters, you can create the two SqlParameters, put them in the myparams object array, and use the ExecuteNonQuery function to execute the stored procedure. Now that you've created the JobAccess class, you need to create the final layer of classes to bridge the gap between the flow layer and the data access layer.
Working with Scheduled Jobs
The final layer that must be modified to work with scheduled jobs is the Business Logic layer, which I'll call JobLogic. This class will perform basic logic on the variables between the flow layer and the data access layer.
First, add the JobLogic class to the DataAccess layer using the following statements::
using System.Data; using ScheduledWebService.DataAccess;
Second, build the GetAllActiveJobs function of the JobLogic class to find all of the jobs that still need to be run at or before the current time, as shown here:
public DataSet GetAllActiveJobs() { JobAccess ja = new JobAccess(); return ja.SelectJobsBeforeDate(DateTime.Now); }
The GetAllActiveJobs function creates an instance of the JobAccess class and calls its SelectJobsBeforeDate with the parameter value of the current date. GetAllActiveJobs picks the current date to pass to this function, so you can find out which jobs were scheduled to run before the current time.
Lastly, create the UpdateJobDone function of the JobLogic class to update the database to indicate that the job specified was just completed, as shown here:
public void UpdateJobDone(int jobID) { JobAccess ja = new JobAccess(); ja.UpdateJob(jobID, DateTime.Now); }
This function creates an instance of the JobAccess class and calls its UpdateJob method. It passes along the jobID parameter and then uses the current date for the dateLastJobRan parameter. You pass the current date and time to the UpdateJob function because it is the time at which the job completed successfully.
Conclusion
Extending your ASP.NET application with automated tasks allows you to program events explicitly rather than waiting for a request to execute code. You can harness this power to perform a variety of tasks from running complex calculations to creating and sending reports to executives on a regular schedule. Such tasks can reuse both your existing logic and the objects in your ASP.NET layers, decreasing development time and improving maintainability. You can also expand the jobs that this scheduler starts without changing the Windows service that initiates it.
Note that there are many variations to what I've discussed in this article. For example, rather than creating a custom Windows service to act as the scheduler, you could use something as straightforward as the Windows Task Scheduler, which is quite robust and implements much of the capabilities discussed here. That said, the creation of Windows services has been vastly simplified by the .NET Framework, so they should be reconsidered as an option even if you have previously found them too difficult to use. Similarly, Web services are a great way for apps to expose functionality to other apps and will continue to be valuable in that regard.
Andrew Needleman is managing partner of Claricode, a consultancy based near Boston that specializes in architecting and developing n-tier Web apps in .NET. He has trained hundreds of developers in C#, the .NET Framework, and Visual Basic .NET. Andrew can be reached at Andrew@claricode.com.