Earthly Delights
Code Your Applications To Deliver The World With Virtual Earth APIs
Chandu Thota
This article is based on a prerelease version of Virtual Earth. All information contained herein is subject to change.
This article discusses:
|
This article uses the following technologies: JavaScript |
Contents
Creating a Map
Working with Styles
Making the Map Interactive
Map Views
Events
Creating Pushpins
Polylines on the Map
Locations and Points of Interest
Routing Between Locations
Working with Content Layers
Adding GeoRSS Content Layers
Virtual Earth Collection Content Layers
Virtual Earth is the mapping technology that powers local.live.com, the latest local search and mapping site from Microsoft. Virtual Earth™ technology was built by the same team that created MapPoint® 2006 and the MapPoint Web service. It is implemented using a mix of both server-side and client-side technologies that include ASP.NET, asynchronous JavaScript, and JavaScript Object Notation (JSON).
You can build your own application or Web site that uses Virtual Earth mapping technologies by using the Virtual Earth map control, a JavaScript component that provides all the functionality you need to draw maps, search for locations, and get driving directions. In this article, I'll highlight some of the most salient features of the Virtual Earth APIs and show you how to build rich, powerful mapping and local search apps.
Creating a Map
Let's take a look at the Windows Live™ Local Web site. The first thing you'll see is the interactive map (see Figure 1). When you begin clicking, you'll notice that map interaction is enabled using the mouse and keyboard, that interaction doesn't require page refreshes, and that search, pan, and zoom are performed asynchronously for a better end-user experience. All this is made possible through asynchronous JavaScript communication that occurs between the browser and the Virtual Earth app servers.
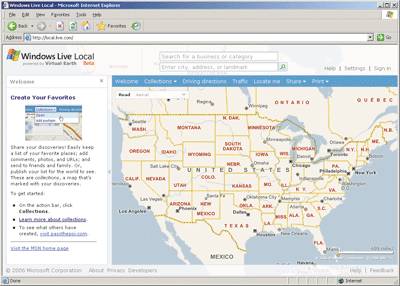
Figure 1** Windows Live Local Web Site **
Virtual Earth APIs are exposed as a set of JavaScript classes that can be included on your HTML or ASPX page using the script tag:
<script src="https://dev.virtualearth.net/mapcontrol/v3/MapControl.js"> </script>
When you include this file on your Web page, the classes listed in Figure 2 will be available for you to program with.
Figure 2 Classes/Enums Available in Virtual Earth APIs
| Class | Description |
| VEMap | Contains all the features for creating a map, finding places, addresses, points of interest, and so on. |
| VEPushpin | Defines a pushpin and holds information about it. |
| VELatLong | Defines a point with latitude and longitude coordinates. |
| VEPolyline | Defines a polyline and its color, opacity, width, and so forth. |
| VEColor | Defines a color with Red, Green, Blue, and Transparency values. |
| VERoute | Represents a route, itinerary details, and geometry to render the route. An instance of this class is returned from a valid map control instance when a valid route is created. |
| VEFindResults | Represents results after a find method call. An instance of this class is returned from a valid map control instance when a valid find operation is performed. A valid instance of this class contains a collection of VEFindResult objects. |
| VEFindResult | Represents point of interest (POI) instances after a find method call. A collection of these objects is usually contained in a VEFindResults object. |
| VEException | Represents an error condition. This class has source, name, and message properties. |
| VEMapStyle | Enumeration indicating the valid map styles supported in Virtual Earth APIs. Available values are: VEMapStyle.Road, VEMapStyle.Aerial, VEMapStyle.Hybrid, VEMapStyle.Oblique, and VEMapStyle.Birdseye. |
| VEBirdseyeScene | Represents the current Birdseye map view. To program with Birdseye map navigation, you always need to obtain the underlying scene. |
| VEOrientation | Enumeration indicating North, South, East, West. Values are: VEOrientation.North, VEOrientation.South, VEOrienta- |
| tion.East, and VEOrientation.West. | |
| VEDistanceUnit | Enumeration indicating distance unit types: VEDistanceUnit.Miles or VEDistanceUnit.Kilometers. |
| VERouteType | Enumeration indicating the type of requested route: VERouteType.Shortest vs. VERouteType.Quickest. |
| VELayerType | Enumeration indicating the type of the content layer; valid values are VELayerType.GeoRSS and VELayerType.VECollection. |
| VELayerSpecification | Defines a content layer that can be bound to a valid map instance; two types of content layers are supported by the VEMap class: geo RSS and Virtual Earth Collections. |
Now, let's create a basic map. A Virtual Earth map is simply an HTML div element on a Web page that binds to a VEMap object. So in order to create a map on your Web page, you create a div tag first and then a VEMap instance binding to that tag, as shown here:
<html> <head> <title>Programming Virtual Earth</title> <script src= "https://dev.virtualearth.net/mapcontrol/v3/MapControl.js"> </script> </head> <body MS_POSITIONING="GridLayout"> <div id="mymapcontroldiv"></div> <script> var map = new VEMap("mymapcontroldiv"); map.LoadMap(); </script> </body> </html>
This code creates a map that appears, by default, in the upper left-hand corner of the page.
The map is created with a height of 400px and width of 600px. If you inspect the rendered document object model of the page, you'll notice that the map container div element is set to absolute positioning. Because this may not work if you have other content elements on the page that are relatively positioned, you may need to customize the initial map view.
Working with Styles
You can override the defaults by setting the style attribute in the map container div tag you've created. The following code shows the style set to position "relative" and height and width set to values that are different from the default 400×600:
<html> <head> <title>Programming Virtual Earth</title> <script src= "https://dev.virtualearth.net/mapcontrol/v3/MapControl.js"> </script> </head> <body MS_POSITIONING="GridLayout"> <div id="mymapcontroldiv" style="position:relative;width:940px;height:550px;"> </div> <script> var map = new VEMap("mymapcontroldiv"); map.LoadMap(); </script> </body> </html>
The addition of a style attribute changes the default map to look like Figure 3. You can also set the initial map view to a specific location and change the map style from road to aerial or bird's eye, using the VEMap constructor as shown in Figure 4.
Figure 4 Initial Map Location
<html> <head> <title>Programming Virtual Earth</title> <script src= "https://dev.virtualearth.net/mapcontrol/v3/MapControl.js"> </script> </head> <body MS_POSITIONING="GridLayout"> <div id="mymapcontroldiv" style="position:relative;width:940px;height:550px;"> </div> <script> var map = new VEMap("mymapcontroldiv"); map.LoadMap(new VELatLong(47.22, -122.44), //Center point 12, //Zoom level VEMapStyle.Road, //Map style false); //Static map? No. </script> </body> </html>
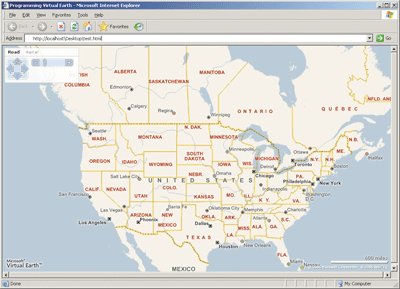
Figure 3** Map View with Specific Style Settings **
As you can see, you can select a specific map style, center point, zoom level, and behavior (static versus dynamic). To make your map static with no zoom or pan interaction, set the static map flag to true, as shown here:
map.LoadMap(new VELatLong(47.22, -122.44), //Center point 12, //Zoom level VEMapStyle.Road, //Map style true); //Static map? Yes.
Finally, the map control created with the VEMap constructor contains the navigation control (also called the dashboard) that provides zoom and pan controls at the top-left corner of the map. If you'd rather provide your own navigation control or if you don't want to provide any, you can turn off the default navigation by calling the following method on the VEMap instance:
map.HideDashboard();
Once a map is loaded, you can get the current map style by calling the VEMap.GetMapStyle method. Similarly, you can change map styles by using the VEMap.SetMapStyle method:
map.SetMapStyle(VEMapStyle.Hybrid);
In this case, the map style is set to hybrid, which is an aerial view with labels enabled. As you can see, this method takes the VEMapStyle enumeration that defines different map styles such as Road, Aerial, Hybrid, Oblique, and Birdseye. While the method works seamlessly for all map styles, when you use it to switch to Birdseye in a location where no Birdseye maps are available, it simply switches to the road map style. So if you want to switch your map to Birdseye, you may want to query the map to check the availability of that style first.
You query the map for Birdseye availability using the VEMap.IsBirdseyeAvailable method; this method returns a Boolean value indicating the availability of the Birdseye maps in the current map view. If this method returns true, you can then call the VEMap.SetMapStyle method with VEMapStyle.Birdseye or VEMapStyle.Oblique values. The following code shows how this is accomplished:
//Change the map style to Birdseye if (map.IsBirdseyeAvailable()) map.SetMapStyle(VEMapStyle.Birdseye);
Note that the method IsBirdseyeAvailable requires the map to be present in a fully loaded state, so if you are calling this method right after creating a new map, it may return unpredictable results; in such a scenario, use the window.setTimeout method to fire a Birdseye map-style check with some delay to allow the map to be loaded. In the code in Figure 5 the bird's eye map availability is checked one second after the map is loaded.
Figure 5 Check Birdseye Availability
var map = new VEMap("mymapcontroldiv"); map.LoadMap(new VELatLong(47.6, -122.33), //Center point 12, //Zoom level VEMapStyle.Road, //Map style false); //Static map? No! window.setTimeout(switchMapStyle, 1000); function switchMapStyle() { if(map.IsBirdseyeAvailable()) { //Change the map style to Birdseye map.SetMapStyle(VEMapStyle.Birdseye); } else { //Change the map style to hybrid map.SetMapStyle(VEMapStyle.Hybrid); } }
Note that you do not need to delay the Birdseye availability check if you are using the VEMapStyle.Birdseye map style when loading the initial map. Once you are in Birdseye view, you can rotate the map using the VEMap.SetBirdseyeOrientation method, as shown here:
map.SetBirdseyeOrientation(VEOrientation.South);
Unlike Road, Aerial, and Hybrid styles, Birdseye-style maps are composed from views that support scene-by-scene navigation that is similar to panning in other map styles. So if you want to pan a Birdseye map, you need to get the underlying scene first and then get the neighboring scenes to pan to them; the code in Figure 6 shows how to navigate among multiple scenes in Birdseye map style. Once you have the neighboring scene, you can also get the thumbnail image path by calling the VEBirdseyeScene.GetThumbnailFilename method. Note that if you use the standard navigation control provided with the MapControl, you get all this functionality out of the box.
Figure 6 Panning
//Go to next scene in Birdseye mode var currentMapStyle = map.GetMapStyle(); if(currentMapStyle == VEMapStyle.Birdseye) { //Get current scene var beScene = map.GetBirdseyeScene(); if(beScene != null) { //You can get any scene that is neighboring the current //scene such as North, East, West, South, Northeast //and so on /* var neighbor = beScene.GetNeighborSceneID(VEOrientation.East); var neighbor = beScene.GetNeighborSceneID(VEOrientation.West); var neighbor = beScene.GetNeighborSceneID(VEOrientation.South); var neighbor = beScene.GetNeighborSceneID(VEOrientation.North); . . . */ //For now get Northeast scene var neighbor = beScene.GetNeighbor(VEOrientation.NorthEast); map.SetBirdseyeScene(neighbor.GetID()); } }
Making the Map Interactive
VEMap class provides methods to perform pan and zoom operations on any valid map instance. To pan a map by a specific number of pixels, you simply call VEMap.Pan method like so:
//Pan the map by 20px X and 20px Y map.Pan(20, 20);
Similarly, if you want to pan the map to specific latitude and longitude values, you have to call the VEMap.PanToLatLong method:
map.PanToLatLong(new VELatLong(33, -5));
For zooming in and out of maps, VEMap provides VEMap.ZoomIn and VEMap.ZoomOut methods. Each time this method is called on a given map instance, the map zooms in or zooms out by one level (valid zoom levels are from 1 to 19). In some scenarios you may want to set a specific zoom level to the map, which you can do by calling the VEMap.SetZoomLevel method. Here's how to set the zoom level to 15 when it's currently less than 12:
var currentZoom = map.GetZoomLevel(); if(currentZoom <= 12) map.SetZoomLevel(15);
As you can see, VEMap.SetZoomLevel sets the zoom level to a specific value while VEMap.GetZoomLevel returns the current zoom level value of the map.
Map Views
A map view defines the visible map area for a given map instance. The VEMap class offers a number of methods to get and set map view information. Usually for any given map, there are two important items that define the view: the center point of the map and the view point of the map—both are defined in terms of top-left and bottom-right coordinates.
You can query the center point of a given map using the VEMap.GetCenter method, which returns a valid VELatlong object that contains the latitude and longitude coordinate values. The following shows how to get the center point for a given map:
var latlon = map.GetCenter(); var lat = latlon.Latitude; var lon = latlon.Longitude;
Similarly, you can set the center for a map using the VEMap.SetCenter method call:
map.SetCenter(new VELatLong(47.22, -122.44));
This method changes the map view by setting the center point to the specified coordinates; it has no impact on the zoom level or the map style. As with the center point, you can get and set the map view port information using the VEMap.GetMapView and VEMap.SetMapView methods. VEMap.GetMapView returns a latitude/longitude pair as an instance of the VELatLongRectangle object where you can access the top-left and bottom-right latitude and longitude pairs:
var VELatLongRectangle = map.GetMapView(); var topLeftLatLon = VELatLongRectangle.TopLeftLatLong; var bottomRight = VELatLongRectangle.BottomRightLatLong;
Once you have the top-left and bottom-right latitude and longitude pairs, you can access their values by accessing the Latitude and Longitude properties of the VELatLong objects.
To get and set map view information, use the VEMap.GetMapView and VEMap.SetMapView methods. SetMapView is overloaded with three different parameter types:
- VELatLongRectangle object
- Array of VELatLong objects
- Array of VEPolyline objects
Each of these valid parameters sets the map view to fit the data passed in. For example, this snippet shows how to set the map view for a given array of latitude and longitude objects:
map.SetMapView([new VELatLong(40, -120), new VELatLong(42, -122), new VELatLong(44, -124), new VELatLong(46, -126)]);
Don't worry about the polylines yet; I'll discuss them in detail later. Finally, to get the top and left values of the current map container div element you can use the VEMap.GetTop and VEMap.GetLeft methods. These methods return the top and left position (in pixel values) of the div element that hosts the map control.
Events
VEMap class exposes two generic methods to attach and detach events. Using these methods, you can wire up the map events you want to tap into. To attach an event handler for a specific event, use the VEMap.AttachEvent method:
map.AttachEvent("onclick", AddPushpinOnClick); function AddPushpinOnClick(e) { var id = Math.random().toString(); map.AddPushpin(new VEPushpin(id, e.view.LatLong, null, id, id)); }
As you can see, the onclick event is designed so that a pushpin is added to the map where the mouse clicks on it. The event information is captured and exposed to the event handler via the method parameter. The latitude and longitude information of the mouse click event (e.view.LatLong) is presented as a valid VELatLong instance. You can detach event handlers from events by calling the VEMap.DetachEvent method:
map.DetachEvent("onclick", AddPushpinOnClick);
Creating Pushpins
You can add pushpins to the map for any location represented by a valid latitude/longitude value pair using the VEMap.AddPushpin method, which takes a valid VEPushpin object as an argument:
//Create a pushpin and add it to the map var pushpin = new VEPushpin('1', //Id - must be unique new VELatLong(47.6, -122.33), //latitude, longitude null, //icon url 'Seattle', //Title 'The emerald city' //Notes ); map.AddPushpin(pushpin);
As you can see, the VEPushpin constructor takes an ID, latitude, longitude, icon url, title, and notes. If you don't pass any icon url to the pushpin constructor, the default pushpin icon is used. By default, rollover pop-up is enabled for all pushpins unless you intentionally leave the title and notes empty to make the pushpin static. Figure 7 shows the default pushpin icon with the rollover pop-up.
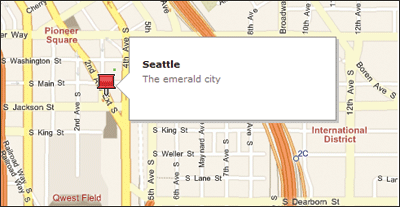
Figure 7** Default Pushpin with Rollover Pop-Up **
You can assign custom icons to your pushpins by providing icon urls in the VEPushpin constructor:
//Create a pushpin and add it to the map var pushpin = new VEPushpin('1', //Id - must be unique new VELatLong(47.6, -122.33), //latitude, longitude 'https://www.contoso.com/myicon.jpg', //icon url 'Seattle', //Title 'The emerald city' //Notes ); map.AddPushpin(pushpin);
Finally, if you want to suppress the standard rollover pop-up and replace it with your own, you can do so by disabling the standard pop-up and wiring up the onmouseover event to capture mouse position along with the title and notes values from the pushpin instance. The following code shows how:
VEPushpin.ShowDetailOnMouseOver = false; VEPushpin.OnMouseOverCallback = function(x, y, title, details) { alert('your mouse is at : ' + x + ', ' + y + ' : ' + title + ' and details: ' + details); };
VEMap class also offers the VEMap.DeletePushpin method to delete the pushpins by ID and the VEMap.DeleteAllPushpins method to delete all pushpins from the map.
Polylines on the Map
VEMap class supports drawing basic polylines using VML/SVG markup. Polylines are programmatically represented as a VEPolyline object that contains an array of VELatLong points. The VEPolyline object takes a set of parameters such as a unique ID, array of points, and so on. Once you have a valid VEPolyline instance you can draw it on the map using the VEMap.AddPolyline method, as shown here:
var vepolyline = new VEPolyline("line1", //id – must be unique [new VELatLong(43, -122), new VELatLong(41, -120), new VELatLong(41, -122)]); //Array of lat/lon map.AddPolyline(vepolyline);
You can also customize polylines by specifying specific color, opacity, and width as part of the constructor:
var vepolyline = new VEPolyline("line5", //id - must be unique [new VELatLong(45, -125), new VELatLong(43, -118), new VELatLong(43, -122)], //array of lat/long new VEColor(255, 50, 75, .5), //color & opacity 30); //width map.AddPolyline(vepolyline);
To remove polylines you can either use VEMap.DeletePolyline, which deletes the polyline by ID, or VEMap.DeleteAllPolylines, which deletes all polylines.
Locations and Points of Interest
VEMap class provides a way to find places, addresses (also known as geo-coding), and points of interest using the VEMap.Find method, as shown here:
VEMap.Find(what, where, [pageindex], [fnCallback]);
The what parameter is usually a point of interest business name or category such as pizza, bar, cafe, and so on. The where parameter is usually a place or address such as Redmond, WA or One Microsoft Way, Redmond, WA.
VEMap.Find expects at least a what or a where argument; when only place or address is passed, the Find method simply geocodes the input location and sets the map view based on the resolved location. In case of ambiguity, a standard disambiguation pop-up will be shown on the map, as you can see in Figure 8.
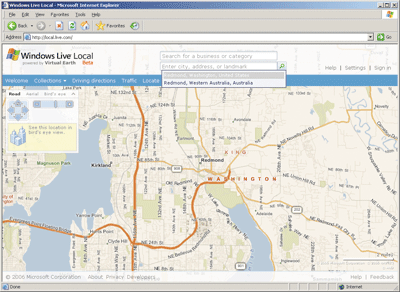
Figure 8** Disambiguation Pop-Up from a Find Call **
When only the what value is passed, the current map bounding box is used to perform the points of interest search. When both values are present, a geocoding is performed first and then a points of interest search is performed around the resolved location.
When performing what queries, the points of interest results are returned 10 items per page. If you want to get items from page 2 you need to pass the page index in the find method call:
map.Find('pizza' /* what */, 'redmond, wa' /* where */, 2);
Finally, if you want to get the point of interest results after a find call you can pass the findCallback function pointer so that the VEMap instance can call your callback method with the points of interest results from the what/where query. Since the VEMap.Find method is asynchronous in nature, a callback method is the only way to get the resultset. Figure 9 shows how find callback works. As you can see, findCallback gets invoked as soon as the server responds with the find results and you can access the results, as shown earlier.
Figure 9 Using a Callback to Get the Resultset
var nextPage = false; try { map.Find(‘pizza’ /*what*/, ‘redmond, wa’, 1, fnCallback); function fnCallback(findResults) { var i = findResults.length; for(var j = 0;j<i;j++) { //Do some processing with the //find results /* alert(findResults[j].Name); alert(findResults[j].Description); alert(findResults[j].LatLong.Latitude); alert(findResults[j].LatLong.Longitude); */ } //Need to go for another page? if(findResults.HasMore == true) nextPage = true; //Any special messages from server? if(findResults.Message != null) { vemap.ShowMessage(findResults.Message); } } } catch(err) { alert(err.source + ‘:’ + err.message); }
Routing Between Locations
VEMap class provides APIs for routing between places, addresses, and latitude/longitude pairs. The routing API is responsible for both calculating routes and rendering them on top of the map using VML/SVG markup. You use the VEMap.GetRoute method to get the route:
map.GetRoute('redmond, wa', 'seattle, wa', [VEDistanceUnit.Miles], [VERouteType.Shortest] [fnCallback]);
As you can imagine, both from and to are always required, and route type and distance unit are optional. In case of ambiguity, the disambiguation pop-up is displayed on the map before calculating the route. The from and to parameters can be either strings or VELatLongs specifying exact positions. The following code snippet shows the VEMap.GetRoute method using lat/long value pairs:
vemap.GetRoute(new VELatLong(43, -122), new VELatLong(43, -123.8), [VEDistanceUnit.Miles], [VERouteType.Shortest] [fnCallback]);
If you need to access the route details such as itinerary, you can do so by passing a callback function pointer, as shown in Figure 10.
Figure 10 Using a Callback for the RouteObject
try { //Get route map.GetRoute(‘redmond, wa’, ‘seattle, wa’, VEDistanceUnit.Miles, VERouteType.Shortest, fnCallback); //Function callback for route object function fnCallback(route) { //Do some processing with route object /* alert(route); alert(route.Itinerary.Distance); alert(route.Itinerary.Time); alert(route.Itinerary.DistanceUnit); alert(route.StartLocation.Address); alert(route.StartLocation.LatLong.Latitude); alert(route.StartLocation.LatLong.Longitude); . . . var len = route.Itinerary.Segments.length; for(var i = 0; i<len ;i++) { alert(route.Itinerary.Segments[i].Instruction); alert(route.Itinerary.Segments[i].Distance); alert(route.Itinerary.Segments[i].LatLong.Latitude); alert(route.Itinerary.Segments[i].LatLong.Longitude); } */ } } catch(err) { alert(err.source + ‘:’ + err.message); }
Finally, it is important to note that your Web page encoding must be set to UTF-8 in order for the route rendering to work. If you are creating an HTML page in Notepad, you need to set the encoding by adding the following meta tag in the head section of the HTML:
<meta http-equiv="Content-Type" content="text/ html; charset=utf-8">
This is set by default if you create your Web page as part of an ASP.NET Web project using Visual Studio®.
Working with Content Layers
It is not uncommon to add layers of content on top of maps when you are building a mapping application. To that end, the VEMap class supports two different content layers to render the content: GeoRSS Layers and Virtual Earth Collection Layers. Each layer is defined using a VELayerSpecification object and then passed to the VEMap.AddLayer method. When a valid VELayerSpecification is passed to the AddLayer method, the map control automatically downloads the data from the data source and binds to it and renders the data in the form of pushpin layers. Each layer added to the map control is given a unique ID so you can show and hide them by layer. You can also delete layers by ID or delete all layers by calling the VEMap.DeleteAllLayers method. Now let's take a detailed look at how to add content layers.
Adding GeoRSS Content Layers
GeoRSS documents are merely RSS content with location information embedded at each item level. When a GeoRSS content layer is provided as a source, the map control downloads the RSS document (typically in XML format) and parses it to derive pushpins to add to the map. The following code shows how to add a GeoRSS content layer to your map:
var veLayerSpec = new VELayerSpecification( VELayerType.GeoRSS, //Layer type "2", //ID - must be unique "https://www.contoso.com/georss.xml", //source "get" //download method ); map.AddLayer(veLayerSpec);
Once the layer is downloaded and added to the map as a collection of pushpins, you can control the visibility of the layer by calling the VEMap.ShowLayer and VEMap.HideLayer methods:
vemap.ShowLayer('2'); vemap.HideLayer('2');
As part of the VELayerSpecification, you can also provide a callback method to access the content layer data. This callback method will be invoked by the map control as soon as the data is downloaded, parsed, and added to the map. The argument passed to the callback is always an array of VEPushpin objects. Finally, you can set a specific pushpin icon for each layer by specifying the icon URL as part of the VELayerSpecification object, as shown in Figure 11.
Figure 11 Setting a Pushpin Icon
try { //Define a layer var s = new VELayerSpecification( VELayerType.GeoRSS, "1", "https://www.contoso.com/mylayer.xml", "get", fnCallback, "https://www.contoso.com/myicon.jpg"); //Add a layer map.AddLayer(s); //Define callback function fnCallback(arrPoints) { alert(arrPoints.length); } } catch(err) { alert(err.source + ‘:’ + err.message); }
Having an icon URL is extremely helpful in adding content layers, especially when you have grouped content based on category or type (such as ATMs, banks, and coffee shops).
Virtual Earth Collection Content Layers
A Virtual Earth collection is a group of pushpins that are created on the Windows Live Local Web site using the scratch pad and saved to the storage. Once you have created, stored, and shared a collection as public, you can use the VEMap layer APIs to access and render it on the maps. The same VELayerSpecification object that is used for GeoRSS layer is used in the Virtual Earth Collection content layer. The only difference is that the layer type and the source are specified differently. Figure 12 shows how a Virtual Earth Collection content layer is added to the map.
Figure 12 Adding a Virtual Earth Collection Content Layer
try { //Define Virtual Earth Collection layer var s = new VELayerSpecification(); s.Type = VELayerType.VECollection; s.ID = "3"; s.LayerSource = "362A462EA1D52DA!159"; //Add to the map map.AddLayer(s); } catch(err) { alert(err.source + ‘:’ + err.message); }
Note that the type of the content layer is set to VECollection and the source value is set to the Virtual Earth Collection ID. Again, you do not have APIs to write anything to your Virtual Earth Collections storage, the layer APIs can only read the public (shared) collections from the Virtual Earth storage.
Virtual Earth provides a powerful mapping and local search technology that enables developers to build rich Web applications. I've covered only the main features of Virtual Earth APIs in this article; consult our online SDK (available at msdn.com/mappoint) for full reference material.
Chandu Thota is a lead software development engineer for Virtual Earth business unit at Microsoft. Besides working on Virtual Earth products, he works with external developers and companies evangelizing the Virtual Earth developer platform via his blog. He is the author of Programming MapPoint in .NET (O'Reilly, 2005).