Test Run
AJAX Test Automation
Dr. James McCaffrey
Code download available at: Test Run 2007_02.exe(574 KB)
Contents
The Web Application under Test
The Test Automation
Inside asyncCall
Inside Delay
Building the Test Page
Extending the Test Harness
Wrapping Up
The popularity of Web applications that use AJAX (Asynchronous JavaScript And XML) technology has increased steadily over the past year. When written correctly, AJAX can yield significant improvements in performance and user experience compared with non-AJAX Web applications. However, because AJAX Web applications work asynchronously, traditional synchronous test automation techniques generally don't work. In this month's column, I present a technique that allows you to write lightweight test automation to verify the functionality of AJAX Web applications.
The best way for me to show you where this column is headed is with a couple of screenshots. Figure 1 shows a simplistic but representative ASP.NET Web application that uses AJAX technology. The application simulates a mapping tool such as Microsoft® Windows Live™ Local. When a user clicks on one of the directional button controls, the application fetches the appropriate map image from the Web server and displays the new map in the center area. What is not apparent from the screenshot is that the Web application uses Microsoft ASP.NET AJAX to send and retrieve map images asynchronously. Of course, your Web application will be much more complex, but the technique I'll show you easily generalizes to arbitrarily complex applications and works for any AJAX-enabled application, regardless of the implementation technology.
Manually testing the application in Figure 1 would be time consuming, inefficient, and tedious. A better testing approach is to write lightweight test automation as shown in Figure 2. The test harness is a simple HTML page that consists of two frames. The right-hand frame hosts the Web application without any modifications or instrumentation. The left-hand frame hosts a single HTML page that contains JavaScript code that manipulates the Web application in the other frame, using the Internet Explorer® Document Object Model (DOM).
Although the testing technique is specifically designed to handle applications that use asynchronous operations, the technique also works for Web applications that use the traditional synchronous HTTP request/response mechanism. In this column, I will briefly describe the Web application under test so you'll understand why traditional test automation techniques are ineffective on AJAX applications. Then, I'll explain in detail the test harness that generated the image in Figure 2, and I'll describe how you can modify and extend the technique presented here to meet your own needs. In the end, I think you'll find this technique a useful addition to your developer and tester skill sets.

Figure 1** AJAX Web Application under Test **(Click the image for a larger view)
The Web Application under Test
I created the AJAX map application shown in Figure 1 using the ASP.NET AJAX code library, which greatly simplifies creating AJAX applications. Instead of using real map images, I simply used nine dummy images containing the digits 1 through 9, named 1.jpg through 9.jpg. (see Jeff Prosise's Wicked Code column in this issue for an example of using Microsoft TerraServer to get real map images.) My miniature world consists of a 3-by-3 grid with 1, 2, and 3 in the first row, 4, 5, and 6 in the second row, and 7, 8, and 9 in the third row. 5 is the center of the world and if a user clicked on the North control button from 5, the application should display 2. The logic for the North button is shown in Figure 3.
Figure 3 Code Behind the North Button
protected void Button1_Click(object sender, EventArgs e)
{
  string imageUrl = Image1.ImageUrl.ToString();
  if (!(imageUrl == "~/1.JPG" || imageUrl == "~/2.JPG" ||
        imageUrl == "~/3.JPG"))
 {
    string oldNum = imageUrl.Substring(2, 1);
    int oldNumAsInt = int.Parse(oldNum);
    int newNumAsInt = oldNumAsInt - 3;
    string newNum = newNumAsInt.ToString();
    string newImageURL = imageUrl.Replace(oldNum, newNum);
    Image1.ImageUrl = newImageURL;
  }
}
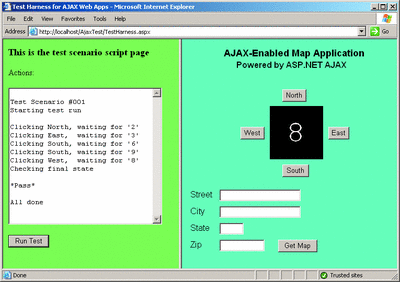
Figure 2** Sample Test Run **(Click the image for a larger view)
If the current map is in the top row (1, 2, 3) of the world, a click on North has no effect. Otherwise, I obtain the digit of the current map location, subtract 3, determine the corresponding new JPEG image, and update the Image control's ImageUrl property. The handlers for the South, East, and West button controls are similar.
Let me emphasize that I'm purposely not using good coding practices here in order to keep the application code short and easy to read. In a real Web application, your code logic would likely access and fetch data from a backend SQL or XML store and update the application state using that data. Because the technique in this column tests a Web application through the Internet Explorer DOM, it doesn't matter how the application state is determined-any user input causes the app state to change, which is reflected in the app's UI, which you can access through the Internet Explorer DOM.
A traditional, non-AJAX approach posts an HTTP request to the Web server, passing request information in a Form object or a query string. Without AJAX technology, the map application works, but has two drawbacks. First, because the HTTP request/response mechanism is synchronous, while the request is being processed by the Web server, the user loses most ability to interact with the Web application until the response is returned to the client. Second, in most cases the HTTP request causes an entire response page to be created, so when the response is received by Internet Explorer, the entire page is repainted. This leads to an annoying page flicker effect if the request/response is relatively quick-or worse, a page blank-out effect if the action is slower.
AJAX solves both of these problems. AJAX works by sending an XMLHTTP request instead of an HTTP request. XMLHTTP requests are asynchronous. So while the XMLHTTP request is being processed behind the scenes, the user can continue interacting with the Web application. And when the XMLHTTP response is received, the Internet Explorer DOM can be used to repaint only the area of the Web page that holds the new data, rather than having to repaint the entire page.
Instead of writing "raw" JavaScript to enable AJAX on my ASP.NET map application, I used the Microsoft ASP.NET AJAX framework. Using it is remarkably easy, as its installation provides a Visual Studio® AJAX Web Site template. Selecting this template adds the necessary assembly references to your Web application project. To enable AJAX functionality in my map application, I added the following tag to my source file:
<asp:ScriptManager ID="sm" runat="server" />
Then I wrapped my Image control (the control that I want to update after an asynchronous request-response) in an ASP.NET AJAX UpdatePanel control like this:
<asp:UpdatePanel ID="up1" runat="server">
  <ContentTemplate>
    <asp:Image ID="Image1" runat="server" ImageUrl="~/5.JPG"
               (other attributes omitted) />
  </ContentTemplate>
  <Triggers>
    <asp:AsyncPostbackTrigger ControlID="Button1" EventName="Click" />
    <asp:AsyncPostbackTrigger ControlID="Button2" EventName="Click" />
  </Triggers>
</asp:UpdatePanel>
And that's all there is to it. Very nice! The framework takes care of all the messy details such as creating the XMLHTTP object, listening for the asynchronous response, error handling, cross-browser differences, and so on.
Notice that I enable AJAX asynchronous request/responses only when there is a click event for the Button1 (North) and Button2 (South) controls, rather than enabling for all four directional controls. I did this on purpose in order to illustrate that the testing technique in this month's column works for both asynchronous and synchronous requests. And if you try the application yourself using the code download that accompanies this article, you'll see a significant performance difference between North and South requests (AJAX) and East and West requests (non-AJAX).
Most traditional test automation techniques just don't work with AJAX Web applications. The most fundamental way to test a Web application's functionality is to programmatically send an HTTP request that corresponds to the request generated by some user input to the Web server, fetch the HTTP response, and then examine the response in order to determine a pass/fail result. This approach doesn't work for AJAX applications because they use special XMLHTTP requests.
Another traditional approach is to use JavaScript to manipulate the Internet Explorer DOM to send a request to the Web server, wait until the onload event fires (signaling that the response has been received by the client and has been loaded), then use JavaScript and the Internet Explorer DOM to examine the new state of the Web page to determine a pass/fail result. The problem with this approach is that because AJAX works asynchronously, you can't use the onload event to tell when the response has been received by the client. But you can modify this approach to create lightweight test automation for AJAX applications. Instead of using the onload event to signal when a response has been received, you can write code that watches the application for some expected change in application state and then transfers control to a callback function.
The Test Automation
The AJAX application test harness system illustrated in the screenshot in Figure 2 consists of three files. Figure 4 shows a block diagram of the overall structure of the harness. The harness itself, TestHarness.aspx, is a simple Web page with two frames. The right-hand frame holds the AJAX Web app under test. The left-hand frame holds a test scenario page that has some minimal UI and all the JavaScript code to manipulate and examine the Web app under test. For consistency, I decided to make all three pages .aspx files even though I could have used basic HTML for the test harness and test scenario pages. Here is the complete source for the TestHarness.aspx page:
<html>
<head>
  <title>Test Harness for AJAX Web Apps</title>
</head>
  <frameset cols="45%,*">
    <frame src="https://localhost/AjaxTest/TestScenario001.aspx"
      name="leftFrame">
    <frame src="https://localhost/AjaxApplication/Default.aspx"
      name="rightFrame">
  </frameset>
</html>
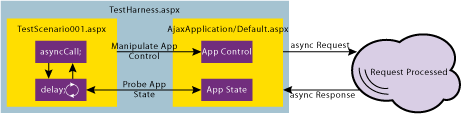
Figure 4** Structure of the Test Harness **(Click the image for a larger view)
As you can see, the main test harness page is really just a container file. A test scenario run starts by calling a program-defined function asyncCall, which causes the application under test to send an asynchronous XMLHTTP request to the Web server and also calls a program-defined delay function. The delay function loops while the Web server processes the request and returns the asynchronous response, probing the state of the Web application every so often. After the response is received by the client and the app state is updated, the delay function finds the Web page state change, and a new asynchronous call can be made.
Inside asyncCall
The heart of my AJAX test automation technique is a pair of program-defined functions, asyncCall and delay, which work together. The asyncCall method is shown here:
function asyncCall(action, checkFunc, arg, callback, pollTime)
{
  numTries = 0;
  action();
  window.setTimeout("delay(" + checkFunc + ", " + "'" + arg +
    "'" + ", " + callback + ", " + pollTime + ")", pollTime);
}
I pass in five arguments. The first parameter, action, is a function pointer to some routine which uses the Internet Explorer DOM to fire an action that initiates an asynchronous XMLHTTP request. The second parameter, checkFunc, is a function pointer to a routine that returns true when the state of the Web application indicates that the asynchronous response has completed. The third parameter, arg, is an argument that is passed to the checkFunc function. The fourth parameter, callback, is a function pointer to the routine to invoke when the asynchronous response has completed. The last parameter, pollTime, specifies how long, in milliseconds, to wait between calls in the partner delay function.
Inside the asyncCall function, I first set a global numTries counter to zero. I use this variable to keep track of how many times I've entered the delay function so that I can exit after a specified number of attempts to find the state that indicates the asynchronous response has occurred. Next I call the action argument, which in turn causes the asynchronous request to fire. You should note that the parentheses appended to the function name is the syntax mechanism to call the function.
Now comes the real trick: I call the intrinsic window.setTimeout function. As you can see, setTimeout accepts two arguments. The first argument is a JavaScript statement to execute one time only. The second argument is a time, in milliseconds, to delay before executing the first argument. If you examine the code in asyncCall, you'll see that my first argument to setTimeout resolves to this:
delay(checkFunc, 'arg', callback, pollTime)
The second arg is just pollTime. In short, after a delay of pollTime milliseconds, I invoke the program-defined delay function.
A call to the asyncCall function looks something like this:
asyncCall(clickNorth, imgIsTwo, "2", clickSouth, 200);
This call can be interpreted as "invoke a function named clickNorth, then go into a delay loop, calling a function imgIsTwo with an argument of '2' every 200 milliseconds, and when imgIsTwo finally returns true, transfer control to a function named clickSouth."
The single-quote characters around arg in the definition of the asyncCall method are important. Without the single quotes in the asyncCall definition, the parameter would be passed by reference, as shown here:
asyncCall(doThis, findX, "X", doThat, 200);
A call like this would generate an error saying that variable X is not defined. With the single quotes, the parameter is passed by value, which is what you want in this situation.
There is an interesting alternative way to call the window.setTimeout function inside asyncCall. Normally you'd write something like this:
window.setTimeout("delay(" + checkFunc + ", " + "'" + arg +
    "'" + ", " + callback + ", " + pollTime + ")", pollTime);
Instead, you can use JavaScript's anonymous function feature and write this:
window.setTimeout(
    function(){delay(checkFunc, arg, callback, pollTime);},
    pollTime);
Because the quote characters and string concatenation are removed, this code is a bit cleaner than the non-anonymous alternative. It's also slightly more efficient because the non-anonymous alternative requires the browser to create a new script environment to process the script. However, without the single quote characters delimiting the arg argument to checkFunc, it is not obvious that arg is being passed by value (although a simple comment would clear up any possible confusion).
Inside Delay
Now here is my partner to asyncCall, the delay function:
function delay(checkFunc, arg, callback, pollTime)
{
  ++numTries;

  if (numTries > maxTries) finish();
  else if (checkFunc(arg)) callback();
  else window.setTimeout("delay(" + checkFunc + ", " + "'" + arg +
      "'" + ", " + callback + ")", pollTime);
}
The delay function accepts four arguments that correspond exactly to the last four arguments that were passed to the calling asyncCall function.
Inside delay, I first increment the global numTries counter. Recall that I'm using this to keep track of how many times I enter the delay function-or put another way, how many times I've checked the state of the Web application to see if the asynchronous response has completed. If this global counter is greater than a global maxTries constant, then either my Web application is timing out on the server side or the XMLHTTP response is incorrect, so I transfer control to a finish function where I can determine what happened.
If delay hasn't timed out, I call the checkFunc function to test whether the condition that indicates a correct response is true. If checkFunc returns true, then I can call the callback function to continue the test scenario execution. But if the checkFunc function returns false, I need to continue waiting, so I call the intrinsic setTimeout function again, which will wait for pollTime milliseconds and then call delay again.
My delay function is not quite recursive because it doesn't call itself directly, but it is self-referential because it calls itself indirectly via the setTimeout function. The net effect is a waiting loop that will either transfer control to a finish function (if the maximum number of times in the delay loop is exceeded) or a callback function (if some Web application state becomes true). This approach is one of those things that seems obvious in hindsight, but isn't so obvious before you see the solution. There are other approaches, of course, but this one has proven to be simple and effective in practice.
Just as in the asyncCall function, instead of calling the window.setTimeout function using a named function argument, you can use the anonymous function feature like this:
window.setTimeout(
    function(){delay(checkFunc, arg, callback);},
    pollTime);
Building the Test Page
With the asyncCall and delay functions taken care of, I can now construct my test scenario page. The overall structure of the test scenario is presented in Figure 5.
Figure 5 Test Scenario Structure
<html>
<head>
  <script type="text/javascript">
    var maxTries = 10;
    var numTries;
    var polling = 200; // milliseconds

    function asyncCall(action, checkFunc, arg, callback, pollTime)
    {
      // code here
    }

    function delay(checkFunc, arg, callback, pollTime)
    {
      // code here
    }

    // other functions go here
  </script>
</head>
<body bgcolor="#22EE66">
  <h3>This is the test scenario script page</h3>
  <p>Actions:</p><p><textarea id="comments" rows="16"
                      cols="34"></textarea></p>
  <input type="button" value="Run Test" onclick="runTest();" />
</body>
</html>
The test scenario page <body> section consists of just a title, a textarea with ID "comments" to display comments, and a button control to launch the automation. The <head> section contains all of my JavaScript code. I declare and initialize a global maxTries constant to specify the maximum number of times I'm willing to enter the delay function, checking for some condition that tells me that the asynchronous response has completed. Global variable numTries keeps track of how many times I've entered the delay function. Global constant polling sets the delay time between successive calls to my delay function.
Depending on the complexity of your AJAX Web application under test, you may have to modify the values of maxTries and polling. Here, 10 times through with a delay of 200 milliseconds between calls is just 2 seconds, which may not be long enough for your Web server to process the XMLHTTP request and return the response to the client.
The test scenario begins by calling a runTest function:
function runTest()
{
  try
  {
    logRemark("Test Scenario #001");
    logRemark("Starting test run\n");
    step1(); // starting at 5, go N to 2
  }
  catch(ex) { logRemark("Fatal error: " + ex); }
  }
}
All I do is display a couple of messages in the <textarea> on the harness body with a program-defined logRemark function, and then transfer control to a step1 function. I wrap my code in a simple try/catch block so that any exceptions that are thrown during the test run will bubble up and be caught. My logRemark function is very simple:
function logRemark(comment)
{
  var currComment = document.all["comments"].value;
  var newComment = currComment + "\n" + comment;
  document.all["comments"].value = newComment;
}
I retrieve the current contents of the <textarea> element with ID "comments," append a newline character and the new comment text to the current contents, and replace the <textarea> contents with the updated comment set. This isn't an efficient approach, but in lightweight test automation, simplicity considerations often outweigh efficiency concerns.
The step1 function begins the manipulation of my AJAX Web application under test:
function step1()
{
  logRemark("Clicking North, waiting for '2'");
  asyncCall(clickNorth, checkImageSrc, "2", step2, polling);
}
After logging a comment, I call the asyncCall function, which is the key to my test automation. The call here means: call function clickNorth and then delay loop until checkImgSrc("2") returns true, pausing 200 milliseconds between checks, and then transfer control to function step2. If the delay loop is called more than 10 (maxTries) times, control will be transferred to a finish function.
The clickNorth function is very simple:
function clickNorth()
{
  var btnNorth = parent.rightFrame.document.all["Button1"];
  if (!btnNorth) throw "Did not find btnNorth";
  btnNorth.click();
}
I use the Internet Explorer DOM to obtain a reference to the Button1 control and then invoke its click method. Notice that because my automation is in one frame and my AJAX application is in another frame, in order to access controls on the app from my test script.I have to use the parent keyword to go "up" one level and then use the frame ID of the app container. I like to use the document.all collection to get references to Web page controls, but some of my colleagues prefer to use the getElementById method like this:
var btnNorth = parent.rightFrame.document.getElementById("Button1");
The checkImageSrc function tells the automation when the Image1 control on the AJAX app under test has been updated by an asynchronous response:
function checkImageSrc(target)
{
  try
  {
    var s = parent.rightFrame.document.all["Image1"].src;
    return s.indexOf(target) >= 0;
  }
    // traps case where Image1 is not yet loaded
    // logRemark("Error in checkImageSrc(): " + ex);
  catch(ex) { return false; }
}
Basically, I just check the src property of the Image1 control to see if the property contains some target string. For example, the call checkImageSrc("2") will return true if the image src property contains "2" as in "~/2.jpg" which is the file name I used for map 2. When you write your own AJAX automation you will have to create appropriate check functions. For example, suppose your Web app updates a TextBox control with ID "TextBox1". One possible check function is:
function checkTextBoxValue(target)
{
  try
  {
    var s = parent.rightFrame.document.all["TextBox1"].value;
    return s.indexOf(target) >= 0;
  }
    // traps case where TextBox1 is not yet loaded
    // logRemark("Error in checkTextBoxValue(): " + ex);
  catch(ex) { return false; }
}
Notice the try/catch block in my checkImageSrc function. Unlike most situations where try/catch is used to trap an unexpected error condition, here I'm using try/catch as part of my normal function logic. The idea is that during the time the Web page is being repainted, you cannot get a reference to the Image1 control and any attempt to do so will throw an exception. This doesn't necessarily mean the Web application has an incorrect state, it just means the application has an incomplete state, so I want to catch the exception and return false. You can observe this behavior by un-commenting the call to logRemark and making the polling time very short (say, 10 milliseconds).
By the way, using try/catch as part of normal function logic is usually considered bad coding style, but in this case, the simplicity gained makes using try/catch for normal logic flow acceptable, in my opinion.
My test scenario script defines functions step2, step3, step4, and step5 much like the step1 function. The step2 function calls function clickEast, waits until a "3" appears in the map display area, and then calls step3. The step3 function calls function clickSouth and waits until a "6" appears, and so on. The step5 function calls a brief intermediate finish function step6:
function step6()
{
  finish();
}
Here I simply transfer control to the real finish function (see Figure 6). Recall that the finish function also handles situations where the maximum number of allowed calls to the delay function has been exceeded.
Figure 6 Finish Function
function finish()
{
  if (numTries > maxTries)
  {
    logRemark("\nnumTries has exceeded maxTries");
    logRemark("\n*FAIL*");
  }
  else
  {
    logRemark("Checking final state");
    var is = parent.rightFrame.document.all["Image1"].src;
    if (is.indexOf("8") >= 0) logRemark("\n*Pass*");
    else logRemark("\n*FAIL*");
  }
  logRemark("\nAll done");
}
First I deal with situations where global counter numTries has exceeded global constant maxTries. This can happen in one of two ways: either my AJAX app's logic is correct and the app just took too long to update page state or the app's logic is bad and the check function was not able to find the correct state. Here I arbitrarily choose the simple solution of failing the test scenario.
The second logic branch in finish checks the final state of the application to determine a pass/fail result. In this case, I am checking to see whether the final map image is "8" as it should be if I start at "5" and then click the North, East, South, South, and West controls in succession.
Extending the Test Harness
The test automation system I've presented here is very lightweight and is designed specifically for you to modify. As usual for a magazine article, I've removed most error checking to keep the main ideas clear. You, however, will want to liberally add error traps-test automation is inherently tricky and errors are the rule rather than the exception.
Notice that the test harness is not fully automated: you have to manually click on the Run Test button to launch the automation. There are several ways you can fully automate the harness. One simple way is to add an onload handler to the test harness frame:
<frame src="https://localhost/AjaxApplication/Default.aspx"
  name="rightFrame"
  onload="leftFrame.launch();" >
In this case, the launch function in the test scenario code is defined as follows:
var started = false;
function launch()
{
  if (!started) runTest();
}
In addition, the runTest function described in this column is edited to begin with this statement:
started = true;
When the right-hand frame containing the AJAX Web application under test is loaded, the launch function is called. The first time launch executes, global variable started is false and control is transferred to the runTest function, which sets variable started to true and then executes the automation. On subsequent page loads of the Web app, which occur for regular HTTP request/response actions, the launch function is called, but because global started is true, control is not transferred to runTest again. With a fully automated version of the test harness, you can create multiple harness pages and scenario pages and then execute several scenarios by placing statements like the following into a BAT file and then using the Windows Task Scheduler to launch the automation:
iexplore https://localhost/AjaxTest/TestHarness01.aspx
iexplore https://localhost/AjaxTest/TestHarness02.aspx
Notice that a weakness of my lightweight system is that you cannot conveniently parameterize the system. Although you can easily place the common JavaScript code from the test scenario pages inside a single separate .js file, there's no easy way to coordinate executing multiple test scenarios from a single test harness page. This is not to say you can't do so; I'm just saying it's not a completely trivial task.
Another extension to the AJAX test automation is automating the process of saving test scenario results. The system as presented does not log results, but there are several ways you can do this. One approach is to place a Form element into the test scenario page, put a text field that holds the test scenario result inside the form, and then POST the result to a server, like this:
<form name="resultForm" method="Post" action="saveResults.aspx">
  <p>Result: <input type="text" name="result"></p>
  <p><input type="submit" name="saver" value="Save Results"></p>
</form>
You can supply a pass/fail value to the result field inside the finish function along the lines of this code:
if (is.indexOf("8") >= 0)
{
  logRemark("\n*Pass*");
  theForm.result.value = "Pass";
}
else
{
  logRemark("\n*FAIL*");
  theForm.result.value = "Fail";
}
Now you can manually save the scenario result by clicking on the Save Results button, or you can automate saving by placing the following in your scenario code:
document.all["theForm"].submit();
Wrapping Up
The test harness I've presented here is just one of many ways to test AJAX Web applications. After reading this column you should have no trouble using both my lightweight approach and more sophisticated harnesses to test your AJAX Web applications. With the release of the ASP.NET AJAX framework, the growth of AJAX Web applications is likely to accelerate. The ability to write lightweight test automation should become increasingly important, making it a valuable addition to your personal skill set.
Send your questions and comments for James to testrun@microsoft.com.
Dr. James McCaffrey works for Volt Information Sciences, Inc., where he manages technical training for software engineers working at Microsoft. He has worked on several Microsoft products including Internet Explorer and MSN Search. James is the author of .NET Test Automation Recipes (Apress, 2006). James can be reached at jmccaffrey@volt.com or v-jammc@microsoft.com Thanks to Doug Walter, Shawn Burke, and Scott Guthrie (all at Microsoft), whose comments significantly improved this column.