Share Code
Write Code Once For Both Mobile And Desktop Apps
Daniel Moth
This article discusses:
|
This article uses the following technologies: .NET Framework |
Code download available at: Net Cf Sharing 2007_07.exe(246 KB)
Contents
Platform Differences
How Not to Proceed
Retargetable
Share the Code, Not the Binary
Project and Code Files in the Same Directory
Stub It
Platform Invoke
Different Framework Implementations
Partial Types
System.Diagnostics.Conditional
Deploy to My Computer
Use Reflection
Extension Methods
Wrapping It Up
For the last several years, while developers were building Microsoft® .NET Framework client applications for Windows®, many had no idea that they could also have been creating applications for Windows Mobile® using the same skills and toolsets. But Windows Mobile wasn’t as widespread in the enterprise then, so the need to write custom applications targeting mobile devices was not as great. Today, there’s a huge demand and many desktop developers are getting their feet wet with mobile development. Unfortunately, many miss the opportunity to share their .NET code cross-platform even though it is relatively easy to do so.
There are many reasons you might want to share business logic across both platforms, regardless of whether the original application was written for Windows or Windows Mobile. You can start from either, and port to the other. If your application is currently running on laptops in the field, it is probably a good candidate to run on a mobile device, and vice versa. And if your product is similar to your competitor’s, extending the reach to a new platform gives you an edge. As a bonus, by writing your code to execute on the desktop you can take advantage of developer tools that don’t work with smart device projects.
The techniques and principles discussed in this article can be utilized when writing cross-device code—applications that target Windows devices with differing form factors (different screen sizes, orientations, touch screens and so on).
Platform Differences
When I think of the .NET Framework, I think of the tools, the languages, the libraries, and the runtime engine. Differences in these four elements affect the goal of writing cross-platform code. Fortunately, the tool we use for both desktop and mobile apps is the same: Visual Studio®. With each version of Visual Studio, the Visual Studio for Devices team continues to add new features for device development and to ensure that important new desktop development features work as expected for mobile device development. (You need to use Visual Studio 2005 Standard or higher for device development.)
Both Visual Basic® and C# are fully supported on both platforms, from a syntactical perspective. But if you plan to use Visual Basic, be advised that the Microsoft.VisualBasic.Compatibility assembly and implicit late binding are not supported. The former is an assembly used on desktop projects that are migrated from Visual Basic 6.0, and the latter is not an issue if you are following best practices by enabling Option Strict On in Visual Basic projects. Also realize that managed C++ is not supported (although the same IDE can be used for native device projects). Third-party languages can add support for the .NET Compact Framework by referencing the correct assemblies and by ensuring that their compilers don’t generate IL opcodes that are not supported by the .NET Compact Framework common language runtime (CLR). The offending IL opcodes are: jmp, calli, refanyval, refanytype, mkrefany, arglist, localloc, unaligned, and tail.
It’s worth noting that while the implementations of the garbage collector and the just-in-time (JIT) compiler are different in the .NET Compact Framework than they are in the .NET Framework, they still serve the same purpose and offer the same services to managed code.
Like any modern programming framework, the .NET Framework comes with a rich set of class libraries. The .NET Compact Framework achieves 80 percent of the relevant functionality found in the .NET Framework with only 20 percent of the footprint. Major areas of the .NET Framework that are absent from the compact version include: ASP.NET, CLR hosting, code access security (CAS), binary serialization, Reflection.Emit, and CodeDOM.
Windows Presentation Foundation and Windows Workflow Foundation are not going to be supported any time soon, but there will be a compact version of Windows Communication Foundation in version 3.5 of the .NET Compact Framework. Also in version 3.5, there will be support for LINQ to Objects, LINQ to XML, and LINQ to DataSet, but no support for any other LINQ flavors.
Most of the time, however, it isn’t these large missing areas that cause issues. Typically, problems arise from the fact that some of the supported namespaces don’t have all the classes you expect and, more importantly, some classes do not have all the members you’d expect. I’ll show you some workarounds later on.
The reverse is also true. That is, the .NET Compact Framework is not a strict subset of the .NET Framework; it actually adds some members of its own. There are four device-specific assemblies: System.Data.SqlServerCe, System.Net.IrDA, Microsoft.WindowsMobile.DirectX and Microsoft.WindowsCE.Forms.
SqlServerCe contains classes for working with the in-memory database on the device, IrDA contains classes for programming against infrared, DirectX® is used for rich graphics primarily for game programming, and Forms has a number of GUI classes that are specific to devices. In addition to these device-specific assemblies, there are also some device-specific Windows Mobile APIs for Windows Mobile 5.0 and higher that ship as part of the Mobile platform. Later I’ll show you how to cope with types that exist on one framework and not the other.
Of course, input methods on desktop and mobile devices are different, so you don’t have to worry about keyboard shortcuts, tooltips, and so forth on a mobile device. Moreover, mobile forms are not resizable and are always full screen, which also affects the way you navigate between forms of an application. Finally, the most obvious difference is that the screen size of devices is much smaller. The takeaway is that it is best not to share the UI layer of an application between these two platforms, but rather create platform-specific user interfaces and instead just share the business logic.
How Not to Proceed
The first thing desktop developers usually do when trying to port an application to a mobile device is to take an assembly built against the desktop framework and reference it from a device project. This will not work and is definitely not supported. Even if in your desktop project you’ve been careful to use only types and members that are also available on the .NET Compact Framework, you will still get TypeLoadException and MissingMethodException exceptions at run time. So, if you created a Visual Studio project by choosing a non-smart-device project template, the output of that project will simply not execute on the Windows CE platform (which is what Windows Mobile builds on, of course).
Unfortunately, it is not hard to find yourself in the situation just described. When referencing assemblies from a smart-device project, there are no checks to see if it’s a desktop assembly, so you could be using class libraries built from a desktop project template. This situation arises often when using third-party DLLs. In such cases, you’ll only discover the errors at run time.
If you suspect you are facing this problem, there are a few clues to look for. When you deploy the project to the target through Visual Studio (such as when you run your project with debugging), notice in the Visual Studio output window the diagnostic messages that tell you which assemblies are being deployed to the device (see Figure 1). If the deployment process is taking too long, it may be because Visual Studio is copying to the target the full set of .NET Framework assemblies that it detected as dependencies to the desktop assembly you accidentally referenced.

Figure 1** Output Window of Visual Studio **(Click the image for a larger view)
If you are lucky, the deployment process will fail with an error informing you that there is not enough disk space. If the desktop dependencies are limited, then the deployment process will succeed. In that case, using a remote file viewer that shows all file types, look into the folder on the target where your application was deployed. You’ll find all the .NET Framework assemblies that were deployed. Note that the public key token for the .NET Compact Framework assemblies starts with 9 whereas the desktop equivalents start with B. You can use that information to quickly determine whether what you are deploying or referencing is a desktop or a device framework assembly. That information also appears in the .NET Compact Framework loader log, which will contain errors if your application fails at run time due to these issues.
Retargetable
Though desktop assemblies cannot execute on the device, the good news is that the reverse is possible. If you create a smart device project and build it, the output (the EXE or DLL) can be executed on the desktop and can be referenced by desktop projects. This works because the .NET Compact Framework assemblies are retargetable. If you open one of them with ILDASM, you can observe that they have the System.Reflection.AssemblyNameFlags.Retargetable attribute (see Figure 2). This means that at run time all references to the .NET Compact Framework assemblies are retargeted to the desktop equivalents. So, to be clear, your assembly uses the desktop implementation, not the device implementation of the .NET Framework.
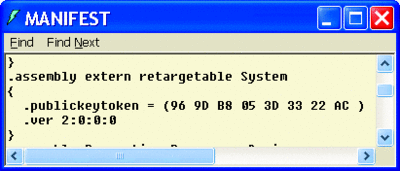
Figure 2** Retargetable Flag in ILDASM **(Click the image for a larger view)
Let’s look at an example you can try at home. Create a new smart device application targeting your favorite Windows Mobile platform. Add some controls to the main form, for example a TabControl, a ProgressBar, and four MenuItems to the MainMenu control (see Figure 3). Generate the Click event handler methods for each of the MenuItems and add the code in Figure 4 in these event handler methods.
Figure 4 Click Event Handler Methods
private void mnuFormShow_Click(object sender, EventArgs e)
{
  // TODO later
}

private void mnuMbox_Click(object sender, EventArgs e)
{
  MessageBox.Show(“some text”, “random caption”);
}

private void mnuDateTime_Click(object sender, EventArgs e)
{
  this.Text = DateTime.Now.TimeOfDay.ToString();
}

private void mnuCalc_Click(object sender, EventArgs e)
{
  string pth = @”\Windows\calc.exe”;
  Process.Start(pth, null);
}
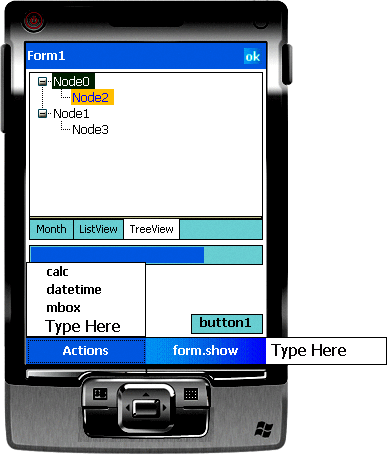
Figure 3** MainMenu Design **
Run the project targeting the emulator or your own device and observe that the behavior is what you expect when you click on each menu item. Back on your desktop, navigate to the build folder (bin/Debug) and notice how you can double-click on the executable and it runs on your desktop machine (see Figure 5).

Figure 5** Device Project **
The controls render themselves in the desktop style—the TabControl has the tabs at the top, the menus appear at the top, the ProgressBar has a slightly different appearance, and so forth. Now click on the MenuItem that shows a MessageBox and it works as expected. Click on the MenuItem that changes the caption of the form and notice how we get higher precision here with the addition of milliseconds. This is a further clue that you are now using the desktop implementation that is slightly different. The lesson here is not to completely rely on retargetability and instead test your application thoroughly to be positive that any minor differences in implementation are not important to you. Finally, click on the MenuItem that launches the calculator and observe the application crashing with a "System.ComponentModel.Win32Exception: The system cannot find the file specified" exception. Clearly, the culprit here is that the path to the calculator on the desktop is different from the path of the calculator on the device. To deal with such platform-specific issues and to offer a single implementation that works cross-platform, you need to detect at run time what platform you are on and branch your code accordingly. See the following modifications to the event handler as an example:
private void mnuCalc_Click(
  object sender, EventArgs e)
{
  string pth;
  if (Environment.OSVersion.Platform == PlatformID.WinCE)
  {
    pth = @”\Windows\calc.exe”;
  }
  else
  {
    pth = @”c:\Windows\system32\calc.exe”;
  }
  Process.Start(pth, null);
}
You can now run the project on either Windows Mobile or Windows desktop and the calculator application corresponding to the platform will be launched correctly.
Remember that there are device-specific assemblies that do not exist on the desktop. Let’s see what happens if you use such an assembly. Add a new form (Form2) to the smart device project, drop an InputPanel control on it, then add two Button controls and a TextBox. Generate the event handlers for the controls and add code as shown in Figure 6.
Figure 6 textBox Event Handlers
private void textBox1_GotFocus(object sender, EventArgs e)
{
  inputPanel1.Enabled = true;
}

private void textBox1_LostFocus(object sender, EventArgs e)
{
  inputPanel1.Enabled = false;
}

private void button1_Click(object sender, EventArgs e)
{
  Cursor.Current = Cursors.WaitCursor;
}

private void button2_Click(object sender, EventArgs e)
{
  Cursor.Current = Cursors.Default;
}
Now revisit the empty MenuItem Click event handler method of the first form and add code that shows Form2, as follows:
private void mnuFormShow_Click(object sender, EventArgs e)
{
  Form2 f = new Form2();
  f.ShowDialog();
}
If you run the project on the device, you’ll notice that when you open Form2 from Form1’s menu item, you can click on Form2’s buttons to show or hide the busy cursor on the device. Giving the focus to the Textbox brings up the Soft Input Panel (SIP) while taking the focus away hides it. Back on the desktop, navigate to your build directory like before and run the executable on the desktop. Clicking on the menu item to show Form2 results in an exception like this:
System.IO.FileNotFoundException: Could not load file or assembly
 ‘Microsoft.WindowsCE.Forms, Version=2.0.0.0, Culture=neutral,

PublicKeyToken=969db8053d3322ac’ or one of its dependencies.
The system cannot find the file specified. File name: ‘Microsoft.WindowsCE.Forms,
 Version=2.0.0.0, Culture=neutral, PublicKeyToken=969db8053d3322ac’
This happens because when you added an InputPanel control to the project, a reference to Microsoft.WindowsCE.Forms was added automatically. That’s a device-only assembly so there’s nothing on the desktop to retarget to, thus the exception is thrown when the form gets constructed and attempts to create a Microsoft.WindowsCE.Forms.InputPanel from that assembly. Let’s make some modifications to better observe this. First delete the InputPanel control from the form’s designer view and then modify the textBox event handlers as you see in Figure 7.
Figure 7 Checking Platform
private void textBox1_GotFocus(object sender, EventArgs e)
{
  if (Environment.OSVersion.Platform == PlatformID.WinCE) //naive
  {
    Microsoft.WindowsCE.Forms.InputPanel inputPanel1 =
                new Microsoft.WindowsCE.Forms.InputPanel();
    inputPanel1.Enabled = true;
  }
}

private void textBox1_LostFocus(object sender, EventArgs e)
{
  // in the interest of space, let’s ignore this method
  //inputPanel1.Enabled = true;
}
What this does is isolate the use of the InputPanel to one method, and it also attempts a naïve fix for the exception by checking the platform at run time. If you run this project on the device, it still works as expected, but if you run it on the desktop it fails with the same exception as before. It fails only when you give the focus to textBox1 rather than as soon as the form is shown, but it still fails nonetheless.
A runtime check is not enough in this case because of JIT compiling. At run time when the method call is made, the CLR checks to see if any native code exists for the method being called (textBox1_GotFocus). If not, then the JIT compiler will generate native opcodes from the IL code that the method entry points to. At that point, the JITer does not "care" what paths get executed at run time, it simply needs to find all the types used in the method. So it tries to load the Microsoft.WindowsCE.Forms.InputPanel type and corresponding assembly, but it can’t because the assembly doesn’t exist on the desktop. Then the exception gets thrown. You could extract the use of the InputPanel into a separate method and ensure with a run-time check from the calling method that the extracted method never gets called, but that’s really messier than most developers would like. The correct way to resolve this issue is by exploring an alternative approach to sharing code cross-platform. (If you are interested in pursuing the previously mentioned approach, see the "Platform Detection" section of msdn2.microsoft.com/ aa480686, which has an example of a factoring approach similar to the one noted here.)
Share the Code, Not the Binary
The previous section explored how you could create smart device projects and use the output binaries on the desktop via retargeting. However, there are two limitations with the retargetable approach: First, you can’t use any desktop-only types or methods in your code. They simply will not compile. Second, you must be careful not to load any device-specific assemblies on the desktop as they will fail with run-time exceptions.
Both of these problems can be solved by using conditional branching of the code at compile time rather than at run time, and by creating two projects, with two separate outputs to achieve platform-specific assemblies that both use a single set of source code files. The latter is an important point since ultimately the goal is to have all modifications to the business logic propagate to both platforms simultaneously without any copy/paste error-prone overhead. Let’s try another approach.
First, create a new desktop Windows project. Delete the code files added by default (the Form1 and Program files). From the project menu select "Add Existing Item..." and browse to the folder of the smart device project created earlier, where the code files reside. Finally, select all the code files only ( *.cs) and add them to the project as links. This is important because if you select the default Add option of the dialog, you will be making copies rather than linking to the files (see Figure 8).

Figure 8** Add Existing Files **
Build the project and notice that you now find at compile time the error that previously was only found at run time (see Figure 9). Of course, in this case there’s no point adding a reference to the device-specific assembly, so this is where I will introduce conditional compilation.
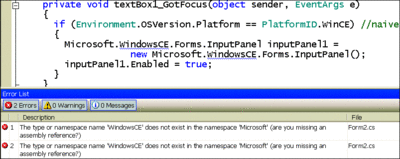
Figure 9** Finding Problems at Compile Time **(Click the image for a larger view)
Go to the desktop project properties and under the Build tab add a new "Conditional compilation symbol" named FULL_FRAME (short for "full framework") as in Figure 10.

Figure 10** Conditional Compilation Constant **(Click the image for a larger view)
Next, fix the compilation error in Form2.cs by using the newly introduced compilation constant. Modify the offending method as follows and then rebuild the desktop project:
private void textBox1_GotFocus(object sender, EventArgs e)
{
#if !FULL_FRAME
    Microsoft.WindowsCE.Forms.InputPanel inputPanel1 =
          new Microsoft.WindowsCE.Forms.InputPanel();
    inputPanel1.Enabled = true;
#endif
}
Now that this (desktop) project builds, you can run it and observe how everything works as expected. If you switch to the device project, note how it warns you that a source file has been changed outside of that instance of Visual Studio and asks if you want to reload it; click on "Yes."
Since this is a separate project using a separate set of conditional compilation constants, the project will compile and run fine on the device—you will not be running the output of this project on the desktop anymore! This means that you can change the runtime conditional introduced earlier when launching the calculator, to a compile-time conditional thus reducing the size of the method.
Now that you’ve seen the mechanics of using conditional compilation, let’s reflect on the benefits. Having two separate projects means you can have a different set of project references in each. You can also include code files in one project and not in the other. On the desktop side, you can take advantage of members of the full framework in order to create a good experience for the desktop user; simply ensure that usage of those desktop members is enclosed in an #if preprocessor directive or is separated out into source files that exist only in the desktop project. There are many examples in which you can use full framework members to enhance the experience on the desktop side, so let’s take a look at one.
In the Program.cs file, modify the Main function as follows:
static void Main()
{
#if FULL_FRAME
  Application.EnableVisualStyles();
#endif
  Application.Run(new Form1());
}
Now run the project and compare the appearance of the original control with the one resulting from the retargetable approach (see Figure 11).
Finally, the astute among you will have observed that the code that shows and hides the cursor will not work on the desktop (even though it produces no compilation or runtime error). Also note that device projects, starting with Visual Studio 2005, have certain conditional compilation constants already defined: PocketPC, Smartphone, Windows CE as appropriate. You can choose to use only those built-in constants or your own, such as the FULL_FRAME that was introduced, or a combination of both—it doesn’t really matter.
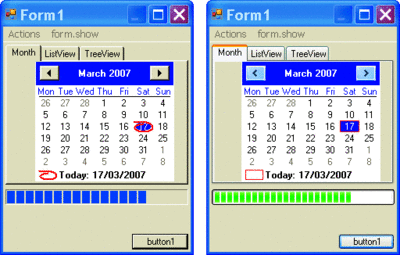
Figure 11** Original and Retargeted Controls **(Click the image for a larger view)
Now that you understand both approaches to sharing code assets cross-platform, it is time to examine some tips and tricks. Some of these apply to the retargetable approach, some to the conditional compilation, and some to both.
Project and Code Files in the Same Directory
When sharing code, I created two separate projects and added as links the source code files of the first to the second. I prefer having all source code files reside in the same directory as the project files, thus making it very easy in Visual Studio Solution Explorer to include or exclude files as appropriate. To achieve this, after creating say the device project, then create a Windows desktop project, and delete the code files as before. Rather than adding any more files, close Visual Studio and navigate to the directory where the desktop project file was created. Cut the project file and paste it in the same directory where the device project file resides. For example, if your device project was at "C:\Temp\", then cut and paste the desktop project file (csproj) into that folder (ensure that desktop and device projects have different names).
Now open the desktop project and "Show All Files" in Solution Explorer. You can see all the device source code files and include in the project whichever you think are applicable—and vice versa if you open the device project (see Figure 12).
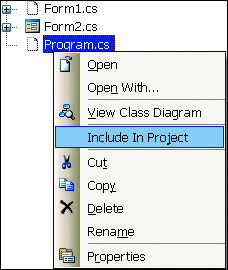
Figure 12** Choosing Files **
With this approach, when adding a new file to one of the projects, it becomes very easy to spot when you open the other project type and it is easier to include the file if you wish.
Note that the project and output assembly names are different, but the namespace and type names should remain the same. If you prefer having the same assembly name for both platforms, then in project properties you need to rename the build folders, for example, binCF and binFF. I also recommend having only one project open at any time as this avoids confusion and it works very well with source control.
Stub It
Many times it is best to avoid littering the code with conditional compilation and instead to add dummy empty stubs of the code that is not applicable on the platform. For example, if you make heavy use of a class throughout the project and that class does not apply on the other platform, you can add the class with the same (but empty) interface. Here’s an example using the InputPanel class:
namespace Microsoft.WindowsCE.Forms
{
    public class InputPanel
    {
        public bool Enabled;
    }
}
Now, wherever the InputPanel is used, the code can stay the same with no conditional branching; it will simply have no effect on the desktop platform.
Platform Invoke
Many .NET Compact Framework applications achieve additional functionality by using P/Invoke services to access functionality residing in native DLLs. Typically the names of those DLLs are different on Windows CE and desktop versions of Windows. There are a couple of ways to cope with that, depending on which of the earlier approaches you chose. If you are using conditional compilation, the code in Figure 13 illustrates how to write cross-platform P/Invoke declarations. The technique in Figure 14 is useful if you have chosen the retargetable approach.
Figure 14 Run-Time P/Invoke Decision
class PInvokesRuntime
{
    [DllImport(“coredll.dll”, EntryPoint = “QueryPerformanceCounter”)]
    internal static extern int QueryPerformanceCounterCE(
        out Int64 perfCounter);

    [DllImport(“kernel32.dll”, EntryPoint = “QueryPerformanceCounter”)]
    internal static extern int QueryPerformanceCounterFull(
        out Int64 perfCounter);

    private void UseIt()
    {
        long p;
        int i;
        if (Environment.OSVersion.Platform == PlatformID.WinCE)
        {
            i = QueryPerformanceCounterCE(out p);
        }
        else
        {
            i = QueryPerformanceCounterFull(out p);
        }
    }
}
Figure 13 Compile-Time P/Invoke Decision
class PInvokesCompileTime
{
#if FULL_FRAME
    private const string DllName = “kernel32.dll”;
#else
    private const string DllName = “coredll.dll”;
#endif

    [DllImport(DllName)]
    internal static extern int QueryPerformanceCounter(
        out Int64 perfCounter);

    private void UseIt()
    {
        long p;
        int i;
        i = QueryPerformanceCounter(out p);
    }
}
Different Framework Implementations
Earlier you saw how System.DateTime.TimeOfDay returns a value of different precision depending on which framework you use. So after testing you can decide how to deal with that in your code if it matters to you. There are other examples where methods behave differently and in particular there are a few cases where methods on one framework throw different exceptions than methods on the other framework, for example:
private void button1_Click(object sender, EventArgs e)
{
    Type t = this.GetType();
    MethodInfo m = t.GetMethod(“DoIt”);
    m.Invoke(this, null); //throws
}

public void DoIt()
{
    throw new InvalidOperationException(“my message”);
}
This code results in an exception on both platforms on the line that invokes the MethodInfo. On the device, the exception thrown is the InvalidOperationException. On the desktop, however, the exception thrown is a TargetInvocationException (that has the original InvalidOperationException set as the InnerException property). Therefore, during testing you should test the exceptional cases as well and ensure that you have a catch block for both Exception types.
Another example of different framework implementations is what you saw earlier with displaying the busy cursor. What works for the device has no effect on the desktop and what is required on the desktop is not supported on the device. If you want consistent behavior across both platforms, you could extract a single method and isolate there the conditional behavior that encapsulates the display of the cursor as follows:
public static class TheCursor
{
    public static void CursorCurrent(Control c, Cursor defaultOrWait)
    {
#if FULL_FRAME
        if (c != null) c.Cursor = defaultOrWait;
#else
        Cursor.Current = defaultOrWait;
#endif
    }
}
Then the calling code can remain the same across both the device and the desktop platforms:
private void button1_Click(object sender, EventArgs e)
{
    TheCursor.CursorCurrent(this, Cursors.WaitCursor);
}

private void button2_Click(object sender, EventArgs e)
{
    TheCursor.CursorCurrent(this, Cursors.Default);
}
Partial Types
Earlier I mentioned that you can include source code files in one project and not in the other if they contain platform-specific functionality. A similar scenario occurs when a class is applicable to both platforms but some members of it are not. Instead of wrapping large sections of the class with a #if directive you can use the partial classes feature introduced with Visual Studio 2005. In other words, split the class across two files using the partial keyword, thus separating out the functionality that is applicable to just one platform into a different file. Then simply do not include that file in the inapplicable project.
System.Diagnostics.Conditional
A tip worth noting is to use the System.Diagnostics.ConditionalAttribute for methods you don’t want to be called at run time. The result of applying the attribute to a method is that any calls to the method will be left out of the compiled binary. The method that has the attribute applied must still be able to compile, of course:
[Conditional(“FULL_FRAME”)]
public void SomeDesktopOnlyMethod()
{
    //TODO code that compiles in both projects
}
If you enclosed the entire method with a #if, you would have to find all places where the method was called and wrap the call with a #if as well. Instead here, you simply apply the attribute to the undesired method and ignore all the call sites; they will not be compiled in the binary.
Deploy to My Computer
If you choose the retargetable approach, you know that you can only find desktop platform errors at run time. The question of how to debug the application on the desktop arises, since a smart device project only deploys to the emulator or physical device. There are a couple of approaches you can take.
The easiest, albeit most tedious approach, is to run the application from the file system and then attach the debugger to it via the Visual Studio Tools | Attach to Process menu (see Figure 15). You can also semiautomate this process by creating a desktop project to act as the launcher. Add the desktop project to the solution with the smart device project, set it as the startup project, and reference the smart device project. Ensure the desktop project has just a single Program file with a single static Main function and from there pass to the Application.Run method a new instance of the startup form of the smart device project.
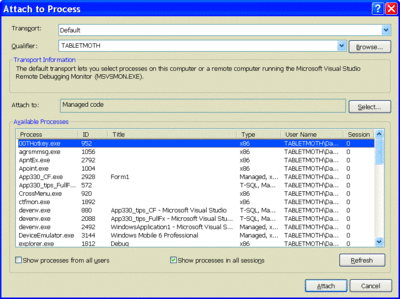
Figure 15** Attach to Process Dialog **(Click the image for a larger view)
It would be ideal if in the deployment options of the smart device project there was a "Deploy to My Computer"choice. In fact, during an early Community Technology Preview of Visual Studio 2005, that option existed (but it was dropped from the final product, and the option is not coming back in the Visual Studio "Orcas" release).
You can re-enable the "Deploy to My Computer" functionality by following the steps described on my blog, but please note that is not recommended or supported by Microsoft.
Use Reflection
If you have chosen the retargetable approach, then you can’t use desktop-only methods since they will not compile in the device project. However, if you really want to, you can invoke such methods using reflection. Revisiting the earlier example where I wanted to enable themes for the application, I could have achieved this as follows:
static void Main()
{
    //Application.EnableVisualStyles();
    if (Environment.OSVersion.Platform != PlatformID.WinCE)
    {
        Type t = typeof(Application);
        MethodInfo m = t.GetMethod(“EnableVisualStyles”);
        m.Invoke(null, null);
    }

    // As before
    Application.Run(new Form1());
}
Extension Methods
While using .NET Compact Framework classes, the occasion often arises that a particular class has members missing compared to the full Framework. Typically, developers have to write the missing functionality themselves and then decide whether to use inheritance if possible to add the missing members or add them to a utility helper class. For example, assume you want to perform a Cut operation on a TextBox in a device project that you are sharing with the desktop. The Cut method is missing from the TextBox class in the .NET Compact Framework. Based on what you’ve learned in this article, you might add a code file to the device project that looks like Figure 16.
Figure 16 TextBoxExtensions
using System;
using System.Windows.Forms;
using Microsoft.WindowsCE.Forms;

static class TextBoxExtensions
{
    const int WM_CUT = 0x0300;
    const int WM_COPY = 0x0301;
    const int WM_PASTE = 0x0302;

    public static void Cut(TextBox t)
    {
        Message msg = Message.Create(
            t.Handle, WM_CUT, IntPtr.Zero, IntPtr.Zero);
        MessageWindow.SendMessage(ref msg);
    }
}
The file in Figure 16 needs no conditionals as it is only present in the device project. You could then write the calling code (that will exist in both projects) as follows:
private void SomeMethod()
{
#if FULL_FRAME
    textBox1.Cut();
#else
    TextBoxExtensions.Cut(textBox1);
#endif
}
There is a new feature called Extension Methods in C# 3.0 and in the upcoming version of Visual Basic. I don’t have space here to fully describe the feature, however, so if you are not familiar with it please visit my blog or see Anson Horton’s article in the June 2007 issue of MSDN® Magazine. The feature is also supported in .NET Compact Framework 3.5 that ships with Visual Studio code-named "Orcas" and it helps address the situation described above.
In the device project add a reference to System.Core.dll and then modify the device-only file by adding the this keyword before the first parameter of the helper method, thus making it an extension method, like so:
public static void Cut(this TextBox t)
With that change in place, the calling code can be the same cross-platform with no conditionals:
private void SomeMethod()
{
  textBox1.Cut();
}
On the desktop, the framework method will be called, and on the device the extension method will be called. If in the future the .NET Compact Framework team adds the method, then the code will seamlessly call the real .NET Framework method (as instance methods take precedence over extension methods), and at some point you can remove the superfluous code file.
Wrapping It Up
In this article I looked at the differences between developing for the desktop and developing for Windows Mobile, concluding that most of the differences are in the Framework libraries rather than anywhere else. I offered examples of two approaches for sharing code assets cross-platform, indicated my preference for the conditional compilation approach, and suggested some handy tips. While I personally recommend that you use this knowledge to share business logic contained in class libraries, you may wish to share your GUI as well, especially if the application is targeting devices such as the Ultra Mobile PC (UMPC) or other touch-screen devices running Windows desktop rather than Windows Mobile.
Daniel Moth works for Microsoft in the Developer and Platform group in the UK. He is a coauthor of Microsoft Mobile Development Handbook (Microsoft Press, 2007).