January 2009
Volume 24 Number 01
Security Briefs - Getting Started With The SDL Threat Modeling Tool
By Adam Shostack | January 2009
Contents
Starting the Threat Modeling Process
Analyzing Threats
Environment Screen
Keeping Track with Reports
Actions Menu
Threat Modeling Meetings
Thinking about Assets
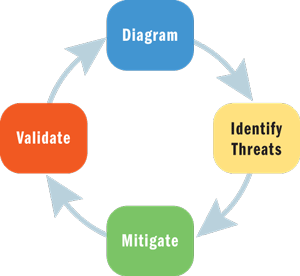
Figure 1 The Threat Modeling Process
In November 2008, Microsoft announced the general availability of the Security Development Lifecycle (SDL) Threat Modeling Tool as a free download from MSDN. This column follows a team through the process of getting started with the SDL threat modeling approach and shows you how to use the new tool to develop great threat models as a backbone of your security process.
This column isn't a primer on SDL threat modeling. For that, see the article I co-authored in the November 2006 issue of MSDN Magazine on using the STRIDE approach, "Threat Modeling: Uncover Security Design Flaws Using the STRIDE Approach." Figure 1 provides a quick overview of the process.
Starting the Threat Modeling Process
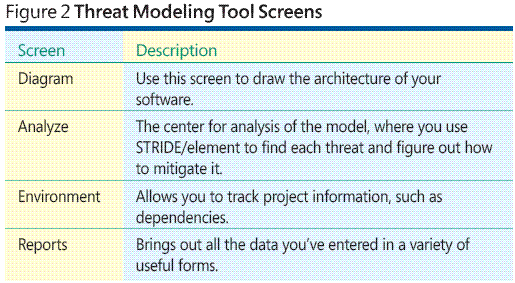
When you launch the SDL Threat Modeling Tool, you'll see that the lower left-hand corner looks quite a bit like Microsoft Office Outlook with four screens: diagram, analyze, environment, and reports (see Figure 2 for details). Note that these screens are slightly different from the outline shown in Figure 1 because it makes sense to consider threats and mitigations together since they are closely related.
In this section, I will follow Deb (a developer), Paul (a program manager), and Tim (a tester) through the process of developing their first threat model, and I'll also discuss each screen of the tool.
"Hi Deb, I've been working on that threat model diagram, and wanted to walk through it with you to make sure we've gotten the details right."
"Sure thing, Paul! Come on in."
Paul brings out a print-out of a diagram that he's already made from the threat model tool's "Diagrams only" report, shown in Figure 3.
"Paul, I haven't seen these diagrams before. It looks pretty simple, but can you walk me through what the different shapes mean?"
"The way this works is Carl, our normal customer persona, is drawn as an outside entity—a rectangle. He's sending commands to our Web server—the circle is any running code, and the arrow gives us the direction of communication. The Web server is consulting a database, which, just as with anywhere we store data, is two parallel lines. The system is called a data flow diagram (DFD). There's a good Wikipedia article on DFDs. The only bit that's not covered there is these trust boundary dotted lines between where different people are in control. For example, you know the IT pros require that we use their Active Directory system for logon information, and so the Active Directory is shown as outside our control."

Figure 3 Paul’s DFD Diagram
When the tool starts, the diagram screen is displayed. This is where Paul used the Visio tools and the provided stencil to draw his DFD (see Figure 4). Even though this was his first time, he was comfortable because the validator on the left gave him feedback, based on his experience using threat modeling as part of the SDL. As he found himself drawing more complexity, he added additional details by right-clicking on the context folder in the upper- right and was able to create a complex, layered diagram.
.gif)
Figure 4 The Diagrams Screen
Analyzing Threats
Paul was a little hesitant when he opened the Analyze screen (see Figure 5). There was a long list of threats there—where did they all come from? The tool had constructed them, using the SDL approach called "STRIDE per element." The idea is that software generally comes under a predictable set of threats (those shown in Figure 5). Some security experts like to chase after the hacker first because the chase itself can be fun. I think it makes sense to start securing your house by making sure each door and window has some sort of lock on it, and only then wondering about an alarm system. So start with STRIDE per element by clicking on any of the lines of the Analyze screen .
.gif)
Figure 5 The Analyze Screen
Paul started out by selecting the database in the list of elements. He read at the top of the screen that "database" is a data store, therefore subject to tampering, information disclosure, and denial of service threats. As he read down, the questions helped him think about how people might tamper with the data, and he realized that no one had specified who was able to connect to the database. A whiteboard diagram and some simple rules revealed the first threat! Score one for threat modeling.
A few minutes of discussion led to a realization that they needed to think about access control and roles. Paul filled in some quick notes in two threats. The first note said "No access control plan." He also filed a work item in their Team Foundation Server (TFS) database. The second note said "Access control plan requires a role list." Paul then went into TFS and created a second bug that was dependent on the first.
As Paul went into information disclosure, he realized that their access control plan required some read-only accounts for audit and report generation. He wondered whether this was a new threat, then decided it wasn't because the mitigation is the same, and he edited the bug in TFS. He then decided to certify the threat as mitigated elsewhere, and wrote "covered in TFS bug #235." He wasn't quite sure whether that was OK, but that's what the certification feature is for (see Figure 6).
.gif)
Figure 6 Certifying That Threats Don’t Apply
He also thought about information disclosure a bit more and realized that the backup tapes were going to need encryption, but that's an operations job. (I'll cover how he tracked that in just a minute, after covering one related feature: the "auto-generate threats for this element" checkbox at the top.)
The auto-generation feature is designed for large teams that have a lot of threat models and that also have a way to ensure that the testers and program managers are all talking about what's in the threat models. So, for this situation, Paul might say that Phil is responsible for several elements that he wants to show for context and how they interact with his features. The auto-generate box is checked by default, but Paul can uncheck it and state that he thinks this is Phil's feature.
Environment Screen
Worried about operations encrypting backup tapes, Paul opened the environment screen and saw a section for external security notes (see Figure 7). There, he made a note that operations was going to have to handle tape backup. He would have to make sure operations had a copy of the tool.
.gif)
Figure 7 External Security Notes
While he was there, he wondered what the document header section was and was relieved to see that there was more guiding text up there, explaining that this was where he identified who owned the threat model, what it was for, and so on. He filled it in and wished that he could include the Contoso project tracking number.
Moving systematically through the elements of the tree, Paul noted that there were dependencies on SQL Server and the Fabrikam Foxy Web Widgets 2.3 widget library. Paul added a note to have Tim investigate, make sure they were up-to-date, and that they were getting security notifications from Fabrikam.
Keeping Track with Reports
There are five threat modeling reports available:
Analysis Report This report is designed for a security advisor or consultant to review a threat model, although anyone can use it to see what diagram validation issues are open, what empty threats haven't been filled out, what threats have no mitigations, what threats have been certified or marked as not generating threats.
Threat Model Report This report contains the information entered into the threat model, presented in a single page view.
Diagrams Only This report is designed to make it easy to print diagrams. Some people like working on paper, but don't need to print entire reports when all they want is the diagram.
Bug Report This report shows the bugs which have been filed from this threat model and their status
Fuzzing Report The fuzzing report uses the architectural information provided in the diagramming step to offer a prioritized list of fuzzing targets. Fuzzing is a testing technique that involves generating random input for a program. It is surprising how good fuzzing can be at making things crash, and many of those crashes are exploitable. (Please see Create a Custom Test Interface Provider for Team System or Fuzz Testing at Microsoft and the Triage Process for more on fuzz testing.)
Actions Menu
There are a couple of useful features tucked away under the Action menu: Thumbnail view, Bug Tracking Settings, and Team Lead Mode. Thumbnail view gives you easy access to the diagrams when you're on other screens. This is useful when you have a complex diagram and you'd like to have it on screen while analyzing your model. It automatically sizes the thumbnail to take up most of the window, keeping the whole diagram in view as you resize.
If you try to file a bug without entering any bug information, the bug tracking dialog will come up to prompt you, but you can bring it up anytime via the actions menu. There's a very simple XML file that you can use to define fields to be filled in, or you can just edit the fields (assuming the "use template" box isn't checked). Bugs automatically get a title of "TM: [threat] affects [element]" and content is pre-filled from the threat and mitigation information. Fields can be deleted by selecting them and hitting the Delete key.
Team Lead Mode displays a new section in the describe environment screen, called Template Settings. This allows a team leader to change the guiding questions and set a default location to save threat models. The team leader can also edit the fields in document header information, adding and removing things to fit the environment.
As he had wanted to do earlier, Paul added the Contoso project tracking number as a new field. Any threat model saved from team lead mode can function as a template. (Actually, any threat model at all can function as a template for additional work.)
Changing the guiding questions involves editing an XML file that starts in the SDL Threat Modeling Tool's \Data folder. The format is quite easy to follow.
Threat Modeling Meetings
When Paul sent his threat model around, Tim, the tester, was pretty underwhelmed. All sorts of things popped out at him, and he asked Paul: "You program managers always assume everything is going to work, huh?"
It may surprise you to know that testers and their skepticism can function as a great complement to threat models. As a result, many teams ask their testers to lead the threat modeling process. In this scenario, after Tim took over the threat model, he called for two threat modeling meetings: one meeting to synchronize on the process and walk through the diagrams and then a second meeting for threat review and sign-off.
In the first meeting, Tim spent 10 minutes walking everyone through the SDL threat modeling process. He then pulled up the threat model diagram and started explaining it in detail. Within five minutes, an important missing component had been identified.
A few minutes later, Tim and Paul got into an extended discussion of how the Web server was actually built. It was not the ideal way for a meeting to proceed, but everyone eventually agreed that discovering the discrepancy early was going to save them a great deal of time later on.
In the second meeting, the team walked through the threats, discussed some ways to address them, and signed off on the threat model. They checked the document into source control and continued with development.
Thinking about Assets
Some readers who have threat modeled may notice that we haven't talked about assets at all. We've discovered that many software engineers understand their software better than they understand the concept of assets and what assets an attacker may be interested in.
If you're going to threat model a house, you might start by thinking about your family or irreplaceable photos or valuable artwork. Perhaps you might start by thinking about who might break in and the current security system. Or you might start by considering the physical features, like the pool or the front porch. These are analogous to thinking about assets, attackers, or software design. Any of these three approaches will work.
The approach to threat modeling we've presented here is substantially simpler than what Microsoft has done in the past. The Microsoft SDL team has found that the software design approach works really well for a lot of teams. We hope that will include yours.
Send your questions and comments to briefs@microsoft.com.
Adam Shostack is a Program Manager on the Security Development Lifecycle (SDL) team at Microsoft. He is responsible for the threat modeling component of the SDL.