Use JavaScript Services to Create Single Page Applications in ASP.NET Core
By Fiyaz Hasan
Warning
The features described in this article are obsolete as of ASP.NET Core 3.0. A simpler SPA frameworks integration mechanism is available in the Microsoft.AspNetCore.SpaServices.Extensions NuGet package. For more information, see [Announcement] Obsoleting Microsoft.AspNetCore.SpaServices and Microsoft.AspNetCore.NodeServices.
A Single Page Application (SPA) is a popular type of web application due to its inherent rich user experience. Integrating client-side SPA frameworks or libraries, such as Angular or React, with server-side frameworks such as ASP.NET Core can be difficult. JavaScript Services was developed to reduce friction in the integration process. It enables seamless operation between the different client and server technology stacks.
What is JavaScript Services
JavaScript Services is a collection of client-side technologies for ASP.NET Core. Its goal is to position ASP.NET Core as developers' preferred server-side platform for building SPAs.
JavaScript Services consists of two distinct NuGet packages:
- Microsoft.AspNetCore.NodeServices (NodeServices)
- Microsoft.AspNetCore.SpaServices (SpaServices)
These packages are useful in the following scenarios:
- Run JavaScript on the server
- Use a SPA framework or library
- Build client-side assets with Webpack
Much of the focus in this article is placed on using the SpaServices package.
What is SpaServices
SpaServices was created to position ASP.NET Core as developers' preferred server-side platform for building SPAs. SpaServices isn't required to develop SPAs with ASP.NET Core, and it doesn't lock developers into a particular client framework.
SpaServices provides useful infrastructure such as:
Collectively, these infrastructure components enhance both the development workflow and the runtime experience. The components can be adopted individually.
Prerequisites for using SpaServices
To work with SpaServices, install the following:
Node.js (version 6 or later) with npm
To verify these components are installed and can be found, run the following from the command line:
node -v && npm -vIf deploying to an Azure web site, no action is required—Node.js is installed and available in the server environments.
-
- On Windows using Visual Studio 2017, the SDK is installed by selecting the .NET Core cross-platform development workload.
Microsoft.AspNetCore.SpaServices NuGet package
Server-side prerendering
A universal (also known as isomorphic) application is a JavaScript application capable of running both on the server and the client. Angular, React, and other popular frameworks provide a universal platform for this application development style. The idea is to first render the framework components on the server via Node.js, and then delegate further execution to the client.
ASP.NET Core Tag Helpers provided by SpaServices simplify the implementation of server-side prerendering by invoking the JavaScript functions on the server.
Server-side prerendering prerequisites
Install the aspnet-prerendering npm package:
npm i -S aspnet-prerendering
Server-side prerendering configuration
The Tag Helpers are made discoverable via namespace registration in the project's _ViewImports.cshtml file:
@using SpaServicesSampleApp
@addTagHelper "*, Microsoft.AspNetCore.Mvc.TagHelpers"
@addTagHelper "*, Microsoft.AspNetCore.SpaServices"
These Tag Helpers abstract away the intricacies of communicating directly with low-level APIs by leveraging an HTML-like syntax inside the Razor view:
<app asp-prerender-module="ClientApp/dist/main-server">Loading...</app>
asp-prerender-module Tag Helper
The asp-prerender-module Tag Helper, used in the preceding code example, executes ClientApp/dist/main-server.js on the server via Node.js. For clarity's sake, main-server.js file is an artifact of the TypeScript-to-JavaScript transpilation task in the Webpack build process. Webpack defines an entry point alias of main-server; and, traversal of the dependency graph for this alias begins at the ClientApp/boot-server.ts file:
entry: { 'main-server': './ClientApp/boot-server.ts' },
In the following Angular example, the ClientApp/boot-server.ts file utilizes the createServerRenderer function and RenderResult type of the aspnet-prerendering npm package to configure server rendering via Node.js. The HTML markup destined for server-side rendering is passed to a resolve function call, which is wrapped in a strongly-typed JavaScript Promise object. The Promise object's significance is that it asynchronously supplies the HTML markup to the page for injection in the DOM's placeholder element.
import { createServerRenderer, RenderResult } from 'aspnet-prerendering';

export default createServerRenderer(params => {
    const providers = [
        { provide: INITIAL_CONFIG, useValue: { document: '<app></app>', url: params.url } },
        { provide: 'ORIGIN_URL', useValue: params.origin }
    ];

    return platformDynamicServer(providers).bootstrapModule(AppModule).then(moduleRef => {
        const appRef = moduleRef.injector.get(ApplicationRef);
        const state = moduleRef.injector.get(PlatformState);
        const zone = moduleRef.injector.get(NgZone);

        return new Promise<RenderResult>((resolve, reject) => {
            zone.onError.subscribe(errorInfo => reject(errorInfo));
            appRef.isStable.first(isStable => isStable).subscribe(() => {
                // Because 'onStable' fires before 'onError', we have to delay slightly before
                // completing the request in case there's an error to report
                setImmediate(() => {
                    resolve({
                        html: state.renderToString()
                    });
                    moduleRef.destroy();
                });
            });
        });
    });
});
asp-prerender-data Tag Helper
When coupled with the asp-prerender-module Tag Helper, the asp-prerender-data Tag Helper can be used to pass contextual information from the Razor view to the server-side JavaScript. For example, the following markup passes user data to the main-server module:
<app asp-prerender-module="ClientApp/dist/main-server"
        asp-prerender-data='new {
            UserName = "John Doe"
        }'>Loading...</app>
The received UserName argument is serialized using the built-in JSON serializer and is stored in the params.data object. In the following Angular example, the data is used to construct a personalized greeting within an h1 element:
import { createServerRenderer, RenderResult } from 'aspnet-prerendering';

export default createServerRenderer(params => {
    const providers = [
        { provide: INITIAL_CONFIG, useValue: { document: '<app></app>', url: params.url } },
        { provide: 'ORIGIN_URL', useValue: params.origin }
    ];

    return platformDynamicServer(providers).bootstrapModule(AppModule).then(moduleRef => {
        const appRef = moduleRef.injector.get(ApplicationRef);
        const state = moduleRef.injector.get(PlatformState);
        const zone = moduleRef.injector.get(NgZone);

        return new Promise<RenderResult>((resolve, reject) => {
            const result = `<h1>Hello, ${params.data.userName}</h1>`;

            zone.onError.subscribe(errorInfo => reject(errorInfo));
            appRef.isStable.first(isStable => isStable).subscribe(() => {
                // Because 'onStable' fires before 'onError', we have to delay slightly before
                // completing the request in case there's an error to report
                setImmediate(() => {
                    resolve({
                        html: result
                    });
                    moduleRef.destroy();
                });
            });
        });
    });
});
Property names passed in Tag Helpers are represented with PascalCase notation. Contrast that to JavaScript, where the same property names are represented with camelCase. The default JSON serialization configuration is responsible for this difference.
To expand upon the preceding code example, data can be passed from the server to the view by hydrating the globals property provided to the resolve function:
import { createServerRenderer, RenderResult } from 'aspnet-prerendering';

export default createServerRenderer(params => {
    const providers = [
        { provide: INITIAL_CONFIG, useValue: { document: '<app></app>', url: params.url } },
        { provide: 'ORIGIN_URL', useValue: params.origin }
    ];

    return platformDynamicServer(providers).bootstrapModule(AppModule).then(moduleRef => {
        const appRef = moduleRef.injector.get(ApplicationRef);
        const state = moduleRef.injector.get(PlatformState);
        const zone = moduleRef.injector.get(NgZone);

        return new Promise<RenderResult>((resolve, reject) => {
            const result = `<h1>Hello, ${params.data.userName}</h1>`;

            zone.onError.subscribe(errorInfo => reject(errorInfo));
            appRef.isStable.first(isStable => isStable).subscribe(() => {
                // Because 'onStable' fires before 'onError', we have to delay slightly before
                // completing the request in case there's an error to report
                setImmediate(() => {
                    resolve({
                        html: result,
                        globals: {
                            postList: [
                                'Introduction to ASP.NET Core',
                                'Making apps with Angular and ASP.NET Core'
                            ]
                        }
                    });
                    moduleRef.destroy();
                });
            });
        });
    });
});
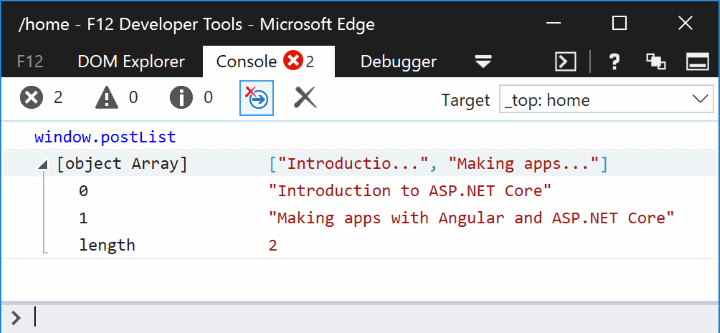
The postList array defined inside the globals object is attached to the browser's global window object. This variable hoisting to global scope eliminates duplication of effort, particularly as it pertains to loading the same data once on the server and again on the client.
Webpack Dev Middleware
Webpack Dev Middleware introduces a streamlined development workflow whereby Webpack builds resources on demand. The middleware automatically compiles and serves client-side resources when a page is reloaded in the browser. The alternate approach is to manually invoke Webpack via the project's npm build script when a third-party dependency or the custom code changes. An npm build script in the package.json file is shown in the following example:
"build": "npm run build:vendor && npm run build:custom",
Webpack Dev Middleware prerequisites
Install the aspnet-webpack npm package:
npm i -D aspnet-webpack
Webpack Dev Middleware configuration
Webpack Dev Middleware is registered into the HTTP request pipeline via the following code in the Startup.cs file's Configure method:
if (env.IsDevelopment())
{
    app.UseDeveloperExceptionPage();
    app.UseWebpackDevMiddleware();
}
else
{
    app.UseExceptionHandler("/Home/Error");
}

// Call UseWebpackDevMiddleware before UseStaticFiles
app.UseStaticFiles();
The UseWebpackDevMiddleware extension method must be called before registering static file hosting via the UseStaticFiles extension method. For security reasons, register the middleware only when the app runs in development mode.
The webpack.config.js file's output.publicPath property tells the middleware to watch the dist folder for changes:
module.exports = (env) => {
        output: {
            filename: '[name].js',
            publicPath: '/dist/' // Webpack dev middleware, if enabled, handles requests for this URL prefix
        },
Hot Module Replacement
Think of Webpack's Hot Module Replacement (HMR) feature as an evolution of Webpack Dev Middleware. HMR introduces all the same benefits, but it further streamlines the development workflow by automatically updating page content after compiling the changes. Don't confuse this with a refresh of the browser, which would interfere with the current in-memory state and debugging session of the SPA. There's a live link between the Webpack Dev Middleware service and the browser, which means changes are pushed to the browser.
Hot Module Replacement prerequisites
Install the webpack-hot-middleware npm package:
npm i -D webpack-hot-middleware
Hot Module Replacement configuration
The HMR component must be registered into MVC's HTTP request pipeline in the Configure method:
app.UseWebpackDevMiddleware(new WebpackDevMiddlewareOptions {
    HotModuleReplacement = true
});
As was true with Webpack Dev Middleware, the UseWebpackDevMiddleware extension method must be called before the UseStaticFiles extension method. For security reasons, register the middleware only when the app runs in development mode.
The webpack.config.js file must define a plugins array, even if it's left empty:
module.exports = (env) => {
        plugins: [new CheckerPlugin()]
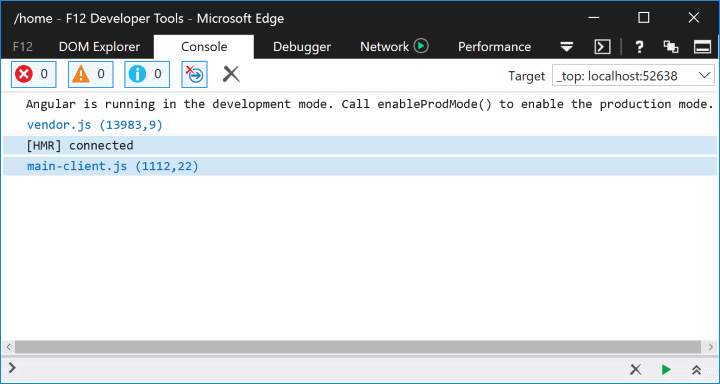
After loading the app in the browser, the developer tools' Console tab provides confirmation of HMR activation:
Routing helpers
In most ASP.NET Core-based SPAs, client-side routing is often desired in addition to server-side routing. The SPA and MVC routing systems can work independently without interference. There's, however, one edge case posing challenges: identifying 404 HTTP responses.
Consider the scenario in which an extensionless route of /some/page is used. Assume the request doesn't pattern-match a server-side route, but its pattern does match a client-side route. Now consider an incoming request for /images/user-512.png, which generally expects to find an image file on the server. If that requested resource path doesn't match any server-side route or static file, it's unlikely that the client-side application would handle it—generally returning a 404 HTTP status code is desired.
Routing helpers prerequisites
Install the client-side routing npm package. Using Angular as an example:
npm i -S @angular/router
Routing helpers configuration
An extension method named MapSpaFallbackRoute is used in the Configure method:
app.UseMvc(routes =>
{
    routes.MapRoute(
        name: "default",
        template: "{controller=Home}/{action=Index}/{id?}");

    routes.MapSpaFallbackRoute(
        name: "spa-fallback",
        defaults: new { controller = "Home", action = "Index" });
});
Routes are evaluated in the order in which they're configured. Consequently, the default route in the preceding code example is used first for pattern matching.
Create a new project
JavaScript Services provide pre-configured application templates. SpaServices is used in these templates in conjunction with different frameworks and libraries such as Angular, React, and Redux.
These templates can be installed via the .NET Core CLI by running the following command:
dotnet new --install Microsoft.AspNetCore.SpaTemplates::*
A list of available SPA templates is displayed:
| Templates | Short Name | Language | Tags |
|---|---|---|---|
| MVC ASP.NET Core with Angular | angular | [C#] | Web/MVC/SPA |
| MVC ASP.NET Core with React.js | react | [C#] | Web/MVC/SPA |
| MVC ASP.NET Core with React.js and Redux | reactredux | [C#] | Web/MVC/SPA |
To create a new project using one of the SPA templates, include the Short Name of the template in the dotnet new command. The following command creates an Angular application with ASP.NET Core MVC configured for the server side:
dotnet new angular
Set the runtime configuration mode
Two primary runtime configuration modes exist:
- Development:
- Includes source maps to ease debugging.
- Doesn't optimize the client-side code for performance.
- Production:
- Excludes source maps.
- Optimizes the client-side code via bundling and minification.
ASP.NET Core uses an environment variable named ASPNETCORE_ENVIRONMENT to store the configuration mode. For more information, see Set the environment.
Run with .NET Core CLI
Restore the required NuGet and npm packages by running the following command at the project root:
dotnet restore && npm i
Build and run the application:
dotnet run
The application starts on localhost according to the runtime configuration mode. Navigating to http://localhost:5000 in the browser displays the landing page.
Run with Visual Studio 2017
Open the .csproj file generated by the dotnet new command. The required NuGet and npm packages are restored automatically upon project open. This restoration process may take up to a few minutes, and the application is ready to run when it completes. Click the green run button or press Ctrl + F5, and the browser opens to the application's landing page. The application runs on localhost according to the runtime configuration mode.
Test the app
SpaServices templates are pre-configured to run client-side tests using Karma and Jasmine. Jasmine is a popular unit testing framework for JavaScript, whereas Karma is a test runner for those tests. Karma is configured to work with the Webpack Dev Middleware such that the developer isn't required to stop and run the test every time changes are made. Whether it's the code running against the test case or the test case itself, the test runs automatically.
Using the Angular application as an example, two Jasmine test cases are already provided for the CounterComponent in the counter.component.spec.ts file:
it('should display a title', async(() => {
    const titleText = fixture.nativeElement.querySelector('h1').textContent;
    expect(titleText).toEqual('Counter');
}));

it('should start with count 0, then increments by 1 when clicked', async(() => {
    const countElement = fixture.nativeElement.querySelector('strong');
    expect(countElement.textContent).toEqual('0');

    const incrementButton = fixture.nativeElement.querySelector('button');
    incrementButton.click();
    fixture.detectChanges();
    expect(countElement.textContent).toEqual('1');
}));
Open the command prompt in the ClientApp directory. Run the following command:
npm test
The script launches the Karma test runner, which reads the settings defined in the karma.conf.js file. Among other settings, the karma.conf.js identifies the test files to be executed via its files array:
module.exports = function (config) {
    config.set({
        files: [
            '../../wwwroot/dist/vendor.js',
            './boot-tests.ts'
        ],
Publish the app
See this GitHub issue for more information on publishing to Azure.
Combining the generated client-side assets and the published ASP.NET Core artifacts into a ready-to-deploy package can be cumbersome. Thankfully, SpaServices orchestrates that entire publication process with a custom MSBuild target named RunWebpack:
<Target Name="RunWebpack" AfterTargets="ComputeFilesToPublish">
  <!-- As part of publishing, ensure the JS resources are freshly built in production mode -->
  <Exec Command="npm install" />
  <Exec Command="node node_modules/webpack/bin/webpack.js --config webpack.config.vendor.js --env.prod" />
  <Exec Command="node node_modules/webpack/bin/webpack.js --env.prod" />

  <!-- Include the newly-built files in the publish output -->
  <ItemGroup>
    <DistFiles Include="wwwroot\dist\**; ClientApp\dist\**" />
    <ResolvedFileToPublish Include="@(DistFiles->'%(FullPath)')" Exclude="@(ResolvedFileToPublish)">
      <RelativePath>%(DistFiles.Identity)</RelativePath>
      <CopyToPublishDirectory>PreserveNewest</CopyToPublishDirectory>
    </ResolvedFileToPublish>
  </ItemGroup>
</Target>
The MSBuild target has the following responsibilities:
- Restore the npm packages.
- Create a production-grade build of the third-party, client-side assets.
- Create a production-grade build of the custom client-side assets.
- Copy the Webpack-generated assets to the publish folder.
The MSBuild target is invoked when running:
dotnet publish -c Release
Additional resources
ASP.NET Core
Feedback
Coming soon: Throughout 2024 we will be phasing out GitHub Issues as the feedback mechanism for content and replacing it with a new feedback system. For more information see: https://aka.ms/ContentUserFeedback.
Submit and view feedback for