Use multiple environments in ASP.NET Core
By Rick Anderson and Kirk Larkin
ASP.NET Core configures app behavior based on the runtime environment using an environment variable.
Environments
To determine the runtime environment, ASP.NET Core reads from the following environment variables:
- DOTNET_ENVIRONMENT
ASPNETCORE_ENVIRONMENTwhen the WebApplication.CreateBuilder method is called. The default ASP.NET Core web app templates callWebApplication.CreateBuilder. TheASPNETCORE_ENVIRONMENTvalue overridesDOTNET_ENVIRONMENT.
To determine the runtime environment, ASP.NET Core reads from the following environment variables:
- DOTNET_ENVIRONMENT
ASPNETCORE_ENVIRONMENTwhen the WebApplication.CreateBuilder method is called. The default ASP.NET Core web app templates callWebApplication.CreateBuilder. TheDOTNET_ENVIRONMENTvalue overridesASPNETCORE_ENVIRONMENTwhenWebApplicationBuilderis used. For other hosts, such asConfigureWebHostDefaultsandWebHost.CreateDefaultBuilder,ASPNETCORE_ENVIRONMENThas higher precedence.
IHostEnvironment.EnvironmentName can be set to any value, but the following values are provided by the framework:
- Development: The launchSettings.json file sets
ASPNETCORE_ENVIRONMENTtoDevelopmenton the local machine. - Staging
- Production: The default if
DOTNET_ENVIRONMENTandASPNETCORE_ENVIRONMENThave not been set.
The following code:
- Is similar to the code generated by the ASP.NET Core templates.
- Enables the Developer Exception Page when
ASPNETCORE_ENVIRONMENTis set toDevelopment. This is done automatically by the WebApplication.CreateBuilder method. - Calls UseExceptionHandler when the value of
ASPNETCORE_ENVIRONMENTis anything other thanDevelopment. - Provides an IWebHostEnvironment instance in the Environment property of
WebApplication.
var builder = WebApplication.CreateBuilder(args);

// Add services to the container.
builder.Services.AddRazorPages();

var app = builder.Build();

// Configure the HTTP request pipeline.
if (!app.Environment.IsDevelopment())
{
    app.UseExceptionHandler("/Error");
    // The default HSTS value is 30 days. You may want to change this for production scenarios, see https://aka.ms/aspnetcore-hsts.
    app.UseHsts();
}

app.UseHttpsRedirection();
app.UseStaticFiles();

app.UseRouting();

app.UseAuthorization();

app.MapRazorPages();

app.Run();
The Environment Tag Helper uses the value of IHostEnvironment.EnvironmentName to include or exclude markup in the element:
<environment include="Development">
    <div>Environment is Development</div>
</environment>
<environment exclude="Development">
    <div>Environment is NOT Development</div>
</environment>
<environment include="Staging,Development,Staging_2">
    <div>Environment is: Staging, Development or Staging_2</div>
</environment>
The About page from the sample code includes the preceding markup and displays the value of IWebHostEnvironment.EnvironmentName.
On Windows and macOS, environment variables and values aren't case-sensitive. Linux environment variables and values are case-sensitive by default.
Create EnvironmentsSample
The sample code used in this article is based on a Razor Pages project named EnvironmentsSample.
The following .NET CLI commands create and run a web app named EnvironmentsSample:
dotnet new webapp -o EnvironmentsSample
cd EnvironmentsSample
dotnet run --verbosity normal
When the app runs, it displays output similar to the following:
info: Microsoft.Hosting.Lifetime[14]
      Now listening on: https://localhost:7152
info: Microsoft.Hosting.Lifetime[14]
      Now listening on: http://localhost:5105
info: Microsoft.Hosting.Lifetime[0]
      Application started. Press Ctrl+C to shut down.
info: Microsoft.Hosting.Lifetime[0]
      Hosting environment: Development
info: Microsoft.Hosting.Lifetime[0]
      Content root path: C:\Path\To\EnvironmentsSample
Set environment on the command line
Use the --environment flag to set the environment. For example:
dotnet run --environment Production
The preceding command sets the environment to Production and displays output similar to the following in the command window:
info: Microsoft.Hosting.Lifetime[14]
      Now listening on: https://localhost:7262
info: Microsoft.Hosting.Lifetime[14]
      Now listening on: http://localhost:5005
info: Microsoft.Hosting.Lifetime[0]
      Application started. Press Ctrl+C to shut down.
info: Microsoft.Hosting.Lifetime[0]
      Hosting environment: Production
info: Microsoft.Hosting.Lifetime[0]
      Content root path: C:\Path\To\EnvironmentsSample
Development and launchSettings.json
The development environment can enable features that shouldn't be exposed in production. For example, the ASP.NET Core project templates enable the Developer Exception Page in the development environment. Because of the performance cost, scope validation and dependency validation only happens in development.
The environment for local machine development can be set in the Properties\launchSettings.json file of the project. Environment values set in launchSettings.json override values set in the system environment.
The launchSettings.json file:
- Is only used on the local development machine.
- Is not deployed.
- Contains profile settings.
The following JSON shows the launchSettings.json file for an ASP.NET Core web project named EnvironmentsSample created with Visual Studio or dotnet new:
{
  "iisSettings": {
    "windowsAuthentication": false,
    "anonymousAuthentication": true,
    "iisExpress": {
      "applicationUrl": "http://localhost:59481",
      "sslPort": 44308
    }
  },
  "profiles": {
    "EnvironmentsSample": {
      "commandName": "Project",
      "dotnetRunMessages": true,
      "launchBrowser": true,
      "applicationUrl": "https://localhost:7152;http://localhost:5105",
      "environmentVariables": {
        "ASPNETCORE_ENVIRONMENT": "Development"
      }
    },
    "IIS Express": {
      "commandName": "IISExpress",
      "launchBrowser": true,
      "environmentVariables": {
        "ASPNETCORE_ENVIRONMENT": "Development"
      }
    }
  }
}
The preceding JSON contains two profiles:
EnvironmentsSample: The profile name is the project name. As the first profile listed, this profile is used by default. The"commandName"key has the value"Project", therefore, the Kestrel web server is launched.IIS Express: The"commandName"key has the value"IISExpress", therefore, IISExpress is the web server.
You can set the launch profile to the project or any other profile included in launchSettings.json. For example, in the image below, selecting the project name launches the Kestrel web server.

The value of commandName can specify the web server to launch. commandName can be any one of the following:
IISExpress: Launches IIS Express.IIS: No web server launched. IIS is expected to be available.Project: Launches Kestrel.
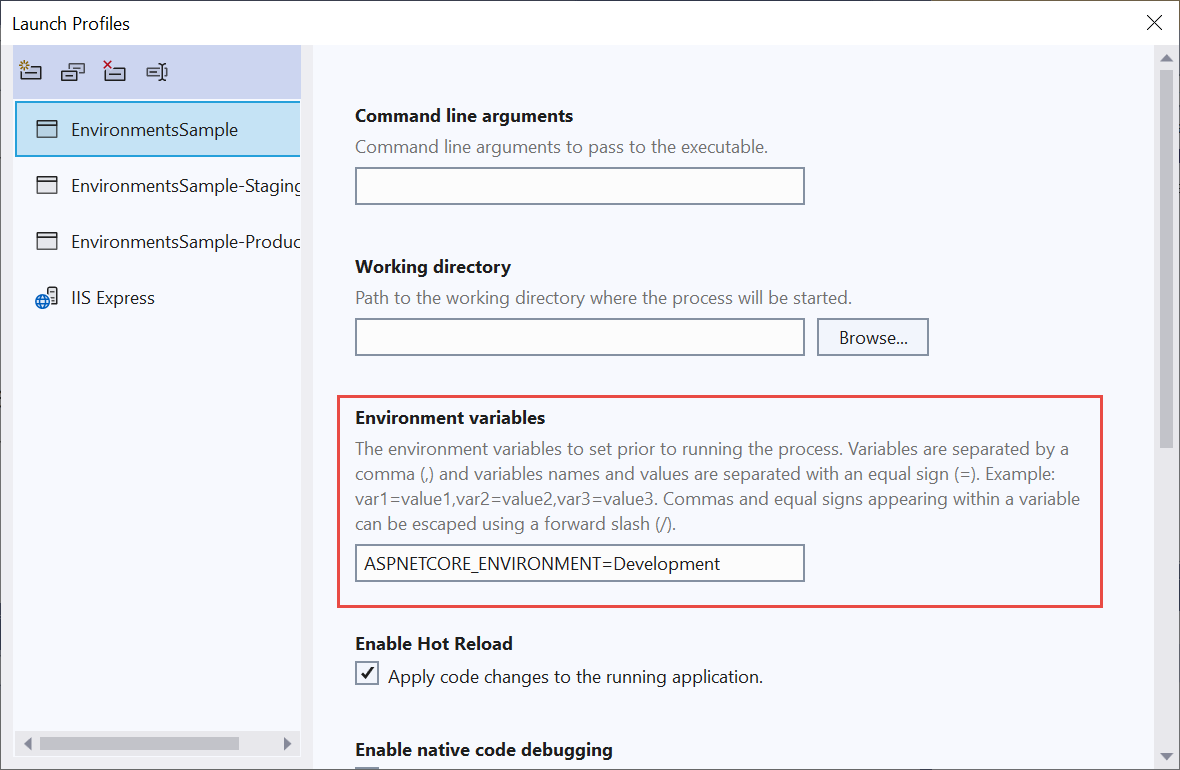
The Visual Studio 2022 project properties Debug / General tab provides an Open debug launch profiles UI link. This link opens a Launch Profiles dialog that lets you edit the environment variable settings in the launchSettings.json file. You can also open the Launch Profiles dialog from the Debug menu by selecting <project name> Debug Properties. Changes made to project profiles may not take effect until the web server is restarted. Kestrel must be restarted before it can detect changes made to its environment.
The following launchSettings.json file contains multiple profiles:
{
  "iisSettings": {
    "windowsAuthentication": false,
    "anonymousAuthentication": true,
    "iisExpress": {
      "applicationUrl": "http://localhost:59481",
      "sslPort": 44308
    }
  },
  "profiles": {
    "EnvironmentsSample": {
      "commandName": "Project",
      "dotnetRunMessages": true,
      "launchBrowser": true,
      "applicationUrl": "https://localhost:7152;http://localhost:5105",
      "environmentVariables": {
        "ASPNETCORE_ENVIRONMENT": "Development"
      }
    },
    "EnvironmentsSample-Staging": {
      "commandName": "Project",
      "dotnetRunMessages": true,
      "launchBrowser": true,
      "applicationUrl": "https://localhost:7152;http://localhost:5105",
      "environmentVariables": {
        "ASPNETCORE_ENVIRONMENT": "Staging",
        "ASPNETCORE_DETAILEDERRORS": "1",
        "ASPNETCORE_SHUTDOWNTIMEOUTSECONDS": "3"
      }
    },
    "EnvironmentsSample-Production": {
      "commandName": "Project",
      "dotnetRunMessages": true,
      "launchBrowser": true,
      "applicationUrl": "https://localhost:7152;http://localhost:5105",
      "environmentVariables": {
        "ASPNETCORE_ENVIRONMENT": "Production"
      }
    },
    "IIS Express": {
      "commandName": "IISExpress",
      "launchBrowser": true,
      "environmentVariables": {
        "ASPNETCORE_ENVIRONMENT": "Development"
      }
    }
  }
}
Profiles can be selected:
From the Visual Studio UI.
Using the
dotnet runCLI command with the--launch-profileoption set to the profile's name. This approach only supports Kestrel profiles.dotnet run --launch-profile "EnvironmentsSample"
Warning
launchSettings.json shouldn't store secrets. The Secret Manager tool can be used to store secrets for local development.
When using Visual Studio Code, environment variables can be set in the .vscode/launch.json file. The following example sets several environment variables for Host configuration values:
{
    "version": "0.2.0",
    "configurations": [
        {
            "name": ".NET Core Launch (web)",
            "type": "coreclr",
            // Configuration ommitted for brevity.
            "env": {
                "ASPNETCORE_ENVIRONMENT": "Development",
                "ASPNETCORE_URLS": "https://localhost:5001",
                "ASPNETCORE_DETAILEDERRORS": "1",
                "ASPNETCORE_SHUTDOWNTIMEOUTSECONDS": "3"
            },
            // Configuration ommitted for brevity.
The .vscode/launch.json file is used only by Visual Studio Code.
Production
The production environment should be configured to maximize security, performance, and application robustness. Some common settings that differ from development include:
- Caching.
- Client-side resources are bundled, minified, and potentially served from a CDN.
- Diagnostic error pages disabled.
- Friendly error pages enabled.
- Production logging and monitoring enabled. For example, using Application Insights.
Set the environment by setting an environment variable
It's often useful to set a specific environment for testing with an environment variable or platform setting. If the environment isn't set, it defaults to Production, which disables most debugging features. The method for setting the environment depends on the operating system.
When the host is built, the last environment setting read by the app determines the app's environment. The app's environment can't be changed while the app is running.
The About page from the sample code displays the value of IWebHostEnvironment.EnvironmentName.
Azure App Service
Production is the default value if DOTNET_ENVIRONMENT and ASPNETCORE_ENVIRONMENT have not been set. Apps deployed to Azure are Production by default.
To set the environment in an Azure App Service app by using the portal:
- Select the app from the App Services page.
- In the Settings group, select Configuration.
- In the Application settings tab, select New application setting.
- In the Add/Edit application setting window, provide
ASPNETCORE_ENVIRONMENTfor the Name. For Value, provide the environment (for example,Staging). - Select the Deployment slot setting checkbox if you wish the environment setting to remain with the current slot when deployment slots are swapped. For more information, see Set up staging environments in Azure App Service in the Azure documentation.
- Select OK to close the Add/Edit application setting dialog.
- Select Save at the top of the Configuration page.
Azure App Service automatically restarts the app after an app setting is added, changed, or deleted in the Azure portal.
Windows - Set environment variable for a process
Environment values in launchSettings.json override values set in the system environment.
To set the ASPNETCORE_ENVIRONMENT for the current session when the app is started using dotnet run, use the following commands at a command prompt or in PowerShell:
set ASPNETCORE_ENVIRONMENT=Staging
dotnet run --no-launch-profile
$Env:ASPNETCORE_ENVIRONMENT = "Staging"
dotnet run --no-launch-profile
Windows - Set environment variable globally
The preceding commands set ASPNETCORE_ENVIRONMENT only for processes launched from that command window.
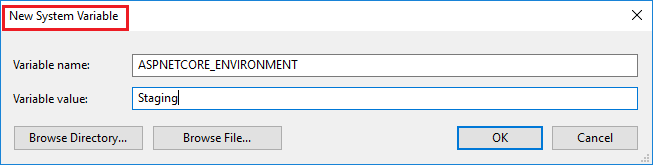
To set the value globally in Windows, use either of the following approaches:
Open the Control Panel > System > Advanced system settings and add or edit the
ASPNETCORE_ENVIRONMENTvalue: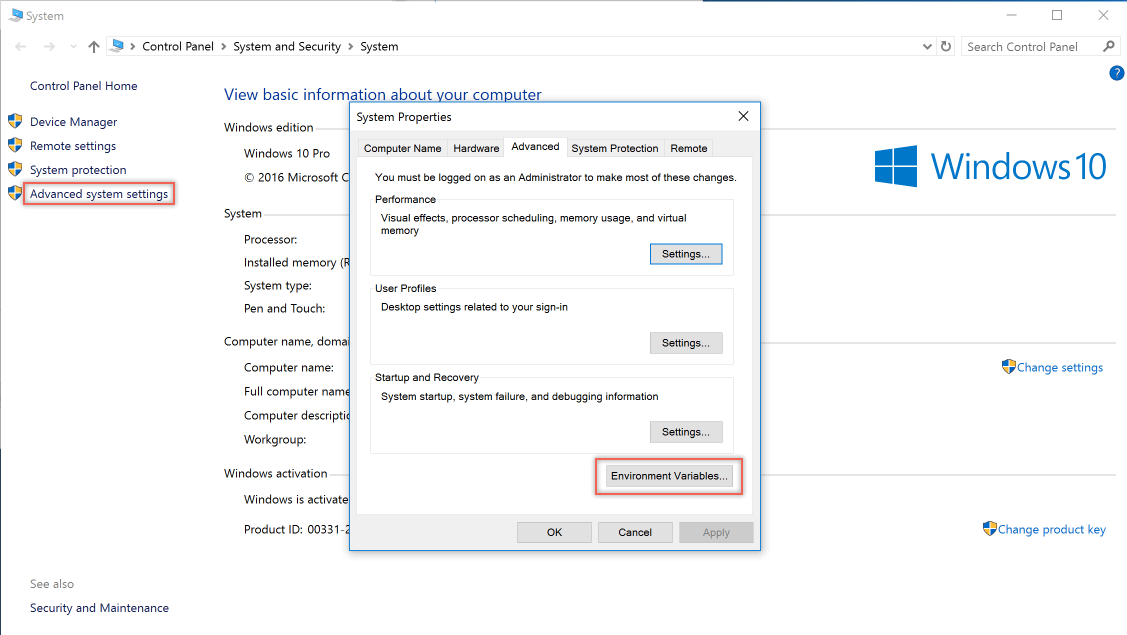
Open an administrative command prompt and use the
setxcommand or open an administrative PowerShell command prompt and use[Environment]::SetEnvironmentVariable:-
setx ASPNETCORE_ENVIRONMENT Staging /MThe
/Mswitch sets the environment variable at the system level. If the/Mswitch isn't used, the environment variable is set for the user account. -
[Environment]::SetEnvironmentVariable("ASPNETCORE_ENVIRONMENT", "Staging", "Machine")The
Machineoption sets the environment variable at the system level. If the option value is changed toUser, the environment variable is set for the user account.
-
When the ASPNETCORE_ENVIRONMENT environment variable is set globally, it takes effect for dotnet run in any command window opened after the value is set. Environment values in launchSettings.json override values set in the system environment.
Windows - Use web.config
To set the ASPNETCORE_ENVIRONMENT environment variable with web.config, see the Set environment variables section of web.config file.
Windows - IIS deployments
Include the <EnvironmentName> property in the publish profile (.pubxml) or project file. This approach sets the environment in web.config when the project is published:
<PropertyGroup>
  <EnvironmentName>Development</EnvironmentName>
</PropertyGroup>
To set the ASPNETCORE_ENVIRONMENT environment variable for an app running in an isolated Application Pool (supported on IIS 10.0 or later), see the AppCmd.exe command section of Environment Variables <environmentVariables>. When the ASPNETCORE_ENVIRONMENT environment variable is set for an app pool, its value overrides a setting at the system level.
When hosting an app in IIS and adding or changing the ASPNETCORE_ENVIRONMENT environment variable, use one of the following approaches to have the new value picked up by apps:
- Execute
net stop was /yfollowed bynet start w3svcfrom a command prompt. - Restart the server.
macOS
Setting the current environment for macOS can be performed in-line when running the app:
ASPNETCORE_ENVIRONMENT=Staging dotnet run
Alternatively, set the environment with export prior to running the app:
export ASPNETCORE_ENVIRONMENT=Staging
Machine-level environment variables are set in the .bashrc or .bash_profile file. Edit the file using any text editor. Add the following statement:
export ASPNETCORE_ENVIRONMENT=Staging
Linux
For Linux distributions, use the export command at a command prompt for session-based variable settings and the bash_profile file for machine-level environment settings.
Set the environment in code
To set the environment in code, use WebApplicationOptions.EnvironmentName when creating WebApplicationBuilder, as shown in the following example:
var builder = WebApplication.CreateBuilder(new WebApplicationOptions
{
    EnvironmentName = Environments.Staging
});

// Add services to the container.
builder.Services.AddRazorPages();

var app = builder.Build();

// Configure the HTTP request pipeline.
if (!app.Environment.IsDevelopment())
{
    app.UseExceptionHandler("/Error");
    // The default HSTS value is 30 days. You may want to change this for production scenarios, see https://aka.ms/aspnetcore-hsts.
    app.UseHsts();
}

app.UseHttpsRedirection();
app.UseStaticFiles();

app.UseRouting();

app.UseAuthorization();

app.MapRazorPages();

app.Run();
Configuration by environment
To load configuration by environment, see Configuration in ASP.NET Core.
Configure services and middleware by environment
Use WebApplicationBuilder.Environment or WebApplication.Environment to conditionally add services or middleware depending on the current environment. The project template includes an example of code that adds middleware only when the current environment isn't Development:
var builder = WebApplication.CreateBuilder(args);

// Add services to the container.
builder.Services.AddRazorPages();

var app = builder.Build();

// Configure the HTTP request pipeline.
if (!app.Environment.IsDevelopment())
{
    app.UseExceptionHandler("/Error");
    // The default HSTS value is 30 days. You may want to change this for production scenarios, see https://aka.ms/aspnetcore-hsts.
    app.UseHsts();
}

app.UseHttpsRedirection();
app.UseStaticFiles();

app.UseRouting();

app.UseAuthorization();

app.MapRazorPages();

app.Run();
The highlighted code checks the current environment while building the request pipeline. To check the current environment while configuring services, use builder.Environment instead of app.Environment.
Additional resources
By Rick Anderson and Kirk Larkin
ASP.NET Core configures app behavior based on the runtime environment using an environment variable.
Environments
To determine the runtime environment, ASP.NET Core reads from the following environment variables:
- DOTNET_ENVIRONMENT
ASPNETCORE_ENVIRONMENTwhen ConfigureWebHostDefaults is called. The default ASP.NET Core web app templates callConfigureWebHostDefaults. TheASPNETCORE_ENVIRONMENTvalue overridesDOTNET_ENVIRONMENT.
IHostEnvironment.EnvironmentName can be set to any value, but the following values are provided by the framework:
- Development : The launchSettings.json file sets
ASPNETCORE_ENVIRONMENTtoDevelopmenton the local machine. - Staging
- Production : The default if
DOTNET_ENVIRONMENTandASPNETCORE_ENVIRONMENThave not been set.
The following code:
- Calls UseDeveloperExceptionPage when
ASPNETCORE_ENVIRONMENTis set toDevelopment. - Calls UseExceptionHandler when the value of
ASPNETCORE_ENVIRONMENTis set toStaging,Production, orStaging_2. - Injects IWebHostEnvironment into
Startup.Configure. This approach is useful when the app only requires adjustingStartup.Configurefor a few environments with minimal code differences per environment. - Is similar to the code generated by the ASP.NET Core templates.
public void Configure(IApplicationBuilder app, IWebHostEnvironment env)
{
    if (env.IsDevelopment())
    {
        app.UseDeveloperExceptionPage();
    }

    if (env.IsProduction() || env.IsStaging() || env.IsEnvironment("Staging_2"))
    {
        app.UseExceptionHandler("/Error");
    }

    app.UseHttpsRedirection();
    app.UseStaticFiles();

    app.UseRouting();

    app.UseAuthorization();

    app.UseEndpoints(endpoints =>
    {
        endpoints.MapRazorPages();
    });
}
The Environment Tag Helper uses the value of IHostEnvironment.EnvironmentName to include or exclude markup in the element:
<environment include="Development">
    <div>The effective tag is: <environment include="Development"></div>
</environment>
<environment exclude="Development">
    <div>The effective tag is: <environment exclude="Development"></div>
</environment>
<environment include="Staging,Development,Staging_2">
    <div>
        The effective tag is:
        <environment include="Staging,Development,Staging_2">
    </div>
</environment>
The About page from the sample code includes the preceding markup and displays the value of IWebHostEnvironment.EnvironmentName.
On Windows and macOS, environment variables and values aren't case-sensitive. Linux environment variables and values are case-sensitive by default.
Create EnvironmentsSample
The sample code used in this document is based on a Razor Pages project named EnvironmentsSample.
The following code creates and runs a web app named EnvironmentsSample:
dotnet new webapp -o EnvironmentsSample
cd EnvironmentsSample
dotnet run --verbosity normal
When the app runs, it displays some of the following output:
Using launch settings from c:\tmp\EnvironmentsSample\Properties\launchSettings.json
info: Microsoft.Hosting.Lifetime[0]
      Now listening on: https://localhost:5001
info: Microsoft.Hosting.Lifetime[0]
      Application started. Press Ctrl+C to shut down.
info: Microsoft.Hosting.Lifetime[0]
      Hosting environment: Development
info: Microsoft.Hosting.Lifetime[0]
      Content root path: c:\tmp\EnvironmentsSample
Development and launchSettings.json
The development environment can enable features that shouldn't be exposed in production. For example, the ASP.NET Core templates enable the Developer Exception Page in the development environment.
The environment for local machine development can be set in the Properties\launchSettings.json file of the project. Environment values set in launchSettings.json override values set in the system environment.
The launchSettings.json file:
- Is only used on the local development machine.
- Is not deployed.
- contains profile settings.
The following JSON shows the launchSettings.json file for an ASP.NET Core web project named EnvironmentsSample created with Visual Studio or dotnet new:
{
  "iisSettings": {
    "windowsAuthentication": false,
    "anonymousAuthentication": true,
    "iisExpress": {
      "applicationUrl": "http://localhost:64645",
      "sslPort": 44366
    }
  },
  "profiles": {
    "IIS Express": {
      "commandName": "IISExpress",
      "launchBrowser": true,
      "environmentVariables": {
        "ASPNETCORE_ENVIRONMENT": "Development"
      }
    },
    "EnvironmentsSample": {
      "commandName": "Project",
      "launchBrowser": true,
      "applicationUrl": "https://localhost:5001;http://localhost:5000",
      "environmentVariables": {
        "ASPNETCORE_ENVIRONMENT": "Development"
      }
    }
  }
}
The preceding markup contains two profiles:
IIS Express: The default profile used when launching the app from Visual Studio. The"commandName"key has the value"IISExpress", therefore, IISExpress is the web server. You can set the launch profile to the project or any other profile included. For example, in the image below, selecting the project name launches the Kestrel web server.
EnvironmentsSample: The profile name is the project name. This profile is used by default when launching the app withdotnet run. The"commandName"key has the value"Project", therefore, the Kestrel web server is launched.
The value of commandName can specify the web server to launch. commandName can be any one of the following:
IISExpress: Launches IIS Express.IIS: No web server launched. IIS is expected to be available.Project: Launches Kestrel.
The Visual Studio project properties Debug tab provides a GUI to edit the launchSettings.json file. Changes made to project profiles may not take effect until the web server is restarted. Kestrel must be restarted before it can detect changes made to its environment.
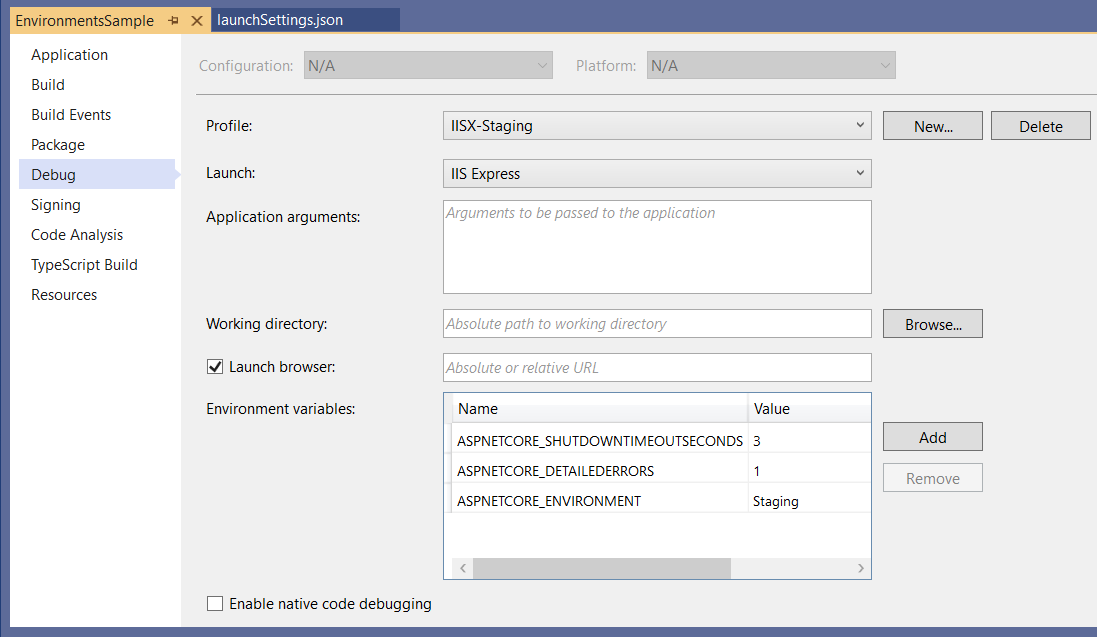
The following launchSettings.json file contains multiple profiles:
{
  "iisSettings": {
    "windowsAuthentication": false,
    "anonymousAuthentication": true,
    "iisExpress": {
      "applicationUrl": "http://localhost:64645",
      "sslPort": 44366
    }
  },
  "profiles": {
    "IIS Express": {
      "commandName": "IISExpress",
      "launchBrowser": true,
      "environmentVariables": {
        "ASPNETCORE_ENVIRONMENT": "Development"
      }
    },
    "IISX-Production": {
      "commandName": "IISExpress",
      "launchBrowser": true,
      "environmentVariables": {
        "ASPNETCORE_ENVIRONMENT": "Production"
      }
    },
    "IISX-Staging": {
      "commandName": "IISExpress",
      "launchBrowser": true,
      "environmentVariables": {
        "ASPNETCORE_ENVIRONMENT": "Staging",
        "ASPNETCORE_DETAILEDERRORS": "1",
        "ASPNETCORE_SHUTDOWNTIMEOUTSECONDS": "3"
      }
    },
    "EnvironmentsSample": {
      "commandName": "Project",
      "launchBrowser": true,
      "applicationUrl": "https://localhost:5001;http://localhost:5000",
      "environmentVariables": {
        "ASPNETCORE_ENVIRONMENT": "Development"
      }
    },
    "KestrelStaging": {
      "commandName": "Project",
      "launchBrowser": true,
      "applicationUrl": "https://localhost:5001;http://localhost:5000",
      "environmentVariables": {
        "ASPNETCORE_ENVIRONMENT": "Staging"
      }
    }
  }
}
Profiles can be selected:
From the Visual Studio UI.
Using the
dotnet runcommand in a command shell with the--launch-profileoption set to the profile's name. This approach only supports Kestrel profiles.dotnet run --launch-profile "SampleApp"
Warning
launchSettings.json shouldn't store secrets. The Secret Manager tool can be used to store secrets for local development.
When using Visual Studio Code, environment variables can be set in the .vscode/launch.json file. The following example sets several Host configuration values environment variables:
{
    "version": "0.2.0",
    "configurations": [
        {
            "name": ".NET Core Launch (web)",
            "type": "coreclr",
            // Configuration ommitted for brevity.
            "env": {
                "ASPNETCORE_ENVIRONMENT": "Development",
                "ASPNETCORE_URLS": "https://localhost:5001",
                "ASPNETCORE_DETAILEDERRORS": "1",
                "ASPNETCORE_SHUTDOWNTIMEOUTSECONDS": "3"
            },
            // Configuration ommitted for brevity.
The .vscode/launch.json file is only used by Visual Studio Code.
Production
The production environment should be configured to maximize security, performance, and application robustness. Some common settings that differ from development include:
- Caching.
- Client-side resources are bundled, minified, and potentially served from a CDN.
- Diagnostic error pages disabled.
- Friendly error pages enabled.
- Production logging and monitoring enabled. For example, using Application Insights.
Set the environment
It's often useful to set a specific environment for testing with an environment variable or platform setting. If the environment isn't set, it defaults to Production, which disables most debugging features. The method for setting the environment depends on the operating system.
When the host is built, the last environment setting read by the app determines the app's environment. The app's environment can't be changed while the app is running.
The About page from the sample code displays the value of IWebHostEnvironment.EnvironmentName.
Azure App Service
Production is the default value if DOTNET_ENVIRONMENT and ASPNETCORE_ENVIRONMENT have not been set. Apps deployed to azure are Production by default.
To set the environment in Azure App Service, perform the following steps:
- Select the app from the App Services blade.
- In the Settings group, select the Configuration blade.
- In the Application settings tab, select New application setting.
- In the Add/Edit application setting window, provide
ASPNETCORE_ENVIRONMENTfor the Name. For Value, provide the environment (for example,Staging). - Select the Deployment slot setting checkbox if you wish the environment setting to remain with the current slot when deployment slots are swapped. For more information, see Set up staging environments in Azure App Service in the Azure documentation.
- Select OK to close the Add/Edit application setting window.
- Select Save at the top of the Configuration blade.
Azure App Service automatically restarts the app after an app setting is added, changed, or deleted in the Azure portal.
Windows
Environment values in launchSettings.json override values set in the system environment.
To set the ASPNETCORE_ENVIRONMENT for the current session when the app is started using dotnet run, the following commands are used:
Command prompt
set ASPNETCORE_ENVIRONMENT=Staging
dotnet run --no-launch-profile
PowerShell
$Env:ASPNETCORE_ENVIRONMENT = "Staging"
dotnet run --no-launch-profile
The preceding command sets ASPNETCORE_ENVIRONMENT only for processes launched from that command window.
To set the value globally in Windows, use either of the following approaches:
Open the Control Panel > System > Advanced system settings and add or edit the
ASPNETCORE_ENVIRONMENTvalue:
Open an administrative command prompt and use the
setxcommand or open an administrative PowerShell command prompt and use[Environment]::SetEnvironmentVariable:Command prompt
setx ASPNETCORE_ENVIRONMENT Staging /MThe
/Mswitch indicates to set the environment variable at the system level. If the/Mswitch isn't used, the environment variable is set for the user account.PowerShell
[Environment]::SetEnvironmentVariable("ASPNETCORE_ENVIRONMENT", "Staging", "Machine")The
Machineoption value indicates to set the environment variable at the system level. If the option value is changed toUser, the environment variable is set for the user account.
When the ASPNETCORE_ENVIRONMENT environment variable is set globally, it takes effect for dotnet run in any command window opened after the value is set. Environment values in launchSettings.json override values set in the system environment.
web.config
To set the ASPNETCORE_ENVIRONMENT environment variable with web.config, see the Set environment variables section of web.config file.
Project file or publish profile
For Windows IIS deployments: Include the <EnvironmentName> property in the publish profile (.pubxml) or project file. This approach sets the environment in web.config when the project is published:
<PropertyGroup>
  <EnvironmentName>Development</EnvironmentName>
</PropertyGroup>
Per IIS Application Pool
To set the ASPNETCORE_ENVIRONMENT environment variable for an app running in an isolated Application Pool (supported on IIS 10.0 or later), see the AppCmd.exe command section of the Environment Variables <environmentVariables> topic. When the ASPNETCORE_ENVIRONMENT environment variable is set for an app pool, its value overrides a setting at the system level.
When hosting an app in IIS and adding or changing the ASPNETCORE_ENVIRONMENT environment variable, use any one of the following approaches to have the new value picked up by apps:
- Execute
net stop was /yfollowed bynet start w3svcfrom a command prompt. - Restart the server.
macOS
Setting the current environment for macOS can be performed in-line when running the app:
ASPNETCORE_ENVIRONMENT=Staging dotnet run
Alternatively, set the environment with export prior to running the app:
export ASPNETCORE_ENVIRONMENT=Staging
Machine-level environment variables are set in the .bashrc or .bash_profile file. Edit the file using any text editor. Add the following statement:
export ASPNETCORE_ENVIRONMENT=Staging
Linux
For Linux distributions, use the export command at a command prompt for session-based variable settings and bash_profile file for machine-level environment settings.
Set the environment in code
Call UseEnvironment when building the host. See .NET Generic Host in ASP.NET Core.
Configuration by environment
To load configuration by environment, see Configuration in ASP.NET Core.
Environment-based Startup class and methods
Inject IWebHostEnvironment into the Startup class
Inject IWebHostEnvironment into the Startup constructor. This approach is useful when the app requires configuring Startup for only a few environments with minimal code differences per environment.
In the following example:
- The environment is held in the
_envfield. _envis used inConfigureServicesandConfigureto apply startup configuration based on the app's environment.
public class Startup
{
    public Startup(IConfiguration configuration, IWebHostEnvironment env)
    {
        Configuration = configuration;
        _env = env;
    }

    public IConfiguration Configuration { get; }
    private readonly IWebHostEnvironment _env;

    public void ConfigureServices(IServiceCollection services)
    {
        if (_env.IsDevelopment())
        {
            Console.WriteLine(_env.EnvironmentName);
        }
        else if (_env.IsStaging())
        {
            Console.WriteLine(_env.EnvironmentName);
        }
        else
        {
            Console.WriteLine("Not dev or staging");
        }

        services.AddRazorPages();
    }

    public void Configure(IApplicationBuilder app)
    {
        if (_env.IsDevelopment())
        {
            app.UseDeveloperExceptionPage();
        }
        else
        {
            app.UseExceptionHandler("/Error");
            app.UseHsts();
        }

        app.UseHttpsRedirection();
        app.UseStaticFiles();

        app.UseRouting();

        app.UseAuthorization();

        app.UseEndpoints(endpoints =>
        {
            endpoints.MapRazorPages();
        });
    }
}
Startup class conventions
When an ASP.NET Core app starts, the Startup class bootstraps the app. The app can define multiple Startup classes for different environments. The appropriate Startup class is selected at runtime. The class whose name suffix matches the current environment is prioritized. If a matching Startup{EnvironmentName} class isn't found, the Startup class is used. This approach is useful when the app requires configuring startup for several environments with many code differences per environment. Typical apps will not need this approach.
To implement environment-based Startup classes, create a Startup{EnvironmentName} classes and a fallback Startup class:
public class StartupDevelopment
{
    public StartupDevelopment(IConfiguration configuration)
    {
        Configuration = configuration;
        Console.WriteLine(MethodBase.GetCurrentMethod().DeclaringType.Name);
    }

    public IConfiguration Configuration { get; }

    public void ConfigureServices(IServiceCollection services)
    {
        services.AddRazorPages();
    }

    public void Configure(IApplicationBuilder app)
    {
        app.UseDeveloperExceptionPage();

        app.UseHttpsRedirection();
        app.UseStaticFiles();

        app.UseRouting();

        app.UseAuthorization();

        app.UseEndpoints(endpoints =>
        {
            endpoints.MapRazorPages();
        });
    }
}

public class StartupProduction
{
    public StartupProduction(IConfiguration configuration)
    {
        Configuration = configuration;
        Console.WriteLine(MethodBase.GetCurrentMethod().DeclaringType.Name);
    }

    public IConfiguration Configuration { get; }

    public void ConfigureServices(IServiceCollection services)
    {
        services.AddRazorPages();
    }

    public void Configure(IApplicationBuilder app)
    {

        app.UseExceptionHandler("/Error");
        app.UseHsts();

        app.UseHttpsRedirection();
        app.UseStaticFiles();

        app.UseRouting();

        app.UseAuthorization();

        app.UseEndpoints(endpoints =>
        {
            endpoints.MapRazorPages();
        });
    }
}

public class Startup
{
    public Startup(IConfiguration configuration)
    {
        Configuration = configuration;
        Console.WriteLine(MethodBase.GetCurrentMethod().DeclaringType.Name);
    }

    public IConfiguration Configuration { get; }

    public void ConfigureServices(IServiceCollection services)
    {
        services.AddRazorPages();
    }

    public void Configure(IApplicationBuilder app, IWebHostEnvironment env)
    {
        if (env.IsDevelopment())
        {
            app.UseDeveloperExceptionPage();
        }
        else
        {
            app.UseExceptionHandler("/Error");
            app.UseHsts();
        }

        app.UseHttpsRedirection();
        app.UseStaticFiles();

        app.UseRouting();

        app.UseAuthorization();

        app.UseEndpoints(endpoints =>
        {
            endpoints.MapRazorPages();
        });
    }
}
Use the UseStartup(IWebHostBuilder, String) overload that accepts an assembly name:
public class Program
{
    public static void Main(string[] args)
    {
        CreateHostBuilder(args).Build().Run();
    }

    public static IHostBuilder CreateHostBuilder(string[] args)
    {
        var assemblyName = typeof(Startup).GetTypeInfo().Assembly.FullName;

        return   Host.CreateDefaultBuilder(args)
            .ConfigureWebHostDefaults(webBuilder =>
            {
                webBuilder.UseStartup(assemblyName);
            });
    }
}
Startup method conventions
Configure and ConfigureServices support environment-specific versions of the form Configure<EnvironmentName> and Configure<EnvironmentName>Services. If a matching Configure<EnvironmentName>Services or Configure<EnvironmentName> method isn't found, the ConfigureServices or Configure method is used, respectively. This approach is useful when the app requires configuring startup for several environments with many code differences per environment:
public class Startup
{
    private void StartupConfigureServices(IServiceCollection services)
    {
        services.AddRazorPages();
    }

    public void ConfigureDevelopmentServices(IServiceCollection services)
    {
        MyTrace.TraceMessage();
        StartupConfigureServices(services);
    }

    public void ConfigureStagingServices(IServiceCollection services)
    {
        MyTrace.TraceMessage();
        StartupConfigureServices(services);
    }

    public void ConfigureProductionServices(IServiceCollection services)
    {
        MyTrace.TraceMessage();
        StartupConfigureServices(services);
    }

    public void ConfigureServices(IServiceCollection services)
    {
        MyTrace.TraceMessage();
        StartupConfigureServices(services);
    }

    public void Configure(IApplicationBuilder app, IWebHostEnvironment env)
    {
        MyTrace.TraceMessage();

        if (env.IsDevelopment())
        {
            app.UseDeveloperExceptionPage();
        }
        else
        {
            app.UseExceptionHandler("/Error");
            app.UseHsts();
        }

        app.UseHttpsRedirection();
        app.UseStaticFiles();

        app.UseRouting();

        app.UseAuthorization();

        app.UseEndpoints(endpoints =>
        {
            endpoints.MapRazorPages();
        });
    }

    public void ConfigureStaging(IApplicationBuilder app, IWebHostEnvironment env)
    {
        MyTrace.TraceMessage();

        app.UseExceptionHandler("/Error");
        app.UseHsts();

        app.UseHttpsRedirection();
        app.UseStaticFiles();

        app.UseRouting();

        app.UseAuthorization();

        app.UseEndpoints(endpoints =>
        {
            endpoints.MapRazorPages();
        });
    }
}

public static class MyTrace
{
    public static void TraceMessage([CallerMemberName] string memberName = "")
    {
        Console.WriteLine($"Method: {memberName}");
    }
}
Additional resources
ASP.NET Core
Feedback
Coming soon: Throughout 2024 we will be phasing out GitHub Issues as the feedback mechanism for content and replacing it with a new feedback system. For more information see: https://aka.ms/ContentUserFeedback.
Submit and view feedback for