Host ASP.NET Core on Windows with IIS
Internet Information Services (IIS) is a flexible, secure and manageable Web Server for hosting web apps, including ASP.NET Core.
Supported platforms
The following operating systems are supported:
- Windows 7 or later
- Windows Server 2012 R2 or later
Apps published for 32-bit (x86) or 64-bit (x64) deployment are supported. Deploy a 32-bit app with a 32-bit (x86) .NET Core SDK unless the app:
- Requires the larger virtual memory address space available to a 64-bit app.
- Requires the larger IIS stack size.
- Has 64-bit native dependencies.
Install the ASP.NET Core Module/Hosting Bundle
Download the latest installer using the following link:
Current .NET Core Hosting Bundle installer (direct download)
For more details instructions on how to install the ASP.NET Core Module, or installing different versions, see Install the .NET Core Hosting Bundle.
To download previous versions of the hosting bundle, see this GitHub issue.
Get started
For getting started with hosting a website on IIS, see our getting started guide.
For getting started with hosting a website on Azure App Services, see our deploying to Azure App Service guide.
Configuration
For configuration guidance, see Advanced configuration.
Deployment resources for IIS administrators
- IIS documentation
- Getting Started with the IIS Manager in IIS
- .NET Core application deployment
- ASP.NET Core Module (ANCM) for IIS
- ASP.NET Core directory structure
- IIS modules with ASP.NET Core
- Troubleshoot ASP.NET Core on Azure App Service and IIS
- Common error troubleshooting for Azure App Service and IIS with ASP.NET Core
Overlapped recycle
In general, we recommend using a pattern like blue-green deployments for zero-downtime deployments. Features like Overlapped Recycle help, but don't guarantee that you can do a zero-downtime deployment. For more information, see this GitHub issue.
Optional client certificates
For information on apps that must protect a subset of the app with a certificate, see Optional client certificates.
Additional resources
For a tutorial experience on publishing an ASP.NET Core app to an IIS server, see Publish an ASP.NET Core app to IIS.
Install the .NET Core Hosting Bundle
Supported operating systems
The following operating systems are supported:
- Windows 7 or later
- Windows Server 2012 R2 or later
HTTP.sys server (formerly called WebListener) doesn't work in a reverse proxy configuration with IIS. Use the Kestrel server.
For information on hosting in Azure, see Deploy ASP.NET Core apps to Azure App Service.
For troubleshooting guidance, see Troubleshoot and debug ASP.NET Core projects.
Supported platforms
Apps published for 32-bit (x86) or 64-bit (x64) deployment are supported. Deploy a 32-bit app with a 32-bit (x86) .NET Core SDK unless the app:
- Requires the larger virtual memory address space available to a 64-bit app.
- Requires the larger IIS stack size.
- Has 64-bit native dependencies.
Apps published for 32-bit (x86) must have 32-bit enabled for their IIS Application Pools. For more information, see the Create the IIS site section.
Use a 64-bit (x64) .NET Core SDK to publish a 64-bit app. A 64-bit runtime must be present on the host system.
Hosting models
In-process hosting model
Using in-process hosting, an ASP.NET Core app runs in the same process as its IIS worker process. In-process hosting provides improved performance over out-of-process hosting because requests aren't proxied over the loopback adapter, a network interface that returns outgoing network traffic back to the same machine. IIS handles process management with the Windows Process Activation Service (WAS).
The ASP.NET Core Module:
- Performs app initialization.
- Loads the CoreCLR.
- Calls
Program.Main.
- Handles the lifetime of the IIS native request.
The following diagram illustrates the relationship between IIS, the ASP.NET Core Module, and an app hosted in-process:

- A request arrives from the web to the kernel-mode HTTP.sys driver.
- The driver routes the native request to IIS on the website's configured port, usually 80 (HTTP) or 443 (HTTPS).
- The ASP.NET Core Module receives the native request and passes it to IIS HTTP Server (
IISHttpServer). IIS HTTP Server is an in-process server implementation for IIS that converts the request from native to managed.
After the IIS HTTP Server processes the request:
- The request is sent to the ASP.NET Core middleware pipeline.
- The middleware pipeline handles the request and passes it on as an
HttpContextinstance to the app's logic. - The app's response is passed back to IIS through IIS HTTP Server.
- IIS sends the response to the client that initiated the request.
In-process hosting is opt-in for existing apps. The ASP.NET Core web templates use the in-process hosting model.
CreateDefaultBuilder adds an IServer instance by calling the UseIIS method to boot the CoreCLR and host the app inside of the IIS worker process (w3wp.exe or iisexpress.exe). Performance tests indicate that hosting a .NET Core app in-process delivers significantly higher request throughput compared to hosting the app out-of-process and proxying requests to Kestrel.
Apps published as a single file executable can't be loaded by the in-process hosting model.
Out-of-process hosting model
Because ASP.NET Core apps run in a process separate from the IIS worker process, the ASP.NET Core Module handles process management. The module starts the process for the ASP.NET Core app when the first request arrives and restarts the app if it shuts down or crashes. This is essentially the same behavior as seen with apps that run in-process that are managed by the Windows Process Activation Service (WAS).
The following diagram illustrates the relationship between IIS, the ASP.NET Core Module, and an app hosted out-of-process:

- Requests arrive from the web to the kernel-mode HTTP.sys driver.
- The driver routes the requests to IIS on the website's configured port. The configured port is usually 80 (HTTP) or 443 (HTTPS).
- The module forwards the requests to Kestrel on a random port for the app. The random port isn't 80 or 443.
The ASP.NET Core Module specifies the port via an environment variable at startup. The UseIISIntegration extension configures the server to listen on http://localhost:{PORT}. Additional checks are performed, and requests that don't originate from the module are rejected. The module doesn't support HTTPS forwarding. Requests are forwarded over HTTP even if received by IIS over HTTPS.
After Kestrel picks up the request from the module, the request is forwarded into the ASP.NET Core middleware pipeline. The middleware pipeline handles the request and passes it on as an HttpContext instance to the app's logic. Middleware added by IIS Integration updates the scheme, remote IP, and pathbase to account for forwarding the request to Kestrel. The app's response is passed back to IIS, which forwards it back to the HTTP client that initiated the request.
For ASP.NET Core Module configuration guidance, see ASP.NET Core Module (ANCM) for IIS.
For more information on hosting, see Host in ASP.NET Core.
Application configuration
Enable the IISIntegration components
When building a host in CreateHostBuilder (Program.cs), call CreateDefaultBuilder to enable IIS integration:
public static IHostBuilder CreateHostBuilder(string[] args) =>
    Host.CreateDefaultBuilder(args)
        ...
For more information on CreateDefaultBuilder, see .NET Generic Host in ASP.NET Core.
IIS options
In-process hosting model
To configure IIS Server options, include a service configuration for IISServerOptions in ConfigureServices. The following example disables AutomaticAuthentication:
services.Configure<IISServerOptions>(options =>
{
    options.AutomaticAuthentication = false;
});
| Option | Default | Setting |
|---|---|---|
AutomaticAuthentication |
true |
If true, IIS Server sets the HttpContext.User authenticated by Windows Authentication. If false, the server only provides an identity for HttpContext.User and responds to challenges when explicitly requested by the AuthenticationScheme. Windows Authentication must be enabled in IIS for AutomaticAuthentication to function. For more information, see Windows Authentication. |
AuthenticationDisplayName |
null |
Sets the display name shown to users on login pages. |
AllowSynchronousIO |
false |
Whether synchronous I/O is allowed for the HttpContext.Request and the HttpContext.Response. |
MaxRequestBodySize |
30000000 |
Gets or sets the max request body size for the HttpRequest. Note that IIS itself has the limit maxAllowedContentLength which will be processed before the MaxRequestBodySize set in the IISServerOptions. Changing the MaxRequestBodySize won't affect the maxAllowedContentLength. To increase maxAllowedContentLength, add an entry in the web.config to set maxAllowedContentLength to a higher value. For more details, see Configuration. |
Out-of-process hosting model
To configure IIS options, include a service configuration for IISOptions in ConfigureServices. The following example prevents the app from populating HttpContext.Connection.ClientCertificate:
services.Configure<IISOptions>(options =>
{
    options.ForwardClientCertificate = false;
});
| Option | Default | Setting |
|---|---|---|
AutomaticAuthentication |
true |
If true, IIS Integration Middleware sets the HttpContext.User authenticated by Windows Authentication. If false, the middleware only provides an identity for HttpContext.User and responds to challenges when explicitly requested by the AuthenticationScheme. Windows Authentication must be enabled in IIS for AutomaticAuthentication to function. For more information, see the Windows Authentication topic. |
AuthenticationDisplayName |
null |
Sets the display name shown to users on login pages. |
ForwardClientCertificate |
true |
If true and the MS-ASPNETCORE-CLIENTCERT request header is present, the HttpContext.Connection.ClientCertificate is populated. |
Proxy server and load balancer scenarios
The IIS Integration Middleware and the ASP.NET Core Module are configured to forward the:
- Scheme (HTTP/HTTPS).
- Remote IP address where the request originated.
The IIS Integration Middleware configures Forwarded Headers Middleware.
Additional configuration might be required for apps hosted behind additional proxy servers and load balancers. For more information, see Configure ASP.NET Core to work with proxy servers and load balancers.
web.config file
The web.config file configures the ASP.NET Core Module. Creating, transforming, and publishing the web.config file is handled by an MSBuild target (_TransformWebConfig) when the project is published. This target is present in the Web SDK targets (Microsoft.NET.Sdk.Web). The SDK is set at the top of the project file:
<Project Sdk="Microsoft.NET.Sdk.Web">
If a web.config file isn't present in the project, the file is created with the correct processPath and arguments to configure the ASP.NET Core Module and moved to published output.
If a web.config file is present in the project, the file is transformed with the correct processPath and arguments to configure the ASP.NET Core Module and moved to published output. The transformation doesn't modify IIS configuration settings in the file.
The web.config file may provide additional IIS configuration settings that control active IIS modules. For information on IIS modules that are capable of processing requests with ASP.NET Core apps, see the IIS modules topic.
To prevent the Web SDK from transforming the web.config file, use the <IsTransformWebConfigDisabled> property in the project file:
<PropertyGroup>
  <IsTransformWebConfigDisabled>true</IsTransformWebConfigDisabled>
</PropertyGroup>
When disabling the Web SDK from transforming the file, the processPath and arguments should be manually set by the developer. For more information, see ASP.NET Core Module (ANCM) for IIS.
web.config file location
In order to set up the ASP.NET Core Module correctly, the web.config file must be present at the content root path (typically the app base path) of the deployed app. This is the same location as the website physical path provided to IIS. The web.config file is required at the root of the app to enable the publishing of multiple apps using Web Deploy.
Sensitive files exist on the app's physical path, such as {ASSEMBLY}.runtimeconfig.json, {ASSEMBLY}.xml (XML Documentation comments), and {ASSEMBLY}.deps.json, where the placeholder {ASSEMBLY} is the assembly name. When the web.config file is present and the site starts normally, IIS doesn't serve these sensitive files if they're requested. If the web.config file is missing, incorrectly named, or unable to configure the site for normal startup, IIS may serve sensitive files publicly.
The web.config file must be present in the deployment at all times, correctly named, and able to configure the site for normal start up. Never remove the web.config file from a production deployment.
Transform web.config
If you need to transform web.config on publish, see Transform web.config. You might need to transform web.config on publish to set environment variables based on the configuration, profile, or environment.
IIS configuration
Windows Server operating systems
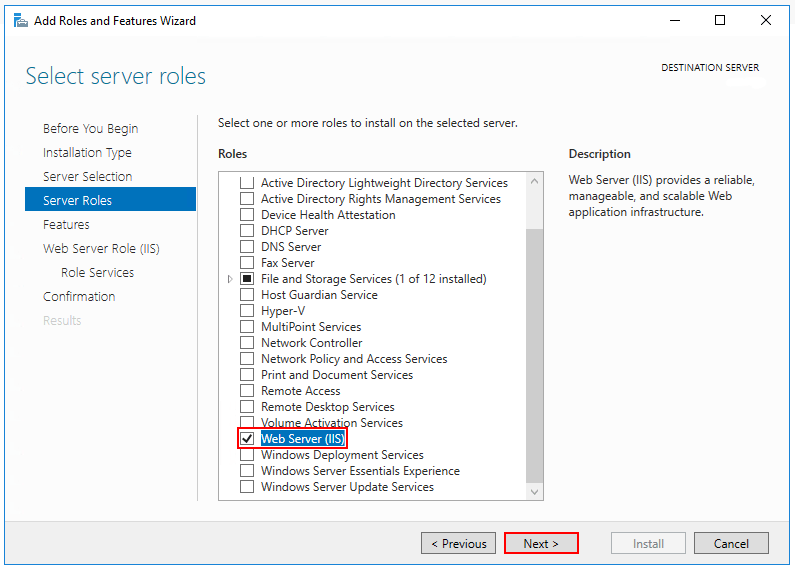
Enable the Web Server (IIS) server role and establish role services.
Use the Add Roles and Features wizard from the Manage menu or the link in Server Manager. On the Server Roles step, check the box for Web Server (IIS).
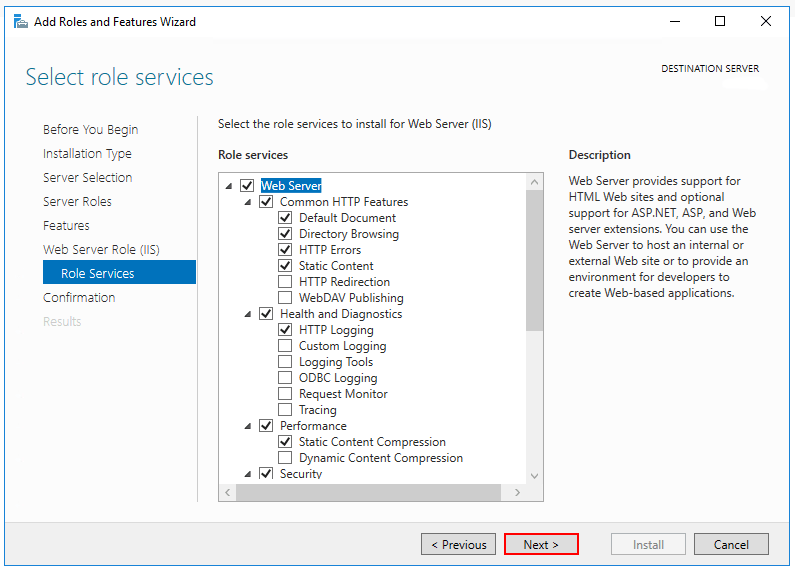
After the Features step, the Role services step loads for Web Server (IIS). Select the IIS role services desired or accept the default role services provided.
Windows Authentication (Optional)
To enable Windows Authentication, expand the following nodes: Web Server > Security. Select the Windows Authentication feature. For more information, see Windows Authentication<windowsAuthentication>and Configure Windows authentication.WebSockets (Optional)
WebSockets is supported with ASP.NET Core 1.1 or later. To enable WebSockets, expand the following nodes: Web Server > Application Development. Select the WebSocket Protocol feature. For more information, see WebSockets.Proceed through the Confirmation step to install the web server role and services. A server/IIS restart isn't required after installing the Web Server (IIS) role.
Windows desktop operating systems
Enable the IIS Management Console and World Wide Web Services.
Navigate to Control Panel > Programs > Programs and Features > Turn Windows features on or off (left side of the screen).
Open the Internet Information Services node. Open the Web Management Tools node.
Check the box for IIS Management Console.
Check the box for World Wide Web Services.
Accept the default features for World Wide Web Services or customize the IIS features.
Windows Authentication (Optional)
To enable Windows Authentication, expand the following nodes: World Wide Web Services > Security. Select the Windows Authentication feature. For more information, see Windows Authentication <windowsAuthentication> and Configure Windows authentication.WebSockets (Optional)
WebSockets is supported with ASP.NET Core 1.1 or later. To enable WebSockets, expand the following nodes: World Wide Web Services > Application Development Features. Select the WebSocket Protocol feature. For more information, see WebSockets.If the IIS installation requires a restart, restart the system.

Install the .NET Core Hosting Bundle
Install the .NET Core Hosting Bundle on the hosting system. The bundle installs the .NET Core Runtime, .NET Core Library, and the ASP.NET Core Module. The module allows ASP.NET Core apps to run behind IIS.
Important
If the Hosting Bundle is installed before IIS, the bundle installation must be repaired. Run the Hosting Bundle installer again after installing IIS.
If the Hosting Bundle is installed after installing the 64-bit (x64) version of .NET Core, SDKs might appear to be missing (No .NET Core SDKs were detected). To resolve the problem, see Troubleshoot and debug ASP.NET Core projects.
Direct download (current version)
Download the installer using the following link:
Current .NET Core Hosting Bundle installer (direct download)
Earlier versions of the installer
To obtain an earlier version of the installer:
- Navigate to the Download .NET Core page.
- Select the desired .NET Core version.
- In the Run apps - Runtime column, find the row of the .NET Core runtime version desired.
- Download the installer using the Hosting Bundle link.
Warning
Some installers contain release versions that have reached their end of life (EOL) and are no longer supported by Microsoft. For more information, see the support policy.
Install the Hosting Bundle
Run the installer on the server. The following parameters are available when running the installer from an administrator command shell:
OPT_NO_ANCM=1: Skip installing the ASP.NET Core Module.OPT_NO_RUNTIME=1: Skip installing the .NET Core runtime. Used when the server only hosts self-contained deployments (SCD).OPT_NO_SHAREDFX=1: Skip installing the ASP.NET Shared Framework (ASP.NET runtime). Used when the server only hosts self-contained deployments (SCD).OPT_NO_X86=1: Skip installing x86 runtimes. Use this parameter when you know that you won't be hosting 32-bit apps. If there's any chance that you will host both 32-bit and 64-bit apps in the future, don't use this parameter and install both runtimes.OPT_NO_SHARED_CONFIG_CHECK=1: Disable the check for using an IIS Shared Configuration when the shared configuration (applicationHost.config) is on the same machine as the IIS installation. Only available for ASP.NET Core 2.2 or later Hosting Bundler installers. For more information, see ASP.NET Core Module (ANCM) for IIS.
Restarting IIS picks up a change to the system PATH, which is an environment variable, made by the installer. To restart the web server, stop the Windows Process Activation Service (WAS) and then restart the World Wide Web Publishing Service (W3SVC). Restart the system or execute the following commands in an elevated command shell:
net stop was /y
net start w3svc
ASP.NET Core doesn't adopt roll-forward behavior for patch releases of shared framework packages. After upgrading the shared framework by installing a new hosting bundle, restart the system or execute the following commands in an elevated command shell:
net stop was /y
net start w3svc
Note
For information on IIS Shared Configuration, see ASP.NET Core Module with IIS Shared Configuration.
Install Web Deploy when publishing with Visual Studio
When deploying apps to servers with Web Deploy, install the latest version of Web Deploy on the server. To install Web Deploy, use the Web Platform Installer (WebPI) or obtain an installer directly from the Microsoft Download Center. The preferred method is to use WebPI. WebPI offers a standalone setup and a configuration for hosting providers.
Create the IIS site
On the hosting system, create a folder to contain the app's published folders and files. In a following step, the folder's path is provided to IIS as the physical path to the app. For more information on an app's deployment folder and file layout, see ASP.NET Core directory structure.
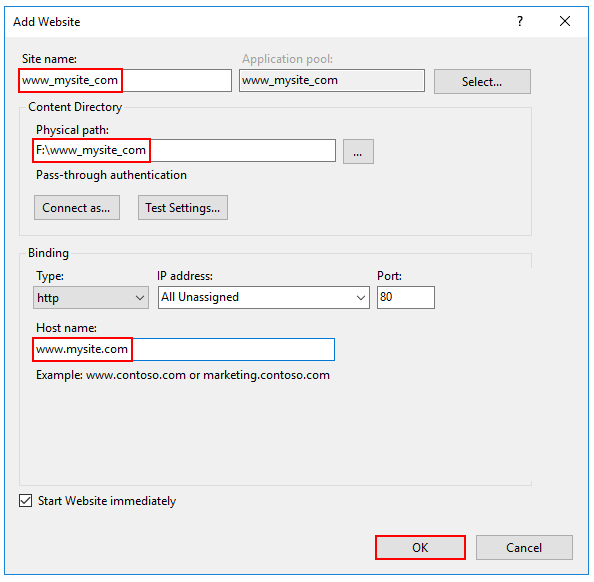
In IIS Manager, open the server's node in the Connections panel. Right-click the Sites folder. Select Add Website from the contextual menu.
Provide a Site name and set the Physical path to the app's deployment folder. Provide the Binding configuration and create the website by selecting OK:
Warning
Top-level wildcard bindings (
http://*:80/andhttp://+:80) should not be used. Top-level wildcard bindings can open up your app to security vulnerabilities. This applies to both strong and weak wildcards. Use explicit host names rather than wildcards. Subdomain wildcard binding (for example,*.mysub.com) doesn't have this security risk if you control the entire parent domain (as opposed to*.com, which is vulnerable). See RFC 9110: HTTP Semantics (Section 7.2: Host and :authority) for more information.Under the server's node, select Application Pools.
Right-click the site's app pool and select Basic Settings from the contextual menu.
In the Edit Application Pool window, set the .NET CLR version to No Managed Code:
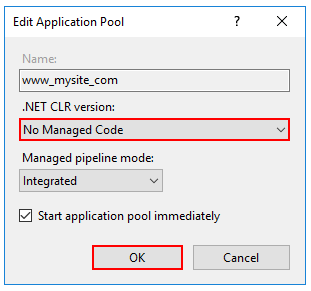
ASP.NET Core runs in a separate process and manages the runtime. ASP.NET Core doesn't rely on loading the desktop CLR (.NET CLR). The Core Common Language Runtime (CoreCLR) for .NET Core is booted to host the app in the worker process. Setting the .NET CLR version to No Managed Code is optional but recommended.
ASP.NET Core 2.2 or later:
For a 32-bit (x86) self-contained deployment published with a 32-bit SDK that uses the in-process hosting model, enable the Application Pool for 32-bit. In IIS Manager, navigate to Application Pools in the Connections sidebar. Select the app's Application Pool. In the Actions sidebar, select Advanced Settings. Set Enable 32-Bit Applications to
True.For a 64-bit (x64) self-contained deployment that uses the in-process hosting model, disable the app pool for 32-bit (x86) processes. In IIS Manager, navigate to Application Pools in the Connections sidebar. Select the app's Application Pool. In the Actions sidebar, select Advanced Settings. Set Enable 32-Bit Applications to
False.
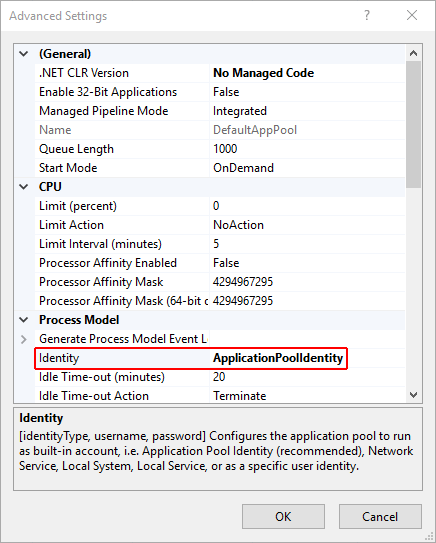
Confirm the process model identity has the proper permissions.
If the default identity of the app pool (Process Model > Identity) is changed from ApplicationPoolIdentity to another identity, verify that the new identity has the required permissions to access the app's folder, database, and other required resources. For example, the app pool requires read and write access to folders where the app reads and writes files.
Windows Authentication configuration (Optional)
For more information, see Configure Windows authentication.
Deploy the app
Deploy the app to the IIS Physical path folder that was established in the Create the IIS site section. Web Deploy is the recommended mechanism for deployment, but several options exist for moving the app from the project's publish folder to the hosting system's deployment folder.
Web Deploy with Visual Studio
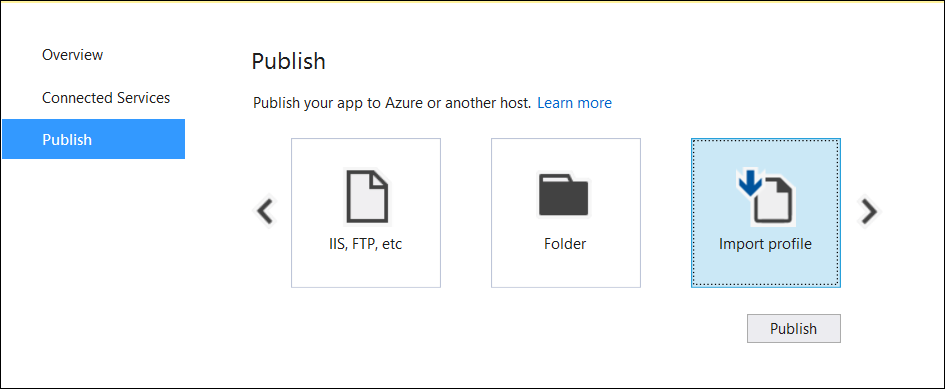
See the Visual Studio publish profiles for ASP.NET Core app deployment topic to learn how to create a publish profile for use with Web Deploy. If the hosting provider provides a Publish Profile or support for creating one, download their profile and import it using the Visual Studio Publish dialog:
Web Deploy outside of Visual Studio
Web Deploy can also be used outside of Visual Studio from the command line. For more information, see Web Deployment Tool.
Alternatives to Web Deploy
Use any of several methods to move the app to the hosting system, such as manual copy, Xcopy, Robocopy, or PowerShell.
For more information on ASP.NET Core deployment to IIS, see the Deployment resources for IIS administrators section.
Browse the website
After the app is deployed to the hosting system, make a request to one of the app's public endpoints.
In the following example, the site is bound to an IIS Host name of www.mysite.com on Port 80. A request is made to http://www.mysite.com:

Locked deployment files
Files in the deployment folder are locked when the app is running. Locked files can't be overwritten during deployment. To release locked files in a deployment, stop the app pool using one of the following approaches:
Use Web Deploy and reference
Microsoft.NET.Sdk.Webin the project file. Anapp_offline.htmfile is placed at the root of the web app directory. When the file is present, the ASP.NET Core Module gracefully shuts down the app and serves theapp_offline.htmfile during the deployment. For more information, see the ASP.NET Core Module configuration reference.Manually stop the app pool in the IIS Manager on the server.
Use PowerShell to drop
app_offline.htm(requires PowerShell 5 or later):$pathToApp = 'PATH_TO_APP' # Stop the AppPool New-Item -Path $pathToApp app_offline.htm # Provide script commands here to deploy the app # Restart the AppPool Remove-Item -Path $pathToApp app_offline.htm
Data protection
The ASP.NET Core Data Protection stack is used by several ASP.NET Core middlewares, including middleware used in authentication. Even if Data Protection APIs aren't called by user code, data protection should be configured with a deployment script or in user code to create a persistent cryptographic key store. If data protection isn't configured, the keys are held in memory and discarded when the app restarts.
If the key ring is stored in memory when the app restarts:
- All cookie-based authentication tokens are invalidated.
- Users are required to sign in again on their next request.
- Any data protected with the key ring can no longer be decrypted. This may include CSRF tokens and ASP.NET Core MVC TempData cookies.
To configure data protection under IIS to persist the key ring, use one of the following approaches:
Create Data Protection Registry Keys
Data protection keys used by ASP.NET Core apps are stored in the registry external to the apps. To persist the keys for a given app, create registry keys for the app pool.
For standalone, non-webfarm IIS installations, the Data Protection Provision-AutoGenKeys.ps1 PowerShell script can be used for each app pool used with an ASP.NET Core app. This script creates a registry key in the HKLM registry that's accessible only to the worker process account of the app's app pool. Keys are encrypted at rest using DPAPI with a machine-wide key.
In web farm scenarios, an app can be configured to use a UNC path to store its data protection key ring. By default, the data protection keys aren't encrypted. Ensure that the file permissions for the network share are limited to the Windows account the app runs under. An X509 certificate can be used to protect keys at rest. Consider a mechanism to allow users to upload certificates: Place certificates into the user's trusted certificate store and ensure they're available on all machines where the user's app runs. See Configure ASP.NET Core Data Protection for details.
Configure the IIS Application Pool to load the user profile
This setting is in the Process Model section under the Advanced Settings for the app pool. Set Load User Profile to
True. When set toTrue, keys are stored in the user profile directory and protected using DPAPI with a key specific to the user account. Keys are persisted to the %LOCALAPPDATA%/ASP.NET/DataProtection-Keys folder.The app pool's setProfileEnvironment attribute must also be enabled. The default value of
setProfileEnvironmentistrue. In some scenarios (for example, Windows OS),setProfileEnvironmentis set tofalse. If keys aren't stored in the user profile directory as expected:- Navigate to the %windir%/system32/inetsrv/config folder.
- Open the applicationHost.config file.
- Locate the
<system.applicationHost><applicationPools><applicationPoolDefaults><processModel>element. - Confirm that the
setProfileEnvironmentattribute isn't present, which defaults the value totrue, or explicitly set the attribute's value totrue.
Use the file system as a key ring store
Adjust the app code to use the file system as a key ring store. Use an X509 certificate to protect the key ring and ensure the certificate is a trusted certificate. If the certificate is self-signed, place the certificate in the Trusted Root store.
When using IIS in a web farm:
- Use a file share that all machines can access.
- Deploy an X509 certificate to each machine. Configure data protection in code.
Set a machine-wide policy for data protection
The data protection system has limited support for setting a default machine-wide policy for all apps that consume the Data Protection APIs. For more information, see ASP.NET Core Data Protection Overview.
Virtual Directories
IIS Virtual Directories aren't supported with ASP.NET Core apps. An app can be hosted as a sub-application.
Sub-applications
An ASP.NET Core app can be hosted as an IIS sub-application (sub-app). The sub-app's path becomes part of the root app's URL.
Static asset links within the sub-app should use tilde-slash (~/) notation. Tilde-slash notation triggers a Tag Helper to prepend the sub-app's pathbase to the rendered relative link. For a sub-app at /subapp_path, an image linked with src="~/image.png" is rendered as src="/subapp_path/image.png". The root app's Static File Middleware doesn't process the static file request. The request is processed by the sub-app's Static File Middleware.
If a static asset's src attribute is set to an absolute path (for example, src="/image.png"), the link is rendered without the sub-app's pathbase. The root app's Static File Middleware attempts to serve the asset from the root app's web root, which results in a 404 - Not Found response unless the static asset is available from the root app.
To host an ASP.NET Core app as a sub-app under another ASP.NET Core app:
Establish an app pool for the sub-app. Set the .NET CLR Version to No Managed Code because the Core Common Language Runtime (CoreCLR) for .NET Core is booted to host the app in the worker process, not the desktop CLR (.NET CLR).
Add the root site in IIS Manager with the sub-app in a folder under the root site.
Right-click the sub-app folder in IIS Manager and select Convert to Application.
In the Add Application dialog, use the Select button for the Application Pool to assign the app pool that you created for the sub-app. Select OK.
The assignment of a separate app pool to the sub-app is a requirement when using the in-process hosting model.
For more information on the in-process hosting model and configuring the ASP.NET Core Module, see ASP.NET Core Module (ANCM) for IIS.
Configuration of IIS with web.config
IIS configuration is influenced by the <system.webServer> section of web.config for IIS scenarios that are functional for ASP.NET Core apps with the ASP.NET Core Module. For example, IIS configuration is functional for dynamic compression. If IIS is configured at the server level to use dynamic compression, the <urlCompression> element in the app's web.config file can disable it for an ASP.NET Core app.
For more information, see the following topics:
- Configuration reference for <system.webServer>
- ASP.NET Core Module (ANCM) for IIS
- IIS modules with ASP.NET Core
To set environment variables for individual apps running in isolated app pools (supported for IIS 10.0 or later), see the AppCmd.exe command section of the Environment Variables <environmentVariables> topic in the IIS reference documentation.
Sections that aren't used by ASP.NET Core
Configuration sections of ASP.NET apps in web.config aren't used by ASP.NET Core apps for configuration:
<system.web><appSettings><connectionStrings><location>
ASP.NET Core apps are configured using other configuration providers. For more information, see Configuration and .NET Core run-time configuration settings
Application Pools
App pool isolation is determined by the hosting model:
- In-process hosting: Apps are required to run in separate app pools.
- Out-of-process hosting: We recommend isolating the apps from each other by running each app in its own app pool.
The IIS Add Website dialog defaults to a single app pool per app. When a Site name is provided, the text is automatically transferred to the Application pool textbox. A new app pool is created using the site name when the site is added.
Application Pool Identity
An app pool identity account allows an app to run under a unique account without having to create and manage domains or local accounts. On IIS 8.0 or later, the IIS Admin Worker Process (WAS) creates a virtual account with the name of the new app pool and runs the app pool's worker processes under this account by default. In the IIS Management Console under Advanced Settings for the app pool, ensure that the Identity is set to use ApplicationPoolIdentity:
The IIS management process creates a secure identifier with the name of the app pool in the Windows Security System. Resources can be secured using this identity. However, this identity isn't a real user account and doesn't show up in the Windows User Management Console.
If the IIS worker process requires elevated access to the app, modify the Access Control List (ACL) for the directory containing the app:
Open Windows Explorer and navigate to the directory.
Right-click on the directory and select Properties.
Under the Security tab, select the Edit button and then the Add button.
Select the Locations button and make sure the system is selected.
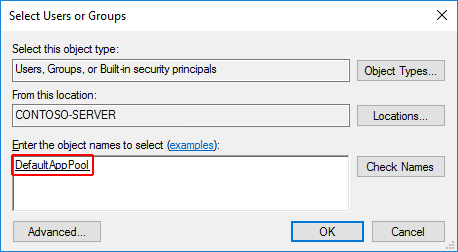
Enter
IIS AppPool\{APP POOL NAME}, where the placeholder{APP POOL NAME}is the app pool name, in Enter the object names to select area. Select the Check Names button. For the DefaultAppPool check the names usingIIS AppPool\DefaultAppPool. When the Check Names button is selected, a value ofDefaultAppPoolis indicated in the object names area. It isn't possible to enter the app pool name directly into the object names area. Use theIIS AppPool\{APP POOL NAME}format, where the placeholder{APP POOL NAME}is the app pool name, when checking for the object name.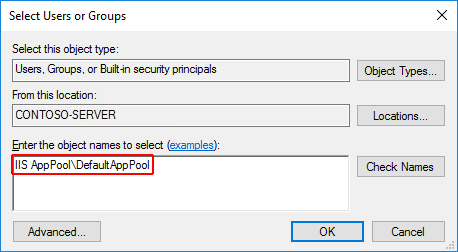
Select OK.
Read & execute permissions should be granted by default. Provide additional permissions as needed.
Access can also be granted at a command prompt using the ICACLS tool. Using the DefaultAppPool as an example, the following command is used:
ICACLS C:\sites\MyWebApp /grant "IIS AppPool\DefaultAppPool":F
For more information, see the icacls topic.
HTTP/2 support
HTTP/2 is supported with ASP.NET Core in the following IIS deployment scenarios:
- In-process
- Windows Server 2016/Windows 10 or later; IIS 10 or later
- TLS 1.2 or later connection
- Out-of-process
- Windows Server 2016/Windows 10 or later; IIS 10 or later
- Public-facing edge server connections use HTTP/2, but the reverse proxy connection to the Kestrel server uses HTTP/1.1.
- TLS 1.2 or later connection
For an in-process deployment when an HTTP/2 connection is established, HttpRequest.Protocol reports HTTP/2. For an out-of-process deployment when an HTTP/2 connection is established, HttpRequest.Protocol reports HTTP/1.1.
For more information on the in-process and out-of-process hosting models, see ASP.NET Core Module (ANCM) for IIS.
HTTP/2 is enabled by default. Connections fall back to HTTP/1.1 if an HTTP/2 connection isn't established. For more information on HTTP/2 configuration with IIS deployments, see HTTP/2 on IIS.
CORS preflight requests
This section only applies to ASP.NET Core apps that target the .NET Framework.
For an ASP.NET Core app that targets the .NET Framework, OPTIONS requests aren't passed to the app by default in IIS. To learn how to configure the app's IIS handlers in web.config to pass OPTIONS requests, see Enable cross-origin requests in ASP.NET Web API 2: How CORS Works.
Application Initialization Module and Idle Timeout
When hosted in IIS by the ASP.NET Core Module version 2:
- Application Initialization Module: App's hosted in-process or out-of-process can be configured to start automatically on a worker process restart or server restart.
- Idle Timeout: App's hosted in-process can be configured not to timeout during periods of inactivity.
Application Initialization Module
Applies to apps hosted in-process and out-of-process.
IIS Application Initialization is an IIS feature that sends an HTTP request to the app when the app pool starts or is recycled. The request triggers the app to start. By default, IIS issues a request to the app's root URL (/) to initialize the app (see the additional resources for more details on configuration).
Confirm that the IIS Application Initialization role feature in enabled:
On Windows 7 or later desktop systems when using IIS locally:
- Navigate to Control Panel > Programs > Programs and Features > Turn Windows features on or off (left side of the screen).
- Open Internet Information Services > World Wide Web Services > Application Development Features.
- Select the checkbox for Application Initialization.
On Windows Server 2008 R2 or later:
- Open the Add Roles and Features Wizard.
- In the Select role services panel, open the Application Development node.
- Select the checkbox for Application Initialization.
Use either of the following approaches to enable the Application Initialization Module for the site:
Using IIS Manager:
- Select Application Pools in the Connections panel.
- Right-click the app's app pool in the list and select Advanced Settings.
- The default Start Mode is OnDemand. Set the Start Mode to AlwaysRunning. Select OK.
- Open the Sites node in the Connections panel.
- Right-click the app and select Manage Website > Advanced Settings.
- The default Preload Enabled setting is False. Set Preload Enabled to True. Select OK.
Using
web.config, add the<applicationInitialization>element withdoAppInitAfterRestartset totrueto the<system.webServer>elements in the app's web.config` file:<?xml version="1.0" encoding="utf-8"?> <configuration> <location path="." inheritInChildApplications="false"> <system.webServer> <applicationInitialization doAppInitAfterRestart="true" /> </system.webServer> </location> </configuration>
Idle Timeout
Only applies to apps hosted in-process.
To prevent the app from idling, set the app pool's idle timeout using IIS Manager:
- Select Application Pools in the Connections panel.
- Right-click the app's app pool in the list and select Advanced Settings.
- The default Idle Time-out (minutes) is 20 minutes. Set the Idle Time-out (minutes) to 0 (zero). Select OK.
- Recycle the worker process.
To prevent apps hosted out-of-process from timing out, use either of the following approaches:
- Ping the app from an external service in order to keep it running.
- If the app only hosts background services, avoid IIS hosting and use a Windows Service to host the ASP.NET Core app.
Application Initialization Module and Idle Timeout additional resources
- IIS 8.0 Application Initialization
- Application Initialization <applicationInitialization>.
- Process Model Settings for an Application Pool <processModel>.
Deployment resources for IIS administrators
- IIS documentation
- Getting Started with the IIS Manager in IIS
- .NET Core application deployment
- ASP.NET Core Module (ANCM) for IIS
- ASP.NET Core directory structure
- IIS modules with ASP.NET Core
- Troubleshoot ASP.NET Core on Azure App Service and IIS
- Common error troubleshooting for Azure App Service and IIS with ASP.NET Core
Additional resources
For a tutorial experience on publishing an ASP.NET Core app to an IIS server, see Publish an ASP.NET Core app to IIS.
Install the .NET Core Hosting Bundle
Supported operating systems
The following operating systems are supported:
- Windows 7 or later
- Windows Server 2008 R2 or later
HTTP.sys server (formerly called WebListener) doesn't work in a reverse proxy configuration with IIS. Use the Kestrel server.
For information on hosting in Azure, see Deploy ASP.NET Core apps to Azure App Service.
For troubleshooting guidance, see Troubleshoot and debug ASP.NET Core projects.
Supported platforms
Apps published for 32-bit (x86) or 64-bit (x64) deployment are supported. Deploy a 32-bit app with a 32-bit (x86) .NET Core SDK unless the app:
- Requires the larger virtual memory address space available to a 64-bit app.
- Requires the larger IIS stack size.
- Has 64-bit native dependencies.
Use a 64-bit (x64) .NET Core SDK to publish a 64-bit app. A 64-bit runtime must be present on the host system.
ASP.NET Core ships with Kestrel server, a default, cross-platform HTTP server.
When using IIS or IIS Express, the app runs in a process separate from the IIS worker process (out-of-process) with the Kestrel server.
Because ASP.NET Core apps run in a process separate from the IIS worker process, the module handles process management. The module starts the process for the ASP.NET Core app when the first request arrives and restarts the app if it shuts down or crashes. This is essentially the same behavior as seen with apps that run in-process that are managed by the Windows Process Activation Service (WAS).
The following diagram illustrates the relationship between IIS, the ASP.NET Core Module, and an app hosted out-of-process:
Requests arrive from the web to the kernel-mode HTTP.sys driver. The driver routes the requests to IIS on the website's configured port, usually 80 (HTTP) or 443 (HTTPS). The module forwards the requests to Kestrel on a random port for the app, which isn't port 80 or 443.
The module specifies the port via an environment variable at startup, and the IIS Integration Middleware configures the server to listen on http://localhost:{port}. Additional checks are performed, and requests that don't originate from the module are rejected. The module doesn't support HTTPS forwarding, so requests are forwarded over HTTP even if received by IIS over HTTPS.
After Kestrel picks up the request from the module, the request is pushed into the ASP.NET Core middleware pipeline. The middleware pipeline handles the request and passes it on as an HttpContext instance to the app's logic. Middleware added by IIS Integration updates the scheme, remote IP, and pathbase to account for forwarding the request to Kestrel. The app's response is passed back to IIS, which pushes it back out to the HTTP client that initiated the request.
CreateDefaultBuilder configures Kestrel server as the web server and enables IIS Integration by configuring the base path and port for the ASP.NET Core Module.
The ASP.NET Core Module generates a dynamic port to assign to the backend process. CreateDefaultBuilder calls the UseIISIntegration method. UseIISIntegration configures Kestrel to listen on the dynamic port at the localhost IP address (127.0.0.1). If the dynamic port is 1234, Kestrel listens at 127.0.0.1:1234. This configuration replaces other URL configurations provided by:
UseUrls- Kestrel's Listen API
- Configuration (or command-line --urls option)
Calls to UseUrls or Kestrel's Listen API aren't required when using the module. If UseUrls or Listen is called, Kestrel listens on the port specified only when running the app without IIS.
For ASP.NET Core Module configuration guidance, see ASP.NET Core Module (ANCM) for IIS.
For more information on hosting, see Host in ASP.NET Core.
Application configuration
Enable the IISIntegration components
When building a host in CreateWebHostBuilder (Program.cs), call CreateDefaultBuilder to enable IIS integration:
public static IWebHostBuilder CreateWebHostBuilder(string[] args) =>
    WebHost.CreateDefaultBuilder(args)
        ...
For more information on CreateDefaultBuilder, see ASP.NET Core Web Host.
IIS options
| Option | Default | Setting |
|---|---|---|
AutomaticAuthentication |
true |
If true, IIS Server sets the HttpContext.User authenticated by Windows Authentication. If false, the server only provides an identity for HttpContext.User and responds to challenges when explicitly requested by the AuthenticationScheme. Windows Authentication must be enabled in IIS for AutomaticAuthentication to function. For more information, see Windows Authentication. |
AuthenticationDisplayName |
null |
Sets the display name shown to users on login pages. |
To configure IIS options, include a service configuration for IISOptions in ConfigureServices. The following example prevents the app from populating HttpContext.Connection.ClientCertificate:
services.Configure<IISOptions>(options =>
{
    options.ForwardClientCertificate = false;
});
| Option | Default | Setting |
|---|---|---|
AutomaticAuthentication |
true |
If true, IIS Integration Middleware sets the HttpContext.User authenticated by Windows Authentication. If false, the middleware only provides an identity for HttpContext.User and responds to challenges when explicitly requested by the AuthenticationScheme. Windows Authentication must be enabled in IIS for AutomaticAuthentication to function. For more information, see the Windows Authentication topic. |
AuthenticationDisplayName |
null |
Sets the display name shown to users on login pages. |
ForwardClientCertificate |
true |
If true and the MS-ASPNETCORE-CLIENTCERT request header is present, the HttpContext.Connection.ClientCertificate is populated. |
Proxy server and load balancer scenarios
The IIS Integration Middleware, which configures Forwarded Headers Middleware, and the ASP.NET Core Module are configured to forward the scheme (HTTP/HTTPS) and the remote IP address where the request originated. Additional configuration might be required for apps hosted behind additional proxy servers and load balancers. For more information, see Configure ASP.NET Core to work with proxy servers and load balancers.
web.config file
The web.config file configures the ASP.NET Core Module. Creating, transforming, and publishing the web.config file is handled by an MSBuild target (_TransformWebConfig) when the project is published. This target is present in the Web SDK targets (Microsoft.NET.Sdk.Web). The SDK is set at the top of the project file:
<Project Sdk="Microsoft.NET.Sdk.Web">
If a web.config file isn't present in the project, the file is created with the correct processPath and arguments to configure the ASP.NET Core Module and moved to published output.
If a web.config file is present in the project, the file is transformed with the correct processPath and arguments to configure the ASP.NET Core Module and moved to published output. The transformation doesn't modify IIS configuration settings in the file.
The web.config file may provide additional IIS configuration settings that control active IIS modules. For information on IIS modules that are capable of processing requests with ASP.NET Core apps, see the IIS modules topic.
To prevent the Web SDK from transforming the web.config file, use the <IsTransformWebConfigDisabled> property in the project file:
<PropertyGroup>
  <IsTransformWebConfigDisabled>true</IsTransformWebConfigDisabled>
</PropertyGroup>
When disabling the Web SDK from transforming the file, the processPath and arguments should be manually set by the developer. For more information, see ASP.NET Core Module (ANCM) for IIS.
web.config file location
In order to set up the ASP.NET Core Module correctly, the web.config file must be present at the content root path (typically the app base path) of the deployed app. This is the same location as the website physical path provided to IIS. The web.config file is required at the root of the app to enable the publishing of multiple apps using Web Deploy.
Sensitive files exist on the app's physical path, such as <assembly>.runtimeconfig.json, <assembly>.xml (XML Documentation comments), and <assembly>.deps.json. When the web.config file is present and the site starts normally, IIS doesn't serve these sensitive files if they're requested. If the web.config file is missing, incorrectly named, or unable to configure the site for normal startup, IIS may serve sensitive files publicly.
The web.config file must be present in the deployment at all times, correctly named, and able to configure the site for normal start up. Never remove the web.config file from a production deployment.
Transform web.config
If you need to transform web.config on publish (for example, set environment variables based on the configuration, profile, or environment), see Transform web.config.
IIS configuration
Windows Server operating systems
Enable the Web Server (IIS) server role and establish role services.
Use the Add Roles and Features wizard from the Manage menu or the link in Server Manager. On the Server Roles step, check the box for Web Server (IIS).
After the Features step, the Role services step loads for Web Server (IIS). Select the IIS role services desired or accept the default role services provided.
Windows Authentication (Optional)
To enable Windows Authentication, expand the following nodes: Web Server > Security. Select the Windows Authentication feature. For more information, see Windows Authentication <windowsAuthentication> and Configure Windows authentication.WebSockets (Optional)
WebSockets is supported with ASP.NET Core 1.1 or later. To enable WebSockets, expand the following nodes: Web Server > Application Development. Select the WebSocket Protocol feature. For more information, see WebSockets.Proceed through the Confirmation step to install the web server role and services. A server/IIS restart isn't required after installing the Web Server (IIS) role.
Windows desktop operating systems
Enable the IIS Management Console and World Wide Web Services.
Navigate to Control Panel > Programs > Programs and Features > Turn Windows features on or off (left side of the screen).
Open the Internet Information Services node. Open the Web Management Tools node.
Check the box for IIS Management Console.
Check the box for World Wide Web Services.
Accept the default features for World Wide Web Services or customize the IIS features.
Windows Authentication (Optional)
To enable Windows Authentication, expand the following nodes: World Wide Web Services > Security. Select the Windows Authentication feature. For more information, see Windows Authentication <windowsAuthentication> and Configure Windows authentication.WebSockets (Optional)
WebSockets is supported with ASP.NET Core 1.1 or later. To enable WebSockets, expand the following nodes: World Wide Web Services > Application Development Features. Select the WebSocket Protocol feature. For more information, see WebSockets.If the IIS installation requires a restart, restart the system.
Install the .NET Core Hosting Bundle
Install the .NET Core Hosting Bundle on the hosting system. The bundle installs the .NET Core Runtime, .NET Core Library, and the ASP.NET Core Module. The module allows ASP.NET Core apps to run behind IIS.
Important
If the Hosting Bundle is installed before IIS, the bundle installation must be repaired. Run the Hosting Bundle installer again after installing IIS.
If the Hosting Bundle is installed after installing the 64-bit (x64) version of .NET Core, SDKs might appear to be missing (No .NET Core SDKs were detected). To resolve the problem, see Troubleshoot and debug ASP.NET Core projects.
Download
- Navigate to the Download .NET Core page.
- Select the desired .NET Core version.
- In the Run apps - Runtime column, find the row of the .NET Core runtime version desired.
- Download the installer using the Hosting Bundle link.
Warning
Some installers contain release versions that have reached their end of life (EOL) and are no longer supported by Microsoft. For more information, see the support policy.
Install the Hosting Bundle
Run the installer on the server. The following parameters are available when running the installer from an administrator command shell:
OPT_NO_ANCM=1: Skip installing the ASP.NET Core Module.OPT_NO_RUNTIME=1: Skip installing the .NET Core runtime. Used when the server only hosts self-contained deployments (SCD).OPT_NO_SHAREDFX=1: Skip installing the ASP.NET Shared Framework (ASP.NET runtime). Used when the server only hosts self-contained deployments (SCD).OPT_NO_X86=1: Skip installing x86 runtimes. Use this parameter when you know that you won't be hosting 32-bit apps. If there's any chance that you will host both 32-bit and 64-bit apps in the future, don't use this parameter and install both runtimes.OPT_NO_SHARED_CONFIG_CHECK=1: Disable the check for using an IIS Shared Configuration when the shared configuration (applicationHost.config) is on the same machine as the IIS installation. Only available for ASP.NET Core 2.2 or later Hosting Bundler installers. For more information, see ASP.NET Core Module (ANCM) for IIS.
Restart the system or execute the following commands in a command shell:
net stop was /y
net start w3svc
Restarting IIS picks up a change to the system PATH, which is an environment variable, made by the installer.
It isn't necessary to manually stop individual sites in IIS when installing the Hosting Bundle. Hosted apps (IIS sites) restart when IIS restarts. Apps start up again when they receive their first request, including from the Application Initialization Module.
ASP.NET Core adopts roll-forward behavior for patch releases of shared framework packages. When apps hosted by IIS restart with IIS, the apps load with the latest patch releases of their referenced packages when they receive their first request. If IIS isn't restarted, apps restart and exhibit roll-forward behavior when their worker processes are recycled and they receive their first request.
Note
For information on IIS Shared Configuration, see ASP.NET Core Module with IIS Shared Configuration.
Install Web Deploy when publishing with Visual Studio
When deploying apps to servers with Web Deploy, install the latest version of Web Deploy on the server. To install Web Deploy, use the Web Platform Installer (WebPI) or obtain an installer directly from the Microsoft Download Center. The preferred method is to use WebPI. WebPI offers a standalone setup and a configuration for hosting providers.
Create the IIS site
On the hosting system, create a folder to contain the app's published folders and files. In a following step, the folder's path is provided to IIS as the physical path to the app. For more information on an app's deployment folder and file layout, see ASP.NET Core directory structure.
In IIS Manager, open the server's node in the Connections panel. Right-click the Sites folder. Select Add Website from the contextual menu.
Provide a Site name and set the Physical path to the app's deployment folder. Provide the Binding configuration and create the website by selecting OK:
Warning
Top-level wildcard bindings (
http://*:80/andhttp://+:80) should not be used. Top-level wildcard bindings can open up your app to security vulnerabilities. This applies to both strong and weak wildcards. Use explicit host names rather than wildcards. Subdomain wildcard binding (for example,*.mysub.com) doesn't have this security risk if you control the entire parent domain (as opposed to*.com, which is vulnerable). See RFC 9110: HTTP Semantics (Section 7.2: Host and :authority) for more information.Under the server's node, select Application Pools.
Right-click the site's app pool and select Basic Settings from the contextual menu.
In the Edit Application Pool window, set the .NET CLR version to No Managed Code:
ASP.NET Core runs in a separate process and manages the runtime. ASP.NET Core doesn't rely on loading the desktop CLR (.NET CLR)—the Core Common Language Runtime (CoreCLR) for .NET Core is booted to host the app in the worker process. Setting the .NET CLR version to No Managed Code is optional but recommended.
ASP.NET Core 2.2 or later: For a 64-bit (x64) self-contained deployment that uses the in-process hosting model, disable the app pool for 32-bit (x86) processes.
In the Actions sidebar of IIS Manager > Application Pools, select Set Application Pool Defaults or Advanced Settings. Locate Enable 32-Bit Applications and set the value to
False. This setting doesn't affect apps deployed for out-of-process hosting.Confirm the process model identity has the proper permissions.
If the default identity of the app pool (Process Model > Identity) is changed from ApplicationPoolIdentity to another identity, verify that the new identity has the required permissions to access the app's folder, database, and other required resources. For example, the app pool requires read and write access to folders where the app reads and writes files.
Windows Authentication configuration (Optional)
For more information, see Configure Windows authentication.
Deploy the app
Deploy the app to the IIS Physical path folder that was established in the Create the IIS site section. Web Deploy is the recommended mechanism for deployment, but several options exist for moving the app from the project's publish folder to the hosting system's deployment folder.
Web Deploy with Visual Studio
See the Visual Studio publish profiles for ASP.NET Core app deployment topic to learn how to create a publish profile for use with Web Deploy. If the hosting provider provides a Publish Profile or support for creating one, download their profile and import it using the Visual Studio Publish dialog:
Web Deploy outside of Visual Studio
Web Deploy can also be used outside of Visual Studio from the command line. For more information, see Web Deployment Tool.
Alternatives to Web Deploy
Use any of several methods to move the app to the hosting system, such as manual copy, Xcopy, Robocopy, or PowerShell.
For more information on ASP.NET Core deployment to IIS, see the Deployment resources for IIS administrators section.
Browse the website
After the app is deployed to the hosting system, make a request to one of the app's public endpoints.
In the following example, the site is bound to an IIS Host name of www.mysite.com on Port 80. A request is made to http://www.mysite.com:
Locked deployment files
Files in the deployment folder are locked when the app is running. Locked files can't be overwritten during deployment. To release locked files in a deployment, stop the app pool using one of the following approaches:
Use Web Deploy and reference
Microsoft.NET.Sdk.Webin the project file. Anapp_offline.htmfile is placed at the root of the web app directory. When the file is present, the ASP.NET Core Module gracefully shuts down the app and serves theapp_offline.htmfile during the deployment. For more information, see the ASP.NET Core Module configuration reference.Manually stop the app pool in the IIS Manager on the server.
Use PowerShell to drop
app_offline.htm(requires PowerShell 5 or later):$pathToApp = 'PATH_TO_APP' # Stop the AppPool New-Item -Path $pathToApp app_offline.htm # Provide script commands here to deploy the app # Restart the AppPool Remove-Item -Path $pathToApp app_offline.htm
Data protection
The ASP.NET Core Data Protection stack is used by several ASP.NET Core middlewares, including middleware used in authentication. Even if Data Protection APIs aren't called by user code, data protection should be configured with a deployment script or in user code to create a persistent cryptographic key store. If data protection isn't configured, the keys are held in memory and discarded when the app restarts.
If the key ring is stored in memory when the app restarts:
- All cookie-based authentication tokens are invalidated.
- Users are required to sign in again on their next request.
- Any data protected with the key ring can no longer be decrypted. This may include CSRF tokens and ASP.NET Core MVC TempData cookies.
To configure data protection under IIS to persist the key ring, use one of the following approaches:
Create Data Protection Registry Keys
Data protection keys used by ASP.NET Core apps are stored in the registry external to the apps. To persist the keys for a given app, create registry keys for the app pool.
For standalone, non-webfarm IIS installations, the Data Protection Provision-AutoGenKeys.ps1 PowerShell script can be used for each app pool used with an ASP.NET Core app. This script creates a registry key in the HKLM registry that's accessible only to the worker process account of the app's app pool. Keys are encrypted at rest using DPAPI with a machine-wide key.
In web farm scenarios, an app can be configured to use a UNC path to store its data protection key ring. By default, the data protection keys aren't encrypted. Ensure that the file permissions for the network share are limited to the Windows account the app runs under. An X509 certificate can be used to protect keys at rest. Consider a mechanism to allow users to upload certificates: Place certificates into the user's trusted certificate store and ensure they're available on all machines where the user's app runs. See Configure ASP.NET Core Data Protection for details.
Configure the IIS Application Pool to load the user profile
This setting is in the Process Model section under the Advanced Settings for the app pool. Set Load User Profile to
True. When set toTrue, keys are stored in the user profile directory and protected using DPAPI with a key specific to the user account. Keys are persisted to the %LOCALAPPDATA%/ASP.NET/DataProtection-Keys folder.The app pool's setProfileEnvironment attribute must also be enabled. The default value of
setProfileEnvironmentistrue. In some scenarios (for example, Windows OS),setProfileEnvironmentis set tofalse. If keys aren't stored in the user profile directory as expected:- Navigate to the %windir%/system32/inetsrv/config folder.
- Open the applicationHost.config file.
- Locate the
<system.applicationHost><applicationPools><applicationPoolDefaults><processModel>element. - Confirm that the
setProfileEnvironmentattribute isn't present, which defaults the value totrue, or explicitly set the attribute's value totrue.
Use the file system as a key ring store
Adjust the app code to use the file system as a key ring store. Use an X509 certificate to protect the key ring and ensure the certificate is a trusted certificate. If the certificate is self-signed, place the certificate in the Trusted Root store.
When using IIS in a web farm:
- Use a file share that all machines can access.
- Deploy an X509 certificate to each machine. Configure data protection in code.
Set a machine-wide policy for data protection
The data protection system has limited support for setting a default machine-wide policy for all apps that consume the Data Protection APIs. For more information, see ASP.NET Core Data Protection Overview.
Virtual Directories
IIS Virtual Directories aren't supported with ASP.NET Core apps. An app can be hosted as a sub-application.
Sub-applications
An ASP.NET Core app can be hosted as an IIS sub-application (sub-app). The sub-app's path becomes part of the root app's URL.
A sub-app shouldn't include the ASP.NET Core Module as a handler. If the module is added as a handler in a sub-app's web.config file, a 500.19 Internal Server Error referencing the faulty config file is received when attempting to browse the sub-app.
The following example shows a published web.config file for an ASP.NET Core sub-app:
<?xml version="1.0" encoding="utf-8"?>
<configuration>
  <system.webServer>
    <aspNetCore processPath="dotnet"
      arguments=".\MyApp.dll"
      stdoutLogEnabled="false"
      stdoutLogFile=".\logs\stdout" />
  </system.webServer>
</configuration>
When hosting a non-ASP.NET Core sub-app underneath an ASP.NET Core app, explicitly remove the inherited handler in the sub-app's web.config file:
<?xml version="1.0" encoding="utf-8"?>
<configuration>
  <system.webServer>
    <handlers>
      <remove name="aspNetCore" />
    </handlers>
    <aspNetCore processPath="dotnet"
      arguments=".\MyApp.dll"
      stdoutLogEnabled="false"
      stdoutLogFile=".\logs\stdout" />
  </system.webServer>
</configuration>
Static asset links within the sub-app should use tilde-slash (~/) notation. Tilde-slash notation triggers a Tag Helper to prepend the sub-app's pathbase to the rendered relative link. For a sub-app at /subapp_path, an image linked with src="~/image.png" is rendered as src="/subapp_path/image.png". The root app's Static File Middleware doesn't process the static file request. The request is processed by the sub-app's Static File Middleware.
If a static asset's src attribute is set to an absolute path (for example, src="/image.png"), the link is rendered without the sub-app's pathbase. The root app's Static File Middleware attempts to serve the asset from the root app's web root, which results in a 404 - Not Found response unless the static asset is available from the root app.
To host an ASP.NET Core app as a sub-app under another ASP.NET Core app:
Establish an app pool for the sub-app. Set the .NET CLR Version to No Managed Code because the Core Common Language Runtime (CoreCLR) for .NET Core is booted to host the app in the worker process, not the desktop CLR (.NET CLR).
Add the root site in IIS Manager with the sub-app in a folder under the root site.
Right-click the sub-app folder in IIS Manager and select Convert to Application.
In the Add Application dialog, use the Select button for the Application Pool to assign the app pool that you created for the sub-app. Select OK.
The assignment of a separate app pool to the sub-app is a requirement when using the in-process hosting model.
For more information on the in-process hosting model and configuring the ASP.NET Core Module, see ASP.NET Core Module (ANCM) for IIS.
Configuration of IIS with web.config
IIS configuration is influenced by the <system.webServer> section of web.config for IIS scenarios that are functional for ASP.NET Core apps with the ASP.NET Core Module. For example, IIS configuration is functional for dynamic compression. If IIS is configured at the server level to use dynamic compression, the <urlCompression> element in the app's web.config file can disable it for an ASP.NET Core app.
For more information, see the following topics:
- Configuration reference for <system.webServer>
- ASP.NET Core Module (ANCM) for IIS
- IIS modules with ASP.NET Core
To set environment variables for individual apps running in isolated app pools (supported for IIS 10.0 or later), see the AppCmd.exe command section of the Environment Variables <environmentVariables> topic in the IIS reference documentation.
Sections that aren't used by ASP.NET Core
Configuration sections of ASP.NET 4.x apps in web.config aren't used by ASP.NET Core apps for configuration:
<system.web><appSettings><connectionStrings><location>
ASP.NET Core apps are configured using other configuration providers. For more information, see Configuration.
Application Pools
When hosting multiple websites on a server, we recommend isolating the apps from each other by running each app in its own app pool. The IIS Add Website dialog defaults to this configuration. When a Site name is provided, the text is automatically transferred to the Application pool textbox. A new app pool is created using the site name when the site is added.
Application Pool Identity
An app pool identity account allows an app to run under a unique account without having to create and manage domains or local accounts. On IIS 8.0 or later, the IIS Admin Worker Process (WAS) creates a virtual account with the name of the new app pool and runs the app pool's worker processes under this account by default. In the IIS Management Console under Advanced Settings for the app pool, ensure that the Identity is set to use ApplicationPoolIdentity:
The IIS management process creates a secure identifier with the name of the app pool in the Windows Security System. Resources can be secured using this identity. However, this identity isn't a real user account and doesn't show up in the Windows User Management Console.
If the IIS worker process requires elevated access to the app, modify the Access Control List (ACL) for the directory containing the app:
Open Windows Explorer and navigate to the directory.
Right-click on the directory and select Properties.
Under the Security tab, select the Edit button and then the Add button.
Select the Locations button and make sure the system is selected.
Enter IIS AppPool\<app_pool_name> in Enter the object names to select area. Select the Check Names button. For the DefaultAppPool check the names using IIS AppPool\DefaultAppPool. When the Check Names button is selected, a value of DefaultAppPool is indicated in the object names area. It isn't possible to enter the app pool name directly into the object names area. Use the IIS AppPool\<app_pool_name> format when checking for the object name.
Select OK.
Read & execute permissions should be granted by default. Provide additional permissions as needed.
Access can also be granted at a command prompt using the ICACLS tool. Using the DefaultAppPool as an example, the following command is used:
ICACLS C:\sites\MyWebApp /grant "IIS AppPool\DefaultAppPool":F
For more information, see the icacls topic.
HTTP/2 support
HTTP/2 is supported for out-of-process deployments that meet the following base requirements:
- Windows Server 2016/Windows 10 or later; IIS 10 or later
- Public-facing edge server connections use HTTP/2, but the reverse proxy connection to the Kestrel server uses HTTP/1.1.
- Target framework: Not applicable to out-of-process deployments, since the HTTP/2 connection is handled entirely by IIS.
- TLS 1.2 or later connection
If an HTTP/2 connection is established, HttpRequest.Protocol reports HTTP/1.1.
HTTP/2 is enabled by default. Connections fall back to HTTP/1.1 if an HTTP/2 connection isn't established. For more information on HTTP/2 configuration with IIS deployments, see HTTP/2 on IIS.
CORS preflight requests
This section only applies to ASP.NET Core apps that target the .NET Framework.
For an ASP.NET Core app that targets the .NET Framework, OPTIONS requests aren't passed to the app by default in IIS. To learn how to configure the app's IIS handlers in web.config to pass OPTIONS requests, see Enable cross-origin requests in ASP.NET Web API 2: How CORS Works.
Deployment resources for IIS administrators
- IIS documentation
- Getting Started with the IIS Manager in IIS
- .NET Core application deployment
- ASP.NET Core Module (ANCM) for IIS
- ASP.NET Core directory structure
- IIS modules with ASP.NET Core
- Troubleshoot ASP.NET Core on Azure App Service and IIS
- Common error troubleshooting for Azure App Service and IIS with ASP.NET Core
Additional resources
ASP.NET Core
Feedback
Coming soon: Throughout 2024 we will be phasing out GitHub Issues as the feedback mechanism for content and replacing it with a new feedback system. For more information see: https://aka.ms/ContentUserFeedback.
Submit and view feedback for