Manage Key Vault in Azure Stack Hub using PowerShell
This article describes how to create and manage a key vault in Azure Stack Hub using PowerShell. You'll learn how to use Key Vault PowerShell cmdlets to:
- Create a key vault.
- Store and manage cryptographic keys and secrets.
- Authorize users or apps to invoke operations in the vault.
Note
The Key Vault PowerShell cmdlets described in this article are provided in the Azure PowerShell SDK.
Prerequisites
- You must subscribe to an offer that includes the Azure Key Vault service.
- Install PowerShell for Azure Stack Hub.
- Configure the Azure Stack Hub PowerShell environment.
Enable your tenant subscription for Key Vault operations
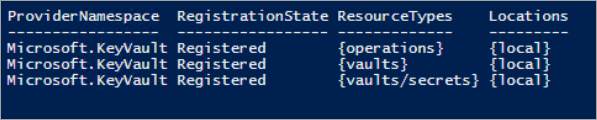
Before you can issue any operations against a key vault, you must ensure that your tenant subscription is enabled for vault operations. To verify that key vault operations are enabled, run the following command:
Get-AzResourceProvider -ProviderNamespace Microsoft.KeyVault | ft -Autosize
If your subscription is enabled for vault operations, the output shows RegistrationState is Registered for all resource types of a key vault.
If vault operations are not enabled, issue the following command to register the Key Vault service in your subscription:
Register-AzResourceProvider -ProviderNamespace Microsoft.KeyVault
If the registration is successful, the following output is returned:

When you invoke the key vault commands, you might receive an error, such as "The subscription is not registered to use namespace 'Microsoft.KeyVault'." If you get an error, confirm you've enabled the Key Vault resource provider by following the previous instructions.
Create a key vault
Before you create a key vault, create a resource group so that all of the resources related to the key vault exist in a resource group. Use the following command to create a new resource group:
New-AzResourceGroup -Name "VaultRG" -Location local -verbose -Force

Now, use the following cmdlet to create a key vault in the resource group that you created earlier. This command reads three mandatory parameters: resource group name, key vault name, and geographic location.
Run the following command to create a key vault:
New-AzKeyVault -VaultName "Vault01" -ResourceGroupName "VaultRG" -Location local -verbose
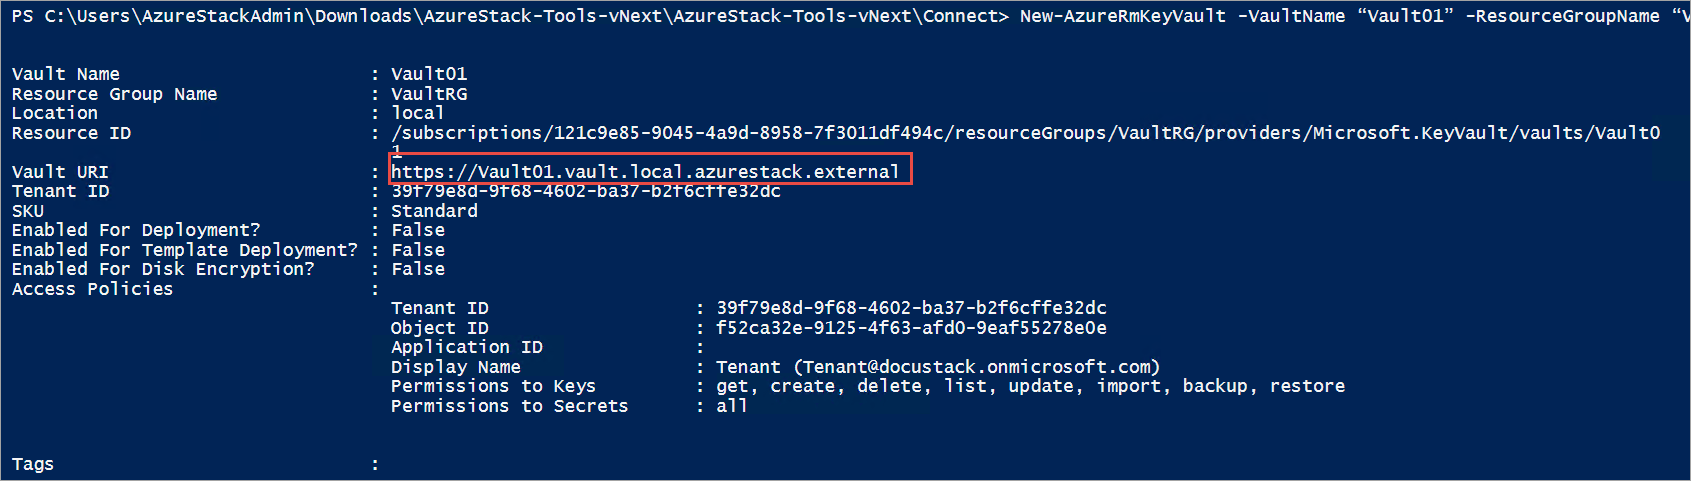
The output of this command shows the properties of the key vault that you created. When an app accesses this vault, it must use the Vault URI property, which is https://vault01.vault.local.azurestack.external in this example.
Active Directory Federation Services (AD FS) deployment
In an AD FS deployment, you might get this warning: "Access policy is not set. No user or application has access permission to use this vault." To resolve this issue, set an access policy for the vault by using the Set-AzKeyVaultAccessPolicy command:
# Obtain the security identifier(SID) of the active directory user
$adUser = Get-ADUser -Filter "Name -eq '{Active directory user name}'"
$objectSID = $adUser.SID.Value

# Set the key vault access policy
Set-AzKeyVaultAccessPolicy -VaultName "{key vault name}" -ResourceGroupName "{resource group name}" -ObjectId "{object SID}" -PermissionsToKeys {permissionsToKeys} -PermissionsToSecrets {permissionsToSecrets} -BypassObjectIdValidation
Manage keys and secrets
After you create a vault, use these steps to create and manage keys and secrets in the vault.
Create a key
Use the Add-AzureKeyVaultKey cmdlet to create or import a software-protected key in a key vault:
Add-AzureKeyVaultKey -VaultName "Vault01" -Name "Key01" -verbose -Destination Software
The -Destination parameter is used to specify that the key is software protected. When the key is successfully created, the command outputs the details of the created key.

You can now reference the created key by using its URI. If you create or import a key that has same name as an existing key, the original key is updated with the values specified in the new key. You can access the previous version by using the version-specific URI of the key. For example:
- Use
https://vault10.vault.local.azurestack.external:443/keys/key01to always get the current version. - Use
https://vault010.vault.local.azurestack.external:443/keys/key01/d0b36ee2e3d14e9f967b8b6b1d38938ato get this specific version.
Get a key
Use the Get-AzureKeyVaultKey cmdlet to read a key and its details:
Get-AzureKeyVaultKey -VaultName "Vault01" -Name "Key01"
Create a secret
Use the Set-AzureKeyVaultSecret cmdlet to create or update a secret in a vault. A secret is created if one does not already exist. A new version of the secret is created if it already exists:
$secretvalue = ConvertTo-SecureString "User@123" -AsPlainText -Force
Set-AzureKeyVaultSecret -VaultName "Vault01" -Name "Secret01" -SecretValue $secretvalue

Get a secret
Use the Get-AzureKeyVaultSecret cmdlet to read a secret in a key vault. This command can return all or specific versions of a secret:
Get-AzureKeyVaultSecret -VaultName "Vault01" -Name "Secret01"
After you create the keys and secrets, you can authorize external apps to use them.
Authorize an app to use a key or secret
Use the following cmdlet to authorize an app to access a key or secret in the key vault.
In the following example, the vault name is ContosoKeyVault, and the app you want to authorize has a client ID of 8f8c4bbd-485b-45fd-98f7-ec6300b7b4ed. To authorize the app, run the following command. You can also specify the PermissionsToKeys parameter to set permissions for a user, an app, or a security group.
When using the cmdlet against an AD FS configured Azure Stack Hub environment, the parameter BypassObjectIdValidation should be provided
Set-AzKeyVaultAccessPolicy -VaultName 'ContosoKeyVault' -ServicePrincipalName 8f8c4bbd-485b-45fd-98f7-ec6300b7b4ed -PermissionsToKeys decrypt,sign -BypassObjectIdValidation
If you want to authorize that same app to read secrets in your vault, run the following cmdlet:
Set-AzKeyVaultAccessPolicy -VaultName 'ContosoKeyVault' -ServicePrincipalName 8f8c4bbd-485b-45fd-98f7-ec6300 -PermissionsToKeys Get -BypassObjectIdValidation
Next steps
Feedback
Coming soon: Throughout 2024 we will be phasing out GitHub Issues as the feedback mechanism for content and replacing it with a new feedback system. For more information see: https://aka.ms/ContentUserFeedback.
Submit and view feedback for