Set up a password reset flow in Azure Active Directory B2C
Before you begin, use the Choose a policy type selector at the top of this page to choose the type of policy you’re setting up. Azure Active Directory B2C offers two methods to define how users interact with your applications: through predefined user flows or through fully configurable custom policies. The steps required in this article are different for each method.
In a sign-up and sign-in journey, a user can reset their own password by using the Forgot your password? link. This self-service password reset flow applies to local accounts in Azure Active Directory B2C (Azure AD B2C) that use an email address or a username with a password for sign-in.
Tip
A user can change their password by using the self-service password reset flow if they forget their password and want to reset it. You can also choose one of the following user flow options to change a user's password:
- If a user knows their password and wants to change it, use a password change flow.
- If you want to force a user to reset their password (for example, when they sign in for the first time, when their passwords have been reset by an admin, or after they've been migrated to Azure AD B2C with random passwords), use a force password reset flow.
The password reset flow involves the following steps:
- On the sign-up and sign-in page, the user selects the Forgot your password? link. Azure AD B2C initiates the password reset flow.
- In the next dialog that appears, the user enters their email address, and then selects Send verification code. Azure AD B2C sends a verification code to the user's email account. The user copies the verification code from the email, enters the code in the Azure AD B2C password reset dialog, and then selects Verify code.
- The user can then enter a new password. (After the email is verified, the user can still select the Change e-mail button; see Hide the change email button if you wish to remove it.)

The default name of the Change email button in selfAsserted.html is changeclaims. To find the button name, on the sign-up page, inspect the page source by using a browser tool such as Inspect.
Prerequisites
- Create a user flow so users can sign up and sign in to your application.
- Register a web application.
- Complete the steps in Get started with custom policies in Active Directory B2C. This tutorial guides you how to update custom policy files to use your Azure AD B2C tenant configuration.
- Register a web application.
- The B2C Users need to have an authentication method specified for self-service password reset. Select the B2C User, in the left menu under Manage, select Authentication methods, ensure Authentication contact info is set. B2C users created via a SignUp flow will have this set by default. For users created via Azure Portal or by Graph API need to have this set for SSPR to work.
Self-service password reset (recommended)
The new password reset experience is now part of the sign-up or sign-in policy. When the user selects the Forgot your password? link, they are immediately sent to the Forgot Password experience. Your application no longer needs to handle the AADB2C90118 error code, and you don't need a separate policy for password reset.
The self-service password reset experience can be configured for the Sign in (Recommended) or Sign up and sign in (Recommended) user flows. If you don't have one of these user flows set up, create a sign-up or sign-in user flow.
To set up self-service password reset for the sign-up or sign-in user flow:
- Sign in to the Azure portal.
- If you have access to multiple tenants, select the Settings icon in the top menu to switch to your Azure AD B2C tenant from the Directories + subscriptions menu.
- In the Azure portal, search for and select Azure AD B2C.
- Select User flows.
- Select a sign-up or sign-in user flow (of type Recommended) that you want to customize.
- In the menu under Settings, select Properties.
- Under Password configuration, select Self-service password reset.
- Select Save.
- In the left menu under Customize, select Page layouts.
- In Page Layout Version, select 2.1.3 or later.
- Select Save.
The following sections describe how to add a self-service password experience to a custom policy. The sample is based on the policy files that are included in the custom policy starter pack.
Tip
You can find a complete sample of the Sign Up and Sign In with Password Reset policy on GitHub.
Indicate that a user selected the Forgot your password? link
To indicate to the policy that a user selected the Forgot your password? link, define a Boolean claim. Use the claim to direct the user journey to the Forgot Password technical profile. The claim also can be issued to the token, so the application detects that the user signed in by using the Forgot Password user flow.
Declare your claims in the claims schema. Open the extensions file of your policy, for example, in SocialAndLocalAccounts/TrustFrameworkExtensions.xml.
Search for the BuildingBlocks element. If the element doesn't exist, add it.
Locate the ClaimsSchema element. If the element doesn't exist, add it.
Add the following claim to the ClaimsSchema element.
<!--
<BuildingBlocks>
  <ClaimsSchema> -->
    <ClaimType Id="isForgotPassword">
      <DisplayName>isForgotPassword</DisplayName>
      <DataType>boolean</DataType>
      <AdminHelpText>Whether the user has selected Forgot your Password</AdminHelpText>
    </ClaimType>
  <!--
  </ClaimsSchema>
</BuildingBlocks> -->
Upgrade the page layout version
Page layout version 2.1.2 is required to enable the self-service password reset flow in the sign-up or sign-in journey. To upgrade the page layout version:
Open the base file of your policy, for example, SocialAndLocalAccounts/TrustFrameworkBase.xml.
Search for the BuildingBlocks element. If the element doesn't exist, add it.
Locate the ContentDefinitions element. If the element doesn't exist, add it.
Modify the DataURI element within the ContentDefinition element to have the ID
api.signuporsignin:<!-- <BuildingBlocks> <ContentDefinitions> --> <ContentDefinition Id="api.signuporsignin"> <DataUri>urn:com:microsoft:aad:b2c:elements:contract:unifiedssp:2.1.2</DataUri> </ContentDefinition> <!-- </ContentDefinitions> </BuildingBlocks> -->
Add the technical profiles
A claims transformation technical profile accesses the isForgotPassword claim. The technical profile is referenced later. When it's invoked, it sets the value of the isForgotPassword claim to true.
- Open the extensions file of your policy, for example, in SocialAndLocalAccounts/TrustFrameworkExtensions.xml.
- Find the ClaimsProviders element (if the element doesn't exist, create it), and then add the following claims provider:
<!--
<ClaimsProviders> -->
  <ClaimsProvider>
    <DisplayName>Local Account</DisplayName>
    <TechnicalProfiles>
      <TechnicalProfile Id="ForgotPassword">
        <DisplayName>Forgot your password?</DisplayName>
        <Protocol Name="Proprietary" Handler="Web.TPEngine.Providers.ClaimsTransformationProtocolProvider, Web.TPEngine, Version=1.0.0.0, Culture=neutral, PublicKeyToken=null"/>
        <OutputClaims>
          <OutputClaim ClaimTypeReferenceId="isForgotPassword" DefaultValue="true" AlwaysUseDefaultValue="true"/>
        </OutputClaims>
        <UseTechnicalProfileForSessionManagement ReferenceId="SM-Noop" />
      </TechnicalProfile>
      <TechnicalProfile Id="SelfAsserted-LocalAccountSignin-Email">
        <Metadata>
          <Item Key="setting.forgotPasswordLinkOverride">ForgotPasswordExchange</Item>
        </Metadata>
      </TechnicalProfile>
      <TechnicalProfile Id="LocalAccountWritePasswordUsingObjectId">
        <UseTechnicalProfileForSessionManagement ReferenceId="SM-AAD" />
      </TechnicalProfile>
    </TechnicalProfiles>
  </ClaimsProvider>
<!--
</ClaimsProviders> -->
The SelfAsserted-LocalAccountSignin-Email technical profile setting.forgotPasswordLinkOverride defines the password reset claims exchange that executes in your user journey.
The LocalAccountWritePasswordUsingObjectId technical profile UseTechnicalProfileForSessionManagement SM-AAD session manager is required for the user to preform subsequent logins successfully under SSO conditions.
Add the password reset sub journey
The user can now sign in, sign up, and perform password reset in your user journey. To better organize the user journey, you can use a sub journey to handle the password reset flow.
The sub journey is called from the user journey and performs the specific steps that deliver the password reset experience to the user. Use the Call type sub journey so that when the sub journey is finished, control is returned to the orchestration step that initiated the sub journey.
- Open the extensions file of your policy, such as SocialAndLocalAccounts/TrustFrameworkExtensions.xml.
- Find the SubJourneys element. If the element doesn't exist, add it after the User Journeys element. Then, add the following sub journey:
<!--
<SubJourneys>-->
  <SubJourney Id="PasswordReset" Type="Call">
    <OrchestrationSteps>
      <!-- Validate user's email address. -->
      <OrchestrationStep Order="1" Type="ClaimsExchange">
        <ClaimsExchanges>
          <ClaimsExchange Id="PasswordResetUsingEmailAddressExchange" TechnicalProfileReferenceId="LocalAccountDiscoveryUsingEmailAddress" />
        </ClaimsExchanges>
      </OrchestrationStep>

      <!-- Collect and persist a new password. -->
      <OrchestrationStep Order="2" Type="ClaimsExchange">
        <ClaimsExchanges>
          <ClaimsExchange Id="NewCredentials" TechnicalProfileReferenceId="LocalAccountWritePasswordUsingObjectId" />
        </ClaimsExchanges>
      </OrchestrationStep>
    </OrchestrationSteps>
  </SubJourney>
<!--
</SubJourneys>-->
Prepare your user journey
Next, to connect the Forgot your password? link to the Forgot Password sub journey you will need to reference the Forgot Password sub journey ID in the ClaimsProviderSelection element of the CombinedSignInAndSignUp step.
If you don't have your own custom user journey that has a CombinedSignInAndSignUp step, complete the following steps to duplicate an existing sign-up or sign-in user journey. Otherwise, continue to the next section.
- In the starter pack, open the TrustFrameworkBase.xml file such as SocialAndLocalAccounts/TrustFrameworkBase.xml.
- Find and copy the entire contents of the UserJourney element that includes
Id="SignUpOrSignIn". - Open TrustFrameworkExtensions.xml file, such as SocialAndLocalAccounts/TrustFrameworkExtensions.xml, and find the UserJourneys element. If the element doesn't exist, create it.
- Create a child element of the UserJourneys element by pasting the entire contents of the UserJourney element you copied in step 2.
- Rename the ID of the user journey. For example,
Id="CustomSignUpSignIn".
Connect the Forgot Password link to the Forgot Password sub journey
In your user journey, you can represent the Forgot Password sub journey as a ClaimsProviderSelection. By adding this element, you connect the Forgot your password? link to the Forgot Password sub journey.
Open the TrustFrameworkExtensions.xml file, such as SocialAndLocalAccounts/TrustFrameworkExtensions.xml.
In the user journey, find the orchestration step element that includes
Type="CombinedSignInAndSignUp"orType="ClaimsProviderSelection". It's usually the first orchestration step. The ClaimsProviderSelections element contains a list of identity providers that a user can use to sign in. Add the following line:<ClaimsProviderSelection TargetClaimsExchangeId="ForgotPasswordExchange" />In the next orchestration step, add a ClaimsExchange element by adding the following line:
<ClaimsExchange Id="ForgotPasswordExchange" TechnicalProfileReferenceId="ForgotPassword" />Add the following orchestration step between the current step and the next step. The new orchestration step you add checks whether the isForgotPassword claim exists. If the claim exists, it invokes the password reset sub journey.
<OrchestrationStep Order="3" Type="InvokeSubJourney">
  <Preconditions>
    <Precondition Type="ClaimsExist" ExecuteActionsIf="false">
      <Value>isForgotPassword</Value>
      <Action>SkipThisOrchestrationStep</Action>
    </Precondition>
  </Preconditions>
  <JourneyList>
    <Candidate SubJourneyReferenceId="PasswordReset" />
  </JourneyList>
</OrchestrationStep>
After you add the new orchestration step, renumber the steps sequentially without skipping any integers from 1 to N.
Set the user journey to be executed
Now that you've modified or created a user journey, in the Relying Party section, specify the journey that Azure AD B2C will execute for this custom policy.
Open the file that has the Relying Party element, such as SocialAndLocalAccounts/SignUpOrSignin.xml.
In the RelyingParty element, find the DefaultUserJourney element.
Update the DefaultUserJourney ReferenceId to match the ID of the user journey in which you added the ClaimsProviderSelections.
<RelyingParty>
  <DefaultUserJourney ReferenceId="CustomSignUpSignIn" />
  ...
</RelyingParty>
Indicate the Forgot Password flow to your App
Your application might need to detect whether the user signed in by using the Forgot Password user flow. The isForgotPassword claim contains a Boolean value that indicates that they did. The claim can be issued in the token that's sent to your application. If necessary, add isForgotPassword to the output claims in the Relying Party section. Your application can check the isForgotPassword claim to determine whether the user resets their password.
<RelyingParty>
  <OutputClaims>
    ...
    <OutputClaim ClaimTypeReferenceId="isForgotPassword" DefaultValue="false" />
  </OutputClaims>
</RelyingParty>
Upload the custom policy
- Sign in to the Azure portal.
- If you have access to multiple tenants, select the Settings icon in the top menu to switch to the Azure AD B2C tenant from the Directories + subscriptions menu.
- In the Azure portal, search for and select Azure AD B2C.
- In the menu under Policies, select Identity Experience Framework.
- Select Upload custom policy. In the following order, upload the policy files that you changed:
- The base file of your policy, for example TrustFrameworkBase.xml.
- The extension policy, for example, TrustFrameworkExtensions.xml.
- The relying party policy, for example, SignUpSignIn.xml.
Hide the change email button (Optional)
After the email is verified, the user can still select Change email, enter another email address, and then repeat email verification. If you'd prefer to hide the Change email button, you can modify the CSS to hide the associated HTML elements in the dialog. For example, you can add the following CSS entry to selfAsserted.html and customize the user interface by using HTML templates:
<style type="text/css">
   .changeClaims
   {
     visibility: hidden;
   }
</style>
Test the password reset flow
- Select a sign-up or sign-in user flow (Recommended type) that you want to test.
- Select Run user flow.
- For Application, select the web application named webapp1 that you registered earlier. The Reply URL should show
https://jwt.ms. - Select Run user flow.
- On the sign-up or sign-in page, select Forgot your password?.
- Verify the email address of the account that you created earlier, and then select Continue.
- In the dialog that's shown, change the password for the user, and then select Continue. The token is returned to
https://jwt.msand the browser displays it. - Check the return token's isForgotPassword claim value. If it exists and is set to
true, the user has reset the password.
Password reset policy (legacy)
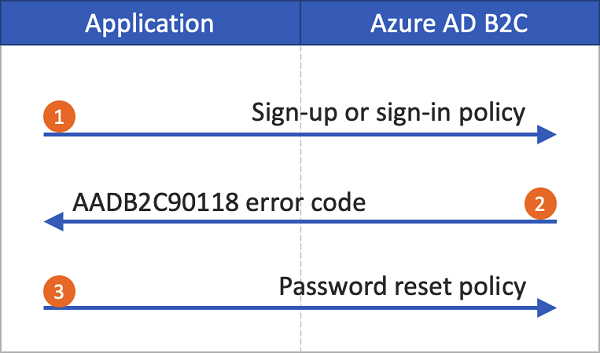
If the self-service password reset experience isn't enabled, selecting this link doesn't automatically trigger a password reset user flow. Instead, the error code AADB2C90118 is returned to your application. Your application must handle this error code by reinitializing the authentication library to authenticate an Azure AD B2C password reset user flow.
The following diagram depicts the process:
- In the application, the user selects Sign in. The app initiates an authorization request and redirects to Azure AD B2C so the user can finish signing in. The authorization request specifies a sign-up or sign-in policy name, such as B2C_1_signup_signin.
- The user selects the Forgot your password? link. Azure AD B2C returns the
AADB2C90118error code to the application. - The application handles the error code and initiates a new authorization request. The authorization request specifies the password reset policy name, such as B2C_1_pwd_reset.
You can see a basic demonstration of how user flows link in our ASP.NET sample.
Create a password reset user flow
To let your application users reset their passwords, create a password reset user flow:
- In the Azure portal, go to the Azure AD B2C tenant overview.
- In the left menu under Policies, select User flows, and then select New user flow.
- In Create a user flow, select the Password reset user flow.
- Under Select a version, select Recommended, and then select Create.
- For Name, enter a name for the user flow. For example, passwordreset1.
- For Identity providers, enable Reset password using username or Reset password using email address.
- Under Multifactor authentication, if you want to require users to verify their identities by using a second authentication method, select the method type and when to enforce multifactor authentication. Learn more.
- Under Conditional access, if you've configured conditional access policies for your Azure AD B2C tenant and you want to use them in this user flow, select the Enforce conditional access policies checkbox. You don't need to specify a policy name. Learn more.
- Under Application claims, select Show more. Choose the claims you want returned in the authorization tokens that are sent back to your application. For example, select User's Object ID.
- Select OK.
- Select Create to add the user flow. A prefix of B2C_1 is automatically added to the name.
Test the user flow
To test the user flow:
- Select the user flow you created. On the user flow overview page, select Run user flow.
- For Application, select the web application you wish to test, such as the one named webapp1 if you registered that earlier. The Reply URL should be
https://jwt.ms. - Select Run user flow, verify the email address of the account that you want to reset the password for, and then select Continue.
- Change the password, and then select Continue. The token is returned to
https://jwt.msand the browser displays it.
Create a password reset policy
Custom policies are a set of XML files that you upload to your Azure AD B2C tenant to define user journeys. We provide starter packs that have several pre-built policies, including sign up and sign in, password reset, and profile editing policies. For more information, see Get started with custom policies in Azure AD B2C.
Troubleshoot Azure AD B2C user flows and custom policies
Your application needs to handle certain errors coming from Azure B2C service. Learn how to troubleshoot Azure AD B2C's user flows and custom policies.
Next steps
Set up a force password reset.
Feedback
Coming soon: Throughout 2024 we will be phasing out GitHub Issues as the feedback mechanism for content and replacing it with a new feedback system. For more information see: https://aka.ms/ContentUserFeedback.
Submit and view feedback for