Create branching in user journey by using Azure Active Directory B2C custom policy
Different users of the same app can follow different user journeys depending on the values of the data in a custom policy. Azure Active Directory B2C (Azure AD B2C) custom policies allows you to conditionally enable or disable a technical profile to achieve this capability. For example, in Validate user inputs by using Azure AD B2C custom policy, we used a Precondition to determine whether or not we should run a validation technical profile based on the value of accountType claim.
A technical profile also provides a EnabledForUserJourneys element to allow you to specify whether or not a technical profile should run. The EnabledForUserJourneys element contains one of five values including OnClaimsExistence, which you use to specify that a technical profile should run only when a certain claim specified in the technical profile exists. Learn more about technical profile's EnabledForUserJourneys element.
Scenario overview
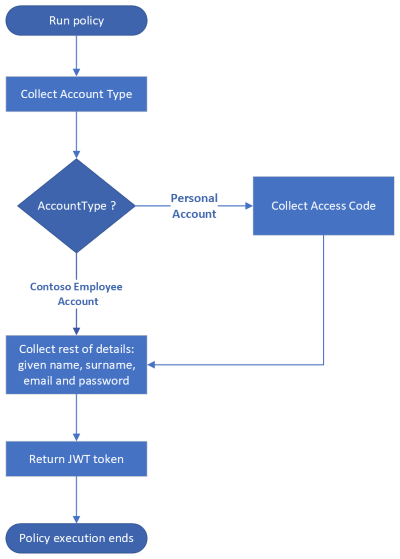
In Validate user inputs by using Azure AD B2C custom policy article, a user inputs their details in a single screen. In this article, a user needs to first select their account type, Contoso Employee Account or Personal Account. A user who selects Contoso Employee Account can proceed to provide further details. However, a user who selects Personal Account need to provide a valid invitation access code before they can proceed to provide further details. Hence, users who use Personal Account account type see an extra user interface to complete their journey.
In this article, you learn how to use EnabledForUserJourneys element inside a technical profile to create different user experiences based on a claim value.
Prerequisites
If you don't have one already, create an Azure AD B2C tenant that is linked to your Azure subscription.
Register a web application, and enable ID token implicit grant. For the Redirect URI, use https://jwt.ms.
You must have Visual Studio Code (VS Code) installed in your computer.
Complete the steps in Validate user inputs by using Azure AD B2C custom policy. This article is a part of Create and run your own custom policies how-to guide series.
Note
This article is part of the Create and run your own custom policies in Azure Active Directory B2C how-to guide series. We recommend that you start this series from the first article.
Step 1 - Declare claims
A user who selects Personal Account needs to provide a valid access code. So, we need a claim to hold this value:
In VS Code, open the
ContosoCustomPolicy.XMLfile.In the
ClaimsSchemasection, declare accessCode and isValidAccessCode claims by using the following code:<ClaimType Id="accessCode"> <DisplayName>Access Code</DisplayName> <DataType>string</DataType> <UserHelpText>Enter your invitation access code.</UserHelpText> <UserInputType>Password</UserInputType> <Restriction> <Pattern RegularExpression="[0-9][0-9][0-9][0-9][0-9]" HelpText="Please enter your invitation access code. It's a 5-digit number, something like 95765"/> </Restriction> </ClaimType> <ClaimType Id="isValidAccessCode"> <DataType>boolean</DataType> </ClaimType>
Step 2 - Define claims transformations
Locate the ClaimsTransformations element, and add the following claims transformations:
    <!---<ClaimsTransformations>-->
        <ClaimsTransformation Id="CheckIfIsValidAccessCode" TransformationMethod="CompareClaimToValue">
            <InputClaims>
                <InputClaim ClaimTypeReferenceId="accessCode" TransformationClaimType="inputClaim1"/>
            </InputClaims>
            <InputParameters>
                <InputParameter Id="compareTo" DataType="string" Value="88888"/>
                <InputParameter Id="operator" DataType="string" Value="equal"/>
                <InputParameter Id="ignoreCase" DataType="string" Value="true"/>
            </InputParameters>
            <OutputClaims>
                <OutputClaim ClaimTypeReferenceId="isValidAccessCode" TransformationClaimType="outputClaim"/>
            </OutputClaims>
        </ClaimsTransformation>
        <ClaimsTransformation Id="ThrowIfIsNotValidAccessCode" TransformationMethod="AssertBooleanClaimIsEqualToValue">
            <InputClaims>
                <InputClaim ClaimTypeReferenceId="isValidAccessCode" TransformationClaimType="inputClaim"/>
            </InputClaims>
            <InputParameters>
                <InputParameter Id="valueToCompareTo" DataType="boolean" Value="true"/>
            </InputParameters>
        </ClaimsTransformation>
    <!---</ClaimsTransformations>-->
We've defined two claims transformations, CheckIfIsValidAccessCode and ThrowIfIsNotValidAccessCode. CheckIfIsValidAccessCode uses CompareClaimToValue transformation method to compare the access code input by the user against a static value 88888 (let's use this value for testing) and assigns true or false to isValidAccessCode claim. ThrowIfIsNotValidAccessCode checks whether or not two boolean values of two claims are equal, and throws an exception if they aren't.
Step 3 - Configure or update technical profiles
You now need two new self-asserted technical profiles, one to collect the account type, and the other to collect access code from the user. You also need a new claims transformation type technical profile to validate the user's access code by executing the claims transformations that you defined in step 2. Now that we're collecting the account type in a different self-asserted technical profile, we need to update the UserInformationCollector self-asserted technical profile to prevent it from collecting the account type.
Locate the
ClaimsProviderselement, and then add a new claims provider using the following code:<!--<ClaimsProviders>--> <ClaimsProvider> <DisplayName>Technical Profiles to collect user's access code</DisplayName> <TechnicalProfiles> <TechnicalProfile Id="AccessCodeInputCollector"> <DisplayName>Collect Access Code Input from user Technical Profile</DisplayName> <Protocol Name="Proprietary" Handler="Web.TPEngine.Providers.SelfAssertedAttributeProvider, Web.TPEngine, Version=1.0.0.0, Culture=neutral, PublicKeyToken=null"/> <Metadata> <Item Key="ContentDefinitionReferenceId">SelfAssertedContentDefinition</Item> <Item Key="UserMessageIfClaimsTransformationBooleanValueIsNotEqual">The access code is invalid.</Item> <Item Key="ClaimTypeOnWhichToEnable">accountType</Item> <Item Key="ClaimValueOnWhichToEnable">personal</Item> </Metadata> <DisplayClaims> <DisplayClaim ClaimTypeReferenceId="accessCode" Required="true"/> </DisplayClaims> <OutputClaims> <OutputClaim ClaimTypeReferenceId="accessCode"/> </OutputClaims> <ValidationTechnicalProfiles> <ValidationTechnicalProfile ReferenceId="CheckAccessCodeViaClaimsTransformationChecker"/> </ValidationTechnicalProfiles> <EnabledForUserJourneys>OnClaimsExistence</EnabledForUserJourneys> </TechnicalProfile> <TechnicalProfile Id="CheckAccessCodeViaClaimsTransformationChecker"> <DisplayName>A Claims Transformations to check user's access code validity</DisplayName> <Protocol Name="Proprietary" Handler="Web.TPEngine.Providers.ClaimsTransformationProtocolProvider, Web.TPEngine, Version=1.0.0.0, Culture=neutral, PublicKeyToken=null"/> <OutputClaims> <OutputClaim ClaimTypeReferenceId="isValidAccessCode"/> </OutputClaims> <OutputClaimsTransformations> <OutputClaimsTransformation ReferenceId="CheckIfIsValidAccessCode"/> <OutputClaimsTransformation ReferenceId="ThrowIfIsNotValidAccessCode"/> </OutputClaimsTransformations> </TechnicalProfile> </TechnicalProfiles> </ClaimsProvider> <!--</ClaimsProviders>-->We've configured two technical profiles, AccessCodeInputCollector and CheckAccessCodeViaClaimsTransformationChecker. We call the CheckAccessCodeViaClaimsTransformationChecker technical profile as a validation technical profile from within the AccessCodeInputCollector technical profile. The CheckAccessCodeViaClaimsTransformationChecker itself is of type Claims Transformation technical Profile, which executes the Claims Transformations we defined in step 2.
AccessCodeInputCollector is a Self-Asserted Technical Profile used to collect an access code from the user. It includes
EnabledForUserJourneyselement that's set to OnClaimsExistence. ItsMetadataelement includes a claim (accountType) and its value (personal) that activates this technical profile.Locate the
ClaimsProviderselement, and then add a new claims provider using the following code:<!--<ClaimsProviders>--> <ClaimsProvider> <DisplayName>Technical Profile to collect user's accountType</DisplayName> <TechnicalProfiles> <TechnicalProfile Id="AccountTypeInputCollector"> <DisplayName>Collect User Input Technical Profile</DisplayName> <Protocol Name="Proprietary" Handler="Web.TPEngine.Providers.SelfAssertedAttributeProvider, Web.TPEngine, Version=1.0.0.0, Culture=neutral, PublicKeyToken=null"/> <Metadata> <Item Key="ContentDefinitionReferenceId">SelfAssertedContentDefinition</Item> </Metadata> <DisplayClaims> <DisplayClaim ClaimTypeReferenceId="accountType" Required="true"/> </DisplayClaims> <OutputClaims> <OutputClaim ClaimTypeReferenceId="accountType"/> </OutputClaims> </TechnicalProfile> </TechnicalProfiles> </ClaimsProvider> <!--</ClaimsProviders>-->We've configured a self-asserted technical profile,
AccountTypeInputCollector, which collect the user's account type. It's the account types's value that determines whether theAccessCodeInputCollectorself-asserted technical profile should be activated.To prevent the
UserInformationCollectorself-asserted technical profile from collecting the account type, locate theUserInformationCollectorself-asserted technical profile, and then:Remove the
accountTypedisplay claim,<DisplayClaim ClaimTypeReferenceId="accountType" Required="true"/>from theDisplayClaimscollection.Remove the
accountTypeoutput claim,<OutputClaim ClaimTypeReferenceId="accountType"/>, from theOutputClaimscollection.
Step 4 - Update the User journey orchestration steps
Now that you've set up your technical profiles, you need to update your user journey orchestration steps:
Locate your
HelloWorldJourneyuser journey and add replace all the orchestration steps with the following code:<!--<OrchestrationSteps>--> <OrchestrationStep Order="1" Type="ClaimsExchange"> <ClaimsExchanges> <ClaimsExchange Id="AccountTypeInputCollectorClaimsExchange" TechnicalProfileReferenceId="AccountTypeInputCollector"/> </ClaimsExchanges> </OrchestrationStep> <OrchestrationStep Order="2" Type="ClaimsExchange"> <ClaimsExchanges> <ClaimsExchange Id="GetAccessCodeClaimsExchange" TechnicalProfileReferenceId="AccessCodeInputCollector" /> </ClaimsExchanges> </OrchestrationStep> <OrchestrationStep Order="3" Type="ClaimsExchange"> <ClaimsExchanges> <ClaimsExchange Id="GetUserInformationClaimsExchange" TechnicalProfileReferenceId="UserInformationCollector"/> </ClaimsExchanges> </OrchestrationStep> <OrchestrationStep Order="4" Type="ClaimsExchange"> <ClaimsExchanges> <ClaimsExchange Id="GetMessageClaimsExchange" TechnicalProfileReferenceId="ClaimGenerator"/> </ClaimsExchanges> </OrchestrationStep> <OrchestrationStep Order="5" Type="SendClaims" CpimIssuerTechnicalProfileReferenceId="JwtIssuer"/> <!--</OrchestrationSteps>-->The orchestration steps shows that we call the technical profile in the order shown by the orchestration steps'
Orderattribute. However, theAccessCodeInputCollectortechnical profile is activated if the user selects Personal Account account type.
Step 5 - Upload custom policy file
Follow the steps in Upload custom policy file to upload your policy file. If you're uploading a file with same name as the one already in the portal, make sure you select Overwrite the custom policy if it already exists.
Step 6 - Test the custom policy
Follow the steps in Test the custom policy to test your custom policy:
- In the first screen, for Account Type, select Personal Account.
- For Access Code, enter 88888, and then select Continue.
- Enter the rest of the details as required, and then select Continue. After the policy finishes execution, you're redirected to
https://jwt.ms, and you see a decoded JWT token. - Repeat step 5, but this time, select Account Type, select Contoso Employee Account, and then follow the prompts.
Next steps
In step 3, we enable or disable the technical profile by using the EnabledForUserJourneys element. Alternatively, you can use Preconditions inside the user journey orchestration steps to execute or skip an orchestration step as we learn later in this series.
Next, learn:
Feedback
Coming soon: Throughout 2024 we will be phasing out GitHub Issues as the feedback mechanism for content and replacing it with a new feedback system. For more information see: https://aka.ms/ContentUserFeedback.
Submit and view feedback for