Tutorial: Configure Azure Active Directory B2C with the Arkose Labs platform
In this tutorial, learn how to integrate Azure Active Directory B2C (Azure AD B2C) authentication with the Arkose Labs Arkose Protect Platform. Arkose Labs products help organizations against bot attacks, account takeover, and fraudulent account openings.
Prerequisites
To get started, you'll need:
- An Azure subscription
- If you don't have one, you can get an Azure free account
- An Azure AD B2C tenant linked to your Azure subscription
- An Arkose Labs account
- Go to arkoselabs.com to request a demo
Scenario description
Arkose Labs products integration includes the following components:
- Arkose Protect Platform - A service to protect against bots and other automated abuse
- Azure AD B2C sign-up user flow - The sign-up experience that uses the Arkose Labs platform
- Custom HTML, JavaScript, and API connectors integrate with the Arkose platform
- Azure Functions - Your hosted API endpoint that works with the API connectors feature
- This API validates the server-side of the Arkose Labs session token
- Learn more in the Azure Functions Overview
The following diagram illustrates how the Arkose Labs platform integrates with Azure AD B2C.
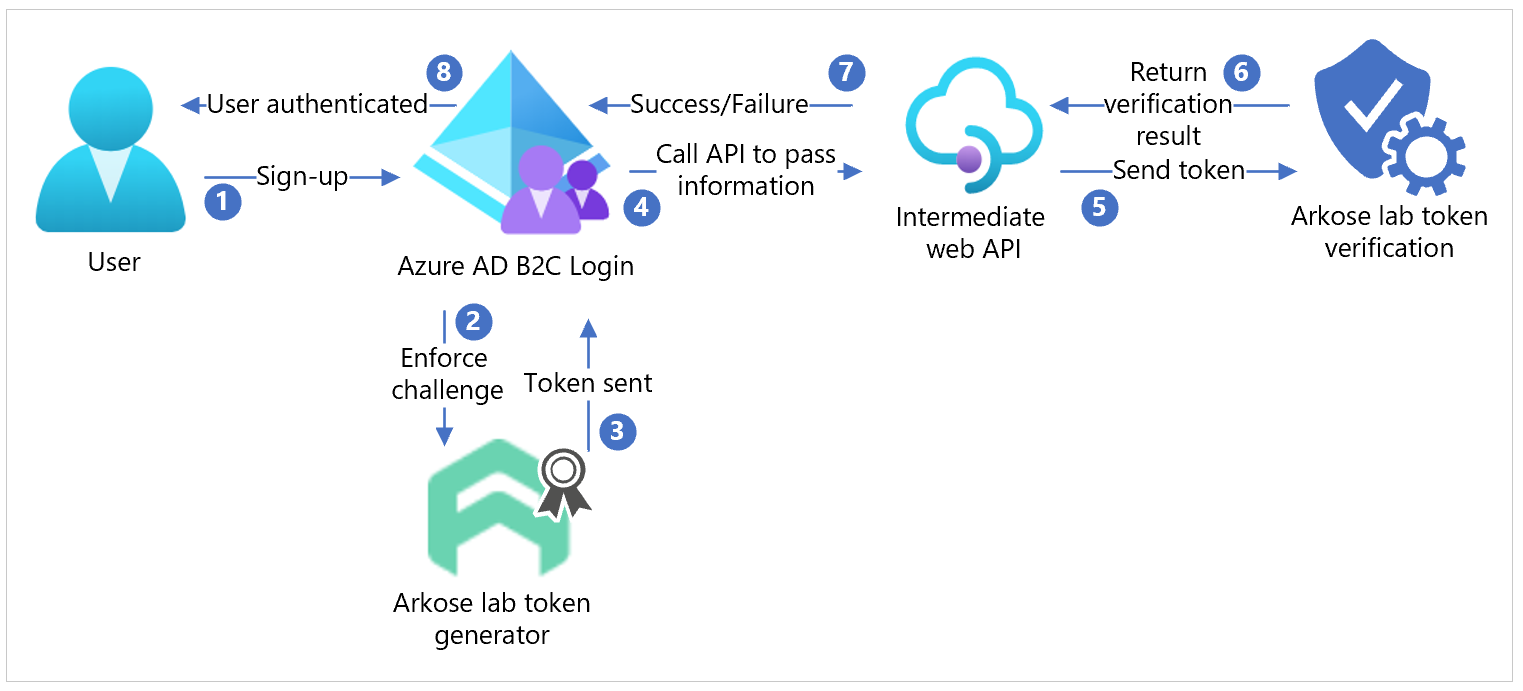
- A user signs up and creates an account. The user selects Submit, and an Arkose Labs enforcement challenge appears.
- The user completes the challenge. Azure AD B2C sends the status to Arkose Labs to generate a token.
- Arkose Labs sends the token to Azure AD B2C.
- Azure AD B2C calls an intermediate web API to pass the sign-up form.
- The sign-up form goes to Arkose Labs for token verification.
- Arkose Labs sends verification results to the intermediate web API.
- The API sends a success or failure result to Azure AD B2C.
- If the challenge is successful, a sign-up form goes to Azure AD B2C, which completes authentication.
Request a demo from Arkose Labs
- Go to arkoselabs.com to book a demo.
- Create an account.
- Navigate to the Arkose Portal sign-in page.
- In the dashboard, navigate to site settings.
- Locate your public key and private key. You'll use this information later.
Note
The public and private key values are ARKOSE_PUBLIC_KEY and ARKOSE_PRIVATE_KEY.
See, Azure-Samples/active-directory-b2c-node-sign-up-user-flow-arkose.
Integrate with Azure AD B2C
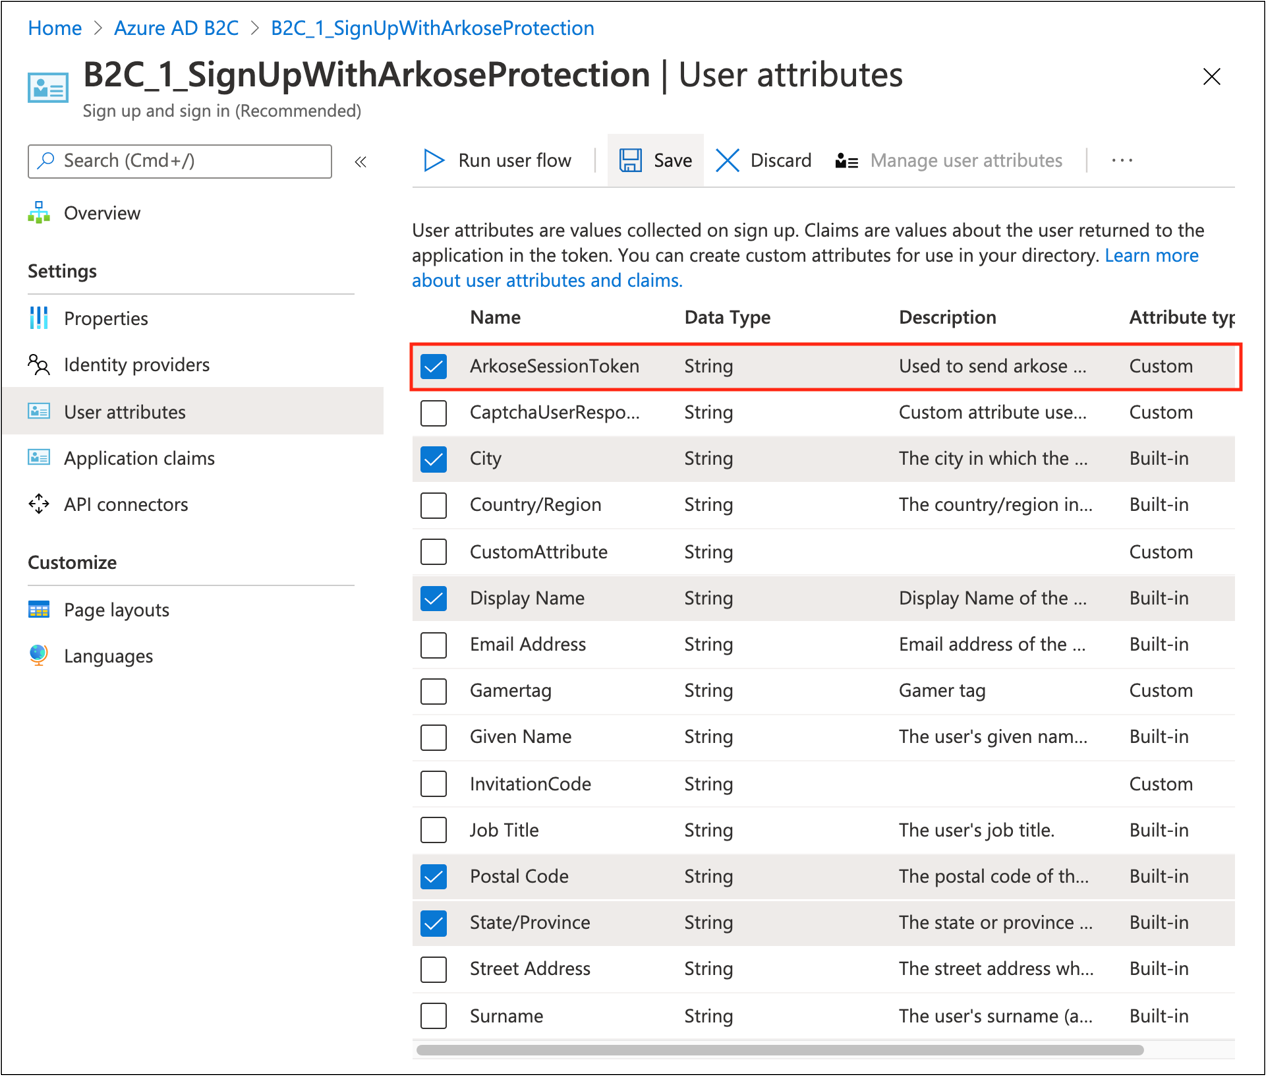
Create an ArkoseSessionToken custom attribute
To create a custom attribute:
- Sign in to the Azure portal, then navigate to Azure AD B2C.
- Select User attributes.
- Select Add.
- Enter ArkoseSessionToken as the attribute Name.
- Select Create.
Learn more: Define custom attributes in Azure Active Directory B2C
Create a user flow
The user flow is for sign-up and sign-in, or sign-up. The Arkose Labs user flow appears during sign-up.
Create user flows and custom policies in Azure Active Directory B2C. If using a user flow, use Recommended.
In the user flow settings, go to User attributes.
Select the ArkoseSessionToken claim.
Configure custom HTML, JavaScript, and page layout
- Go to Azure-Samples/active-directory-b2c-node-sign-up-user-flow-arkose.
- Find the HTML template with JavaScript
<script>tags. These do three things:
Load the Arkose Labs script, which renders their widget and does client-side Arkose Labs validation.
Hide the
extension_ArkoseSessionTokeninput element and label, corresponding to theArkoseSessionTokencustom attribute.When a user completes the Arkose Labs challenge, the user response is verified and a token generated. The callback
arkoseCallbackin the custom JavaScript sets the value ofextension_ArkoseSessionTokento the generated token value. This value is submitted to the API endpoint.Note
Go to developer.arkoselabs.com for Client-Side Instructions. Follow the steps to use the custom HTML and JavaScript for your user flow.
In Azure-Samples, modify selfAsserted.html file so
<ARKOSE_PUBLIC_KEY>matches the value you generated for the client-side validation.Host the HTML page on a Cross-Origin Resource Sharing (CORS) enabled web endpoint.
CORS support for Azure Storage.
Note
If you have custom HTML, copy and paste the
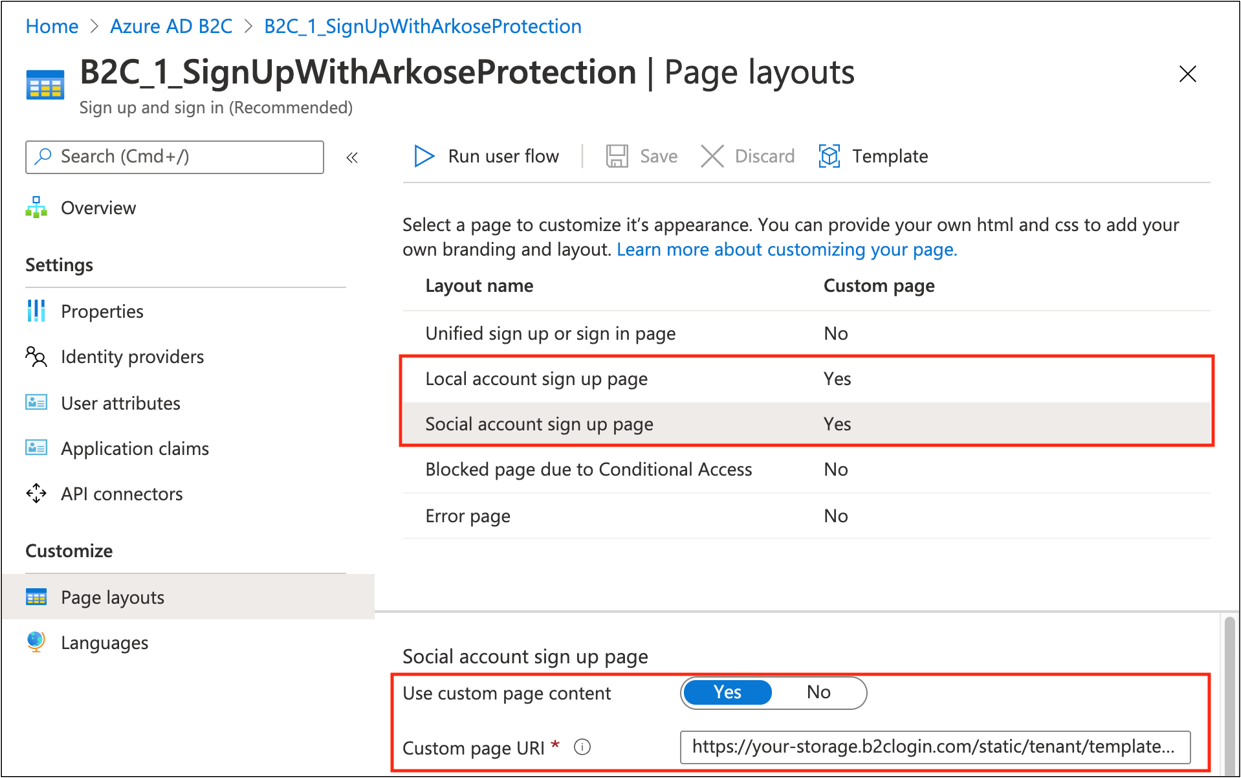
<script>elements onto your HTML page.In the Azure portal, go to Azure AD B2C.
Navigate to User flows.
Select your user flow.
Select Page layouts.
Select Local account sign up page layout.
For Use custom page content, select YES.
In Use custom page content, paste your custom HTML URI.
(Optional) If you use social identity providers, repeat steps for Social account sign-up page.
From your user flow, go to Properties.
Select Enable JavaScript.
Learn more: Enable JavaScript and page layout versions in Azure Active Directory B2C
Create and deploy your API
This section assumes you use Visual Studio Code to deploy Azure Functions. You can use the Azure portal, terminal, or command prompt to deploy.
Go to Visual Studio Marketplace to install Azure Functions for Visual Studio Code.
Run the API locally
- In Visual Studio code, in the left navigation, go to the Azure extension.
- Select the Local Project folder for your local Azure Function.
- Press F5 or select Debug > Start Debugging. This command uses the debug configuration Azure Function created.
- Azure Function generates files for local development, installs dependencies, and the Function Core tools, if needed.
- In the Visual Studio Code Terminal panel, output from the Function Core tool appears.
- When the host starts, select Alt+click on the local URL in the output.
- The browser opens and runs the function.
- In the Azure Functions explorer, right-click the function to see the locally hosted function URL.
Add environment variables
The sample in this section protects the web API endpoint when using HTTP Basic authentication. Learn more on the Internet Engineering Task Force page RFC 7617: The Basic Authentication.
Username and password are stored as environment variables, not part of the repository. Learn more on Code and test Azure Functions locally, Local settings file.
- In your root folder, create a local.settings.json file.
- Copy and paste the following code onto the file:
{
  "IsEncrypted": false,
  "Values": {
    "AzureWebJobsStorage": "",
    "FUNCTIONS_WORKER_RUNTIME": "node",
    "BASIC_AUTH_USERNAME": "<USERNAME>",
    "BASIC_AUTH_PASSWORD": "<PASSWORD>",
    "ARKOSE_PRIVATE_KEY": "<ARKOSE_PRIVATE_KEY>",
    "B2C_EXTENSIONS_APP_ID": "<B2C_EXTENSIONS_APP_ID>"
  }
}
- The BASIC_AUTH_USERNAME and BASIC_AUTH_PASSWORD are the credentials to authenticate the API call to your Azure Function. Select values.
- <ARKOSE_PRIVATE_KEY> is the server-side secret you generated in the Arkose Labs platform.
- It calls the Arkose Labs server-side validation API to validate the value of the
ArkoseSessionTokengenerated by the front end. - See, Server-Side Instructions.
- It calls the Arkose Labs server-side validation API to validate the value of the
- <B2C_EXTENSIONS_APP_ID> is the application ID used by Azure AD B2C to store custom attributes in the directory.
Navigate to App registrations.
Search for b2c-extensions-app.
From the Overview pane, copy the Application (client) ID.
Remove the
-characters.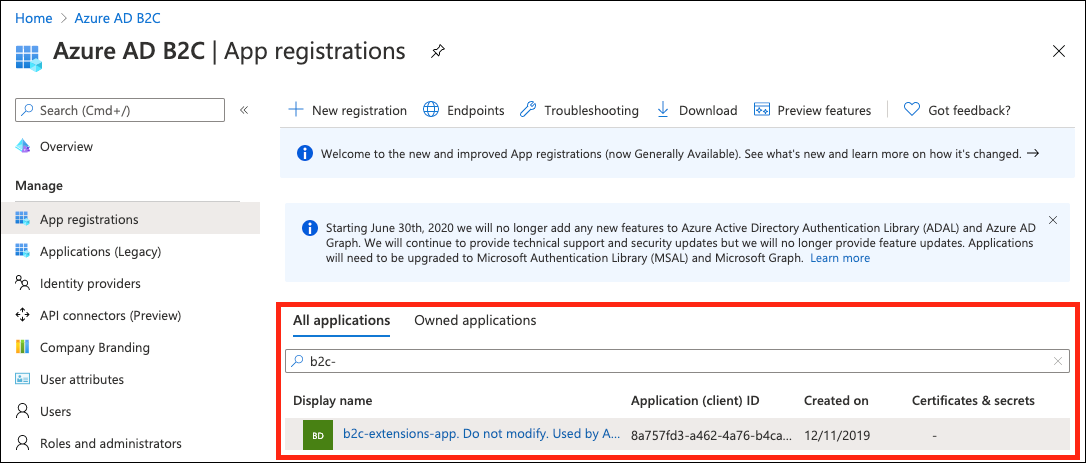
Deploy the application to the web
Deploy your Azure Function to the cloud. Learn more with Azure Functions documentation.
Copy the endpoint web URL of your Azure Function.
After deployment, select the Upload settings option.
Your environment variables are uploaded to the Application settings of the app service. Learn more on Application settings in Azure.
Note
You can manage your function app. See also, Deploy project files to learn about Visual Studio Code development for Azure Functions.
Configure and enable the API connector
Create an API connector. See, Add an API connector to a sign-up user flow.
Enable it for your user flow.
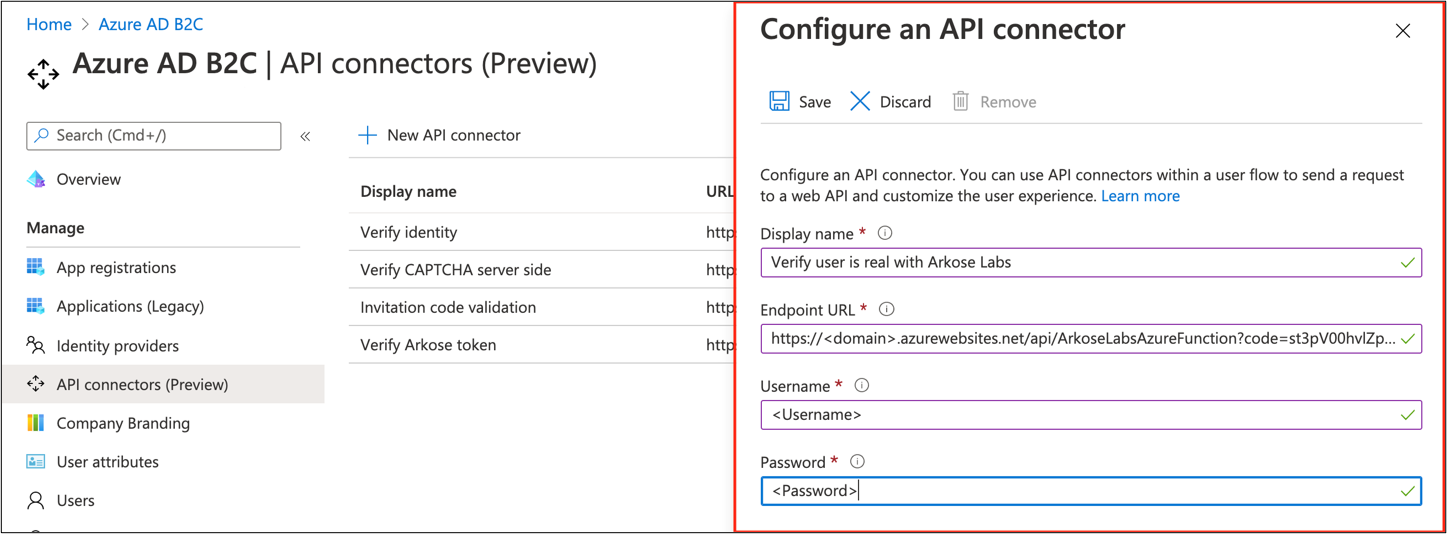
- Endpoint URL - The Function URL you copied while you deployed Azure Function
- Username - The username you defined
- Password - The password you defined
In the API connector settings for your user flow, select the API connector to be invoked at Before creating the user.
The API validates the
ArkoseSessionTokenvalue.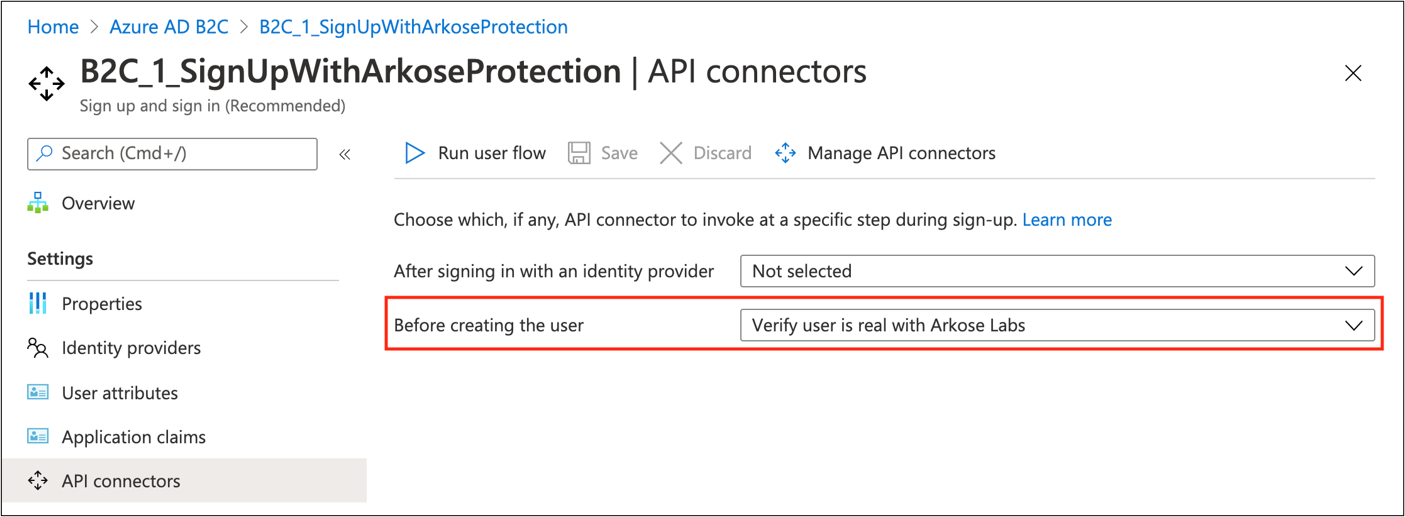
Test the user flow
- Open the Azure AD B2C tenant.
- Under Policies, select User flows.
- Select your created user flow.
- Select Run user flow.
- For Application select the registered app (the example is JWT).
- For Reply URL, select the redirect URL.
- Select Run user flow.
- Perform the sign-up flow.
- Create an account.
- Sign out.
- Perform the sign-in flow.
- Select Continue.
- An Arkose Labs puzzle appears.
Resources
Feedback
Coming soon: Throughout 2024 we will be phasing out GitHub Issues as the feedback mechanism for content and replacing it with a new feedback system. For more information see: https://aka.ms/ContentUserFeedback.
Submit and view feedback for