Set up phone sign-up and sign-in for user flows
In addition to email and username, you can enable phone number as a sign-up option tenant-wide by adding phone sign-up and sign-in to your local account identity provider. After you enable phone sign-up and sign-in for local accounts, you can add phone sign-up to your user flows.
Setting up phone sign-up and sign-in in a user flow involves the following steps:
Configure phone sign-up and sign-in tenant-wide in your local account identity provider to accept a phone number as a user's identity.
Add phone sign-up to your user flow to enable users to sign up for your application using their phone number.
Enable the recovery email prompt (preview) to let users specify an email that can be used to recover their account when they don't have their phone.
Display consent information to the user during the sign up or sign in flow. You can display the default consent information or customize the your own consent information.
Multi-factor authentication (MFA) is disabled by default when you configure a user flow with phone sign-up. You can enable MFA in user flows with phone sign-up, but because a phone number is used as the primary identifier, email one-time passcode is the only option available for the second authentication factor.
Configure phone sign-up and sign-in tenant-wide
Email sign-up is enabled by default in your local account identity provider settings. You can change the identity types you'll support in your tenant by selecting or deselecting email sign-up, username, or phone number.
Sign in to the Azure portal.
If you have access to multiple tenants, select the Settings icon in the top menu to switch to your Azure AD B2C tenant from the Directories + subscriptions menu.
Choose All services in the top-left corner of the Azure portal, and then search for and select Azure AD B2C.
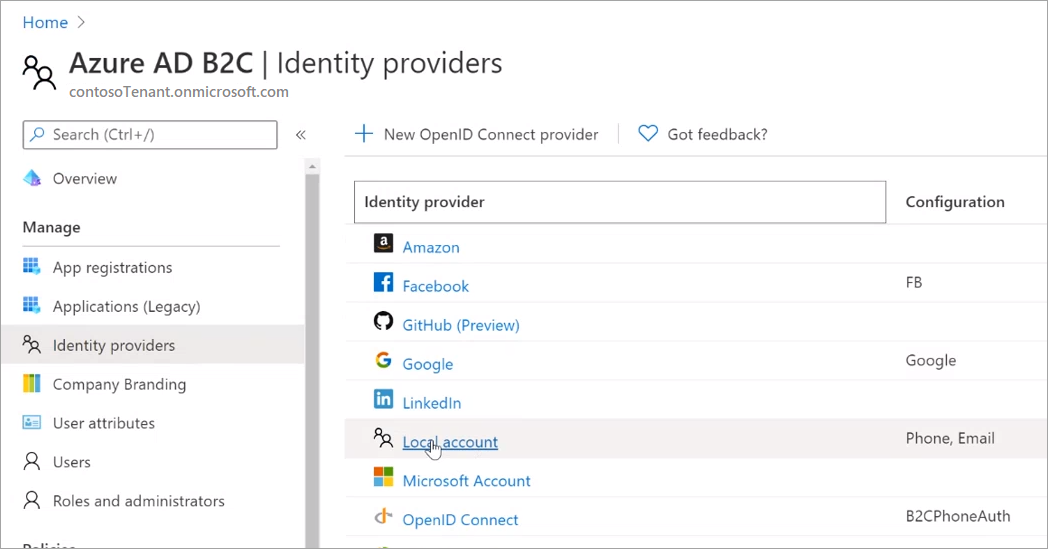
Under Manage, select Identity providers.
In the identity provider list, select Local account.
In the Configure local IDP page, make sure Phone is selected as one of the allowable identity types consumers can use to create their local accounts in your Azure AD B2C tenant.
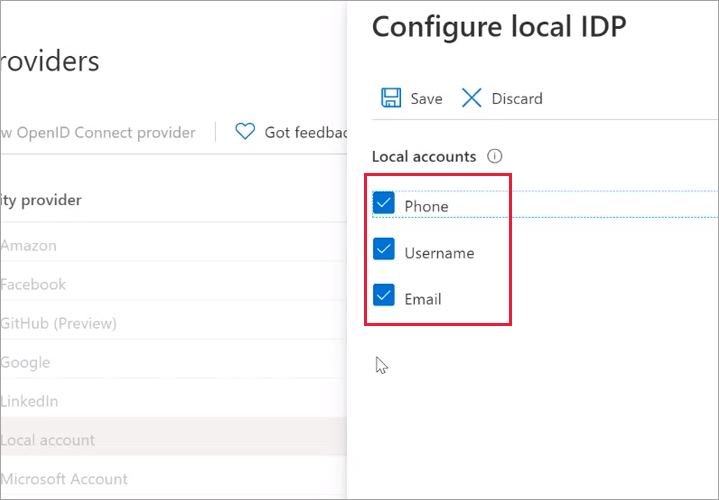
Select Save.
Add phone sign-up to a user flow
After you've added phone sign-up as an identity option for local accounts, you can add it to user flows as long as they're the latest Recommended user flow versions. The following is an example showing how to add phone sign-up to new user flows. But you can also add phone sign-up to existing Recommended-version user flows (select User Flows > user flow name > Identity providers > Local Account Phone signup).
Here's an example showing how to add phone sign-up to a new user flow.
Sign in to the Azure portal.
If you have access to multiple tenants, select the Settings icon in the top menu to switch to your Azure AD B2C tenant from the Directories + subscriptions menu.
In the Azure portal, search for and select Azure AD B2C.
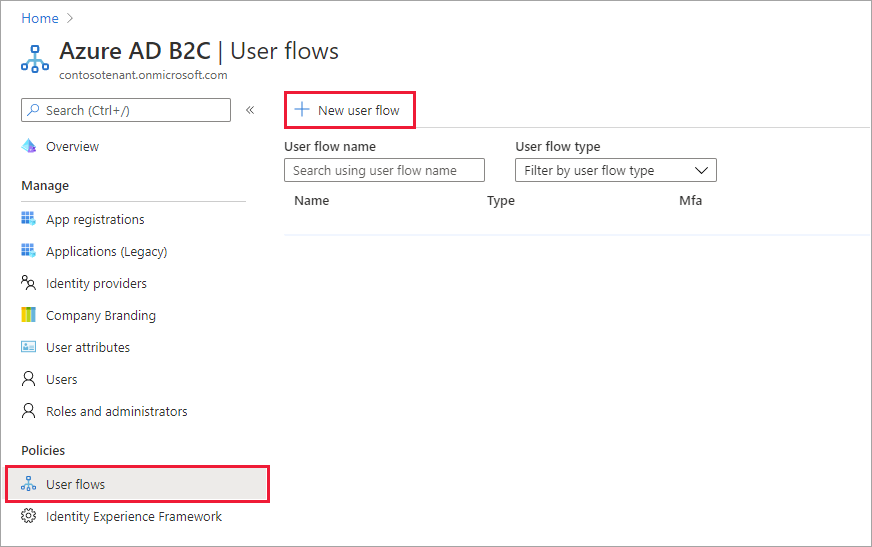
Under Policies, select User flows, and then select New user flow.
On the Create a user flow page, select the Sign up and sign in user flow.

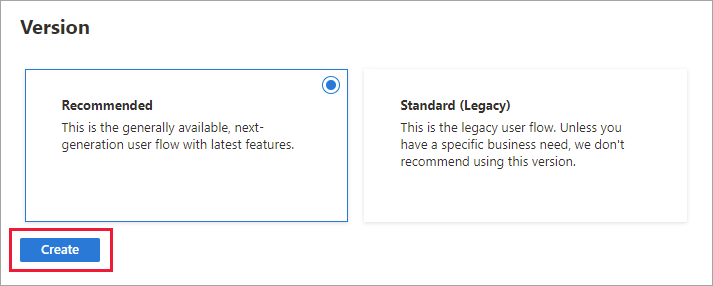
Under Select a version, select Recommended, and then select Create. (Learn more about user flow versions.)
Enter a Name for the user flow, such as signupsignin1.
In the Identity providers section, under Local accounts, select Phone signup.

Under Social identity providers, select any other identity providers you want to allow for this user flow.
Note
Multi-factor authentication (MFA) is disabled by default for sign-up user flows. You can enable MFA for a phone sign-up user flow, but because a phone number is used as the primary identifier, email one-time passcode and Authenticator app - TOTP (preview) are the only options available for the second authentication factor.
In the User attributes and token claims section, choose the claims and attributes that you want to collect and send from the user during sign-up. For example, select Show more, and then choose attributes and claims for Country/Region, Display Name, and Postal Code. Select OK.
Select Create to add the user flow. A prefix of B2C_1 is automatically prepended to the name.
Enable the recovery email prompt (preview)
When you enable phone sign-up and sign-in for your user flows, it's also a good idea to enable the recovery email feature. With this feature, a user can provide an email address that can be used to recover their account when they don't have their phone. This email address is used for account recovery only. It can't be used for signing in.
When the recovery email prompt is On, a user signing up for the first time is asked to verify a backup email. A user who hasn't provided a recovery email before is asked to verify a backup email during next sign in.
When recovery email is Off, a user signing up or signing in isn't shown the recovery email prompt.
You can enable the recovery email prompt in the user flow properties.
Note
Before you begin, make sure you have added phone sign-up to your user flow as described above.
To enable the recovery email prompt
Sign in to the Azure portal.
If you have access to multiple tenants, select the Settings icon in the top menu to switch to your Azure AD B2C tenant from the Directories + subscriptions menu.
In the Azure portal, search for and select Azure AD B2C.
In Azure AD B2C, under Policies, select User flows.
Select the user flow from the list.
Under Settings, select Properties.
Next to Enable recovery email prompt for phone number signup and sign in (preview), select:
- On to show the recovery email prompt during both sign-up and sign-in.
- Off to hide the recovery email prompt.
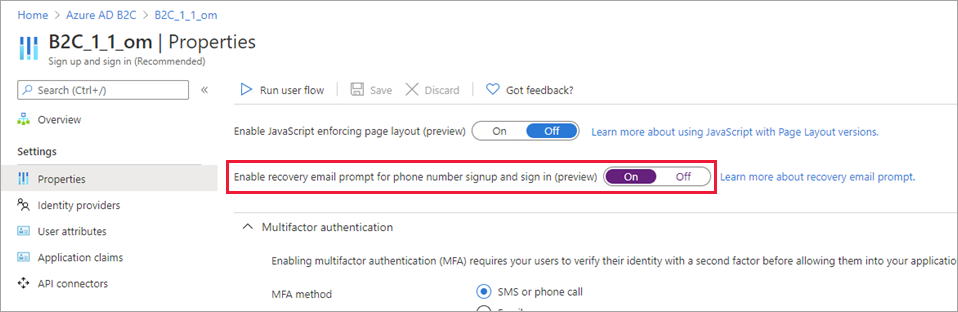
Select Save.
To test the recovery email prompt
After you've enabled phone sign-up and sign-in and the recovery email prompt in your user flow, you can use Run user flow to test the user experience.
Select Policies > User flows, and then select the user flow you created. On the user flow overview page, select Run user flow.
For Application, select the web application you registered in step 1. The Reply URL should show
https://jwt.ms.Select Run user flow and verify the following behavior:
- A user who signs up for the first time is asked to provide a recovery email.
- A user who has already signed up but hasn't provided a recovery email is asked to provide one upon signing in.
Enter an email address and then select Send verification code. Verify that a code is sent to the email inbox you provided. Retrieve the code and enter it in the Verification code box. Then select Verify code.
Enable consent information
We strongly suggest you include consent information in your sign-up and sign-in flow. Sample text is provided. Please refer to the Short Code Monitoring Handbook on the CTIA website and consult with your own legal or compliance experts for guidance on your final text and feature configuration to meet your own compliance needs:
By providing your phone number, you consent to receiving a one-time passcode sent by text message to help you sign in to <insert: your application name>. Standard message and data rates may apply.
<insert: a link to your Privacy Statement>
<insert: a link to your Terms of Service>
To enable consent information
Sign in to the Azure portal.
If you have access to multiple tenants, select the Settings icon in the top menu to switch to your Azure AD B2C tenant from the Directories + subscriptions menu.
In the Azure portal, search for and select Azure AD B2C.
In Azure AD B2C, under Policies, select User flows.
Select the user flow from the list.
Under Customize, select Languages.
To display consent text, select Enable language customization.
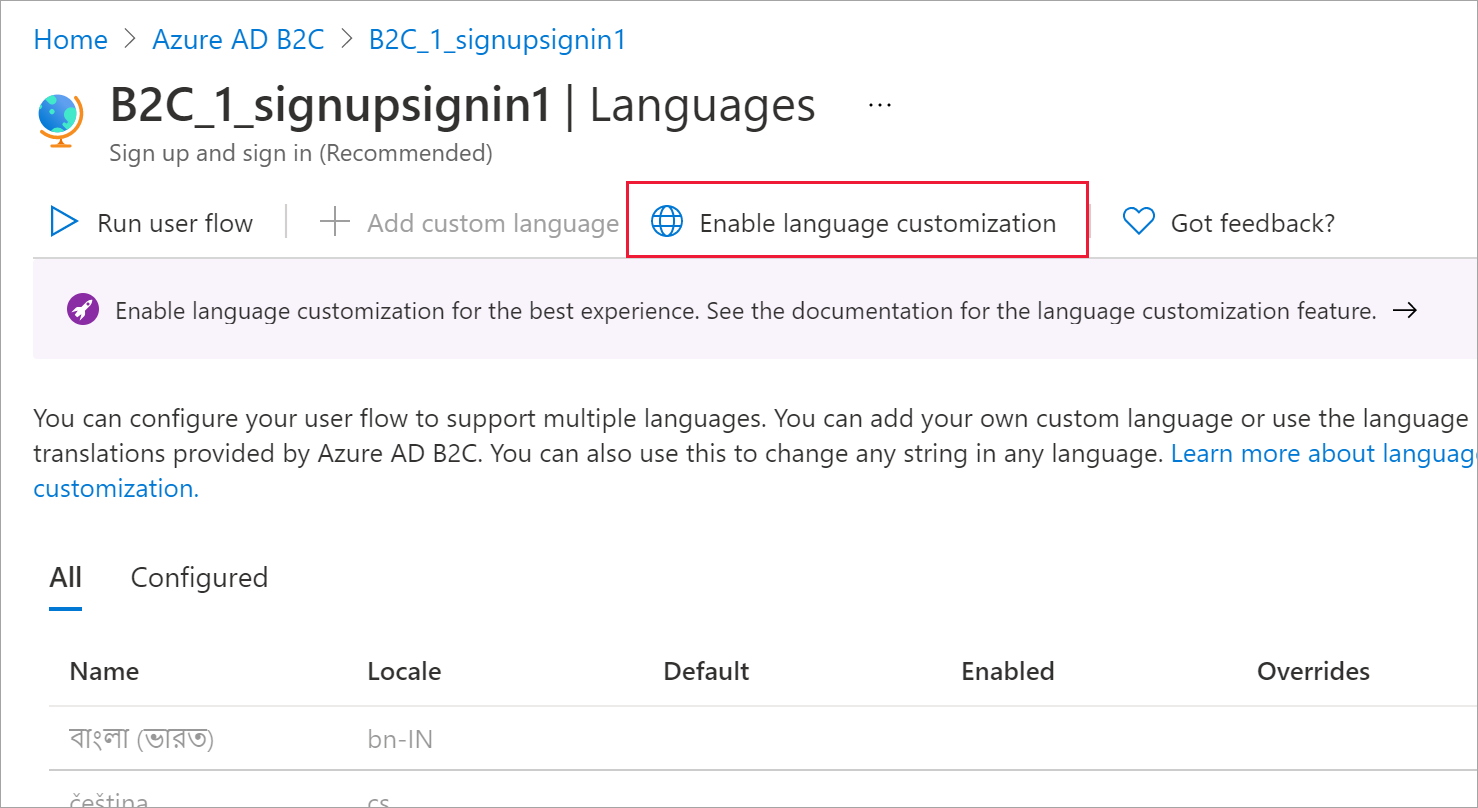
To customize the consent information, select a language in the list.
In the language panel, select Phone signIn page.
Select Download defaults.

Open the downloaded JSON file. Search for the following text and customize it:
disclaimer_link_1_url: Change override to "true" and add the URL for your privacy information.
disclaimer_link_2_url: Change override to "true" and add the URL for your terms of use.
disclaimer_msg_intro: Change override to "true" and change value to your desired disclaimer strings.
Save the file. Under Upload new overrides, browse for the file and select it. Confirm that you see a “Successfully uploaded overrides” notification.
Select Phone signUp page, and then repeat steps 10 through 12.
Get a user's phone number in your directory
Run the following request in Graph Explorer:
GET https://graph.microsoft.com/v1.0/users/{object_id}?$select=identitiesFind the
issuerAssignedIdproperty in the response returned:"identities": [ { "signInType": "phoneNumber", "issuer": "contoso.onmicrosoft.com", "issuerAssignedId": "+11231231234" } ]
Next steps
Feedback
Coming soon: Throughout 2024 we will be phasing out GitHub Issues as the feedback mechanism for content and replacing it with a new feedback system. For more information see: https://aka.ms/ContentUserFeedback.
Submit and view feedback for