Secure an Azure API Management API with Azure AD B2C
Learn how to restrict access to your Azure API Management API to clients that have authenticated with Azure Active Directory B2C (Azure AD B2C). Follow the instructions in this article to create and test an inbound policy in Azure API Management that restricts access to only those requests that include a valid Azure AD B2C-issued access token.
Prerequisites
Before you begin, make sure that you have the following resources in place:
- An Azure AD B2C tenant
- An application that's registered in your tenant
- User flows that are created in your tenant
- A published API in Azure API Management
Get Azure AD B2C application ID
When you secure an API in Azure API Management with Azure AD B2C, you need several values for the inbound policy that you create in Azure API Management. First, record the application ID of an application you've previously created in your Azure AD B2C tenant. If you're using the application you created to satisfy the prerequisites, use the application ID for webapp1.
To register an application in your Azure AD B2C tenant, you can use our new, unified App registrations experience or our legacy Applications experience. Learn more about the new registrations experience.
- Sign in to the Azure portal.
- If you have access to multiple tenants, select the Settings icon in the top menu to switch to your Azure AD B2C tenant from the Directories + subscriptions menu.
- On the left pane, select Azure AD B2C. Alternatively, you can select All services and then search for and select Azure AD B2C.
- Select App registrations, and then select the Owned applications tab.
- Record the value in the Application (client) ID column for webapp1 or for another application you've previously created.
Get a token issuer endpoint
Next, get the well-known config URL for one of your Azure AD B2C user flows. You also need the token issuer endpoint URI that you want to support in Azure API Management.
In the Azure portal, go to your Azure AD B2C tenant.
Under Policies, select User flows.
Select an existing policy (for example, B2C_1_signupsignin1), and then select Run user flow.
Record the URL in the hyperlink that's displayed under the Run user flow heading near the top of the page. This URL is the OpenID Connect well-known discovery endpoint for the user flow, and you'll use it in the next section when you configure the inbound policy in Azure API Management.
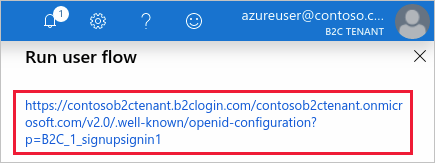
Select the hyperlink to go to the OpenID Connect well-known configuration page.
On the page that opens in your browser, record the
issuervalue. For example:https://<tenant-name>.b2clogin.com/xxxxxxxx-xxxx-xxxx-xxxx-xxxxxxxxxxxx/v2.0/You'll use this value in the next section, when you configure your API in Azure API Management.
You should now have two URLs recorded for use in the next section: the OpenID Connect well-known configuration endpoint URL and the issuer URI. For example:
https://<tenant-name>.b2clogin.com/<tenant-name>.onmicrosoft.com/B2C_1_signupsignin1/v2.0/.well-known/openid-configuration
https://<tenant-name>.b2clogin.com/99999999-0000-0000-0000-999999999999/v2.0/
Configure the inbound policy in Azure API Management
You're now ready to add the inbound policy in Azure API Management that validates API calls. By adding a JSON web token (JWT) validation policy that verifies the audience and issuer in an access token, you can ensure that only API calls with a valid token are accepted.
In the Azure portal, go to your Azure API Management instance.
Select APIs.
Select the API that you want to secure with Azure AD B2C.
Select the Design tab.
Under Inbound processing, select </> to open the policy code editor.
Place the following
<validate-jwt>tag inside the<inbound>policy, and then do the following:a. Update the
urlvalue in the<openid-config>element with your policy's well-known configuration URL.
b. Update the<audience>element with the application ID of the application you created previously in your B2C tenant (for example, webapp1).
c. Update the<issuer>element with the token issuer endpoint you recorded earlier.<policies> <inbound> <validate-jwt header-name="Authorization" failed-validation-httpcode="401" failed-validation-error-message="Unauthorized. Access token is missing or invalid."> <openid-config url="https://<tenant-name>.b2clogin.com/<tenant-name>.onmicrosoft.com/B2C_1_signupsignin1/v2.0/.well-known/openid-configuration" /> <audiences> <audience>44444444-0000-0000-0000-444444444444</audience> </audiences> <issuers> <issuer>https://<tenant-name>.b2clogin.com/99999999-0000-0000-0000-999999999999/v2.0/</issuer> </issuers> </validate-jwt> <base /> </inbound> <backend> <base /> </backend> <outbound> <base /> </outbound> <on-error> <base /> </on-error> </policies>
Support multiple applications and issuers
Several applications typically interact with a single REST API. To enable your API to accept tokens intended for multiple applications, add their application IDs to the <audiences> element in the Azure API Management inbound policy.
<!-- Accept tokens intended for these recipient applications -->
<audiences>
    <audience>44444444-0000-0000-0000-444444444444</audience>
    <audience>66666666-0000-0000-0000-666666666666</audience>
</audiences>
Similarly, to support multiple token issuers, add their endpoint URIs to the <issuers> element in the Azure API Management inbound policy.
<!-- Accept tokens from multiple issuers -->
<issuers>
    <issuer>https://<tenant-name>.b2clogin.com/99999999-0000-0000-0000-999999999999/v2.0/</issuer>
    <issuer>https://login.microsoftonline.com/99999999-0000-0000-0000-999999999999/v2.0/</issuer>
</issuers>
Migrate to b2clogin.com
If you have an Azure API ManagementM API that validates tokens issued by the legacy login.microsoftonline.com endpoint, you should migrate the API and the applications that call it to use tokens issued by b2clogin.com.
You can follow this general process to perform a staged migration:
- Add support in your Azure API Management inbound policy for tokens issued by both b2clogin.com and login.microsoftonline.com.
- Update your applications one at a time to obtain tokens from the b2clogin.com endpoint.
- After all your applications are correctly obtaining tokens from b2clogin.com, remove support for login.microsoftonline.com-issued tokens from the API.
The following example Azure API Management inbound policy illustrates how to accept tokens that are issued by both b2clogin.com and login.microsoftonline.com. Additionally, the policy supports API requests from two applications.
<policies>
    <inbound>
        <validate-jwt header-name="Authorization" failed-validation-httpcode="401" failed-validation-error-message="Unauthorized. Access token is missing or invalid.">
            <openid-config url="https://<tenant-name>.b2clogin.com/<tenant-name>.onmicrosoft.com/B2C_1_signupsignin1/v2.0/.well-known/openid-configuration" />
            <audiences>
                <audience>44444444-0000-0000-0000-444444444444</audience>
                <audience>66666666-0000-0000-0000-666666666666</audience>
            </audiences>
            <issuers>
                <issuer>https://login.microsoftonline.com/99999999-0000-0000-0000-999999999999/v2.0/</issuer>
                <issuer>https://<tenant-name>.b2clogin.com/99999999-0000-0000-0000-999999999999/v2.0/</issuer>
            </issuers>
        </validate-jwt>
        <base />
    </inbound>
    <backend> <base /> </backend>
    <outbound> <base /> </outbound>
    <on-error> <base /> </on-error>
</policies>
Next steps
For additional information about Azure API Management policies, see the Azure API Management policy reference index.
For information about migrating OWIN-based web APIs and their applications to b2clogin.com, see Migrate an OWIN-based web API to b2clogin.com.
Feedback
Coming soon: Throughout 2024 we will be phasing out GitHub Issues as the feedback mechanism for content and replacing it with a new feedback system. For more information see: https://aka.ms/ContentUserFeedback.
Submit and view feedback for